Table of Contents
Advertisement
Please read the manual first before operating this machine.
Please pay attention to the items marked in "note".
1) Certain part of the game is with high voltage. Adjust the game by technician.
Do not open the game door unless maintenance or parts replacement is
required.
2) Please switch off the power before checking and maintenance.
3) Please switch off the power before opening the game door.
4) Fire extinguisher equiment must be nearby the game.
5) The game must be located properly to avoid damages.
Improper Locations:
P lac e direc t ly
ex pos ed t o s uns hine
P lac e w ith c orros s iv e
air and liguid
1) The voltage range of the game should be 105V~115V or 215V~225V. The
proper voltage should be 110V/220V. The specific voltage accords to the date
plate on the back door of the game.
2) The plug must be plugged in tightly but keep the power cords not be too
tight.
3) Please properly adjust the coin mech and the game settings when use at the
ATTENTIONS
Safety Attentions
H umid area
R ough area or plac e
w ith s trong s hak e
Notes of Usage
P lac e w ith high
t emperature
P lac e w it h mas s iv e
dus t
1
Advertisement
Table of Contents

Related Manuals for Tecway Target Zero Kiddy Ride


Summary of Contents for Tecway Target Zero Kiddy Ride
- Page 1 ATTENTIONS Please read the manual first before operating this machine. Please pay attention to the items marked in “note”. Safety Attentions 1) Certain part of the game is with high voltage. Adjust the game by technician. Do not open the game door unless maintenance or parts replacement is required. 2) Please switch off the power before checking and maintenance. 3) Please switch off the power before opening the game door. 4) Fire extinguisher equiment must be nearby the game. 5) The game must be located properly to avoid damages. Improper Locations: P lac e w ith high P lac e direc t ly H umid area t emperature ex pos ed t o s uns hine P lac e w it h mas s iv e P lac e w ith c orros s iv e ...
- Page 2 first time. 4) Please regularly check all the functions of the game when operate. Notes of Maintenance 1) Be sure to check and maintance the game regularly. 2) Switch off the power before replacing the parts of the game. 3) The parts for replacement should be the same model as the old one. 4) Please check the connection and voltage output after replacing the power supply. 5) The voltage range of the PCB should be 5.1V5.4V. 6) Check whether the game has creepage and the voltage before repairing the PCB. Notes of Clean 1) Please use clean and soft colth to clean the game. 2) Prevent damaging the surface of the game, please do not use the following cleanser: l Alterative Cleanser; l Acidic Cleanser; l Insecticide, sterilized water, alcohol or other chemical cleanser. Notes of Moving and Shipping 1) Properly disassemble the game for necessary moving and shipping. 2) Prevent the game from hitting or being attrite during movement. Protecting the case when move the game. ...
-
Page 3: Table Of Contents
CONTENT GAME INTRODUCTION…………………………………………………………….4 PLAYING INSTRUCTIONS………………………………………………………….5 TECHNICAL PARAMETERS………………………………………………………..6 INSTALLATION……………………………………………………………………...7 GAME SETTINGS…………………………………………………………………..10 ADJUSTMENT………………………………………………………………………12 CHECK AND MAINTENANCE…………………………………………………….14 TROUBLESHOOTING……………………………………………………………...15 PARTS DRAWING AND PARTS LIST……………………………………………..16 SCHEMATIC DIAGRAM…………………………………………………………...20 ... -
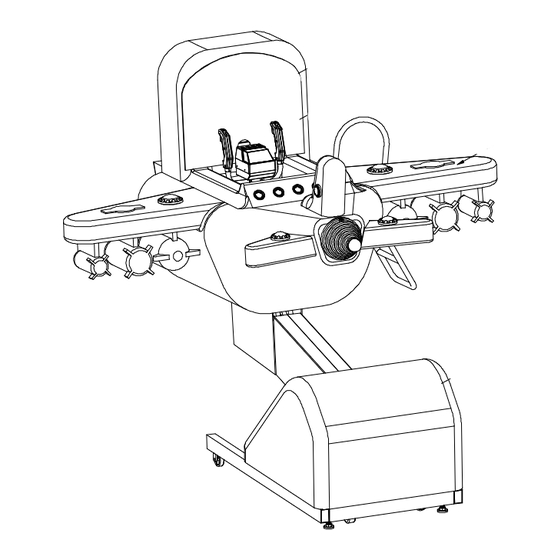
Page 4: Game Introduction
GAME INTORDUCTION Target Zero Kiddy Ride is one of our latest kiddie rides, with its crative and unique outlook and exciting game. It will be very popular for your FEC!! LCD monitor joystick funny outlook drive assembly Features: Creative outlook. Controlled by integrated main board; fastprocessing CPU; Stable and reliable performance. Highdefinition and highquality LCD monitor. Highquality coin mech fits for various coins. Exciting game for kiddie ride specially designed for kids. ... -
Page 5: Playing Instructions
PLAYING INSTRUCTIONS Sit in the plane, insert coin to start the game. The plane will move up/down and forward/backward. When the enemy planes appear in the monitor, please aim and shoot them down. Shoot as many enemy planes as possible to fulfil the task. SHOOT button joystick handrail coin slot ... -
Page 6: Technical Parameters
TECHNICAL PARAMETERS Voltage: AC 220V/110V(50/60HZ) Max. current: 6A/12A (Note: The proper voltage and current used accords to the nameplate at the back door of the game.) Max. power: 1320W Coin size: φ21mm φ30mm (diameter) ~ 1.2mm 2.5mm (thickness) ~ Capacity of coin box: about 1200 pcs with coin size φ25mm*1.5mm Location required: indoor use; temperature: 5~40°C ; no contact with any corrosive, greasiness and dirt. Dimensions: L2400mm*1600mm*H1550mm Spare parts: # DRAWING NAME SPEC./MODEL QTY 1 fuse 10A, LARGE 2 2 ... -
Page 7: Installation
INSTALLATION Choose a proper location. Please make sure there is enough space around the game, as the drawing shown below: m m m m Note: The game should be installed on the flat floor. Check the connection 1. Check if the inner structure of the game is loose caused by transportation or the terminals drop. 1. Check if the game is grounded. 2. Check if the resistance of the GNDs is more than 100 megohm. 3. Set the playing instructions. (Please refer to “GAME SETTINGS”.) 4. Properly adjust the coin mech. 5. ... - Page 8 Attentions: a) Please make sure the power cord is not pressed by wheel, foundation, etc. Otherwise, the wire will be damaged to cause short circuit, even fire. Do not use strong power to extend and wring the wires. Do not make the wire be near to the high temperature object. Properly put the wire to avoid any kicking or treading. b) Hold the plug to pull it out from the socket. c) Do not touch the plug with wet hands. d) Make sure the voltage and fuse used are proper. ! w a rn in g B e fo re in p u tin g th e p o w e r, p le a s e c h e c k th e re sis ta n c e b e tw e e n in p u t p o rt a n d G N D . M a k e s u re th e c o n n e c tio n is p ro p e r.
- Page 9 Connect the power 1. Check if the input voltage value is same as the one stated on the nameplate on the back of the game. 2. Adjust the coin mech and confirm it can work properly. 3. Visually check the game and confirm all the lights can work properly. 4. Adjust the DIP switches on main baord to change the game setting if necessary. 5. Insert coin to play the game and confirm the plane can move smoothly and the fire button can work properly. 6. Check and confirm the sound is proper. Check before operation 1. The power cord should be tightly connected and withou any damages. 2. Check and confirm the game is properly fixed. 3. Check and confirm the game is without any damages and burrs on the surface. 4. Keep the game clean and all the marks are properly stated Daily operation 1. Turn on the power switch and confirm the power system is proper. 2. Check and confirm all the lights can work properly. 3. Check and confirm the plane can move properly. 4. Check and confirm the background music can properly play. Collect coins and keep record There are a coin box, a coin meter and a ticket meter inside the cabinet. Switch off the power and open the coin door to take out the coins. Then open the door of the coin mech to keep a record of the coin and ticket meters. ...
-
Page 10: Game Settings
GAME SETTINGS Setting board: setting board Descriptions: SELECT select set TEST ENTER change free play SERVE ERASE SELECT: Choose the item you would like to reset. TEST: Enter into the setting meny or skip to the next item. ENTER: Change the setting. SERVE: Free play. ... - Page 11 Game settings 1. Choose the language: Chinese or English. select language 请 按 选 择 键 选 择 版 本 english 请 按 确 定 键 确 定 进 入 2. Adjust the parameters: Initialization 60 second 1 coin 1 play once 50 score 1 ticket 22 volume yes reposition Descriptions: ...
-
Page 12: Adjustment
ADJUSTMENT Adjust the coin mech adjusting chip of entrance sample coin chute microadjust resistance power/signal input GR AY C OU NT E R(+/ -) RE D DC + 12V coin reject bar WH IT E C OI N S IG NA L BL ACK G RO UND GR AY C OU NT E R(-/ +) COIN signal SW ... - Page 13 Adjsut the main board Descriptions: Reset button: press this button to clear the data of coin saved in main board and reset the game settings to default settings. Volume potentiometer: twist this potentiometer with screw driver. Twist clockwisely to increase the volume, counterclockwisely to decrease the volume. Battery: this battery have memory function that will provide power to save the data of coin and game settings in main board when the power is cut off. If the data can not be save when the power is cut off, please replace the battery. ...
-
Page 14: Check And Maintenance
CHECK AND MAINTENANCE Daily check ITEM DESCRIPTIONS Coin mech Check if the coin mech can work properly. Direction Check if the potentiometer can contorl the directions potentiometer properly. Sound Check if the game has sound and the volume is proper. Display Check if the displayed colors are proper. Temperature, Check if the temperature and humidity is proper. humidity Daily maintenance ITEM DESCRIPTIONS Cabinet Wipe the cabinet with water and cloth. Acrylic board of Wipe the acrylic board on the screen with water and screen ... -
Page 15: Troubleshooting
TROUBLESHOOTING PARTS PROBLEM CAUSES SOLUTIONS No sam ple coin installed in coin m ech. Install the sam ple coin in the coin m ech. Can't insert coin. The sensitivity for coins pass the coin Twist the m icroresistor to right to adjust the sensitivity. COIN m ech is too high. MECH The coin signal wire is loose. Check the connection of signal wire. Coin in coin box is invalid. The coin m ech is bad. Repair or replace the coin m ech. The connectio for chasing light is bad. Properly reconnect the control wire of lights. The lights do not CHASING light up or only a The lights or the light board is bad. Repair or replace the light / light board. LIGHT few lights light up. The drive board of light is bad. Repair or replace the drive board of light. The connection of m otor is bad. Properly reconnect the wire of m otor. ... -
Page 16: Parts Drawing And Parts List
PARTS DRAWING AND PARTS LIST Cabinet Main boady assembly NO NAME QTY NO NAME QTY 1 Mointor bracket 1 19 Ladder 1 ∮ 2 17” LCD monitor 1 20 Light 54 1 3 Monitor cover 1 21 Cabochon light 55# 1 4 Speaker mesh 2 22 Mask 1 5 Acrylic board 2 23 Chasing light board MP143A ... - Page 17 Joystick assembly NO. NAME QTY NO. NAME QTY 1 Solenoid 1 17 Bearing bracket 1 2 Solenoid limit piece 1 18 Bearing 1 3 Up cover for joystick 1 19 Holder bracket 1 4 Solenoid holder 1 20 Plastic cover 2 5 Moving piece 1 21 Shaft 1 6 Main bracket 1 22 ...
- Page 18 Chassis 26 27 ...
- Page 19 NO. NAME QTY NO. NAME QTY 1 Brush 1 31 Chassis 1 2 Fiberglass for base bracket 1 32 2” wheel 2 3 Front cover (right) 1 33 PCB plastic pin 8 4 Cover assembly (right) 1 34 Signal amplifier(chasing light) 1 5 Shaft for ball joint 1 35 Drive board for solenoid 1 6 Joint bearing 1 36 Chain ...
-
Page 20: Schematic Diagram
SCHEMATIC DIAGRAM keys control board 290378 SELECT W/Bla1 ENTER 5 SERVE Br/W1 TEST 8Ω15W O/W1 A/D converting board S5554 CN2 convert signal 1 Bla4 R/W1 convert signal 2 NC convert signal 3 CON3 Bla3 finish signal convert signal 4 Y/G1 VR signal convert signal 5 RD signal convert signal 6 R2-1 Bla2-1 speaker+ speaker WD signal convert signal 7 1 Grey1 set/test Br/W1 8 ...
Need help?
Do you have a question about the Target Zero Kiddy Ride and is the answer not in the manual?
Questions and answers