
Related Manuals for A-Neuvideo ANI-44HPSC


Summary of Contents for A-Neuvideo ANI-44HPSC
- Page 1 ANI-44HPSC 4K UHD+ 4X4 MATRIX W/ AUDIO OUTPUT A-NeuVideo.com Frisco, Texas 75036 AUDIO / VIDEO MANUFACTURER...
- Page 2 SAFETY INFORMATION To ensure the best results from this product, please read this manual and all other documentation before operating your equipment. Retain all documentation for future reference. Follow all instructions printed on unit chassis for proper operation. To reduce the risk of fire, do not spill water or other liquids into or on the unit, or operate the unit while standing in liquid. Make sure power outlets conform to the power requirements listed on the back of the unit.
-
Page 3: Table Of Contents
We make no commitment to update or PACKAGE CONTENTS to keep current the information contained in this document. • ANI-44HPSC UHD+ 4x4 HDMI Matrix with Audio Output • 24V/2.7A DC Power Adapter We reserve the right to make improvements to this document and/ •... -
Page 4: Features & Specifications
NEUVIDEO FEATURES & SPECIFICATIONS FEATURES • HDMI inputs and outputs support 18Gbps 4K UHD+ with HDR signals • DVI 1.0 compliant with the use of an HDMI to DVI adapter • HDCP 1.x and 2.2 compliant • HDMI inputs and outputs support UHD+ resolutions up to 4096x2160@60Hz (4:4:4, 8-bit) •... -
Page 5: Operation Controls & Functions
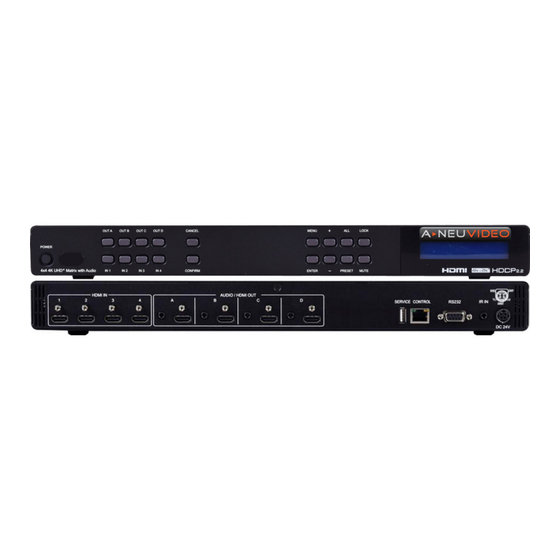
NEUVIDEO OPERATION CONTROLS & FUNCTIONS FRONT PANEL POWER BUTTON: Press this button to power the unit on (green LED) or place it into stand-by mode (red LED). IR RECEIVING WINDOW: Accepts IR signals from the included IR remote for control of this unit only. IN 1~4 &... - Page 6 NEUVIDEO OPERATION CONTROLS & FUNCTIONS Rear Panel HDMI IN 1~4 PORTS: Connect to HDMI source equipment such as media players, game consoles or set-top boxes. AUDIO/HDMI OUT A~D PORTS: Connect the HDMI outputs to devices such as HDMI TVs, monitors or amplifiers for digital video and audio output.
-
Page 7: Remote Control
NEUVIDEO Remote Control Remote Control POWER BUTTON: Press to power the unit on or place it into stand-by mode. 1/A ~ 4/D BUTTON: Press these keys to configure the video routing. Press the “-/ OUT” key followed by the key (A~D) of the outputs you wish to route a source to (they will flash on the LCD to indicate selection). -
Page 8: Pinout Diagrams / Cable Specifications
NEUVIDEO Pinout diagrams / Cable Specifications RS-232 Pinout and Defaults Serial Port Default Settings Baud Rate 19200 Data Bits 8 bits Parity Bits None Stop Bits Flow Control None IR Cable Pinout Cable Specifications 1080p 4K30 4K60 CABLE LENGTH 8-BIT 12-BIT (4:4:4) 8-BIT (4:4:4) 8-BIT... -
Page 9: Front Panel Lcd Menu
NEUVIDEO Front Panel LCD Menu Front Panel LCD Menu All primary functions of this unit can be controlled by using the front panel LCD menu which is activated MAIN MENU by pressing the MENU button on the front of the unit. Use the + (PLUS), − (MINUS), and ENTER buttons EDID to navigate the LCD menu. - Page 10 NEUVIDEO Front Panel LCD Menu 2. IN ALL: Select the EDID to assign to all inputs. (6) internal EDIDs, (4) sink EDID EDIDs and (4) user EDIDs are available. Press the “Enter” button to confirm 2ND LEVEL 3RD LEVEL the selection. After making a selection the change will occur immediately on all inputs.
- Page 11 NEUVIDEO Front Panel LCD Menu 1. MODE: Set the unit to Static or DHCP mode. When DHCP mode is NETWORK SETUP selected, all IP address information will be assigned automatically by the 2ND LEVEL 3RD LEVEL local DHCP server. When Static is selected, the IP address, netmask and gateway must be set manually and additional menu items become Mode: STATIC...
- Page 12 NEUVIDEO Front Panel LCD Menu 1. FIRMWARE: Displays the unit’s current firmware version. FIRMWARE 2ND LEVEL 3RD LEVEL Firmware [Current firmware version] 1. DO USB UPDATE: Selecting “Yes” will prepare the unit to update FIRMWARE UPDATE firmware via the USB port. After inserting a USB thumb drive containing 2ND LEVEL 3RD LEVEL a valid firmware file (*.bin format) the update process will begin.
-
Page 13: Webgui Control
NEUVIDEO WebGUI Control Device Discovery Please obtain the “Device Discovery” software from your authorized dealer and save it in a directory where you can easily find it. Connect the unit and your PC/Laptop to the same active network and execute the “Device Discovery” software. Click on “Find Devices on Network”... - Page 14 NEUVIDEO WebGUI Control Switch Tab This page provides video routing settings, preset saving/loading, and I/O renaming options. To begin assigning a new video route, please click the button of the HDMI output you wish to send video to and then click on the button of the preferred HDMI input port.
- Page 15 NEUVIDEO WebGUI Control 4) PRESET SETTINGS: This matrix can store up to four video routing presets. Presets can be utilized to store multiple routing states in advance for rapid, hassle-free, recall. ■ Preset Set: Once you have the matrix set the way you like, you can click the “Preset Store”...
- Page 16 NEUVIDEO WebGUI Control System Settings Tab This page provides system configuration options including turning the unit’s power on/off, changing the network settings, resetting the system to factory defaults and updating the firmware. 1. POWER: Press this switch to toggle the unit’s power between ON and OFF (standby mode).
-
Page 17: Telnet Control
NEUVIDEO TELNET CONTROL Telnet Control Before attempting to use Telnet control, please ensure that both the unit and the PC/Laptop are connected to the same active networks. To access the Command Line Interface (CLI) In Windows XP Click Start > Run, type “cmd” in the search field and press Enter. Click Start, type “cmd”... - Page 18 NEUVIDEO TELNET CONTROL COMMAND DESCRIPTION AND PARAMETERS Route the specified input to one or more outputs. N1 = A~D [Output port letter(s)] N2 = 1~4 [Input port number] N1N2 8 Note: Multiple output letters may be assigned to N1 to route the same source to more than one output at once.
- Page 19 NEUVIDEO TELNET CONTROL COMMAND DESCRIPTION AND PARAMETERS Set the contents of the OSD banner text used on the specified output. OSDSTR N1 N2 N3 8 N1 = 1~4 [Output port number] N2 = 1~2 [Text line number] N3 = {Text} [64 characters maximum] Set the font size for the OSD banner on the specified output.
-
Page 20: Connection Diagram
NEUVIDEO CONNECTION DIAGRAM CONNECTION DIAGRAM... -
Page 21: Video & Audio Specifications
NEUVIDEO Video & Audio Specifications Supported Resolutions (Hz) RESOLUTION INPUT OUTPUT RESOLUTION INPUT OUTPUT 720x400p@70/85 1600x1200p@60 640x480p@60/72/75/85 1680x1050p@60 720x480i@60 1920x1080i@50/60 720x480p@60 1920x1080p@24/25/30 720x576i@50 1920x1080p@50/60 720x576p@50 1920x1200p@60RB 800x600p@56/60/72/75/85 2560x1440p@60RB 848x480p@60 2560x1600p@60RB 1024x768p@60/70/75/85 2048x1080p@24/25/30 1152x864p@75 2048x1080p@50/60 1280x720p@50/60 3840x2160p@24/25/30 1280x768p@60/75/85 3840x2160p@50/60 (4:2:0) 1280x800p@60/75/85 3840x2160p@24, HDR10 1280x960p@60/85 3840x2160p@50/60 (4:2:0), HDR10... - Page 22 BY, THROUGH OR UNDER A-NeuVideo, INC (COLLECTIVELY, THE “PRODUCT”). By using installing or using the Product, you unconditionally signify your agreement to these Terms and Conditions. If you do not agree to these Terms and Conditions, do not use the Product and return the Product to A-NeuVideo, Inc. at the return address set forth on the Product’s packing label at your expense.
Need help?
Do you have a question about the ANI-44HPSC and is the answer not in the manual?
Questions and answers