
Related Manuals for Lindy 38350


Summary of Contents for Lindy 38350
- Page 1 12 Slot Seamless Modular Matrix & Modular Boards User Manual Eng lis h No. 38350 38351 38352 38353 38354 lindy.com Tested to comply with FCC Standards For Home and Office Use! © LINDY Group - SECOND EDITION (January 2020)
- Page 3 Thank you for purchasing the 12 Slot Seamless Modular Matrix and supporting AV boards. This product has been designed to provide trouble free, reliable operation. It benefits from both a LINDY 2-year warranty and free lifetime technical support. To ensure correct use, please read this manual carefully and retain it for future reference.
- Page 4 User Manual English Features ▪ 12 Slots for flexible input & output configurations: 1x11, 2x10, 3x9, 4x8, 5x7, 6x6, 7x5, 8x4, 9x3, 10x2, 11x1 ▪ In-built scaler for each output (Please see Specifications for supported resolutions) ▪ Instant seamless switching of signals in less than 0.1ms ▪...
- Page 5 7. Connect the country specific AC power cord and power on the matrix by pushing the Power button on the front chassis panel. The front panel LED will show Lindy 38350 for around 5 seconds, then show IIIIIIII0000 and 1~12 in alternate patterns in intervals of 2 seconds. The LEDs will then show the configuration of the input &...
- Page 6 User Manual English Installation of the mounting handles 1. Remove the four screws from either side of the top panel. 2. Remove the four screws from both side panels which lock the power bracket into place. 3. Move the power bracket slightly to the position shown here (->).
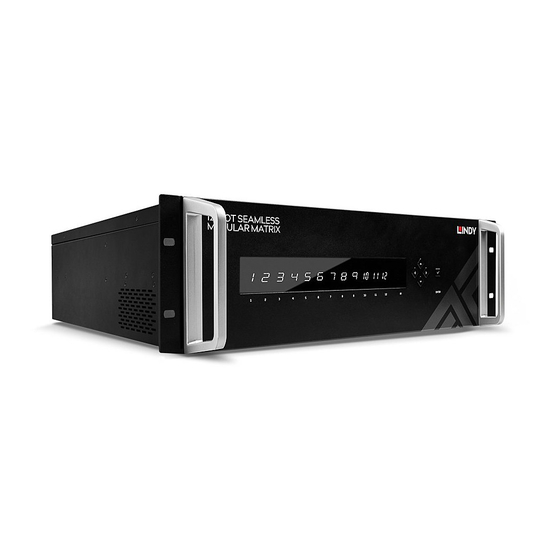
- Page 7 English Chassis & Board Layout 38350 - Chassis Front Panel 1. Input LED Indicator – The LED screen will indicate the inserted input board status when powered 2. Output LED Indicator – The LED screen will show the input channel number selected for each output 3.
- Page 8 User Manual English 38351 – Single Port HDMI 18G Input Board 1. HDMI (Female) Port – Connect a HDMI source device or HDMI equipment via HDMI cable 2. Audio Embedding Terminal Block – Connect an audio device to embed audio over HDMI 38352 –...
- Page 9 Web-Gui Control The seamless modular matrix provides an intelligent Web-Gui for changing settings and control of the installation. The Web-Gui software can be accessed via the Lindy website under Downloads. To access the Web-Gui 1. Connect the matrix to a LAN switch or PC using a Cat.x cable to the LAN port of the chassis.
- Page 10 User Manual English Using the Web-Gui The Matrix Control submenu will have its own options as followed: • Switch • Pre-set Switch This option allows for the user to manage the configuration of the connected displays and source devices. Using this layout, the user can create specific combinations of source devices and displays. Firstly, click the white button of the input or output to select, this will then turn blue.
- Page 11 User Manual English Admin Settings The default password for the Admin Settings is 123456 The admin setting submenu allows the user to perform and control the following ▪ CEC Setting ▪ Resolution Setting ▪ Audio Input Settings ▪ Port Naming ▪...
- Page 12 User Manual English CEC Setting Select the Output drop down menu to the select the output to control. Select Display On to send a CEC command to power on the selected display Select Display Off to send a CEC command to power off the selected display Select Auto CEC Control to create a set automatic power off time for the display (1-30Minutes) Select Off to switch off the Auto CEC Control function Please note: this function is only available for displays and output devices that support CEC control...
- Page 13 User Manual English Audio Input Setting This setting allows the user to control which audio is embedding via the input. Using the drop-down menu, the user can select audio pass-through via the input connection or Audio In via the audio port. Port Naming This setting allows the user to customise the naming of both inputs and outputs.
- Page 14 User Manual English Network This matrix can be controlled via Lan through Telnet. The default IP address for matrix access is 192.168.10.254. Select DHCP to allow the unit to automatically detect the IP address. Select Apply to save any changes. Please note: The Matrixes’...
- Page 15 User Manual English Update Web-Gui This setting allows the user to update the Web-Gui. Firstly, browse for update bin file Select Update. This will take around 2 minutes to update. Please note: the matrix will update and reboot automatically. Please wait around 3 minutes then refresh and log in again to the settings.
- Page 16 User Manual English Custom Web-Gui Logo This setting allows the user to customise the Web-Gui logo to suit their setup or brand. Select Browse to search for a logo file. Please note: The uploaded image must be in a PNG format with a resolution of 512x62p. Select Apply.
- Page 17 Command Instructions SET SW In Out (CR/LF): 1: [SET SW] are command key words where Lindy recommend using capital letters. 2: [in out] is the parameter. We would recommend using lower case letters. 3:'\r\n' or '\r' or '\n' to finish the command is acceptable.
- Page 18 User Manual English Function Command Example Switch Syntax Example Input for Command: Command: Output SET SW in out[CR/LF] SET SW in1 out1[CR/LF] Return: Return: SW in out[CR/LF] SW in1 out1[CR/LF] Parameter: Description: Switch in1 for out1 ※ in = {in0-in11}; in0表示禁止输出...
- Page 19 User Manual English To get Syntax Example audio input Command: Command: status GET AUDIOIN in[CR/LF] GET AUDIOIN in1[CR/LF] Return: Return: AUDIOMP in out[CR/LF] AUDIOIN in1 hdmi/hdbt[CR/LF] Parameter: Description: ※ in = {in1-in11,all}; Get the audio source of the in1, the result is hdmi.
- Page 20 User Manual English To show Syntax Example output Command: Command: resolution GET VIDOUT_RES out[CR/LF] GET VIDOUT_RES out1[CR/LF] Return: Return: VIDOUT_RES out prm[CR/LF] VIDOUT_RES out1 1[CR/LF] Description: Description: ※ out = {out1~out4,all} out1 resolution is Fix 3840x2160@60. ※ prm= {101~108} {NULL: Display not detected 0: Display don't support current selected resolution 1 : Fix 3840x2160@60...
- Page 21 User Manual English Set CEC Syntax Example auto power Command: Command: on / off SET AUTOCEC_FN out prm[CR/LF] SET AUTOCEC_FN out1 on[CR/LF] Return: Return: AUTOCEC_FN out prm[CR/LF] AUTOCEC_FN out1 on[CR/LF] Parameter: Description: ※ out = {out1~out11,all}; Set sink auto power ON ※...
- Page 22 User Manual English Get CEC Syntax Example Power Command: Command: Delay Time GET AUTOCEC_D out[CR/LF] GET AUTOCEC_D out1[CR/LF] Status Return: Return: AUTOCEC_D out prm[CR/LF] AUTOCEC_D out1 2[CR/LF] Description: Parameter: Get out1 auto power delay time, the ※ out = {out1~out11,all}; result is 2 minutes ※...
- Page 23 User Manual English Set Input Syntax Example EDID Command: Command: SET EDID in prm[CR/LF] SET EDID in1 2[CR/LF] Return: Return: EDID in prm[CR/LF] EDID in1 2[CR/LF] Parameter: Description: ※ in = {in1-in11}; // all means all inputs Set in1 EDID fix 4K@60Hz 4:4:4 8bit 2.0ch audio Without HDR ※...
- Page 24 User Manual English 2 : 4K@30Hz 4:4:4 8bit 2.0ch audio Without 3 : 1080p@60Hz 4:4:4 8bit 2.0ch audio Without HDR Description: Get all input EDID Status Factory Syntax Example Reset Command: Command: RESET[CR/LF] RESET[CR/LF] Return: Return: RESET[CR/LF] RESET [CR/LF] Parameter: Description: Factory reset all board Description:...
- Page 25 User Manual English Get IP Syntax Example address Command: Command: GET IPADDR [CR/LF] GET IPADDR [CR/LF] Return: Return: XXX.XXX.XXX.XXX[CR/LF] XXX.XXX.XXX.XXX[CR/LF] Parameter: Description: get ipaddr Description: get ipaddr Syntax Example selected Command: Command: target GET VER target [CR/LF] GET VER all [CR/LF] firmware version Return:...
- Page 26 User Manual English Get the Syntax Example System Command: Command: Code of the GET IR_SYSCODE[CR/LF] GET IR_SYSCODE [CR/LF] remote control Return: Return: IR_SYSCODE prm1[CR/LF] IR_SYSCODE 00 [CR/LF] Parameter: Description: ※ prm1 = {all, 00,4e}; // all --means support all IR system code is 0x00. the system codes of the remote(0x00, 0x4e);...
- Page 27 User Manual English EDID Management The matrix features both Web-Gui and Dipswitch EDID management for ensuring maximum compatibility within an installation. Please note: the dipswitch has a default of 0000 with all triggers in the upward position as below Please see below for the dipswitch EDID configurations HDMI In HDBaseT In EDID Controlled by Web-Gui &...
- Page 28 CE/FCC Statement CE Certification LINDY declares that this equipment complies with the European CE requirements relating to EMC, LVD, ErP and RoHS. CE Konformitätserklärung LINDY erklärt, dass dieses Equipment den europäischen CE-Anforderungen in Bezug auf EMV, LVD, ErP und RoHS entspricht.
-
Page 29: Weee (Waste Of Electrical And Electronic Equipment)
Geräte müssen den Sammel- und Rückgabesystemen zugeführt werden! Dort werden sie kostenlos entgegen genommen. Die Kosten für den weiteren Recyclingprozess übernehmen die Gerätehersteller. LINDY bietet deutschen Endverbrauchern ein kostenloses Rücknahmesystem an, beachten Sie bitte, dass Batterien und Akkus den Produkten vor der Rückgabe an das Rücknahmesystem entnommen werden müssen und über die Sammel- und Rückgabesysteme für Batterien separat entsorgt werden müssen.
Need help?
Do you have a question about the 38350 and is the answer not in the manual?
Questions and answers