PerkinElmer Lambda 265 Assembly/Installation Instructions
Manual magnetic stirrer
Hide thumbs
Also See for Lambda 265:
- User manual (61 pages) ,
- Installation instructions manual (32 pages) ,
- User manual (66 pages)
Advertisement
Quick Links
Lambda 265, 365 and 465 Manual Magnetic Stirrer
This instruction sheet describes the installation of this accessory which is used with the Lambda 265, 365
and 465 Spectrophotometer.
Read these instructions before you install this accessory.
NOTE:
Contacting PerkinElmer
Supplies, replacement parts, and accessories can be ordered directly from PerkinElmer, using the part
numbers.
See our website:
http://perkinelmer.com
PerkinElmer's catalog service offers a full selection of high-quality supplies.
To place an order for supplies and many replacement parts, request a free catalog, or ask for information:
If you are located within the U.S., call toll free 1-800-762-4000, 8 a.m. to 8 p.m. EST. Your order will be
shipped promptly, usually within 24 hours.
If you are located outside of the U.S., call your local PerkinElmer sales or service office.
Features
•
Easy to install
•
Single-hand operation by just turning the adjustment wheel
•
Stirring bar rotating evenly at variable speed
•
Vertical mixing
•
Ideal for small to medium stirring volumes of low-viscosity liquids
•
Only one channel stirring available
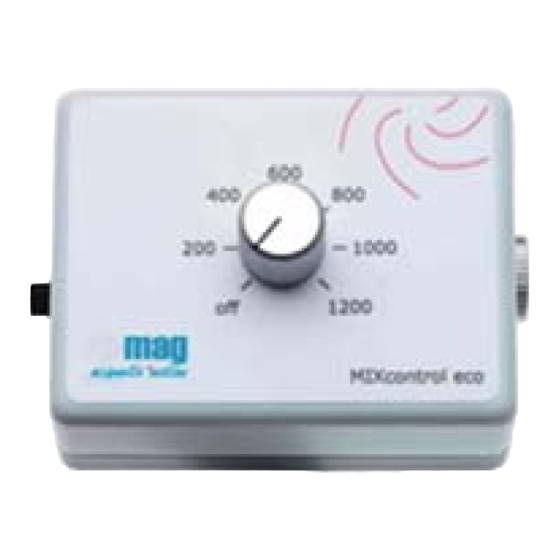
Figure 1 Magnetic Stirrer Control Unit [P/N: N4101015]
Assembly Installation Instructions
09931295C
PerkinElmer, 710 Bridgeport Avenue,
Shelton, CT 06484-4794, U.S.A
Produced in the USA.
Advertisement

Related Manuals for PerkinElmer Lambda 265


Summary of Contents for PerkinElmer Lambda 265
- Page 1 09931295C Lambda 265, 365 and 465 Manual Magnetic Stirrer Assembly Installation Instructions This instruction sheet describes the installation of this accessory which is used with the Lambda 265, 365 and 465 Spectrophotometer. Read these instructions before you install this accessory.
-
Page 2: Dimensions And Specifications
09931295C Dimensions and Specifications Physical Characteristic Specification Dimensions (mm) 65 (W) x 50 (D) x 45(H) Weight (g) Speed (rpm) 120 ~ 1,200 Stirring Power (W) 0~40℃, 80% Humidity Operating Condition Power AC 100-240 V / 50-60 Hz / 0.4 A Description Configuration of the Magnetic Stirrer Assembly Figure 2 Configuration... - Page 3 09931295C Compatible Lambda 265 Cell Holders to Magnetic Stirrer Assembly Accessory Drawing Single Cell Holder Water Jacketed Single Cell Holder Compatible Lambda 365 Cell Holders to Magnetic Stirrer Assembly Accessory Drawing Single Cell Holder Water Jacketed Single Cell Holder Micro Cell Holder...
- Page 4 09931295C Compatible Lambda 465 Cell Holders to Magnetic Stirrer Assembly Accessory Drawing Single Cell Holder (Upon request) Water Jacketed Single Cell Holder (Upon request) 8 Cell Water Jacketed Cell Changer Water Jacketed Automatic Referencing Stage Where, the cell holder will be modified to be connected with the magnetic stirrer only upon request.
-
Page 5: Lambda 265 Installation
09931295C Lambda 265 Installation Make sure the instrument is turned off while installing this accessory. CAUTION Assurez-vous que l’instrument est éteint lors de l’installation de cet ATTENTION accessoire. 1. Connect the plug of the power cable to the power input socket of the control unit. - Page 6 09931295C 4. Insert the stirrer head of the stirrer control cable into the single cell holder. Figure 6 Inserting the stirrer head 5. Assemble the single cell holder with the stirrer head inserted, and tighten the screw using the M3 wrench.
- Page 7 09931295C Lambda 365 Installation Make sure the instrument is turned off while installing this accessory. CAUTION Assurez-vous que l’instrument est éteint lors de l’installation de cet ATTENTION accessoire. Connect to Single Cell Holder 1. Connect the plug of the power cable to the power input socket of the control unit. Figure 8 Connecting the plug 2.
- Page 8 09931295C 3. Using the M3 wrench, remove the screw in the single cell holder and disassemble the holder. Figure 10 Removing the screw 4. Insert the stirrer head of the stirrer control cable into the single cell holder. Figure 11 Inserting the stirrer head 5.
- Page 9 09931295C Connect to the Water Jacketed Single Cell Holder 1. Connect the plug of the power cable to the power input socket of the control unit. Figure 13 Connecting the plug 2. Connect the stirrer control cable to the 4-pin socket of the control unit. Figure 14 Connecting the stirrer control cable 3.
- Page 10 09931295C 4. Insert the stirrer head of the stirrer control cable into the water jacketed single cell holder. Figure 16 Inserting the stirrer head 5. Assemble the water jacketed single cell holder with the stirrer head inserted, and tighten the screw using the M3 wrench.
- Page 11 09931295C Connect to the Micro Cell Holder 1. Connect the plug of the power cable to the power input socket of the control unit. Figure 19 Connecting the plug of the power cable 2. Connect the stirrer control cable to the 4-pin socket of the control unit. Figure 20 Connecting the stirrer control cable 3.
- Page 12 09931295C 4. Using the M3 wrench, remove the screw in the micro cell holder and disassemble the holder. Figure 22 Removing the screw 5. Insert the stirrer head of the stirrer control cable into the micro cell holder. Figure 23 Inserting the stirrer head 6.
- Page 13 09931295C Lambda 465 Installation Make sure the instrument is turned off while installing this accessory. CAUTION Assurez-vous que l’instrument est éteint lors de l’installation de cet ATTENTION accessoire. Connect to the Single/ Water Jacketed Single Cell Holder 1. Connect the plug of the power cable to the power input socket of the control unit. Figure 25 Connecting the plug of the power cable 2.
- Page 14 09931295C 3. Using the M3 wrench, remove the screw in the single cell holder and disassemble the holder. Figure 27 Removing the screw 4. Insert the stirrer head of the stirrer control cable into the single cell holder. Figure 28 Inserting the stirrer 5.
- Page 15 09931295C Connect to the 8 Cell Water Jacketed Cell Change 1. Connect the plug of the power cable to the power input socket of the control unit. Figure 30 Connecting the plug of the power cable 2. Connect the stirrer control cable to the 4-pin socket of the control unit. Figure 31 Connecting the stirrer control cable 3.
- Page 16 09931295C 4. Place the magnetic stirrer head on the stirrer mount of the 8 cell water jacketed cell changer. Figure 33 Placing the magnetic stirrer head on the stirrer mount 5. Fix the stirrer mount to the 8 cell water jacketed cell changer and tighten the screw using the M4 wrench.
- Page 17 09931295C 2. Connect the stirrer control cable to the 4-pin socket of the control unit. Figure 36 Connecting the stirrer control cable 3. Using the M4 wrench, remove the screw of the water jacketed automatic referencing stage and disassemble the stirrer mount. Figure 37 Removing the screw 4.
-
Page 18: Troubleshooting
09931295C ix the stirrer mount to the water jacketed referencing stage and tighten the screw using the M4 wrench. Figure 39 Fixing the stirrer mount Troubleshooting When a magnetic bar does not move 1. Check whether the control unit is powered on. 2.
Need help?
Do you have a question about the Lambda 265 and is the answer not in the manual?
Questions and answers