
Related Manuals for gofanco HDMIExt8P


Summary of Contents for gofanco HDMIExt8P
- Page 1 8-Port HDMI Extender/ Splitter over CAT5e/6 with Loopout - 40m User's Guide P/N:HDMIExt8P G4-0052A...
- Page 2 Thank you for purchasing from gofanco. Our products aim to meet all your connectivity needs wherever you go. For optimum performance and safety, please read the instructions carefully and keep this User's Guide for future reference. If you need more information about our products, please visit www.gofanco.com.
-
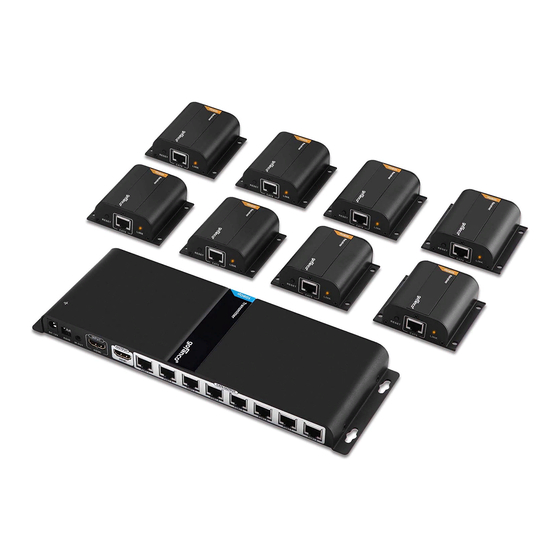
Page 3: Package Contents
Introduction The 8-Port HDMI Extender/Splitter over CAT5e/6 with Looput - 40m extends 1080p signals to 8 monitors over CAT5e/6 up to 40m. Package Contents Transmitter (1pc) Receiver (8pcs) Power Adapter Power Adapter Manual (1pc) 12V/2A (1pc) 5V/1A (8pcs) IR Blaster Extension IR Receiver Extension Cable (1pc) Cable (1pc) - Page 4 Product Layout Figure 1: Transmitter (TX) - Back Panel Power Jack: Connect the included 12VDC/2A power adapter here EDID: The HDMI source device reads EDID information from the TX unit, and outputs it to the RXs. Please refer to the setting below. *Default setting IR Out: Infrared 3.5mm socket.
- Page 5 Figure 2: Transmitter (TX) Front Panel Link LED: Turns red when powered. Turns blue when there is an HDMI signal detected Reset: Press to reset if HDMI Extender doesn't work properly Figure 3: Receiver (RX) - Input Reset: Press to reset if HDMI Extender doesn't work properly RJ45 In: Link to the Transmitter's RJ45 Out via a Cat5e/6 cable...
-
Page 6: Installation Requirements
Figure 4: Receiver (RX) - HDMI Output Power Jack: Connect the included 5VDC power adapter here HDMI Out: Connect your HDMI display here with an HDMI cable (cable not included) IR In: Infrared 3.5mm socket. Plug IR Receiver Extension Cable here. See instructions on page 7. Installation Requirements HDMI source device (DVD player, set top box, PC, etc.) - Page 7 Hardware Installation To achieve optimal performance, Cat6 cable is recommended. Power off all devices including your HDMI source and HDMI display. Connect your HDMI source to the Transmitter's HDMI In connector. Connect your HDMI display to the Transmitter's HDMI Out. This connection is optional and need only when local monitoring of the local display is required.
- Page 8 Connection Diagram Transmitter Note: Please use the IR remote control to control only one Receiver at a time to avoid interference.
- Page 9 FAQ & Solutions Q1: No image or audio output on the display? 1. Check if the display is in standby mode. 2. Make sure the display's HDMI port is properly connected to the HDMI cable. 3. Check the Link LED indicator on the Receiver is on.
-
Page 10: Specifications
Specifications Item Specification HDMI signal HDMI 1.3, HDCP 1.2 Input 1x, 19-pin HDMI, Female Output 8x RJ45, 1x HDMI 480i@60Hz, 480p@60Hz, 576i@50Hz, Resolution 576p@50Hz, 720p@50/60Hz, 1080i@50/60Hz, 1080p@50/60Hz Transmission distance Up to 130 ft (40m) IR signal 20KHz - 60KHz Operating temperature 32 F - 140 F (0 - 60 C) TX: 12VDC/2A Power adapter... - Page 11 Disclaimer The product name and brand name may be registered trademarks of related manufacturers. TM and ® may be omitted on the user's guide. The pictures on the user's guide are just for reference, and there may be some slight differences with the acutal products.
- Page 12 Thank you for choosing gofanco www.gofanco.com...
Need help?
Do you have a question about the HDMIExt8P and is the answer not in the manual?
Questions and answers