
Related Manuals for Siemens MT8001 MP4.20


Summary of Contents for Siemens MT8001 MP4.20
- Page 1 MT8001 MP4.20 Management Terminal Installation Function & Configuration Commissioning Safety Regulations Building Technologies Fire Safety & Security Products...
- Page 2 Data and design subject to change without notice. / Supply subject to availability. © 2009 Copyright by Siemens Switzerland Ltd We reserve all rights in this document and in the subject thereof. By acceptance of the document the recipient acknowledges these rights and undertakes not to publish the document nor the subject thereof in full or in part, nor to make them available to any third party without our prior express written authorization, nor to use it for any purpose other than for which it was delivered to him.
-
Page 3: Table Of Contents
About this document....................5 Safety regulations ...................7 Country-specific standards ...............7 Assembly, installation, commissioning and testing work ......7 Modifications to the system design and the products .......7 Introduction .....................8 What has been changed in MP4.20............9 2.1.1 Documentation changes and corrections in this edition .....9 2.1.2 Approvals..................9 System limits ..................10... - Page 4 The service PC went into standby mode ........66 C.1.4 MT8001 does not start correctly after file transfer ....66 Testing the configuration.................67 C.2.1 Connection problems – faults don’t change to normal .....67 Siemens Building Technologies 048_DMS_MT8001_ICC_MP4.20_A6V10096181_a_en.doc Fire & Security Products 06.2009...
-
Page 5: About This Document
STEP Documentation Repository System released at SBT FS for end-users via the STEP Web Client interface at the following address: https://workspace.sbt.siemens.com/content/00001123/default.aspx The following describes one way to search and find a document: To learn about other ways to locate a document, see DMS8000 Quick Ref- erence Guidelines for Search and Finding DMS Documents in STEP (Document no.A6V10064704). - Page 6 10.2003 Corresponds to version MP1.10 of the MT8001 Management Terminal Software Acknowledgments We wish to thank all the Siemens colleagues and the customers who have given us feedback and comments about this documentation. Building Technologies 048_DMS_MT8001_ICC_MP4.20_A6V10096181_a_en.doc Fire Safety & Security Products...
-
Page 7: Safety Regulations
Safety regulations This section describes the potential sources of danger, and the relevant safety regulations applicable for the use of the Siemens Building Technologies products. Please read the following work instructions as well as the previous section "About this document" thoroughly before beginning any work. -
Page 8: Introduction
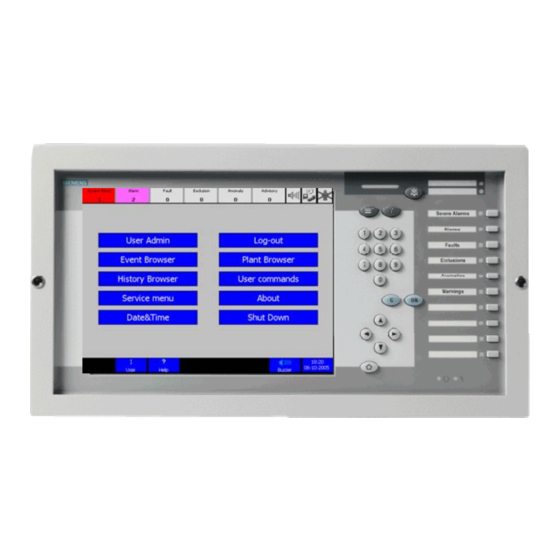
Introduction Introduction This section outlines the physical design of the system, and provides an overview of its functions. Overview The MT8001 Management terminal was designed to provide a single, easy-to-use point of access to the entire security network used in your facility. Whether this se- curity network is limited to a single floor, or spans an entire building, the MT8001 allows the end-user to monitor and control any area or device within the system from one place. -
Page 9: What Has Been Changed In Mp4.20
Introduction What has been changed in MP4.20 Here is the list of modifications included in MP4.20 for new functions and software improvements. Section, Page Modifications 3, p.10 New XLS support 2.1.1 Documentation changes and corrections in this edition The following is the list of corrections and improvements (not related to new soft- ware features) included in this edition of the document. -
Page 10: System Limits
System limits System limits Hardware characteristics • Refer to the MT8001 datasheet, document n. A6V10096155. Subsystems supported by MT8001 • One RS232 serial connection (COM3 or COM4) • Direct connection (RS232 / ISO 1745) Fire Detection: − CS11 AlgoRex / FC700A •... -
Page 11: Installing The Mt8001
Installing the MT8001 Installing the MT8001 This section comprises two parts: • First, it lists the requirements for unit installation, followed by illustrations of how to connect the MT8001 management terminal at the client’s site (4.1, 4.2, and 4.3). • Second, it lists the requirements for the configuration software, followed by soft- ware installation procedure (4.4 and 4.5). -
Page 12: Unit Installation
Installing the MT8001 Unit installation 4.2.1 Cabinet mounting The MT8001 Management Terminal may be mounted directly in a 19“ cabinet, or in a control desk provided by the customer. The drawings in Fig. 2, Fig. 3, and Fig. 4 show the details of the required cut-out plus the necessary mounting details. Note: The panel should be fixed with 4 bolts M4 x 4 mm. -
Page 13: Wall And Desk Mounting (Mh8051)
Installing the MT8001 4.2.2 Wall and desk mounting (MH8051) The desk mounting housing (S24230-C119-A2) fulfils the following customer re- quirements: • Control desk applications • Wall-mounted applications (angled view) To access the device: 1. Release the screws on the left and right of the frame-facing. 2. -
Page 14: Standard H28 Housing (Me8050/Ks)
Installing the MT8001 4.2.3 Standard H28 housing (ME8050/KS) When replacing an existing system, such as an MA7003, the standard H28 hous- ing may be used. To rationalise installation work, this housing is equipped with a central terminal block, from which you can make all the standard external connec- tions. -
Page 15: Rack Mounting Option (Mh8053)
Installing the MT8001 4.2.4 Rack mounting option (MH8053) The MT8001 can be mounted inside a 19” cabinet using the rack mounting option (MH8053). Fig. 10 MT8001 rack mounting dimensions Building Technologies 048_DMS_MT8001_ICC_MP4.20_A6V10096181_a_en.doc Fire Safety & Security Products 06.2009... -
Page 16: Wiring
Installing the MT8001 Wiring 4.3.1 Connectors and jumpers Fig. 11 MT8001 rear view, showing the position of connectors and jumpers Fig. 12 MT8001 side view, showing the position of connectors Fig. 13 MT8001 rear view, Fig. 14 MT8001 side view, COM port details Ethernet RJ45 details (not yet used) - Page 17 Installing the MT8001 Jumper setting The configuration of the plug-in jumpers is only allowed in a voltage-free state! ESD measures should also be taken! Notes Default settings TTY (Com5) See 4.3.2.1 on next page. Connected Mains supply fault If the jumper is connected, then contact Connected X20 / Pin 3-4 is Normally Closed (NC).
-
Page 18: Interface Descriptions
Installing the MT8001 4.3.2 Interface Descriptions 4.3.2.1 RS232 and TTY interfaces The MT8001 is equipped with six serial interfaces via 9-pin Sub-D connectors. The upper 4 of these connectors are RS232 interfaces: COM 1 = Connector X30 Used for configuration download, using the special ActiveSync cable (available as part of Service Kit). -
Page 19: Inputs, Power Supply, And Signals
Installing the MT8001 4.3.2.4 Inputs, power supply, and signals The connector X20 provides the interconnections for the power supply and all other input and output signals: • Mains Fault • Battery Fault • External Alarming Device OFF • Common Alarm •... -
Page 20: Cs1140 Via Iso1745 Interface (Max.30M)
Installing the MT8001 4.3.3.1 CS1140 via ISO1745 interface (max.30m) Using desktop housing or rack mounting X33 (COM4 ) Shielded cable type LiY-CY 3*0,25 or similar CS11 AlgoRex MT8001 2 RxD E3H 02x 3 TxD Settings of SW S5 No HW-configuration 5 GND S5-1 = INT. -
Page 21: Cerloop Via Mk7022 (Max. 30 M)
Installing the MT8001 4.3.3.2 Cerloop via MK7022 (max. 30 m) Using desktop housing or rack mounting X33 (COM4 ) Shielded cable type LiY-CY 3*0,25 or similar MK7022 MT8001 2 RxD K1H 021 K1D 012 3 TxD No HW-configuration 5 GND of the RS232 interface is required Fig. -
Page 22: Nk8000 (Max. 30 M)
Installing the MT8001 4.3.3.3 NK8000 (max. 30 m) Using desktop housing or rack mounting Shielded cable X33 (COM4 ) type LiY-CY 3*0,25 or similar NK822x MT8001 2 RxD 3 TxD COM1, COM2, COM3, COM4 5 GND No HW-configuration 9 pin D-Sub female of the RS232 interface is required Fig. -
Page 23: Power Supply From Cs11 Algorex
Installing the MT8001 4.3.3.4 Power supply from CS11 AlgoRex Using desktop housing or rack mounting Isolated LiYv cable: - min 1 mm if length > 3m - min 0.75mm if length < 3 m ext. horn CS11 AlgoRex Terminal Power supply MT8001 E3G 060 ext. -
Page 24: Configuration Software Installation Requirements
Installing the MT8001 Configuration software installation requirements 4.4.1 Composer hardware requirements • Screen resolution: At least 1024 x 768 • Pentium PC • 512 MB RAM (1 GB recommended) • 500 MB free disk space • At least one parallel or USB port (for hardware key / dongle) •... -
Page 25: Configuration Software Installation Procedure
Installing the MT8001 Configuration software installation procedure 4.5.1 Installation checklist The following two checklists tell you what you need for MT8001 configuration soft- ware installation, and the steps you go through to install it. Items appearing in grey are not covered in this manual. The following abbreviations are used in the checklists: −... -
Page 26: Installing The Activesync ® Utility
Installing the MT8001 ® 4.5.2 Installing the ActiveSync utility Microsoft ActiveSync, which is included with the MT8001 configuration software, must be installed prior to loading the MT8001 subsystem tools. The ActiveSync utility provides access to the MT8001 operating system through your PC. This is the tool you use to transfer the configuration data from Composer to the MT8001. -
Page 27: Installing The Plug-Ins
Installing the MT8001 Fig. 26 MT8001 Add-On window 4. Select and install Active Sync and Composer. 5. Select Install MT8001 Add-On. You will receive a confirmation when MT8001 is successfully installed. 4.5.4 Installing the plug-Ins To install the MT8001 plug-in, launch the AddOnMT8001Installer.exe utility avail- able in the MT8001 Add-on folder of the DMS8000 CD. -
Page 28: Configuring The Mt8001
Configuring the MT8001 Configuring the MT8001 Configuration checklist DMS Configuration Process Overview The configuration checklist is a general guide to the configuration process. The or- der in which you perform the tasks in the checklist may vary depending on your personal preference. - Page 29 Configuring the MT8001 Configuring the MT8001 Prepare the project Place images in their folders p. 30 Add and configure the subsystems, following the planned structure in the SPECS DMS-CG Set vitality checks (required for direct link and links over NK822x) DMS-CG Configure the communication network DMS-CG Link the subsystems to the communication network...
-
Page 30: Preparing The Project
Configuring the MT8001 Preparing the project Now you’re ready to prepare the project. See the following subsection for details on how to do so. 5.2.1 Creating a new MT8001 project in Composer Composer may create a new project using a specific command available in the Welcome page (Fig. - Page 31 Configuring the MT8001 Fig. 28 Empty project restore Fig. 29 NK8000 project restore Building Technologies 048_DMS_MT8001_ICC_MP4.20_A6V10096181_a_en.doc Fire Safety & Security Products 06.2009...
-
Page 32: Configuring The Project Tree
Configuring the MT8001 5.2.2 Configuring the project tree The Composer tool enables you to define your system in a tree-based structure, in which you add and link together the MT8001 management terminal, the control units and the network devices that are required. Adding the MT8001 terminal In new projects, you need to add the MT8001 terminal unit. -
Page 33: Preparing Maps And Instructions Pages
Configuring the MT8001 Preparing maps and instructions pages This section illustrates how to configure the graphic and the instruction pages that can assist the MT8001 operator during the event treatment. 5.3.1 Graphic Maps When an event is triggered, the graphic map associated with the alarmed device is displayed in the assisted treatment pages for that event (see the MT8001 Operat- ing Manual for more information about these pages). - Page 34 Configuring the MT8001 Graphic pages A graphic page is a (possibly partial) view of a map. In the MT8001, every device in the facility can have a graphic page associated with it. When a device is deposited on a map, Composer provides its association with an appropriate page automatically.
- Page 35 Configuring the MT8001 Fig. 35 Graphic maps Add a new map folder Add a new map Map configuration procedure 1. Create a folder structure (for example, ‘fire graphics’ or ‘intrusion 1 floor’). 2. Insert and name your new maps in the first folder. 3.
-
Page 36: Instructions
Configuring the MT8001 5.3.2 Instructions pages Define a default procedure In addition to the plant maps, the MT8001 can provide treatment instructions when an event is being treated (see the MT8001 Operation Manual for more information about these pages). By default, no instructions are available and, without a specific configuration, when the operator looks in the assisted treatment instructions, the message “No instructions associated with this event”... -
Page 37: Customising The Behaviour Of The Mt8001
Configuring the MT8001 Both these bitmap images should be copied in ‘<project folder>\XMLData\Bitmaps’ and then linked in the MT8001 options tab (see Fig. 37 on page 38, ‘Framework Options’). Item Width in Pixels Height in Pixels Colour depth Background Customising the behaviour of the MT8001 This section contains several subsections that tell you how to customise or tailor the MT8001 behaviour for a facility. -
Page 38: Defining Event Behaviour - Approvals Tabs
Configuring the MT8001 Fig. 37 MT8001 Options tab 5.4.2 Defining event behaviour – Approvals tabs 5.4.2.1 Approvals and intrusion options – Duress Alarms Configure the Approvals-1 tab (see Fig. 38) if specific EN54 or ULC Approvals are required for the MT8001 Management Terminal AND/OR if you need to configure a Duress Alarm on the MT8001. - Page 39 Configuring the MT8001 MT8001 Approvals 1 tab Configuration options User confirmation required Enable user confirmation dialog box Intrusion Options – Confirmation of discon- nected objects Display confirmation message Enable confirmation message dialog box EN54 – Filters management Return to Event List timeout (sec) Time before the Event List display returns to the filter for the most severe open event category.
- Page 40 Configuring the MT8001 Fig. 38 Approvals-1 tab Building Technologies 048_DMS_MT8001_ICC_MP4.20_A6V10096181_a_en.doc Fire Safety & Security Products 06.2009...
-
Page 41: Intrusion Options - Pin Code Violations
Configuring the MT8001 5.4.2.2 Intrusion options – PIN code violations Configure the Approvals-2 tab (see Fig. 39) to define a PIN code violation Alarm on the MT8001. To configure a PIN code violation Alarm, do the following: 1. Check the PIN code violation Alarm to enable a local Alarm on the MT8001. 2. -
Page 42: Intrusion Options - Code Alarms
Configuring the MT8001 5.4.2.3 Intrusion options – Code Alarms Configure the Approvals-3 tab (see Fig. 40) to define a Code Alarm on the MT8001. To configure a Code Alarm, do the following: 1. Check the Code Alarm transmission to enable a Code Alarm on the MT8001. 2. -
Page 43: Intrusion Options - Tamper Switch Alarms
Configuring the MT8001 5.4.2.4 Intrusion options – Tamper Switch Alarms Configure the Approvals-4 tab (see Fig. 41) to define a Tamper Switch Alarm on the MT8001. To configure Tamper Switch Alarm, do the following: 1. Check the Tamper Switch Alarm transmission to enable a Tamper Switch Alarm on the MT8001. -
Page 44: Defining Event Behaviour - Cz10 Treatment Tab
Configuring the MT8001 5.4.3 Defining event behaviour – CZ10 Treatment tab The following describes event behaviour settings you can configure for a CZ10 fire panel. Note: Unless the ULC Approvals option is checked in the Approvals-1 tab, the “Su- pervisory Event” settings are disabled. Configure the CZ10 Treatment tab to define specific event behaviour for ULC applications. -
Page 45: Defining Event Behaviour - Treatment Instructions/Information45
Configuring the MT8001 5.4.4 Defining event behaviour – Treatment instructions/information Associate any special procedures with its corresponding zone or device There may be some rooms or situations where a special procedure or information should be provided in addition to that in the default procedure. For example, pro- viding the operator with special instructions, or providing a notification that hazard- ous or explosive materials are contained in an area where an alarm is occurring. -
Page 46: Disabling Events From Being Triggered
Configuring the MT8001 5.4.5 Disabling events from being triggered Each data-point has a number of possible states that can trigger events. The de- fault setting for most of these states is “enabled”. However, you may want to pre- vent event triggering for certain types of states. To disable event triggering, do the following: 1. -
Page 47: Defining Report Actions
Configuring the MT8001 5.4.6 Defining report actions The actions that you define here will display (in a selection list) on the report page of all events. The end user can then compile his report by selecting the actions that he or she followed. The customer should provide a list of these actions. -
Page 48: Defining Users
Configuring the MT8001 5.4.7 Defining users The MT8001 refers to user groups by numbers, starting with zero (0). There are two predefined groups. The rest you define according to your client’s needs. The first predefined user group is called Default User (group 0), and the second is Technical User (group 1). - Page 49 Configuring the MT8001 To define a new user, do the following: 1. Select MT8001 Security Server Users node (see Fig. 46). 2. Select the User icon to create a new user profile. 3. Expand the Users node and select the new User node. 4.
- Page 50 Configuring the MT8001 To define a new user group, do the following: 1. Select MT8001 Security Server User Groups nodes. (See Fig. 47.) 2. Select the User Group icon to create a new user group. 3. Expand the User Groups node and select the new User Group node. 4.
-
Page 51: Defining En54 Access Level Rights
Configuring the MT8001 5.4.8 Defining EN54 access level rights The first step is to create four user groups (1 ... 4). Access rights should then be al- located to these four groups according to the table below. Individual users can now be created and assigned to one of the four user groups in accordance with their operational function: •... -
Page 52: Defining Custom Commands
Configuring the MT8001 5.4.9 Defining custom commands Commands can be defined for each user group (MT8001→ Security Server→ User Groups). (For more information about using commands, see the Operation Manual.) To de- fine a command, you first set it up, and then you add one or more actions for that command. - Page 53 Configuring the MT8001 Fig. 48 Define commands Description Name of command. Action Description Description of command. Action Icon File Name Command icon (not configurable at the moment). Roll Back Description Name of the rollback command. Roll Back Icon File Name Rollback icon (not configurable at the moment).
- Page 54 Configuring the MT8001 Add an action Commands are made up of a series of actions. An action is a state change for a single point property. To add an action, do the following: 1. Drag the subsystem section, subsection, or element from the tree and drop it into the Current Action field.
-
Page 55: Defining Display Mode
Configuring the MT8001 5.4.10 Defining display mode In the MT8001 Framework Node tab, you can define the system display mode (see Fig. 49, A). There are two possible display modes: − Always enabled: The system display is always present, regardless of if a user is logged on;... -
Page 56: Setting Event Limits
Configuring the MT8001 Fig. 49 Setting display and horn modes Select when Display mode: Normal (always enabled) or User enabled (enabled only when a user is logged on). Select which buzzer / horn will sound when an alarm occurs. Select when the buzzer / horn is activated (buzzer mode). 5.4.13 Setting event limits Set maximum events in the event list In the MT8001... -
Page 57: Setting Date And Time Format
Configuring the MT8001 5.4.14 Setting date and time format In the MT8001 Framework Node tab, you can also set the date and time for- mat used by the terminal both for general display and in the event list. (See Fig. 50.) Fig. -
Page 58: Setting Up The Logging Printer
Configuring the MT8001 5.4.16 Setting up the logging printer The logging printer prints information about events and actions related to them. The information that is printed is similar to the information maintained in the history browser. The printer is usually connected to COM3. If you change this setting, en- sure that the new COM port is not already being used. -
Page 59: Creating A Backup Of Your Project
Configuring the MT8001 Creating a backup of your project Before transferring the configuration to the MT8001, backup the Composer project (Tools Backup). This will ensure that if anything happens during the file transfer and your project is corrupted, you will be able to restore it. Transferring the configuration Congratulations! You should be ready to transfer the configuration. - Page 60 Configuring the MT8001 Note: If you did not make a backup of the Composer project, you may need to repeat the entire configuration process. Create the ActiveSync connection between the MT8001 and the PC To do this, perform the following steps: 1.
-
Page 61: Compact Flash Card
Configuring the MT8001 5.6.3 Compact Flash card To transfer the configuration from a PC to the MT8001 via a Compact Flash (CF) card, do the following: 1. Select the MT8001 node in Composer. 2. Use the right-click menu to select: Node Commands Export Configuration 3. -
Page 62: Testing The Configuration
Testing the configuration Testing the configuration Once you have configured the MT8001, you need to test the configuration. This section details how to do this. Checking MT8001-subsystem connection Verify that the subsystems and the MT8001 communicate As soon as you turn on the MT8001, a Fault will be displayed on the Event browser for each control unit that is defined in the configuration. -
Page 63: Appendix A - Activesync Cable Connection Diagram
Testing the configuration Appendix A – ActiveSync cable connection diagram Note: This cable is included in the service kit that can be purchased from the Sie- mens FS-DMS division. Fig. 52 ActiveSync cable connection diagram Building Technologies 048_DMS_MT8001_ICC_MP4.20_A6V10096181_a_en.doc Fire Safety & Security Products 06.2009... -
Page 64: Appendix B - Internal Wiring Of Mt8001 H28 Housing
Testing the configuration Appendix B – Internal wiring of MT8001 H28 housing Fig. 53 H28 housing (ME8050/KS) Building Technologies 048_DMS_MT8001_ICC_MP4.20_A6V10096181_a_en.doc Fire Safety & Security Products 06.2009... -
Page 65: Appendix C - Troubleshooting
Testing the configuration Appendix C – Troubleshooting The following addresses issues that may arise during the MT8001 configuration process. C.1 Downloading (transfer) C.1.1 ActiveSync won’t connect with the MT8001 When connecting to the MT8001, ActiveSync sometimes does not recognise the MT8001. -
Page 66: The Cable From Mt8001 To Service Pc Got Disconnected
Testing the configuration C.1.2 The cable from MT8001 to service PC got disconnected If this happens during the Send XML files procedure, an error message will dis- play on your PC that says there was an error writing the file on WinCE. Fig. -
Page 67: Testing The Configuration
Testing the configuration Regenerate the XML files If you find no configuration errors, you will need to follow the recovery procedure to reset the MT8001. Then you will need to regenerate the XML files and transfer them to the MT8001. Note: You need to first reset the MT8001 so that it is ready to receive the new XML project files. - Page 68 Siemens Switzerland Ltd Building Technologies Group International Headquarters Fire Safety & Security Products Gubelstrasse 22 CH-6301 Zug Tel +41 41 724 24 24 Fax +41 41 724 35 22 www.sbt.siemens.com Document no. A6V10096181_a_en MT8001 Technical Material Edition 06.2009 Section 2...
Need help?
Do you have a question about the MT8001 MP4.20 and is the answer not in the manual?
Questions and answers