
Related Manuals for SHOWTEC EventSpot 1600 Q4 Set


Summary of Contents for SHOWTEC EventSpot 1600 Q4 Set
- Page 1 MANUAL ENGLISH EventSpot 1600 Q4 Set Ordercode: 44057 Highlite International B.V. – Vestastraat 2 – 6468 EX – Kerkrade – the Netherlands...
-
Page 2: Table Of Contents
EventSpot 1600 Q4 Set Table of contents Warning ....................................3 Safety Instructions ................................. 3 Operating Determinations ............................5 Rigging .................................... 5 Connection with the mains ............................6 Return Procedure ................................7 Claims ....................................7 Description of the device ..............................8 Overview (EventSpot 1600 Q4) .......................... - Page 3 EventSpot 1600 Q4 Set 10 Channels ................................28 Maintenance ..................................30 Replacing the Fuse ..............................30 Troubleshooting ................................31 No Light ..................................31 No Response to DMX ..............................31 Product Specifications ..............................33 Dimensions ..................................34 Ordercode: 44057...
-
Page 4: Warning
EventSpot 1600 Q4 Set Warning Unpacking Instructions Immediately upon receiving this product, carefully unpack the carton and check the contents to ensure that all parts are present, and have been received in good condition. Notify the dealer immediately and retain packing material for inspection if any parts appear to be damaged from shipping or the carton itself shows signs of mishandling. - Page 5 ● If your Showtec device fails to work properly, discontinue use immediately. Pack the unit securely (preferably in the original packing material), and return it to your Showtec dealer for service.
-
Page 6: Operating Determinations
EventSpot 1600 Q4 Set ● The user is responsible for correct positioning and operating of the Showtec EventSpot 1600 Q4. The manufacturer will not accept liability for damages caused by the misuse or incorrect installation of this device. ● This device falls under protection class I. Therefore it is essential to connect the yellow/green conductor to earth. -
Page 7: Connection With The Mains
EventSpot 1600 Q4 Set The EventSpot 1600 Q4 can be placed on a flat surface or fitted to any kind of truss with a clamp. Improper installation can cause serious damage to people and property! Connection with the mains Connect the device to the mains with the power plug. -
Page 8: Return Procedure
EventSpot 1600 Q4 Set Return Procedure Returned merchandise must be sent prepaid and in the original packing, call tags will not be issued. Package must be clearly labeled with a Return Authorization Number (RMA number). Products returned without an RMA number will be refused. Highlite will not accept the returned goods or any responsibility. -
Page 9: Description Of The Device
EventSpot 1600 Q4 Set Description of the device Features The EventSpot 1600 Q4 Set consists of 6 LED-equipped wireless EventSpots 1600 Q4, a charging case and a remote control. EventSpot 1600 Q4 ● Long battery life ● Eco mode for extended battery life ●... -
Page 10: Overview (Eventspot 1600 Q4)
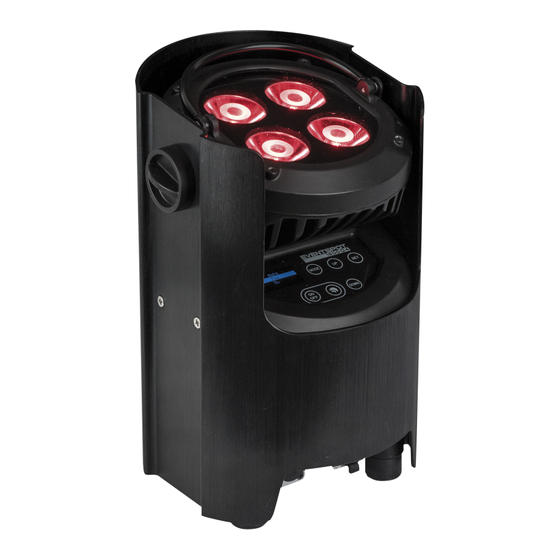
EventSpot 1600 Q4 Set Overview (EventSpot 1600 Q4) Fig. 01 01) Projection angle adjustment 02) 4 x 12 W RGBW LEDs 03) OLED display + control buttons Bottom (EventSpot 1600 Q4) Fig. 02 04) Dedicated 3-pin DMX signal connector IN IP54... -
Page 11: Backside (Eventspot 1600 Q4)
EventSpot 1600 Q4 Set Backside (EventSpot 1600 Q4) Fig. 03 09) Wireless DMX receiving antenna Overview (Charging case) Fig. 04 10) Carrying handle 11) Wheel 12) Lock 13) Fuse T8AL/250V 14) Pro power connector (Blue) IN 15) LED power indicator... -
Page 12: Top (Charging Case)
EventSpot 1600 Q4 Set Top (Charging case) Fig. 05 17) Charging spot 18) Air inlet 19) Battery status indicator 20) Safety switch Installation Remove all packing materials from the EventSpot 1600 Q4 Set. Check that all foam and plastic padding is removed. -
Page 13: Setup And Operation
EventSpot 1600 Q4 Set Setup and Operation Before plugging the unit in, always make sure that the power supply matches the product specification voltage. Do not attempt to operate a 110 V specification product on 240 V power, or vice versa. -
Page 14: Control Modes
EventSpot 1600 Q4 Set Control Modes There are 6 modes: ● Manual (stand alone) ● Auto program (stand alone) ● Built-in programs (stand alone) ● Master/Slave ● DMX-512 ● Wireless DMX (W-DMX) One EventSpot (Manual) When the EventSpot is not connected with a DMX cable and Wireless DMX is switched off, it functions as a stand-alone device. -
Page 15: Multiple Eventspots (Dmx Control)
EventSpot 1600 Q4 Set Multiple EventSpots (DMX Control) 01) Leave at least 0,5 meter on all sides for air circulation Use a 3-pin XLR cable to connect the EventSpots and other devices. Link the units as shown in (Fig. 08). Connect a DMX signal cable from the first unit's DMX "out" socket to the second unit's "in"... -
Page 16: Multiple Eventspots (Wireless Dmx Control)
EventSpot 1600 Q4 Set Multiple EventSpots (Wireless DMX Control) 01) Place the EventSpots at the desired position (see page 16 for maximum WiFi distance). 02) When the W-DMX LED indicator (C) is blinking (green), the device is searching for a connection. -
Page 17: Connect The Eventspot 1600 Q4 To The Wireless Dmx Signal Transmitter
EventSpot 1600 Q4 Set Sweden 2.4GHz Wireless communication module Communication distance: Depending on the transmitting power or transmitter module Test conditions: W-DMX TRx Transmitter module, 2 dBi Antenna, transmitting power 20 dBm (100 mW) Range indoor: 60 m (approx. through three concrete walls) -
Page 18: Fixture Linking
EventSpot 1600 Q4 Set Fixture Linking You will need a serial data link to run light shows of one or more fixtures using a DMX-512 controller or to run synchronized shows on two or more fixtures set to a master/slave operating mode. The combined number of channels required by all the fixtures on a serial data link determines the number of fixtures the data link can support. -
Page 19: Control Panel
EventSpot 1600 Q4 Set The EventSpot 1600 Q4 can be operated with a controller in control mode or without the controller in stand-alone mode. Control Panel OLED display IR-remote sensor W-DMX LED indicator MODE button UP button SET button Power button on/off... -
Page 20: Menu Overview
EventSpot 1600 Q4 Set Menu overview Ordercode: 44057... -
Page 21: Main Menu Options
EventSpot 1600 Q4 Set Press the power button (05) and hold down the power button (G) for at least 3 sec. to activate the EventSpot! The EventSpot will show the current software version, battery energy level, current temperature and type of DMX signal at start-up! Main Menu Options 01) Press the MODE or SET button to open the main menu. -
Page 22: Manual
EventSpot 1600 Q4 Set 2. Manual In this menu you can set the static colors. 01) In main menu, press the UP/DOWN buttons until the display shows Manual. 02) Press the SET button to open the menu. The display will show: Press the UP/DOWN buttons to scroll through the static colors: Red, Green, Blue and White. -
Page 23: Master/Slave
EventSpot 1600 Q4 Set frequency. 10) If you have chosen PROGRAM SPEED, press the SET button to open the submenu. 11) Press the UP/DOWN buttons to set the desired program speed. The adjustment range is between 1– 100, from slow to fast. -
Page 24: Curves Select
EventSpot 1600 Q4 Set 6.1. Curves Select In this menu you can adjust the dimming by choosing a dimming curve. 01) Press the UP/DOWN buttons until the display shows Curves Select. 02) Press the SET button to open the menu. The display will show: 03) Press the UP/DOWN buttons to choose one of the desired dimming curves: 04) Press the SET button to confirm your choice. -
Page 25: Dmx Fail
EventSpot 1600 Q4 Set 6.3. DMX Fail In this menu you can adjust the device’s behavior in case of a DMX signal error. 01) Press the UP/DOWN buttons until the display shows Dmx Fail. 02) Press the SET button to open the menu. The display will show: 03) Press the UP/DOWN buttons to choose between the 4 options. -
Page 26: Lock
EventSpot 1600 Q4 Set 6.6. Lock In this menu you can set the safety lock. 01) Press the UP/DOWN buttons until the display shows Lock. 02) Press the SET button to open the menu. The display will show: 03) Press the UP/DOWN buttons to select Yes or No. -
Page 27: Information
EventSpot 1600 Q4 Set 7. Information In this menu you can view the device’s parameters. In main menu, press the UP/DOWN buttons until the display shows Information. Press the SET button to open the menu. The display will show: 03) You can view the currently installed software version, current temperature, type of DMX signal and the device’s total life time. -
Page 28: Auto Program
EventSpot 1600 Q4 Set Blue Activates Blue color No function White Activates White color Green Activates Green color Purple Activates Purple color Purplish red Activates Purplish Red color Orange Activates Orange color White Activates White color Bright pink Activates Bright Pink color... -
Page 29: Dmx Channels
EventSpot 1600 Q4 Set DMX Channels 4 Channels Channel 1 – Red Dimmer intensity 0–255 Gradual adjustment Red, from dark to brightest Channel 2 – Green Dimmer intensity 0–255 Gradual adjustment Green, from dark to brightest Channel 3 – Blue Dimmer intensity 0–255... - Page 30 EventSpot 1600 Q4 Set Channel 3 – Color presets CH1 must be set between 1–255 0–7 No function 8–13 Color 1 (R255, G000, B000, W000) 14–20 Color 2 (R255, G000, B000, W100) 21–27 Color 3 (R255, G000, B000, W200) 28–34 Color 4 (R255, G050, B000, W000) 35–41...
-
Page 31: Maintenance
04) The electric power supply cables must not show any damages or material fatigue. The EventSpot 1600 Q4 Set requires almost no maintenance. However, you should keep the unit clean. Otherwise, the fixture’s light output will be significantly reduced. Disconnect the mains power supply, and then wipe the cover with a damp cloth. -
Page 32: Troubleshooting
05) If you are unable to determine the cause of the problem, do not open the EventSpot, as this may damage the unit and the warranty will become void. 06) Return the device to your Showtec dealer. No Response to DMX Suspect the DMX cable or connectors, a controller malfunction, a light effect DMX card malfunction. - Page 33 EventSpot 1600 Q4 Set Problem Probable cause(s) Solution ● Check that power is switched on and the battery is charged No power to the fixture One or more fixtures do not function at all ● Replace the fuse. See page 30 for...
-
Page 34: Product Specifications
EventSpot 1600 Q4 Set Product Specifications EventSpot 1600 Q4 Input voltage: 100–240 V AC, 50/60 Hz Battery storage: 15,6 Ah Light source: 4 x 12 W RGBW LEDs Drive current: 650 mA Refresh rate: 12 kHz Luminus flux: 1580 Lux @ 2 m:... -
Page 35: Dimensions
EventSpot 1600 Q4 Set Dimensions Ordercode: 44057... - Page 36 ©2020 Showtec...
Need help?
Do you have a question about the EventSpot 1600 Q4 Set and is the answer not in the manual?
Questions and answers