SMART Board 6000S Series User Manual
Hide thumbs
Also See for 6000S Series:
- Installation and maintenance manual (98 pages) ,
- User manual (64 pages) ,
- User manual (52 pages)

Related Manuals for SMART Board 6000S Series


Summary of Contents for SMART Board 6000S Series
- Page 1 SMART Board® 6000S and 6000S Pro series interactive displays USER GUIDE SBID-6265S SBID-6275S SBID-6265S-PW SBID-6275S-PW Was this document helpful? smarttech.com/docfeedback/171415...
- Page 2 Trademark notice SMART Board, SMART Notebook, SMART Meeting Pro, Pen ID, HyPr Touch, Object Awareness, Silktouch, ToolSense, smarttech, the SMART logo and all SMART taglines are trademarks or registered trademarks of SMART Technologies ULC in the U.S. and/or other countries. The Bluetooth word mark is owned by the Bluetooth SIG, Inc.
-
Page 3: Important Information
Important information NOTE Refer to the SMART Board 6000S and 6000S Pro series interactive displays installation and maintenance guide (smarttech.com/kb/171414) for important information about installing and maintaining the display. WARNING Do not open or disassemble the display. You risk electrical shock from the high voltage inside the casing. -
Page 4: Energy Star
IMPORTANT INFORMATION ENERGY STAR® ENERGY STAR is the government-backed symbol for energy efficiency, providing simple, credible, and unbiased information that consumers and businesses rely on to make well-informed decisions. ENERGY STAR-certified products are the simple choice for energy efficiency, making it easy for consumers and businesses to make purchases that save them money and protect the environment. -
Page 5: Innovation, Science Et Développement Économique Déclaration Du Canada
IMPORTANT INFORMATION CAUTION Any changes or modifications not expressly approved by the party responsible for compliance could void the user’s authority to operate this equipment. Restriction Operations in the 5.15-5.25GHz band are restricted to indoor usage only. IEEE 802.11b or 802.11g operation of this product in the USA is firmware limited to channels 1 through 13. Radiation exposure statement This equipment complies with FCC radiation exposure limits set forth for an uncontrolled environment. -
Page 6: Eu Declaration Of Conformity
IMPORTANT INFORMATION AVERTISSEMENT (i) les dispositifs fonctionnant dans la bande 5 150-5 250 MHz sont réservés uniquement pour une utilisation à l’intérieur afin de réduire les risques de brouillage préjudiciable aux systèmes de satellites mobiles utilisant les mêmes canaux; (ii) le gain maximal d’antenne permis pour les dispositifs utilisant les bandes 5 250-5 350 MHz et 5 470-5 725 MHz doit se conformer à... - Page 7 IMPORTANT INFORMATION Transmitting Band (MHz) Maximum Transmit Power dBm 5470–5725 5745–5875 Restrictions in: AT/BE/BG/CZ/DK/EE/FR/DE/IS/IE/IT/EL/ES/CY/LV/LI/LT/LU/HU/MTNL/NO/PL/PT/RO/SI/SK/TR/FI/SE/CH/UK/HR – 5150MHz-5350MHZ is for indoor use only. For optimal performance any support equipment connected to this device must be CE compliant. Microsoft® statement regarding Windows® 10 operating system Windows 10 is automatically updated, which is always enabled.
-
Page 9: Table Of Contents
Contents Important information ENERGY STAR Federal Communication Commission interference statement Innovation, Science and Economic Development Canada statement Innovation, Science et Développement économique Déclaration du Canada EU Declaration of Conformity Microsoft statement regarding Windows 10 operating system Chapter 1: Welcome About this guide About the display Identifying your specific model Accessories... - Page 10 CONTENTS Connecting room computers and guest laptops Connecting a SMART OPS PC module Connecting USB drives, peripherals, and other devices Chapter 5: Troubleshooting The display isn’t turning on The display is turning on when it shouldn’t The screen is blank or there’s a problem with the image on the screen There’s no sound or there’s a problem with the sound Touch isn’t working as expected The pens and erasers aren’t working as expected...
-
Page 11: Chapter 1: Welcome
Chapter 1 Welcome About this guide About the display Touch Writing, drawing and erasing Support for additional pens and tools iQ experience Display Audio Network connectivity Room computers and guest laptops Accessory slot Convenience panel Proximity sensor Ambient light sensor Remote control and IR sensor Temperature and humidity sensors Mounting hardware... -
Page 12: About The Display
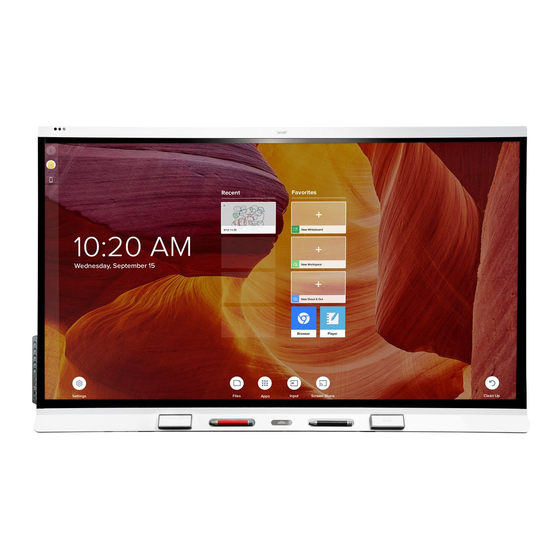
(see More information on page 9). About the display The SMART Board 6000S or 6000S Pro series interactive display with iQ is the hub of your classroom or meeting room. The display includes an extensive set of features and components:... -
Page 13: Touch
For more information, see Using the pens and erasers on page 18. Support for additional pens and tools The SMART Board 6000S features ToolSense™ technology, which enables you to use other SMART–authorized pens and tools in addition to those supplied with the display. No additional configuration is required: just pick up a pen or tool and start using it. -
Page 14: Display
CHAPTER 1 WELCOME manual software and firmware updates. NOTE Some features, such as Browser and Screen Share, require a properly configured network connection. Press the Home button on the display (pictured) or the remote control to open the Home screen. From the Home screen, you can open the iQ apps, switch inputs, and adjust settings. -
Page 15: Room Computers And Guest Laptops
NOTE Unlike with previous SMART Board interactive displays, the SMART Board 6000S and 6000S Pro interactive displays don’t require an AM30, AM40, or AM50 appliance in the accessory slot. The iQ experience is embedded on these interactive displays (see iQ experience on page 3). For this reason, SMART doesn’t recommend installing AM30, AM40, or AM50 appliances in these... -
Page 16: Proximity Sensor
The ambient light sensor detects the room’s brightness and adjusts the brightness of the screen accordingly. You can enable, disable, and adjust this feature. Refer to the SMART Board 6000S and 6000S Pro series interactive displays installation and maintenance guide (smarttech.com/kb/171414) for more information. -
Page 17: Identifying Your Specific Model
CHAPTER 1 WELCOME Temperature and humidity sensors The display features integrated temperature and humidity sensors that enable real-time measurement and recording of the environmental conditions surrounding the display. This data is easily accessible using the temperature and humidity app in the display’s App library. NOTE Temperature and humidity sensors are available only when iQ is enabled. -
Page 18: Accessories
CHAPTER 1 WELCOME Accessories Accessories for the display include: Pen accessory kit SMART OPS PC module SBA-100 projection audio system Stands USB extenders NOTE For more information about these and other accessories, see smarttech.com/accessories. Pen accessory kit The pen accessory kit includes blue, green, purple, and orange pens and a holder that you can mount on the side of the display. -
Page 19: More Information
CHAPTER 1 WELCOME SBA-100 projection audio system Available for education models, the SBA-100 projection audio system consists of two 14 W speakers designed for wall-mounted displays. You can control volume using the display’s convenience panel or the volume controls on a connected computer. -
Page 21: Chapter 2: Using Basic Features
Chapter 2 Using basic features Waking up the display and putting it back to sleep Using the Home button Using the convenience panel Using the remote control Using touch Using the pens and erasers Writing and drawing in digital ink Using the SMART Ink dynamic (floating) toolbar Changing a pen’s default color, thickness, and other properties Erasing digital ink... -
Page 22: Using The Home Button
CHAPTER 2 USING BASIC FEATURES If the display is on, it will return to Ready mode when one of the following occurs: The sensor detects no motion in the room for 60 minutes. You press the Power button on the convenience panel. The display enters Standby mode 60 minutes after entering Ready mode when the sensor doesn’t detect anyone in the room. -
Page 23: Using The Convenience Panel
CHAPTER 2 USING BASIC FEATURES Using the convenience panel The convenience panel contains buttons for turning the display on and off, controlling the volume, freezing and unfreezing the screen, and showing and hiding a screen shade. It also includes connectors for USB peripherals and a computer or other input source. Name Procedure Power... -
Page 24: Using The Remote Control
CHAPTER 2 USING BASIC FEATURES The Power button’s color indicates the display’s status: Power button Display status Not receiving power Amber Standby mode White Normal operating mode Using the remote control The display comes with one of two infrared remote control models. These models are similar, except one has a button screen sharing button. - Page 25 CHAPTER 2 USING BASIC FEATURES The image and table below list the remote control’s functions. Name Procedure Power Press to enter or exit Standby mode (see Waking up the display and putting it back to sleep on page 11). Press and hold for four seconds to turn off the display. Press and hold for 10 seconds to reset the display.
-
Page 26: Using Touch
CHAPTER 2 USING BASIC FEATURES Name Procedure Settings Open iQ Settings. Hide screen contents behind a screen shade (see Showing Screen shade and hiding the screen shade on page 21). Freeze and unfreeze the screen (see page 21). Freeze frame Volume increase Increase the volume (see Adjusting the volume on page 20). - Page 27 CHAPTER 2 USING BASIC FEATURES Pan (one finger) Pan (two fingers) / scroll Pinch to zoom in / scale (enlarge) Pinch to zoom out / scale (reduce) Rotate Flick Erase with palm Erase with fist smarttech.com/kb/171415...
-
Page 28: Using The Pens And Erasers
CHAPTER 2 USING BASIC FEATURES Using the pens and erasers The display comes with a black pen, a red pen, and two erasers. You can use the pens to write and draw in digital ink on the display, and you can use the erasers—or your palm or fist—to erase digital ink. -
Page 29: Using The Smart Ink Dynamic (Floating) Toolbar
CHAPTER 2 USING BASIC FEATURES Using the SMART Ink dynamic (floating) toolbar If you pick up a pen while viewing a connected computer’s input, the SMART Ink® dynamic (floating) toolbar for SMART Ink appears on the screen. You can use this toolbar to temporarily change the pen’s color, thickness, or other properties, you can also access SMART Ink’s tools, such as screen capture, spotlight, screen shade, and so on. -
Page 30: Adjusting The Volume
CHAPTER 2 USING BASIC FEATURES Move your palm or fist over digital ink to erase. Adjusting the volume Use the buttons on the convenience panel or the remote control to increase, decrease, or mute the display’s volume. NOTE See There’s no sound or there’s a problem with the sound on page 40 if you encounter issues with the display’s sound. -
Page 31: Freezing Or Hiding The Screen
CHAPTER 2 USING BASIC FEATURES Freezing or hiding the screen You can temporarily freeze or hide the contents on the screen using the display’s freeze and screen shade features. Freezing the screen You can temporarily freeze the screen by pressing the Freeze button on the convenience panel or remote control. -
Page 33: Chapter 3: Using The Iq Apps
Chapter 3 Using the iQ apps Using the Apps Library Using the SMART Sensors app Using the Files Library Using kapp Whiteboard Using SMART Notebook Player Using Browser Using Screen Share Using screenshots Installing third-party apps Cleaning up the display The display comes with the following iQ apps: SMART Notebook Player Browser Input... -
Page 34: Using The Smart Sensors App
CHAPTER 3 USING THE IQ APPS NOTE SMART Notebook Player is available on education models only. To open the Apps Library From the Home screen, tap Apps Library To learn how to use the other features of Apps Library, see Understanding the Apps Library. -
Page 35: Using Kapp Whiteboard
CHAPTER 3 USING THE IQ APPS Using kapp Whiteboard Use the kapp Whiteboard to write and erase notes on the display just as you do on a traditional dry erase board. You can also save your notes for later and share them using the SMART kapp® app. The kapp Whiteboard app is the default whiteboard for enterprise models. -
Page 36: Using Screenshots
CHAPTER 3 USING THE IQ APPS Mac computers and iOS devices, using AirPlay Android™ devices, using Cast Screen You can also download the SMART Screen Share app for Chromebooks, Windows computers, Mac computers, iOS devices, and Android devices. To learn how to use the other features of Screen Share, see Sharing your device’s screen to the display. - Page 37 CHAPTER 3 USING THE IQ APPS To learn more, see Preparing the display for the next user. smarttech.com/kb/171415...
-
Page 39: Chapter 4: Connecting Computers And Other Devices
Chapter 4 Connecting computers and other devices Installing and using SMART software Downloading and installing SMART software Using SMART software Connecting room computers and guest laptops Viewing a connected computer’s input Setting a connected computer’s resolution and refresh rate Using recommended cables Connecting USB drives, peripherals, and other devices Troubleshooting connected computers Connecting a SMART OPS PC module... - Page 40 CHAPTER 4 CONNECTING COMPUTERS AND OTHER DEVICES Software Description Notes SMART TeamWorks Software that simplifies meetings and Pro models only. room edition facilitates deeper, more natural interaction with on-site and remote participants. SMART Meeting Pro Software that enables you to capture Pro models only.
-
Page 41: Connecting Room Computers And Guest Laptops
CHAPTER 4 CONNECTING COMPUTERS AND OTHER DEVICES SMART Learning Suite SMART TeamWorks SMART Meeting Pro SMART Product Drivers SMART Ink SMART Remote Management Connecting room computers and guest laptops You can connect room computers and guest laptops to the display to view and interact with them. Connector panel Convenience panel NOTES... - Page 42 CHAPTER 4 CONNECTING COMPUTERS AND OTHER DEVICES Your organization’s installers might have connected cables to the display and run the cables behind a wall or under the floor to a desk or table where you can place your computer. Viewing a connected computer’s input Use the Input app to view a connected computer’s input on the display.
- Page 43 CHAPTER 4 CONNECTING COMPUTERS AND OTHER DEVICES Input source Resolution Refresh rate HDMI 3 3840 × 2160 60 Hz 1920 × 1080 60 Hz If possible, set connected computers to these resolutions and refresh rates. See the computers’ operating system documentation for instructions. Using recommended cables SMART recommends the following varieties of cable: Cable type Maximum length...
-
Page 44: Connecting A Smart Ops Pc Module
CHAPTER 4 CONNECTING COMPUTERS AND OTHER DEVICES using the display’s USB plugs. For more information, see Connecting USB drives, peripherals, and other devices on the facing page. Troubleshooting connected computers For troubleshooting information for connected computers, see Chapter 5: Troubleshooting on page 37. -
Page 45: Connecting Usb Drives, Peripherals, And Other Devices
CHAPTER 4 CONNECTING COMPUTERS AND OTHER DEVICES Viewing the OPS PC module input To view the OPS PC module input 1. Do one of the following: If iQ is enabled If iQ is disabled Tap the Home button below the Tap the Home button below the screen. - Page 46 CHAPTER 4 CONNECTING COMPUTERS AND OTHER DEVICES NOTE If a SMART OPS PC module is installed in the accessory slot, you can connect USB drives, peripherals, and other devices to the USB 2.0 Type-A, USB 3.0 Type-B, and USB Type-C receptacles on the OPS PC module to access those devices from the OPS PC module input.
-
Page 47: Chapter 5: Troubleshooting
Chapter 5 Troubleshooting The display isn’t turning on The display is turning on when it shouldn’t The screen is blank or there’s a problem with the image on the screen There’s no sound or there’s a problem with the sound Touch isn’t working as expected The pens and erasers aren’t working as expected iQ apps aren’t working as expected... -
Page 48: The Display Is Turning On When It Shouldn't
CHAPTER 5 TROUBLESHOOTING Symptom Troubleshooting steps The power light is lit, but the screen Press the Power button on the convenience panel or the remote control. is blank. Make sure the proximity sensors aren’t blocked. Restart the display. Determine if the problem is with the video. See The screen is blank or there’s a problem with the image on the screen below. - Page 49 CHAPTER 5 TROUBLESHOOTING Symptom Troubleshooting steps The image on the screen is Tap the Home button below the screen or press the Home button distorted. on the remote control to open the Home screen. If it appears correctly, the issue is with the video input.
-
Page 50: There's No Sound Or There's A Problem With The Sound
CHAPTER 5 TROUBLESHOOTING There’s no sound or there’s a problem with the sound Symptom Troubleshooting steps There’s no sound. If you’re using an external audio system, make sure it is turned on. Make sure the cables connecting the display to the computer are securely fastened. -
Page 51: Touch Isn't Working As Expected
CHAPTER 5 TROUBLESHOOTING Touch isn’t working as expected Symptom Troubleshooting steps The display doesn’t respond to Make sure SMART Product Drivers 12.14 or later are installed and running on touch. any connected computers. Make sure the USB cable between the display and the computer doesn’t exceed the supported maximum cable length. -
Page 52: Iq Apps Aren't Working As Expected
CHAPTER 5 TROUBLESHOOTING Symptom Troubleshooting steps When you write on the screen, the Restart the display. ink appears in the wrong place. Confirm with the installers that the computer is connected to the display with only a single cable. Writing is intermittent. Make sure SMART Product Drivers and SMART Ink are installed and running on... -
Page 53: The Smart Ops Pc Module Isn't Working As Expected
CHAPTER 5 TROUBLESHOOTING Symptom Troubleshooting steps SMART Product Drivers isn’t Troubleshooting SMART Product Drivers. working as expected. The SMART OPS PC module isn’t working as expected Symptom Troubleshooting steps The on-screen keyboard isn’t Enable the on-screen keyboard: visible. a. Select Start > Settings. The Settings window appears. - Page 54 CHAPTER 5 TROUBLESHOOTING Your reseller might ask you for the serial number for the display. The serial number is on a label located on the left side of the display (pictured). TIPS Scan the QR code on the label to view the SMART Board 6000S or 6000S Pro series interactive display support pages on the SMART website.
- Page 56 SMART TECHNOLOGIES smarttech.com/support smarttech.com/contactsupport smarttech.com/kb/171415...
Need help?
Do you have a question about the 6000S Series and is the answer not in the manual?
Questions and answers