SMART Board 6000S Series User Manual
Hide thumbs
Also See for 6000S Series:
- Installation and maintenance manual (98 pages) ,
- User manual (64 pages) ,
- Installation and maintenance manual (81 pages)
Table of Contents
Advertisement
Quick Links
SMART Board®
6000S and 6000S Pro series
interactive displays
USER GUIDE
SBID-6265S-C
|
SBID-6275S-C
SBID-6065S-C
|
SBID-6075S-C
SBID-6265S
|
SBID-6275S
|
SBID-6286S
SBID-6065S
|
SBID-6075S
|
SBID-6086S
IDS665-1
|
IDS675-1
|
IDS686-1
Was this document helpful?
smarttech.com/docfeedback/171415
|
SBID-6286S-C
|
SBID-6265S-CPW
|
SBID-6086S-C
|
SBID-6065S-CPW
|
SBID-6265S-PW
|
SBID-6275S-PW
|
SBID-6065S-PW
|
SBID-6075S-PW
|
SBID-6275S-CPW
|
SBID-6286S-CPW
|
SBID-6075S-CPW
|
SBID-6086S-CPW
|
SBID-6286S-PW
|
SBID-6086S-PW
Advertisement
Table of Contents

Related Manuals for SMART Board 6000S Series


Summary of Contents for SMART Board 6000S Series
- Page 1 SMART Board® 6000S and 6000S Pro series interactive displays USER GUIDE SBID-6265S-C SBID-6275S-C SBID-6286S-C SBID-6265S-CPW SBID-6275S-CPW SBID-6286S-CPW SBID-6065S-C SBID-6075S-C SBID-6086S-C SBID-6065S-CPW SBID-6075S-CPW SBID-6086S-CPW SBID-6265S SBID-6275S SBID-6286S SBID-6265S-PW SBID-6275S-PW SBID-6286S-PW SBID-6065S SBID-6075S SBID-6086S SBID-6065S-PW SBID-6075S-PW SBID-6086S-PW IDS665-1 IDS675-1 IDS686-1 Was this document helpful? smarttech.com/docfeedback/171415...
- Page 2 Trademark notice SMART Board, SMART Notebook, SMART TeamWorks, SMART Meeting Pro, Pen ID, HyPr Touch, Object Awareness, Silktouch, Tool Explorer, smarttech, the SMART logo and all SMART taglines are trademarks or registered trademarks of SMART Technologies ULC in the U.S. and/or other countries. The Bluetooth word mark is owned by the Bluetooth SIG, Inc.
-
Page 3: Important Information
Important information ENERGY STAR® NOTE Refer to the SMART Board 6000S and 6000S Pro series ENERGY STAR is the government-backed symbol interactive displays installation and maintenance guide for energy efficiency, providing simple, credible, (smarttech.com/kb/171414) for important information about and unbiased information that consumers and installing and maintaining the display. - Page 4 Important information NOTE (iii) the maximum antenna gain permitted for devices in the band 5725-5825 MHz shall comply with the e.i.r.p. limits This equipment has been tested and found to comply with the specified for point-to-point and non point-to-point operation as limits for a Class A digital device, pursuant to part 15 of the appropriate.
- Page 5 Important information Déclaration d’exposition aux radiations Restrictions in: AT/BE/BG/CZ/DK/EE/FR/DE/IS/IE/IT/EL/ES/CY/LV/LI/LT/LU/HU/M Cet équipement est conforme aux limites d’exposition aux TNL/NO/PL/PT/RO/SI/SK/TR/FI/SE/CH/UK/HR – 5150MHz- rayonnements ISED établies pour un environnement non 5350MHZ is for indoor use only. contrôlé. Cet équipement doit être installé et utilisé avec un minimum de 20 cm de distance entre la source de rayonnement For optimal performance any support equipment connected to et votre corps.
-
Page 6: Table Of Contents
Contents Important information Chapter 1: Welcome About this guide About the display Identifying your specific model Accessories More information Chapter 2: Using basic features Waking up the display and putting it back in to an energy saving mode Using the Home button Using the convenience panel Using the remote control Using touch... - Page 7 Contents Chapter 5: Troubleshooting The display isn’t turning on The display is turning on when it shouldn’t The screen is blank or there’s a problem with the image on the screen There’s no sound or there’s a problem with the sound Touch isn’t working as expected The pens and erasers aren’t working as expected iQ apps aren’t working as expected...
-
Page 8: Chapter 1: Welcome
Chapter 1 Welcome About this guide About the display Touch Writing, drawing and erasing Support for additional pens and tools iQ experience Display Audio Network connectivity Room computers and guest laptops Accessory slot Convenience panel Proximity sensor Ambient light sensor Remote control and IR sensor Temperature and humidity sensors Mounting hardware... -
Page 9: About The Display
(see More information on page 17). About the display The SMART Board 6000S or 6000S Pro series interactive display with iQ is the hub of your classroom or meeting room. The display includes an extensive set of features and components:... -
Page 10: Touch
For more information, see Using the pens and erasers on page 25. Support for additional pens and tools The SMART Board 6000S features the Tool Explorer™ platform, which enables you to use other SMART- authorized pens and tools in addition to those supplied with the display. No additional configuration is required —... -
Page 11: Iq Experience
Chapter 1 Welcome For more information about available tool kits, see smarttech.com/kb/171796. iQ experience If enabled, the iQ embedded computer provides one-touch access to collaborative tools, such as a whiteboard, wireless screen sharing, and a web browser. There’s no need for wires, cables, or manual software and firmware updates. -
Page 12: Network Connectivity
For more information on SMART OPS PC modules, see SMART OPS PC module on page 16. NOTE Unlike with previous SMART Board interactive displays, the SMART Board 6000S and 6000S Pro interactive displays don’t require an AM30, AM40, or AM50 appliance in the accessory slot. The iQ experience is embedded on these interactive displays (see iQ experience on the previous page). -
Page 13: Convenience Panel
If the room is empty for a specified period, the display returns to an energy saving mode. NOTES For more information on energy saving modes, see the SMART Board 6000S and 6000S Pro series interactive displays installation and maintenance guide (smarttech.com/kb/171414). -
Page 14: Remote Control And Ir Sensor
Chapter 1 Welcome (smarttech.com/kb/171414) for more information. Remote control and IR sensor You can use the remote control to turn the display on and off, adjust display settings, and so on. The display’s IR sensor is located in the top-left corner of the display’s frame. For more information about the remote control, see Using the remote control on page 21. -
Page 15: Identifying Your Specific Model
Chapter 1 Welcome Identifying your specific model SMART offers a variety of models of the SMART Board 6000S and 6000S Pro series interactive display: Model Frame style Screen size iQ embedded SMART Notebook® (approximate) computing Player SBID-6265S-C White 65" SBID-6265S SBID-6275S-C White 75"... -
Page 16: Pen Accessory Kit
Chapter 1 Welcome Pen accessory kit Tool Explorer-enabled objects and manipulatives SMART OPS PC module Stands USB extenders NOTE For more information about these and other accessories, see smarttech.com/accessories. Pen accessory kit The pen accessory kit includes blue, green, purple, and orange pens and a holder that you can mount on the side of the display. -
Page 17: More Information
Chapter 1 Welcome NOTE Refer to an application’s specifications for information about its computer requirements. Stands If you want to move the display from place to place, you can install it on a SMART mobile stand. If you are installing the display on a wall that cannot support the display’s full weight, you can install the display on a SMART floor stand. -
Page 18: Chapter 2: Using Basic Features
Chapter 2 Using basic features Waking up the display and putting it back in to an energy saving mode Using the Home button Using the convenience panel Using the remote control Using touch Using the pens and erasers Writing and drawing in digital ink Using the SMART Ink dynamic (floating) toolbar Changing a pen’s default color, thickness, and other properties Erasing digital ink... -
Page 19: Using The Home Button
Chapter 2 Using basic features If the display is in Ready mode, you can turn it on in a number of ways: Press the Power button on the convenience panel. Tap the Home button below the screen. NOTE The Home button is illuminated when the display is in Ready mode. Press the Home button on the remote control. -
Page 20: Using The Convenience Panel
Chapter 2 Using basic features Using the convenience panel The convenience panel contains buttons for turning the display on and off, controlling the volume, freezing and unfreezing the screen, and showing and hiding a screen shade. It also includes connectors for USB peripherals and a computer or other input source. -
Page 21: Using The Remote Control
Chapter 2 Using basic features Name Procedure USB Type-C Connect a computer, mobile device, with a single connection for connector touch, video, and audio. Also connect any USB Type-C peripheral (such as memory sticks, keyboard, mice, etc.) to use with the display (see page 43). - Page 22 Chapter 2 Using basic features Name Procedure Press to wake the display or put it back in to an energy saving mode Power (see Waking up the display and putting it back in to an energy saving mode on page 18). Home Open the Home screen or the Input screen (see Using the Home button on page 19).
-
Page 23: Using Touch
Chapter 2 Using basic features Name Procedure Hide screen contents behind a screen shade (see Showing and Screen shade hiding the screen shade on page 28). Freeze and unfreeze the screen (see page 28). Freeze frame Volume increase Increase the volume (see Adjusting the volume on page 27). Volume decrease Decrease the volume (see Adjusting the volume on page 27). - Page 24 Chapter 2 Using basic features Pan (one finger) Pan (two fingers) / scroll Pinch to zoom in / scale (enlarge) Pinch to zoom out / scale (reduce) Rotate Flick smarttech.com/kb/171415...
-
Page 25: Using The Pens And Erasers
Chapter 2 Using basic features Erase with palm Erase with fist Using the pens and erasers The display comes with a black pen, a red pen, and two erasers. You can use the pens to write and draw in digital ink on the display, and you can use the erasers—or your palm or fist—to erase digital ink. The display has magnetic holders for the pens and erasers at the bottom of the display’s frame. -
Page 26: Using The Smart Ink Dynamic (Floating) Toolbar
Chapter 2 Using basic features To learn how to change a pen’s default behavior, see Changing a pen’s default color, thickness, and other properties below. Before writing or drawing over a video, an animation, or other moving images, freeze the screen (see Freezing the screen on page 28). -
Page 27: Adjusting The Volume
Chapter 2 Using basic features You can erase digital ink from the screen using an eraser or your palm or fist: Move a pen’s eraser over digital ink to erase. Move the eraser over digital ink to erase. Move your palm or fist over digital ink to erase. Adjusting the volume Use the buttons on the convenience panel or the remote control to increase, decrease, or mute the display’s volume. -
Page 28: Freezing Or Hiding The Screen
Chapter 2 Using basic features You can also mute the volume by pressing and holding the Volume Down button on the convenience panel or the remote control, until the screen slider reaches its lowest position. Freezing or hiding the screen You can temporarily freeze or hide the contents on the screen using the display’s freeze and screen shade features. -
Page 29: Using Additional Tools And Manipulatives
Using basic features Using additional tools and manipulatives The SMART Board 6000S or 6000S Pro series interactive display’s Tool Explorer platform enables you to use a range of different pens, objects, and manipulatives that are automatically recognized the moment they contact the display’s screen. -
Page 30: System Requirements And Smart Software Compatibility
Chapter 2 Using basic features System requirements and SMART software compatibility This table shows the version of iQ system software or SMART software required for each Tool Explorer tool. Tool iQ system software version SMART software installed on a connected computer SMART Product Drivers SMART Notebook... - Page 31 Chapter 2 Using basic features To use the magic pen to spotlight or magnify screen content 1. Pick up the magic pen. 2. Use the gesture end of the pen to draw a circle or rectangle around the portion of the screen you want to spotlight or magnify.
-
Page 32: Using The Highlighter Pen
Chapter 2 Using basic features Using the highlighter pen Use the highlighter pen to emphasize text in supported applications, such as the iQ whiteboard, SMART Notebook Player, and SMART Notebook desktop. NOTE For information about the iQ system software or SMART software version required for each Tool Explorer tool, see System requirements and SMART software compatibility on page 30. - Page 33 Chapter 2 Using basic features To insert an object using a Tool Explore cube 1. Pick up a cube. 2. Tap the cube face that features the image you want on the display’s screen. The image is inserted as an object. The inserted object can be made smaller by tapping a portion or corner of a cube's face on the screen.
-
Page 34: Using Tool Explorer Stamps
Chapter 2 Using basic features To delete an object 1. Tap the object. A selection rectangle appears around the object. 2. Press the object’s menu arrow, and then select Delete. Using Tool Explorer stamps Tool Explorer stamps feature a single shape, number, image, and more, that is inserted as an object when you tap the stamp's face on the display’s screen. - Page 35 Chapter 2 Using basic features To move, resize, rotate, or delete an object See To move, resize, and rotate an object on page 33 and To delete an object on the previous page. smarttech.com/kb/171415...
-
Page 36: Chapter 3: Using The Iq Apps
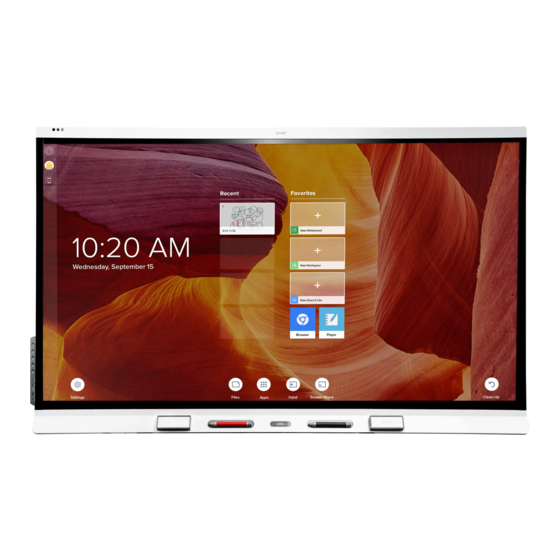
Chapter 3 Using the iQ apps The display comes with the following iQ apps: SMART Whiteboard Browser Input Screen Share kapp Whiteboard You can use these apps along with the Files Library and Apps Library to deliver lessons in a classroom or coordinate meetings and other collaborative activities. -
Page 37: Using The Files Library
Chapter 3 Using the iQ apps To show the temperature and humidity 1. From the Home screen, tap Apps Library 2. Tap SMART Sensors. Using the Files Library The Files Library contains kapp Whiteboard sessions, SMART Notebook files, SMART Whiteboards, PDFs, and screenshots. If a USB drive is connected to the display, the files on the USB drive are also available in the Files Library. -
Page 38: Using Input
Chapter 3 Using the iQ apps Screen Share supports: Chromebook™ laptops, using the Chrome™ browser Windows computers, using Miracast , Chrome browser, or AirParrot Mac computers and iOS devices, using AirPlay Android™ devices, using Cast Screen You can also download the SMART Screen Share app for Chromebooks, Windows computers, Mac computers, iOS devices, and Android devices. -
Page 39: Cleaning Up The Display
Chapter 3 Using the iQ apps Cleaning up the display After you’ve finished using the display, tap Clean Up on the Home screen to clean up the display for the next user. Tapping the Clean Up button does the following: Signs out of everything in the Browser app. -
Page 40: Chapter 4: Connecting Computers And Other Devices
Chapter 4 Connecting computers and other devices Installing and using SMART software Downloading and installing SMART software Using SMART software Connecting room computers and guest laptops Viewing a connected computer’s input Setting a connected computer’s resolution and refresh rate Using recommended cables Connecting USB drives, peripherals, and other devices Troubleshooting connected computers Connecting a SMART OPS PC module... - Page 41 Chapter 4 Connecting computers and other devices Software Description Notes SMART Product Drivers Software that enables the computer to detect Included with input from the display. SMART Learning Suite, SMART TeamWorks, and SMART Meeting Pro software SMART Ink Software that enables you to write and draw in Included with digital ink over applications, files, folders, SMART Learning Suite,...
- Page 42 Chapter 4 Connecting computers and other devices SMART Product Drivers and Ink are installed and used on the computer input of the display to enable touch and digital inking features. This supporting software is included with SMART’s software products, such as SMART Notebook, SMART Meeting Pro, and SMART TeamWorks, or is available for free download on...
-
Page 43: Connecting Room Computers And Guest Laptops
Chapter 4 Connecting computers and other devices Connecting room computers and guest laptops You can connect room computers and guest laptops to the display to view and interact with them. Connector panel Convenience panel SBID-6000S-C/SBID-6200S-C SBID-6000S-CPW/SBID-6200S-CPW All other models NOTES Install SMART software on computers you connect to the display (see Installing and using SMART software on page 40). - Page 44 Chapter 4 Connecting computers and other devices Your organization’s installers might have connected cables to the display and run the cables behind a wall or under the floor to a desk or table where you can place your computer. You can charge devices connected to the USB Type-C receptacle. The display can provide up to 60 W to connected devices.
- Page 45 Chapter 4 Connecting computers and other devices Input source Resolution Refresh rate 1920 × 1080 60 Hz USB Type-C 3840 × 2160 60 Hz If possible, set connected computers to these resolutions and refresh rates. See the computers’ operating system documentation for instructions. Using recommended cables SMART recommends the following varieties of cable: Cable type Maximum length...
-
Page 46: Connecting A Smart Ops Pc Module
Chapter 4 Connecting computers and other devices Using cables that exceed these maximum lengths may produce unexpected results, degraded picture quality or degraded USB connectivity. Connecting USB drives, peripherals, and other devices You can use USB drives, peripherals, and other devices with a computer connected to the display using the display’s USB plugs. - Page 47 Chapter 4 Connecting computers and other devices All other models SBID-6000S-C/SBID-6200S-C SBID-6000S-CPW/SBID-6200S-CPW smarttech.com/kb/171415...
- Page 48 Chapter 5 Troubleshooting The display isn’t turning on The display is turning on when it shouldn’t The screen is blank or there’s a problem with the image on the screen There’s no sound or there’s a problem with the sound Touch isn’t working as expected The pens and erasers aren’t working as expected iQ apps aren’t working as expected...
-
Page 49: Chapter 5 Troubleshooting
Chapter 5 Troubleshooting The display isn’t turning on Symptom Troubleshooting steps The power light isn’t lit. Make sure the power cable is securely fastened to the power outlet and the display. NOTE If the power cable is connected to a power bar, make sure the power bar is securely fastened to the power outlet and turned on. -
Page 50: The Screen Is Blank Or There's A Problem With The Image On The Screen
Chapter 5 Troubleshooting The screen is blank or there’s a problem with the image on the screen Symptom Troubleshooting steps The screen is blank. Make sure the screen is working by tapping the Home button below the screen or pressing the Home button on the remote control to open the Home screen. - Page 51 Chapter 5 Troubleshooting Symptom Troubleshooting steps Colors don’t appear correctly. Be aware that if two or more displays are mounted side-by-side, there could be minor differences in colors across the displays. This issue is not unique to SMART products. If the screen is completely lacking one color on the screen or the color problems occur on the Home screen, see Contacting your reseller for additional support on page 54.
-
Page 52: There's No Sound Or There's A Problem With The Sound
Connecting an audio cable to the display’s stereo 3.5 mm out connector disables the internal speakers. If you’re using the display’s S/PDIF out connector to connect a sound bar or receiver for external speakers, see the SMART Board 6000S series interactive displays installation and maintenance guide (smarttech.com/kb/171414). -
Page 53: The Pens And Erasers Aren't Working As Expected
Chapter 5 Troubleshooting Symptom Troubleshooting steps The display responds to touch Restart the display. intermittently. Make sure SMART Product Drivers and SMART Ink are installed and running on any connected computers. When you touch the screen, the Confirm with the installers that the computer is connected to the display with only a pointer doesn’t appear in the correct single cable. -
Page 54: Iq Apps Aren't Working As Expected
Chapter 5 Troubleshooting iQ apps aren’t working as expected Symptom Troubleshooting steps iQ apps aren’t working as expected. Troubleshooting the iQ experience. SMART software on connected computers isn’t working as expected Symptom Troubleshooting steps SMART Notebook software isn’t Troubleshooting SMART Notebook. working as expected. Lumio isn’t working as expected. - Page 55 Chapter 5 Troubleshooting Your reseller might ask you for the serial number for the display. The serial number is on a label located on the left side of the display (pictured). TIPS Scan the QR code on the label to view the SMART Board 6000S or 6000S Pro series interactive display support pages on the SMART website.
- Page 56 SMART TECHNOLOGIES smarttech.com/support smarttech.com/contactsupport smarttech.com/kb/171415...
Need help?
Do you have a question about the 6000S Series and is the answer not in the manual?
Questions and answers