Table of Contents
Advertisement
Quick Links
Battery Backup
Garage Door Openers
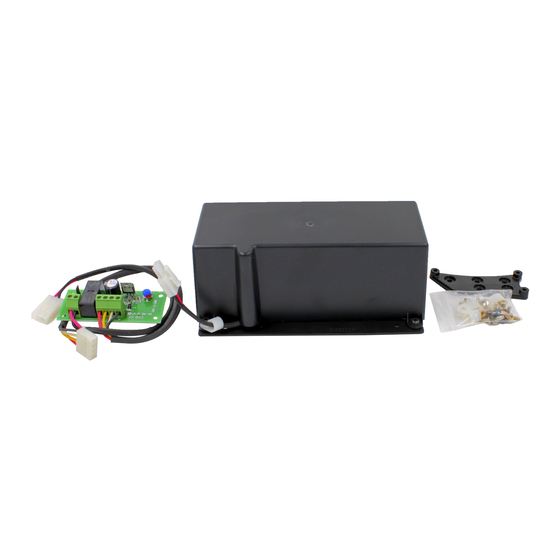
BATTERY BACKUP KIT 2.3Ah V-06 - SAP# NO. 62737
ITEM
DESCRIPTION
1
BATTERIES COVER
2
BATTERIES SUPPORT
3
BATTERY 12V SEC 12-2.2 AGM TYPE
4
BATTERY COUPLING WIRE - ESV24
5
BATTERY HARNESS
6
PAN HEAD SCREW W/WASHER M4x8
7
CABLE CLAMP ACC-1.5 (3/16")
8
CHARGER BOARD SBC-02
9
SBC-02 CHARGER HARNESS
10
SBY-2 BATTERY HARNESS
PACK #1 (SECTIONAL DOOR OPENERS)
11
HEX STANDOFF M4
12
PAN HEAD SCREW W/WASHER M4x8
13
THRUSS SER HD SCREW "S" RoHS M4x8
14
TAPTITE SCREW "P" M4 X 8
15
PCB SUPPORT 76X27
PACK #2 (ROLLER DOOR OPENERS)
16
TAPTITE SCREW "P" M4x8
17
TAPTITE SCREW "P" M4x10
18
CABLE CLAMP ACC-1.5 (3/16")
Commerical Door Openers
BATTERY BACKUP KIT GDO-12 - SAP# NO. 86408
ITEM
DESCRIPTION
30
BATTERY 12PCA1.3 - 12V1.3AH
31
BATTERY COUPLING WIRE - F1
32
BATTERY HARNESS
OPTIONAL PACK 1# (WALL MOUNT) - SAP# NO. 86774
33
TAPTITE SCREW "P" M3.5 X 8
34
PLASTIC WALL PLUG
35
BATTERY HARNESS EXTENSION
Doc # 160018_04
Part # 13403
Released 20/11/18
2.3 Ah V-06 Installation Instructions
QTY
1
1
2
1
1
2
1
1
1
1
2
4
2
3
1
4
2
1
QTY
2
1
1
2
2
1
Gen 2
Swing Gate Openers
BATTERY BACKUP KIT SBC-02 - SAP# NO. MC0090
ITEM
DESCRIPTION
19
BATTERY CHARGER BOX ASSEMBLY
20
CHARGER ASSY SBC-02
ACCESSORY PACK
21
TIE MOUNT CM-13 (ADHIESIVE)
22
CABLE TIE 4" GT-100M
23
BRACKETS GE 44 621
24
SCREW "P" M3.5 X 13 FOR GW 44 621
Sliding Gate Openers
BATTERY BACKUP KIT ESV24V2 - SAP# NO. 69767
ITEM
DESCRIPTION
25
BATTERY CP1223H 12V 2.3H
26
CHARGER ASSY SBC-02
27
BATTERY COUPLING WIRE - ESV24
28
BATTERY HARNESS
29
TAPTITE SCREW "P" M3 X 8
Kit
QTY
1
1
4
4
4
4
QTY
2
1
1
1
4
Advertisement
Table of Contents

Subscribe to Our Youtube Channel
Related Manuals for B&D Automatic Technology Battery Backup Gen 2 Kit


Summary of Contents for B&D Automatic Technology Battery Backup Gen 2 Kit
- Page 1 Battery Backup Gen 2 2.3 Ah V-06 Installation Instructions Garage Door Openers Swing Gate Openers BATTERY BACKUP KIT 2.3Ah V-06 - SAP# NO. 62737 BATTERY BACKUP KIT SBC-02 - SAP# NO. MC0090 ITEM DESCRIPTION ITEM DESCRIPTION BATTERIES COVER BATTERY CHARGER BOX ASSEMBLY BATTERIES SUPPORT CHARGER ASSY SBC-02 BATTERY 12V SEC 12-2.2 AGM TYPE...
-
Page 2: Important Safety Instructions
Important Safety Instructions WARNING! • DO NOT short the output of batteries. Serious personal injury and/or property damage can result from failure to follow this warning • During charging and discharging cycles the lead-acid batteries may release explosive gases. Ensure that the area around the batteries is well ventilated •... - Page 3 Overhead Door Opener Set Up GDO-9V2 GEN2 Enduro, GDO-9V3 GEN2 Dynamo, SDO-2V2 CAD P Diamond, SDO-2V2 CAD Advance, SDO-2V3 CAD Prodigy & SDO-3V2 CAD S SDO-2V3 Prodigy: The Charger board is already installed with the unit. Please proceed to Mount & Connect the Battery. Mount the Charger Board a.
- Page 4 Roll Up Door Opener Set Up GDO-6V4 EasyRoller , RDO-1V3 & RDO-1V4 ® SBC-02 RDO-1V4: Mount the Charger Board The Charger board is already installed with the unit. Remove the a. Unplug the drive unit from mains power. timing cover then proceed to step (e) to remove breakaway slot. b.
- Page 5 Commercial Door Opener Set Up GDO-12V1 Hiro Opener Mounted Wall Mounted Mount & Connect the Battery Openers Mounted a. Mount battery backup kit onto support chassis by sliding down over the slots. WARNING: After Step (b) the opener may become active (even when power is off). This is a result of a residual charge in the batteries.
- Page 6 Swing Gate Opener Set Up DCB-05V2 WARNING! Do not connect the batteries until you have connected wiring on the charger board. Mount the Charger Board a. Unplug the Control Box from mains power. b. Remove the Control Box’s cover. c. Secure the adhesive mounts to the Charger Board with cable ties .
- Page 7 Sliding Gate Opener Set Up NeoSlider V2, NeoSlider Mount the Charger Board a. Unplug the drive unit from mains power. b. Remove the main cover and unscrew the lid from the cover. c. Mount the Charger Board inside the cover using four (4) M3x8 screws d.
-
Page 8: Troubleshooting
Troubleshooting Symptom Possible cause Remedy Door stops or moves very slowly Batteries may be weak or have Connect mains power and allow the batteries under battery power no charge to charge. This may take 24 - 48 hours to reach maximum charge capacity.
Need help?
Do you have a question about the Automatic Technology Battery Backup Gen 2 Kit and is the answer not in the manual?
Questions and answers