Table of Contents
Advertisement
Advertisement
Table of Contents

Related Manuals for PR Lighting XR480 BWS


Summary of Contents for PR Lighting XR480 BWS
- Page 1 XR480 BWS PR-2493 The user manual contains important information about the safe installation and use of a projector. Please read and follow these instructions carefully and keep the manual in a safe place for future reference. PR LIGHTING LTD. http://www.pr-light ing.com...
-
Page 2: Table Of Contents
/ or dealer. Note: For the products made by Guangzhou PR lighting Ltd, the warranty for the whole product is one year starting from the delivery date but the light source is not within the warranty. -
Page 3: Safety And Warnings
1. SAFETY AND WARNINGS NOTE Before a projector’s installation, power-on, operation and maintenance, please carefully read the safety information hereinafter! The following safety signs are used in the user manual. Warning User Electrical Protective Flames High Goggles Manual shock Gloves Temperature When unpacking , check if there is transportation damage before using the projector. -
Page 4: Cleaning And Maintenance
cord supplied through the safety cord holes for safety support. Before any installation, maintenance and cleaning work, please ensure the projector is disconnected from ● power mains. After running for 30minutes, the temperature of the housing of the projector is 45 ℃.After stable operation , ●... -
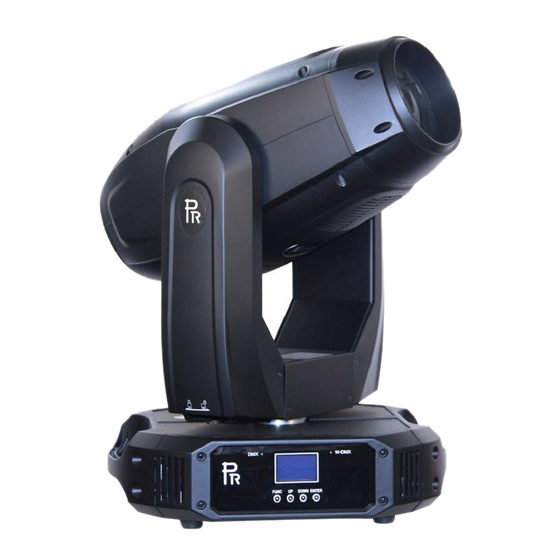
Page 5: Appearance
3. APPEARANCE 1. Front Lens 2. Lens Cover 3. Head Cover 4. Tilt Lock 5. Handle 6. Arm Cover 7. Pan Lock While transportation, the head should be locked-Tilt Lock(4) and Pan Lock(6) should be at locking positions. Before the use of the projector, unlock both. Rear Panel of the Base 1. -
Page 6: Power Connections
Warning please run the safety cord Clamp through the two holes for safety Safety cord Handle Control menu Take 2 clamps and the safety cord out from the package and mount 2 clamps on the underside of fixture with 2 retainers attached to each clamp. -
Page 7: Dmx Control Connections
DMX CONTROL CONNECTION: ● Connection between controller and projector and between one projector and another must be made with a twin-screened cable, with each wire having at least a 0.5mm in diameter. Connection to and from the projector is via cannon 5 pin (which are included with the projector) or 5 pin XLR plugs and sockets. -
Page 8: Alignment/Installation/Replacement Of A Lamp
ALIGNMENT/INSTALLATION/REPLACEMENT OF A LAMP ● Lock the yoke before fitting/replacingthe lamp. Just as Shown by Figure 1, after Opening the cover at the rear of the projector by loosening 8 fastfit screws, you can open the head. To adjust the lamp as per Figure 2. Take out the lamp as per the figure 3. Before lamp installation, tighten its power wires well. - Page 9 Figure3 : Removal of lamp 2.Remove the cover after its 4 screws are 1.Loosen a tightening screw at the lamp's side loosened by a cross screwdriver 2. Remove the lamp's two wires and push it obliquely for the removal. 4.Connect the lamp wires after a new lamp is in place, and align and tighten the lamp as per figure2 GOBO REPLACEMENT ●...
-
Page 10: Setup And Configuration
5. SETUP AND CONFIGURATION FRONT PANEL OPERATION ● The projector configuration can be set conveniently via push buttons and color touch screen. To browse through or change the projector ’s settings, touch the white area of the touch screen or press OK button for more than 3s(Only powered by the battery, pressing the OK button) to unlock the screen , then press ►... -
Page 11: Stand-Alone Mode
Press “Enter” for the menu of Un-link Wireless under the upper level menu of Config Settigns , then the fixture is unlinked with the wireless transmitter. STAND-ALONE MODE ● Operate the projector without connecting with a controller, enable the master mode through the operation panel, the projector will run in Stand-Alone mode automatically. - Page 12 Extended Mode Ch.01 Strobe Ch.02 Dimmer Ch. 03 Dimmer Fine Ch.04 CYM Macro Ch.05 Cyan Ch.06 Yellow Ch.07 Magenta Ch.08 Color Wheel Ch.09 color Wheel Fine Config Settings Ch.10 Fixed Gobo Wheel Ch.11 Rot. Gobo Wheel1 Ch.12 Rot. Gobo1 Rotation Ch.13 Rot.
- Page 13 Invert Auto English\Chinese Language Setting Touch Calibration Celsius Degree Temperature Unit Fahrenheit Degree Un-Link Wireless (Wireless Control is only Really Un-Link? for the fixture with wireless Confirm or Cancel receiver module) Restore Defaults? Defaults Confirm or Cancel Pan DMX Invert OFF/ ON Tilt DMX Invert OFF/ ON...
- Page 14 Pan/Tilt Speed & Time XXX Power/Special Fun. XXX XXX H Lamp Hours Reset Lamp Hours ×××× Total Hours ×××C Display Board= ×××C Pan & Tilt board ×××C Driver Board1 Temperature ×××C Driver Board 2 ×××C Driver Board 3 ×××C Head Sensor= Sys Boot Display Board xxx xxx xxx xxx...
- Page 15 Tilt XXX Tilt Fine XXX Pan & Tilt Speed &Time … Position Calibrations Fixture Type Change Operation Mode? DMX Mode Confirm or Cancel Change Operation Mode? Preset Memory Confirm or Cancel Change Operation Mode? User Memory 1 Master Mode Confirm or Cancel Change Operation Mode? User Memory 2 Confirm or Cancel...
-
Page 16: Dmx Protocol
Delay Time XXX Delay Unit XXX Link to Step XXX Strobe XXX Dimmer XXX Dimmer Fine XXX CYM Macro XXX Cyan XXX Cyan Fine XXX Yellow XXX Edit Static Scene Yellow Fine XXX Magenta XXX Magenta Fine XXX Color Wheel XXX Color Wheel Fine XXX Fixed Gobo Wheel XXX Rot. - Page 17 Yellow 036-054 Yellow +Cyan=Green 055-073 Cyan 074-092 Cyan + Magenta= Violet 093-111 112-130 Magenta 131-255 CYM color mixing from slow to fast Cyan Cyan (linear 0~100%) 000-255 Cyan Fine Cyan in 16 Bit 000-255 Yellow Yellow (linear 0~100%) 000-255 Yellow Fine Yellow in 16 Bit 000-255 Magenta...
- Page 18 196-205 Shake effect 4 from slow to fast 206-215 Shake effect 5 from slow to fast 216-225 Shake effect 6 from slow to fast 226-235 Shake effect 7 from slow to fast 236-245 Shake effect 8 from slow to fast 246-255 Shake effect 9 from slow to fast 000-012...
- Page 19 129-191 Rotation(Clockwise from slow to fast) Stop 193-255 Rotation(Anti- Clockwise from slow to fast) 0-255 Frost Linear Frost 000-010 011-020 Effect Wheel Effect Wheel In 21-255 Effect Wheel rotation from slow to fast 000-255 Focus Linear Focus 000-255 Focus Fine Focus in 16 bit precision 000-255 Zoom...
-
Page 20: Logos
8. Logos Option Settings Lamp Control Information Chinese/English Service Error Messages Operation Mode Address User Memories Reset Config Settings 9.Error messages The system can detect some errors during the reset, if displayed, touch to view the error. The error messages are as follows: Name Type Correction... - Page 21 Driver Board 1 Error Check signal wire Driver Board2 Error Check signal wire Driver Board 3 Error Check signal wire Acceleration Sensor Error Check signal wire Lamp on Timeout Check if he lamp is damaged Lamp Life Timeout Warning Lamp Off[Fan Error Check if all fans are normal...
-
Page 22: Technical Data
10. TECHNICAL DATA INPUT VOLTAGES: 100V~240V AC,50/60Hz RATED POWER :680W@220V LAMP SPECIFICATIONS: 480W Lamp Color Temperature 7000K Manufacturers Rated Lamp Life 1500hours COLORS 1 Color wheel: 13colors(plus 1CTO)+ Open, rainbow effect with bi-directional and variable speeds, Stepping/linear color changing Wave Code No. - Page 23 CMY COLOR MIXING SYSTEM CMY linear color mixing with macros FIXED GOBO WHEEL 1 Fixed gobo wheel: 10 gobos +open+ animation effect Bi-directionally rotatable, and shakable at variable speeds, 2channels to control gobos and shift between animation effects. Gobo1 Gobo 2 Gobo 3 Gobo 4 Gobo 5...
- Page 24 INDEPENDENT DIFFUSER: 1Pcs of independent diffuser Optional even beam mode FROST FILTER: 1Pc frost filter FOCUS: DMX linear Focus ZOOM: DMX linear Zoom DIMMER/STROBE: 0-100% Linearly adjustable/ Double shutter blades, 0.3~25 F.P.S HEAD MOVEMENT: Pan 540º, Tilt 270º with auto position correction BEAM ANGLE: Beam Mode: 2.3°-- 10°, Linear Adjustment...
- Page 25 OPERATION TEMPERATURE: Maximum ambient temperature: 45°C SIZES: LIGHT OUTPUT: 25/30...
- Page 26 26/30...
-
Page 27: Circuit Diagram And Pcb Connections
11. CIRCUIT DIAGRAM AND PCB CONNECTIONS CIRCUIT DIAGRAM ● 27/30... -
Page 28: Pcb Connections
PCB CONNECTIONS ● 1.6-Channel SLAVE1 :P/N230060430 8 Channel Driver Board 1 M1-1 Motor 24V Input M1-2 Motor Reserved M1-3 Motor Reserved M1-4 Motor HALL1-6Magnet Sensor M1-5 Motor HALL1-5 Magnet Sensor M1-6 Motor HALL1-4 Magnet Sensor Reserved HALL1-3 Magnet Sensor Reserved HALL1-2 Magnet Sensor Reserved HALL1-1 Magnet Sensor... -
Page 29: Component Order Codes
12. COMPONENT ORDER CODES NAME PART NO. QUANTITY REMARK 030040233A PAN MOTOR 030040233A TILT MOTOR 030040121 DIMMER/STROBE MOTORS 030040114A CYM MOTOR 030040213A ROTATING GOBO WHEEL MOTOR 030040224A FIXED GOBO MOTOR 030040214 COLOR WHEEL MOTOR 030040214 DIFFUSER MOTOR 030040224A GOBO ROTATION MOTOR 030040213A FOCUS MOTOR 030040221A... - Page 30 1582 Xingye Avenue, Nancun Panyu Guangzhou, 511442 China TEL: +86-20-3995 2888 PR lighting will try its best to offer accurate and overall information about a product’s technical data. Any changes won’t be notified if necessary. Patented Products. Counterfeiting Will be Prosecuted! P/N: 320020367...
Need help?
Do you have a question about the XR480 BWS and is the answer not in the manual?
Questions and answers