Table of Contents
Advertisement
Quick Links
Advertisement
Table of Contents

Related Manuals for Simons Voss Technologies SmartHandle AX


Summary of Contents for Simons Voss Technologies SmartHandle AX
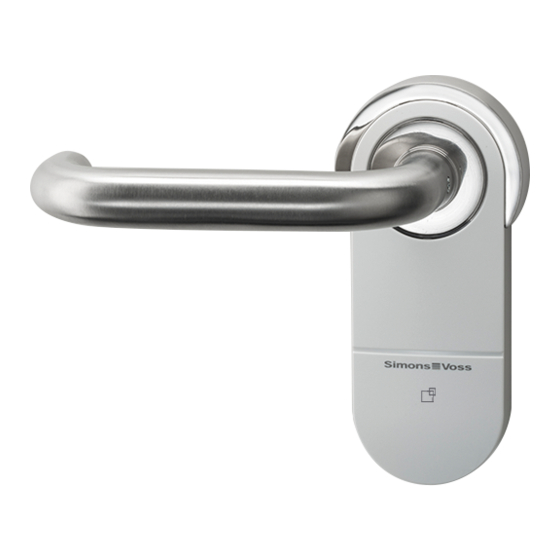
- Page 1 SmartHandle AX Manual 11.11.2019...
-
Page 2: Table Of Contents
Content SmartHandle AX (Manual) 2 / 59 Content Intended use .............................. 4 General ................................ 5 General safety instructions........................ 7 Product-specific safety instructions.................... 11 Installation .............................. 12 Installation instructions.......................... 12 Variant A0................................ 12 5.2.1 Contents of packaging........................ 12 5.2.2 Tools.............................. 13 5.2.3 Procedure............................ 13 Variant A1 ................................ 17 5.3.1... - Page 3 Content SmartHandle AX (Manual) 3 / 59 7.11 Extended configuration.......................... 36 7.11.1 Time-controlled changeover.................... 36 7.11.2 Turn off LED/beeper........................ 37 Operation.............................. 39 Status messages............................. 40 Battery status feedback .......................... 40 Emergency release............................ 40 Deactivated .............................. 40 Engaged................................ 40 Signal ................................ 41 Battery warning ............................ 42 11.1...
-
Page 4: Intended Use
1 Intended use Products in the SmartHandle AX range consist of electronic door fittings. Users can engage the SmartHandle AX and open the door onto which it is fitted with an authorised ID medium, such as a transponder. The corresponding authorisations need to be issued using an electronic locking plan. -
Page 5: General
SmartHandle AX (Manual) 5 / 59 2 General SmartHandle AX is an electronic door handle which can be used to open and close doors. Electronic door handles in this range are available in the following models: Electronic SmartHandle AX Description Electronic door handle to mount on ... - Page 6 2. General SmartHandle AX (Manual) 6 / 59 Electronic SmartHandle AX Description Electronic door handle to mount on existing drill holes for Scandinavian Oval Variant E0 Suitable for a lock centres distance of 105 mm Suitable for handle locks with ...
-
Page 7: General Safety Instructions
3. General safety instructions SmartHandle AX (Manual) 7 / 59 3 General safety instructions Possible immediate effects of non- Signal word (ANSI Z535.6) compliance DANGER Death or serious injury (likely) Death or serious injury (possible, but WARNING unlikely) CAUTION Minor injury... - Page 8 3. General safety instructions SmartHandle AX (Manual) 8 / 59 IMPORTANT Damage resulting from electrostatic discharge (ESD) This product contains electronic components that may be damaged by electrostatic discharges. 1. Use ESD-compliant working materials (e.g. Grounding strap). 2. Ground yourself before carrying out any work that could bring you into contact with the electronics.
- Page 9 3. General safety instructions SmartHandle AX (Manual) 9 / 59 IMPORTANT Failure of operation due to different discharged batteries This product uses one or more batteries for power supply. The batteries are discharged at approximately the same rate. Always replace all batteries at the same time.
- Page 10 3. General safety instructions SmartHandle AX (Manual) 10 / 59 NOTE Dispose of the batteries as per local and country-specific regulations. NOTE Function error due to poor battery contact If the contact surface to the battery is too small, then the battery connec- tion may not create a stable connection to the battery.
-
Page 11: Product-Specific Safety Instructions
Use only the supplied SimonsVoss opening tool. NOTE Effect on the mortise lock The SmartHandle AX acts exclusively on the latch of the mortise lock. NOTE Locking and insurances Insurance companies place increased demands on a closure. 1. If you want to lock the door under insurance law, use a self-locking panic lock or a locking cylinder in addition to the SmartHandle AX. -
Page 12: Installation
(Manual) 12 / 59 5 Installation You can programme the SmartHandle AX while it is still in the packaging (except MP) and then install it. You will also find information on installing the SmartHandle AX in the accompanying quick guide. -
Page 13: Tools
5. Installation SmartHandle AX (Manual) 13 / 59 Quantity Object 2× Adapter sleeve 6.4 mm 2× Adapter sleeve 7.4 mm 2× Adapter sleeve 8.8 mm 1× Spindle 1× Installation tool 1× Dummy cylinder (FH variant only) 1× Quick guide 1× Drilling template 5.2.2 Tools... - Page 14 Locking device added in LSM software. ü ü LSM software launched. Programming device connected. ü 1. Position the programming device. 2. Programme the SmartHandle AX (see , quick guide or LSM manual for details). SmartHandle AX is programmed. Trim screws Screw/spindle Length 2× L1 T - 8 mm (± 3 mm)
- Page 15 5. Installation SmartHandle AX (Manual) 15 / 59 1. Insert the switching plate as shown. 2. Position the spring sub-assembly at an angle to the escutcheon base until it touches the switching plate. 3. Draw the spring sub-assembly back, so that the spring is compressed.
- Page 16 The sub-assembly is mounted. Position outer handle 1. Push the outer handle into the sub-assembly until the pin locks into the spindle. 2. Fasten the grub screw into the handle to affix it. SmartHandle AX fitted.
-
Page 17: Variant A1
5. Installation SmartHandle AX (Manual) 17 / 59 5.3 Variant A1 5.3.1 Contents of packaging Quantity Object Outer fitting assembly, including: 1× 4× Battery (CR2450) 1× Inlay Outside handle, including: 1× 1× Grub screw Inner handle, including: 1× Grub screw 1×... - Page 18 Locking device added in LSM software. ü ü LSM software launched. Programming device connected. ü 1. Position the programming device. 2. Programme the SmartHandle AX (see , quick guide or LSM manual for details). SmartHandle AX is programmed. Trim screws Screw/spindle Length 2× L1 T - 8 mm (± 3 mm)
- Page 19 5. Installation SmartHandle AX (Manual) 19 / 59 NOTE X variant If you have ordered the X version for very thick doors, your supply package will include an extra-long spindle bar and threaded rods in addition to ex- tension sleeves. The indicated length in this case refers to the extension with a threaded rod.
- Page 20 5. Installation SmartHandle AX (Manual) 20 / 59 Insert spindle NOTE If you use a 7 mm spindle, attach the adapter shoe to the spindle before fit- ting the spindle. Insert the spindle into the outer sub-assembly until the pin locks into the ...
-
Page 21: Glass Door Fitting
2. Fasten the grub screw into the handle to affix it. SmartHandle AX fitted. 5.3.4 Glass door fitting You can also use an A1 SmartHandle AX design with an optional lock case on glass doors. The glass door must feature the following holes for SimonsVoss glass door fittings (dimensions in mm): 5.4 Variant A2... -
Page 22: Tools
5. Installation SmartHandle AX (Manual) 22 / 59 Quantity Object Inner handle, including: 1× Grub screw 1× Pre-installed escutcheon 1× base 1× Switching plate 1× Spring element 1× Escutcheon base for cylinder opening 1× Escutcheon for inner handle 1× Escutcheon for cylinder opening 4×... - Page 23 Locking device added in LSM software. ü LSM software launched. Programming device connected. ü 1. Position the programming device. 2. Programme the SmartHandle AX (see , quick guide or LSM manual for details). SmartHandle AX is programmed. Trim screws Screw/spindle Length 2×...
- Page 24 5. Installation SmartHandle AX (Manual) 24 / 59 NOTE X variant If you have ordered the X version for very thick doors, your supply package will include an extra-long spindle bar and threaded rods in addition to ex- tension sleeves. The indicated length in this case refers to the extension with a threaded rod.
- Page 25 5. Installation SmartHandle AX (Manual) 25 / 59 Insert spindle NOTE If you use a 7 mm spindle, attach the adapter shoe to the spindle before fit- ting the spindle. Insert the spindle into the outer sub-assembly until the pin locks into the ...
-
Page 26: Variants E0 And E1
Position outer handle 1. Push the outer handle into the sub-assembly until the pin locks into the spindle. 2. Fasten the grub screw into the handle to affix it. SmartHandle AX fitted. 5.5 Variants E0 AND E1 5.5.1 Contents of packaging Quantity... -
Page 27: Procedure
Locking device added in LSM software. ü ü LSM software launched. Programming device connected. ü 1. Position the programming device. 2. Programme the SmartHandle AX (see , quick guide or LSM manual for details). SmartHandle AX is programmed. Trim screws Screw/spindle Length 2× L1 T + 10 mm (± 3 mm) - Page 28 5. Installation SmartHandle AX (Manual) 28 / 59 2. Calculate the screw lengths. 3. Select suitable predetermined breaking points which are no more than 3 mm longer than the calculated length. 4. Separate the predetermined breaking points with the pliers. Screws are trimmed.
- Page 29 5. Installation SmartHandle AX (Manual) 29 / 59 5. Press the rear clip into the designated pawl. Spring contact is inserted. Reposition bolts (for DIN R only) 1. Undo the indicated screws. 2. Remove the cover plate. 3. Unscrew the stud bolts.
- Page 30 The sub-assembly is mounted. Position outer handle 1. Push the outer handle into the sub-assembly until the pin locks into the spindle. 2. Fasten the grub screw into the handle to affix it. SmartHandle AX fitted.
-
Page 31: Programming
A large volume of data is transmitted during initial programming. You can transfer data significantly faster and reduce the programming time if you use a Smart CD.MP. 12. Right-click on the SmartHandle AX entry in the matrix to open the con- text menu. 13. Select the Programming item. -
Page 32: Configuration
Time Identification medium ID Each SmartHandle AX can store up to 3,000 bookings. NOTE These settings are only available in the .ZK version. LSM open. ü 1. Double-click on the SmartHandle AX entry in the matrix to open the settings. -
Page 33: Logging Unauthorised Attempted Access Events
7. Configuration SmartHandle AX (Manual) 33 / 59 NOTE These settings are only available in the .ZK version. LSM open. ü Add time zone plan (see LSM manual). ü 1. Double-click on the SmartHandle AX entry in the matrix to open the settings. -
Page 34: Close Range Mode
7. Configuration SmartHandle AX (Manual) 34 / 59 activated using a transponder/SmartCard. This mode is suitable for situations such as when a door needs to be used freely without a transponder/SmartCard to allow visitors to enter, for instance 7.6 Close range mode A reduced reader range is required in some situations. - Page 35 7. Configuration SmartHandle AX (Manual) 35 / 59 Activating time zone control and time change-over Whereas time zone control itself can only influence identification media authorisations, the time change-over also activates time-dependent switching of the relay in the controller. Both need to be enabled.
-
Page 36: Ignore Activation Or Expiry Date
7. Configuration SmartHandle AX (Manual) 36 / 59 7.8 Ignore activation or expiry date Identification media can be given a validity date. This validity date can be ignored if identification media need to be used regardless. ü LSM open. 1. Double-click on the SmartHandle AX entry in the matrix to open the settings. - Page 37 7. Configuration SmartHandle AX (Manual) 37 / 59 Unlock in the authorised time period SmartHandle AX: SmartHandle AX: engages to open engages to open SmartHandle AX: SmartHandle AX: as soon as identi- as soon as identi- engages to open engages to open...
-
Page 38: Turn Off Led/Beeper
7. Configuration SmartHandle AX (Manual) 38 / 59 Turn off LED/beeper ü LSM open. "Extended configuration" window open. ü 1. Enable the Turn off LED checkbox or the Turn off beeper check- box. 2. Click on the OK button. Window closes. -
Page 39: Operation
SmartHandle AX (Manual) 39 / 59 8 Operation The SmartHandle AX can be operated in different ways, depending on the programming. NOTE The size of the gap affects the wireless connection. 1. If you use a transponder, you must position it between five and thirty centimetres away. -
Page 40: Status Messages
9. Status messages SmartHandle AX (Manual) 40 / 59 9 Status messages 9.1 Battery status feedback Batteries OK. You do not need to do anything. Batteries low. Change the batteries. Batteries very low. Replace the bat- Very low teries immediately. -
Page 41: Signal
10. Signal SmartHandle AX (Manual) 41 / 59 10 Signal Signal Meaning 2x short before engaging to open Identification medium accepted – (green) normal activation 1 x short (red) Identification medium not authorised Flip-flop mode: Locking device is 1× short, 1× long (green) -
Page 42: Battery Warning
11. Battery warning SmartHandle AX (Manual) 42 / 59 11 Battery warning You or users are warned that the SmartHandle AX is about to fail due to Battery empty batteries. Replace the batteries in good time (see replacement [ 43] ). -
Page 43: Battery Replacement
12.2 Procedure The batteries are located at the SmartHandle AX under the cover. You need the SimonsVoss fitting tool to change the batteries. 1. Place the SimonsVoss fitting tool in the recess provided for it in the cover. - Page 44 8. Push the end of the battery clip back in again. 9. Push the end of the battery clip down. 10. Push the end of the battery clip into the bracket provided. 11. Repeat with the other side. 12. Push the cover back on the SmartHandle AX.
- Page 45 12. Battery replacement SmartHandle AX (Manual) 45 / 59 13. Push the cover firmly in the area of the recesses for the fitting tool again until it engages. 14. Read off the battery status (see LSM Handbook). 15. Read off the battery status (Battery card, see TechGuide WO/VCN).
-
Page 46: Maintenance, Cleaning And Disinfection
13. Maintenance, cleaning and disinfec- tion SmartHandle AX (Manual) 46 / 59 13 Maintenance, cleaning and disinfection NOTE Digital SmartHandles MUST not come into contact with oil, grease, paint or acids. NOTE SmartHandles can be damaged if you use unsuitable or aggressive clean- ing agents or disinfectants. -
Page 47: Disassembly
5. Pull off the handle from the opposite side to the sub-assembly. 6. Unfasten the sub-assembly attachment screws. 7. Pull out the sub-assembly with the spindle. SmartHandle AX has been removed from the door. 8. Press the spindle securing pin inwards and pull the spindle out of the sub-assembly. -
Page 48: Variant A2
(Manual) 48 / 59 7. Pull out the sub-assembly with the spindle. SmartHandle AX has been removed from the door. 8. Press the spindle securing pin inwards and pull the spindle out of the sub-assembly. 9. Insert the hex key into the designated hole in the spindle hole. - Page 49 5. Pull off the handle from the opposite side to the sub-assembly. 6. Unfasten the sub-assembly attachment screws. 7. Pull out the sub-assembly with the spindle. SmartHandle AX has been removed from the door. 8. Press the spindle securing pin inwards and pull the spindle out of the sub-assembly.
-
Page 50: Technical Specifications
15. Technical specifications SmartHandle AX (Manual) 50 / 59 15 Technical specifications Euro Profile cylinder Types Scandinavian Oval Active Read systems Passive Active 5 cm to 30 cm Read ranges Passive Near field Dimensions 120 mm Height 140 mm... - Page 51 15. Technical specifications SmartHandle AX (Manual) 51 / 59 Protection rating IP40 Feedback Audible (beeper) Signal Visual (two-colour LED) Administration and settings Loggable access events Max. 1500 Time zone groups 100+1 Max. transponders per SH AX Max. 64000 Max.
- Page 52 15. Technical specifications SmartHandle AX (Manual) 52 / 59 Fig. 9: Size of suspended SmartHandle.AX (A1, A2)
- Page 53 15. Technical specifications SmartHandle AX (Manual) 53 / 59 NOTE Height depends on the variant (see table).
- Page 54 15. Technical specifications SmartHandle AX (Manual) 54 / 59 Fig. 10: Size of stationary SmartHandle.AX (A0)
- Page 55 15. Technical specifications SmartHandle AX (Manual) 55 / 59 Fig. 11: Size of Scandinavian Oval SmartHandle (E0, E1)
-
Page 56: Declaration Of Conformity
16. Declaration of conformity SmartHandle AX (Manual) 56 / 59 16 Declaration of conformity The company SimonsVoss Technologies GmbH hereby declares that article SmartHandle AX complies with the following guidelines: 2014/53/EU "Radio equipment" 2014/30/EU "EMC" 2011/65/EU "RoHS" ... -
Page 57: Help And Other Information
SimonsVoss website ( certificates.html Information on disposal Do not dispose the device (SmartHandle AX) in the household waste. Dispose of it at a collection point for electronic waste as per European Directive 2012/19/EU. Recycle defective or used batteries in line with European Directive ... - Page 58 17. Help and other information SmartHandle AX (Manual) 58 / 59 SimonsVoss Technologies GmbH Feringastrasse 4 85774 Unterföhring Germany...
- Page 59 This is SimonsVoss SimonsVoss is a technology leader in digital locking systems. The pioneer in wirelessly controlled, cable-free locking technology delivers system solutions with an extensive product range for SOHOs, SMEs, major companies and public institutions. SimonsVoss locking systems unite intelligent functions, optimum quality and award-winning German-made design.
Need help?
Do you have a question about the SmartHandle AX and is the answer not in the manual?
Questions and answers