Table of Contents
Advertisement
Quick Links
Advertisement
Table of Contents

Subscribe to Our Youtube Channel
Related Manuals for Simons Voss Technologies SmartCD


Summary of Contents for Simons Voss Technologies SmartCD
- Page 1 SmartCD Programming Device State of : Dezember 2007...
-
Page 2: Table Of Contents
Changing the connection__________________________________ 5 Configuring the USB connection ________________________5 Start-up _____________________________________________6 Programming with the SmartCD . . . ______________________6 . . . in connection with a PC/laptop __________________________ 6 . . . in connection with a PDA_______________________________ 6 Antenna orientation ___________________________________7 Replacement of the batteries ___________________________8 10.0 Meaning of LED’s _____________________________________9... -
Page 3: Safety Notes
In cases of dispute, the original German manual shall take precedence. Introduction The SmartCD is a programming unit specially designed to be used with a PC/laptop or a Windows Mobile 5.x PDA (Personal Digital Assistant). It allows you to program and retrieve all digital components in the SimonsVoss 3060 system very easily. -
Page 4: Connecting To A Pc/Laptop
Note: In the case of laptops, the USB interface may be deactivated when the laptop is switched off. Tip: If you do not intend to use the SmartCD for a long period, connect the SmartCD to the USB interface. This will prevent the batteries from running down, and the unit may be used at any time. -
Page 5: Configuring The Bluetooth Connection
Please refer to the ‘SmartLSM’ software manual for details of the procedure. Configuring the USB connection When you connect the SmartCD to the PC/laptop using a USB cable for the first time, the Windows operating system will detect new USB hardware. Following the instructions in the installation menu, install the driver contained on the supplied CD onto your desktop computer (selecting the directory ‘SmartCD_USB’). -
Page 6: Start-Up
The installed batteries are pre-charged. The unit is therefore ready for immediate use. (Before using the SmartCD for this first time, we recommend charging the unit on a USB port for around 3-4 hours.) To use the programming unit, please perform the following steps: •... -
Page 7: Antenna Orientation
The antenna orientation for selected components is shown below to guarantee faultless programming. To ensure the largest possible range when programming, the antennas of the SmartCD and the lock should be aligned parallel to one another. To prevent over-modulation, however, the distance between the antennas should always be at least 10 cm. -
Page 8: Replacement Of The Batteries
SmartCD Programming Device Page 8 Replacement of the batteries Please proceed as follows when you need to change the batteries: • Remove the belt clip carefully (if you use a small Phillips screwdriver, you do not need to remove the belt clip). -
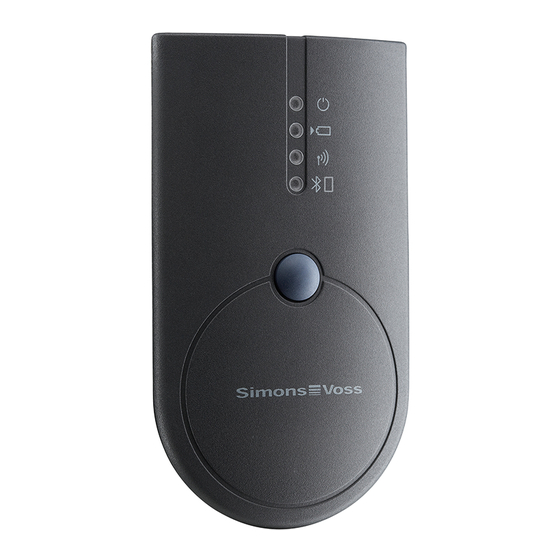
Page 9: Meaning Of Led's
The second LED (yellow) only lights when the SmartCD is connected to the computer by USB for charging purposes and at least one of the batteries requires charging. -
Page 10: Specifications
SmartCD Programming Device Page 10 12.0 Specifications Housing dimensions H x W x D 112 x 63 x 22 mm Weight (including batteries) 95 g Housing material Plastic Housing colour Grey Number of LED’s Battery type Li-Ion manganese storage batteries (rechargeable) Voltage 4.2 V...
Need help?
Do you have a question about the SmartCD and is the answer not in the manual?
Questions and answers