Webasto Thermo Top Evo Installation Documentation
Parking heater for chevrolet trax 2013 diesel
Hide thumbs
Also See for Thermo Top Evo:
- User manual ,
- Installation documentation (64 pages) ,
- Manual (57 pages)
Table of Contents
Advertisement
Quick Links
Water Heater
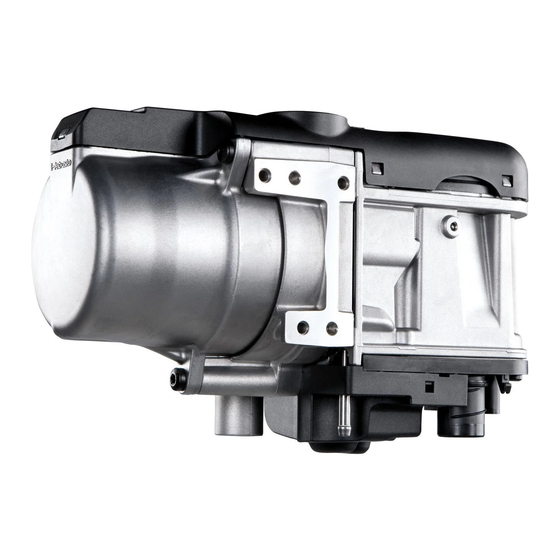
Thermo Top Evo Parking Heater
Installation Documentation
Chevrolet Trax
Validity
Manufacturer
Chevrolet
Motorisation
Fuel
1.7 D
Diesel
1.7 D
Diesel
SG = Manual Transmission
AG = Automatic Transmission
Starting with model year 2013
Left-hand drive vehicle
Verified equipment vari-
ants:
Not verified:
Total installation time:
Ident. No.: 1321414B_EN
00 0258
Model
Trax
Transmission type Output in kW
6-gear SG
AG
Manual air-conditioning
Front fog light
Daytime running lights
Start-Stop
2 WD / 4 WD
Automatic air-conditioning
Passenger compartment monitoring
approx. 7 hours
Status: 22.01.2014
E
1
Type
EG-BE No. / ABE
KL1B
e4 * 2007 / 46 * 0696 * ...
Displacement in cm³ Engine code
96
1686
96
1686
A17DTS (LUD)
A17DTS (LUD)
© Webasto Thermo & Comfort SE
Advertisement
Table of Contents

Related Manuals for Webasto Thermo Top Evo


Summary of Contents for Webasto Thermo Top Evo
-
Page 1: Validity
Water Heater Thermo Top Evo Parking Heater 00 0258 Installation Documentation Chevrolet Trax Validity Manufacturer Model Type EG-BE No. / ABE Chevrolet Trax KL1B e4 * 2007 / 46 * 0696 * ... Motorisation Fuel Transmission type Output in kW Displacement in cm³... -
Page 2: Table Of Contents
Digital Timer Remote Option (Telestart) Remote Option (Thermo Call) Necessary Components Basic delivery scope for Thermo Top Evo based on price list • Installation kit for Chevrolet Trax 2013 Diesel: 1321413A • Heater control in accordance with price list and upon consultation with end customer •... -
Page 3: Notes On Operating And Installation Instructions
1.7.1. A clearly visible operation indicator in the operator's field of view shall in- certified in a Webasto training course. NEVER try to install or repair We- form when the combustion heater is switched on or off. basto heating or cooling systems if you have not completed a Webasto... -
Page 4: Notes On Validity
• Crimping pliers for cable lug / tab connector 0.5 - 6mm² • Torque wrench for 2.0 - 10 Nm • Hose clamping pliers • Metric thread-setter kit • Webasto Thermo Test Diagnosis with current software Dimensions • All dimensions are in mm. Tightening torque values •... -
Page 5: Preliminary Work
• Remove years that do not apply from the type and duplicate label. • Attach the duplicate label (type label) in the appropriate place in the engine compartment. Installation Location of Heater 1 Heater Installation location Ident. No.: 1321414B_EN Status: 22.01.2014 © Webasto Thermo & Comfort SE... -
Page 6: Preparing Electrical System
0,5² 4² 0,75² holder. Preparing relay and fuse holder of passen- 4² ger com- partment 0,5² 4² Connector X7 Disman- tling con- nector of metering pump Ident. No.: 1321414B_EN Status: 22.01.2014 © Webasto Thermo & Comfort SE... -
Page 7: Electrical System
1 Fuses F1-2 1 Protective rubber plug 2 Angle bracket 3 Original vehicle stud bolt, plate nut 4 M5x16 bolt, large diameter washer [2x], re- taining plate of fuse holder, nut Ident. No.: 1321414B_EN Status: 22.01.2014 © Webasto Thermo & Comfort SE... -
Page 8: Fan Controller
Wiring colours may vary. Route wiring harness of heater 1 along origi- nal vehicle wiring harness to installation loca- tion of heater. Routing of heater wir- ing har- ness Ident. No.: 1321414B_EN Status: 22.01.2014 © Webasto Thermo & Comfort SE... - Page 9 1 Violet (ws) wire of fan relay 2 Socket of connector GM Connect- 4 Violet (vi) wire of connector GM ing fan mo- Red (rt) wire from K1/87a Black (sw) wire of K1/30 Ident. No.: 1321414B_EN Status: 22.01.2014 © Webasto Thermo & Comfort SE...
-
Page 10: Digital Timer
2 M5x16 bolt, flanged nut, existing hole 3 Bracket Installing receiver 1 Antenna Installing antenna Temperature sensor T100 HTM Fasten temperature sensor 1 with adhesive tape. Installing tempera- ture sensor Ident. No.: 1321414B_EN Status: 22.01.2014 © Webasto Thermo & Comfort SE... -
Page 11: Remote Option (Thermo Call)
Chevrolet Trax Remote Option (Thermo Call) Fasten receiver 1 with adhesive tape. Installing receiver 1 Antenna Installing antenna Ident. No.: 1321414B_EN Status: 22.01.2014 © Webasto Thermo & Comfort SE... -
Page 12: Preparing Installation Location
Install bracket 2 loosely and align perpendic- ularly. 1 Copy hole pattern [3x] 3 M6x25 bolt Installing bracket Remove bracket. 1 7mm dia. holes [2x] 2 9.1mm dia. holes; rivet nut Installing rivet nut Ident. No.: 1321414B_EN Status: 22.01.2014 © Webasto Thermo & Comfort SE... -
Page 13: Preparing Heater
2 5x15 self-tapping bolt, retaining plate of water connection piece Installing water con- nection pieces Screw 5x13 self-tapping bolts 1 [3x] into exist- ing holes by a maximum of 3 threads. Premount- ing bolts loosely Ident. No.: 1321414B_EN Status: 22.01.2014 © Webasto Thermo & Comfort SE... - Page 14 1 30 mm long heat shrink plastic tubing [8x] Preparing hoses Premount- ing hoses 1 90° moulded hose, 10mm dia. clamp Premount- ing mould- ed hose Ident. No.: 1321414B_EN Status: 22.01.2014 © Webasto Thermo & Comfort SE...
-
Page 15: Installing Heater
2 Tighten 5x13 self-tapping bolt [2x] Installing heater 1 Tighten 5x13 self-tapping bolt Installing heater 1 Connector of circulating pump wiring har- ness 2 Heater wiring harness connector [2x] Installing wiring har- ness Ident. No.: 1321414B_EN Status: 22.01.2014 © Webasto Thermo & Comfort SE... -
Page 16: Fuel
Route fuel line and wiring harness of meter- ing pump in corrugated tube 1 along original vehicle lines to underbody. Installing lines 1 Fuel line and wiring harness of metering pump in corrugated tube Installing lines Ident. No.: 1321414B_EN Status: 22.01.2014 © Webasto Thermo & Comfort SE... - Page 17 Separate fuel return line 1 at Position 2 . 2 90°, 8x5x8 fuel standpipe, 10 mm dia. hose clamp [2x] in fuel return line Fuel ex- traction Ident. No.: 1321414B_EN Status: 22.01.2014 © Webasto Thermo & Comfort SE...
- Page 18 1 Wiring harness of metering pump, con- nector mounted Connect- 2 Fuel line of heater ing meter- 3 10mm dia. clamp ing pump Ident. No.: 1321414B_EN Status: 22.01.2014 © Webasto Thermo & Comfort SE...
-
Page 19: Combustion Air
Installing perforated bracket 1 Combustion air pipe Installing combus- tion air pipe 1 Silencer 2 M5x16 bolt, flanged nut 3 Combustion air pipe 4 51mm dia. clamp Installing silencer Ident. No.: 1321414B_EN Status: 22.01.2014 © Webasto Thermo & Comfort SE... -
Page 20: Exhaust Gas
1 Perforated bracket Preparing perforated bracket 100° 110° 1 M6x20 bolt, spring lockwasher on rivet 2 Perforated bracket Installing perforated bracket 1 7mm dia. hole as shown Hole in cross member Ident. No.: 1321414B_EN Status: 22.01.2014 © Webasto Thermo & Comfort SE... - Page 21 2 Align spacer bracket with original vehicle Fastening hose exhaust 3 P-clamp end section 4 Exhaust end section 5 M6x20 bolt, flanged nut 6 M6x20 bolt, large diameter washer, flanged nut 7 Angle bracket Ident. No.: 1321414B_EN Status: 22.01.2014 © Webasto Thermo & Comfort SE...
-
Page 22: Coolant Circuit
All non-designated spring clips = 25mm dia. 1 = Original vehicle spring clip . 2 = black (sw) rubber isolator All connecting pipes without a specific designation = 18x18mm dia. Ident. No.: 1321414B_EN Status: 22.01.2014 © Webasto Thermo & Comfort SE... - Page 23 Remove original vehicle nut from stud bolt and discard 1 Install large diameter washer with outer dia. d = 21.6mm onto stud bolt Preparing installation location of circulating pump Ident. No.: 1321414B_EN Status: 22.01.2014 © Webasto Thermo & Comfort SE...
- Page 24 2 and re-install again as shown. Shifting fuel lines 1 Original vehicle spring clip 2 Hose of engine outlet Connect- ing engine outlet 1 Perforated bracket Preparing perforated bracket 90° Ident. No.: 1321414B_EN Status: 22.01.2014 © Webasto Thermo & Comfort SE...
- Page 25 1 25x25 hose bracket between A/C line and hose C 2 Cable tie 3 Wiring harness of circulating pump 4 13x23 hose bracket between A/C line and hose C Routing in engine compart- ment Ident. No.: 1321414B_EN Status: 22.01.2014 © Webasto Thermo & Comfort SE...
- Page 26 1 Attach wiring harness of circulating pump 2 Circulating pump Connec- tion of cir- culating pump 1 25x25 hose bracket between A/C line and hose B Mounting hose bracket Ident. No.: 1321414B_EN Status: 22.01.2014 © Webasto Thermo & Comfort SE...
- Page 27 1 Coupling piece of heat exchanger inlet Premount- ing hose H 1 Align 90° connecting pipe 2 Coupling piece of heat exchanger inlet Connec- tion of heat exchanger inlet Ident. No.: 1321414B_EN Status: 22.01.2014 © Webasto Thermo & Comfort SE...
- Page 28 Align hoses. Ensure sufficient distance to ad- jacent components, ensure freedom of move- ment, correct if necessary. 1 Perforated bracket 2 M6x25 bolt, flanged nut Tightening bolt con- nections Ident. No.: 1321414B_EN Status: 22.01.2014 © Webasto Thermo & Comfort SE...
- Page 29 Checking distance Align rubber isolator 1 . Ensure sufficient dis- tance to adjacent components, ensure free- dom of movement, correct if necessary. 2 Air filter box mounted Aligning hoses Ident. No.: 1321414B_EN Status: 22.01.2014 © Webasto Thermo & Comfort SE...
-
Page 30: Final Work
Align exhaust end section 2 flush with wheel well trim 1 . Aligning exhaust end section Webasto Thermo & Comfort SE Postfach 1410 82199 Gilching Germany Internet: www.webasto.com Technical Extranet: http://dealers.webasto.com Ident. No.: 1321414B_EN Status: 22.01.2014 © Webasto Thermo & Comfort SE... -
Page 31: Operating Instructions For End Customer
Chevrolet Trax Operating Instructions for End Customer Please remove page and add to the vehicle operating instructions. Note: We recommend matching the heating time to the driving time. Heating time = driving time Example: For a driving time of approx. 20 min. (in one direction), we recommend not exceeding a switch-on time of 20 min.
Need help?
Do you have a question about the Thermo Top Evo and is the answer not in the manual?
Questions and answers