
Subscribe to Our Youtube Channel
Related Manuals for Bartell Innovatech Terminator Infinity 2.0


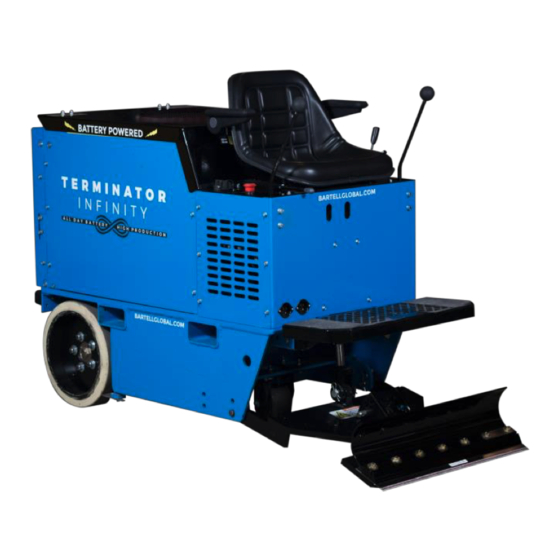
Summary of Contents for Bartell Innovatech Terminator Infinity 2.0
- Page 1 INNOVATECH PRODUCTS & EQUIPMENT. 4701 Allmond Ave, Louisville, KY 40209, USA Telephone: 1-425-405-9100 RIDE-ON TERMINATORS Terminator Infinity 2.0 COMPLETE MANUAL OIPB-I01029-Infinity2.0_v1.2...
- Page 2 No part of this work may be reproduced or transmitted in any form or by any means, electronic or mechanical, including photocopying and recording, or by any information storage or retrieval system without the prior written permission of Bartell Morrison Inc. unless such copying is permitted by federal copyright laws.
- Page 3 P a g e SAFETY PRECAUTIONS DANGER EXPLOSION HAZARD Never operate the machine in an explosive atmosphere, near combustible materials, or where ventilation does not clear exhaust fumes. WARNING BURN HAZARD Never come into contact with the engine or muffler when engine is operating or shortly after it is turned off.
-
Page 4: Table Of Contents
P a g e TABLE OF CONTENTS INTRODUCTION ABOUT THIS MANUAL IMPORTANT SAFETY INSTRUCTIONS o 1. S AFETY NSTRUCTIONS FOR OOLS o 2. A DDITIONAL AFETY ULES FOR IDING LOOR CRAPERS ® GENERAL OPERATING INSTRUCTIONS FOR THE TERMINATOR SAFETY FEATURES o 1. - Page 5 P a g e o 2. L IFTING ATTERIES o 3. W ROTECTIVE LOTHING o 4. IC1200 S AFETY SETTING UP A CHARGING AREA o 1. C ONNECTING ISCONNECTING HARGER o 2. B ASIC HARGING ACTS IC1200 CHARGER INFO o 1. L EFT DISPLAY o 2.
-
Page 6: Introduction
P a g e 1. Introduction ® The Terminator Carpet and Tile Removal Machine is intended for use on large demolition and asbestos abatement projects as well as smaller floor covering removal jobs. Designed and built by experienced floor covering demolition and installation experts, the machine incorporates several design features that are essential for efficient operation: •... -
Page 7: Important Safety Instructions
P a g e 3. Important Safety Instructions WARNING: When using electric tools, basic safety precautions should always be followed to reduce the risk of fire, electric shock, and personal injury, including the READ ALL INSTRUCTIONS following: 1. Safety Instructions for All Tools •... -
Page 8: O 2. Additional Safety Rules For Riding Floor Scrapers
P a g e 2. Additional Safety Rules for Riding Floor Scrapers CAUTION: FAILURE TO HEED THESE WARNINGS MAY RESULT IN SERIOUS PERSONAL INJURY OR DEATH AND SERIOUS DAMAGE TO THE ® TERMINATOR ® The Terminator is to be operated only by qualified, trained personnel. DON’T attempt to operate the Terminator ®... -
Page 9: General Operating Instructions For The Terminator
P a g e ® 4. General Operating Instructions for the Terminator ® The Terminator is designed to remove carpet, tile and glue residue from floors. • When removing product, position removed product so it rolls to the side of the machine or have someone on the side of the machine remove the product. -
Page 10: Terminator ® Infinity Specifications
P a g e | 10 ® 6. Terminator Infinity Specifications Element English Metric 66” Length 1676 mm Width 26.5” 673 mm 47” Height 1194 mm Weight 2430 lbs 1105 kg 15” x 8” Tires (OD x W) 381 mm x 203 mm Motor Voltage 48 VDC Motor Power... -
Page 11: Service Instructions & Personnel
P a g e | 11 9. Service Instructions & Personnel ® Like other machinery, the Terminator requires regular inspection and maintenance of the batteries, motor, hydraulic system and other parts. To prolong the safe and efficient operating life of the machine, clean and service it as instructed in the Maintenance section of this manual. -
Page 12: From A Crate With A Forklift
P a g e | 12 ® 1. To remove the Terminator from a crate with a forklift: ® 1. Forklift slots have been provided on the sides of the Terminator for moving the terminator with a forklift. ® 2. To remove the Terminator from a crate without a forklift: 1. -
Page 13: O 2. Auto Stop
P a g e | 13 • To adjust the jaw assembly down, push and hold jaw lever forward. To adjust the jaw assembly up, pull and hold the jaw lever back. 2. Auto Stop When you release the drive or jaw lever, the motor continues to run but the drive or jaw motion automatically stops and will not start again until you push or pull the levers. -
Page 14: Taking Up Floor Coverings
P a g e | 14 Insert the sharpened blade. Tighten bolts firmly, starting from the center and working out. Bolts should be snug but not over-tightened. 17. Taking Up Floor Coverings 1. Insert the blade. (See Blade Assembly) 2. Lower the jaw assembly to the floor. Lift the caster wheel off the floor 1/4 inch. Use previous procedures to drive forward. -
Page 15: O 3. Wear Protective Clothing
P a g e | 15 current flow, not strength. Connect the lifting device to the negative terminal only if there is not a lifting strap in place. Lifting by both terminals could cause the negative and positive terminals to short. 3. -
Page 16: Ic1200 Charger Info
P a g e | 16 21. IC1200 Charger Info 1. Left display From the top to the bottom, there are three lights that function as follows: 1) Fault/Error Indicator: Solid Red = Charger fault Flashing Amber = External error Flashing Green = USB port active Solid Green = Safe to remove USB 2) Battery Indicator:... -
Page 17: Parts List
P a g e | 17 23. Parts List Terminator Infinity 2.0 OIPB-I01029-Infinity2.0_v1.2... - Page 18 P a g e | 18 Front Panels & Seat Breakdown Item No. Part Number Description Qty. Pan Head Phillips Screw, #6-32 x 1/2” 11-0085 12-0018-06 Lock Washer, M6 12-0026 Hex Head Cap Screw, M6-1.0 x 12mm 12-0043-16 Serrated Flange Cap Screw, M6-1.0 x 16mm 13-0257 GT50 Seat w/ microswitch 23-0155...
- Page 19 P a g e | 19 Front Exterior Breakdown Item No. Part Number Description Qty. Flat Washer, 3/8” 11-0035 Adjustable Clevis Pin, 5/8” x 3” L 11-0045 11-0052 Hitch Pin Clevis Pin, 1/2” x 3” L 11-0236 12-0021-10 Nyloc Nut, M10-1.5 12-0034-40 Hex Head Cap Screw, M10-1.5 x 40mm 13-0378...
- Page 20 P a g e | 20 Front Interior Breakdown Item No. Part Number Description Qty. 12-0018-06 Lock Washer, M6 12-0018-08 Lock Washer, M8 12-0026 Hex Head Cap Screw, M6-1.0 x 12mm 12-0032-25 Hex Head Cap Screw, M8-1.25 x 25mm 12-0032-30 Hex Head Cap Screw, M8-1.25 x 30mm 12-0035-06 Flat Washer, M6...
- Page 21 P a g e | 21 Battery Area Breakdown Item No. Part Number Description Qty. Lock Washer, 1/4” 11-0069 11-0092 Hex Head Cap Screw, 1/4"-20 x 1/2" 12-0043-16 Serrated Flange Cap Screw, M6-1.0 x 16mm 12-0045-20 Flat Head Phillips Screw, M6-1.0 x 20mm Hydraulic Fitting, 90 deg 12 JIC –...
- Page 22 P a g e | 22 Motor & Pump Breakdown Item No. Part Number Description Qty. 12-0018-10 Lock Washer, M10 12-0021-08 Nyloc Nut, M8 12-0021-10 Nyloc Nut, M10 12-0024 Hex Head Cap Screw, M10-1.5 x 30mm 12-0032-16 Hex Head Cap Screw, M8-1.25 x 16mm 12-0032-45 Hex Head Cap Screw, M8-1.25 x 40mm 12-0034-40...
- Page 23 P a g e | 23 Tank Fittings Breakdown Item No. Part Number Description Qty. Threaded Tank Fitting, 2” Male, 1” x 1” Female 31-0124 Hydraulic Fitting, 90 deg 12 JIC – 1” NPTF Male 31-0128 Hex Head Pipe Plug, 2” NPT 31-0252 Pipe Nipple, 1”...
- Page 24 P a g e | 24 Hood Arm Breakdown Item No. Part Number Description Qty. 11-0030 Flat Washer, #10 Flat Washer, 5/16” 11-0034 12-0021-05 Nyloc Nut, M5-0.8 12-0021-08 Nyloc Nut, M8-1.25 12-0032-16 Hex Head Cap Screw, M8-1.25 x 16mm 12-0041-12 Hex Head Cap Screw, M5-0.8 x 12mm 12-0044-20 Serrated Flange Cap Screw, M8-1.25...
- Page 25 P a g e | 25 Rear Panels & Support Breakdown Item No. Part Number Description Qty. 12-0043-16 Serrated Flange Cap Screw, M6-1.0 x 16mm 12-0044-20 Serrated Flange Cap Screw, M8-1.25 x 20mm 12-0045-20 Flat Head Phillips Screw, M6-1.0 x 20mm 51-1048 Uni-Frame Battery Guide, Rear 53-0373...
- Page 26 P a g e | 26 Rear Wheels Breakdown Item No. Part Number Description Qty. 12-0034-40 Hex Head Cap Screw, M10-1.5*40mm Nyloc Nut, 5/16”-18 11-0025 Flat Washer, 3/8” 11-0035 12-0018-10 Lock Washer, M10” 12-0048-16 Hex Head Bolt, M10-1.5*16 Hex Head Cap Screw, 1/4”-20 x 5 1/2” 11-0279-88 Socket Head Shoulder Screw, 3/8”...
- Page 27 P a g e | 27 Infinity Seat Platform Assembly - Part # 96-0389 Item No. Part Number Description Qty. Push-in Grommet for 1 3/8” hole 1001 13-0269 1002 21-0123 Battery Indicator w/ Hour Meter 1003 22-0069 Emergency Stop 1004 22-0071 Key Switch 1005...
- Page 28 P a g e | 28 Pivoting Jaw Assembly - Part # 96-0386 Item No. Part Number Description Qty. Lock Washer, 1/2” 1101 11-0041 Flat Washer, 1/2” 1102 11-0230 Hex Head Cap Screw, 1/2”-13 x 1 1/2" 1103 11-0296 Quick Release Pin, 1/2” x 3” 1104 13-0035 1105...
- Page 29 P a g e | 29 Infinity Controls Assembly (R) - Part # 96-0385 Item No. Part Number Description Qty. 1201 12-0018-08 Lock Washer, M8 1202 12-0043-16 Serrated Flange Cap Screw, M6-1.0 x 16mm 1203 12-0060 Socket Head Bolt, M8-1.25 x 60mm 1204 12-0052 Socket Head Cap Screw, M5-0.8 x 60mm...
- Page 30 P a g e | 30 Infinity Controls Bracket (L) - Part # 96-0384 Item No. Part Number Description Qty. 1301 12-0060 Socket Head Bolt, M8-1.25 x 60mm 1302 12-0049-70 Hex Head Bolt, M8-1.25 x 70mm 1303 12-0052 Socket Head Cap Screw, M5-0.8 x 60mm 1304 13-0023 Brake Cable...
- Page 31 P a g e | 31 Infinity Right Wheel Assembly - Part # 96-0382 Item No. Part Number Description Qty. Hex Head Cap Screw, 1/2”-13 x 3” 1401 11-0013 Nyloc Nut, 1/2”-13 1402 11-0028 Nyloc Nut, 1/2”-20 1403 11-0029 Hex Head Cap Screw, 1/2”-13 x 5” 1404 11-0228 Flat Washer, 1/2”...
- Page 32 P a g e | 32 Infinity Left Wheel Assembly - Part # 96-0381 Item No. Part Number Description Qty. Hex Head Cap Screw, 1/2”-13 x 3” 1501 11-0013 Nyloc Nut, 1/2”-13 1502 11-0028 Nyloc Nut, 1/2”-20 1503 11-0029 Hex Head Cap Screw, 1/2”-13 x 5” 1504 11-0228 Flat Washer, 1/2”...
- Page 33 P a g e | 33 Infinity Top Cover Assembly - Part # 96-0380 Item No. Part Number Description Qty. Nyloc Nut, 1/4”-20 1601 11-0024 Flat Head Socket Screw, 1/4"-20 x 3/4” 1602 11-0140 1603 12-0021-08 Nyloc Nut, M8-1.25 1604 12-0032-16 Hex Head Cap Screw, M8-1.25 x 16mm 1605...
- Page 34 P a g e | 34 Infinity 2.0 Battery Pack - Part # 71-0033 Item No. Part Number Description Qty. 1701 12-0018-06 Lock Washer, M6 1702 12-0020 Socket Head Cap Screw, M6-1.0 x 30mm 1703 12-0021-06 Nyloc Nut, M6-1.0 1704 12-0035-06 Flat Washer, M6 1705...
- Page 35 P a g e | 35 OIPB-I01029-Infinity2.0_v1.2...
- Page 36 P a g e | 36 Infinity 2.0 Hydraulics Item No. Part Number Description Qty. 1801 31-0271 Infinity Hose Assembly, L Valve to Upper Jaw 1802 31-0272 Infinity Hose Assembly, Valve to Wheel 1803 31-0273 Infinity Hose Assembly, L Valve to Filter 1804 31-0274 Infinity Hose Assembly, L Valve to Lower Jaw...
- Page 37 P a g e | 37 Infinity 2.0 Electrical Item No. Part Number Description Qty. 1901 24-0128 Infinity 2.0 Wire Assembly, Motor Neg. to Junction 1902 24-0187 Infinity 2.0 Wire Assembly, Blue Plug Power Pigtail 1903 24-0210 Infinity 2.0 Wire Assembly, Contactor to Motor Pos. 1904 24-0211 Infinity 2.0 Wire Assembly, Breaker to Contactor...
- Page 38 P a g e | 38 OIPB-I01029-Infinity2.0_v1.2...
-
Page 39: Warranty
P a g e | 39 24. Warranty Innovatech warrants to the original buyer, for a period of one (1) year or 300 operating hours (whichever comes first) from the date of delivery, that the Equipment is free from defects in materials and workmanship and that the Equipment conforms to the operating specifications supplied with the Equipment. - Page 40 Bartell Morrison Inc. Bartell Morrison (USA) LLC 375 Annagem Boulevard 200 Commerce Drive, Unit A Mississauga, Ontario, Canada Freehold, New Jersey, USA L5T 3A7 07728 Tel: 1-647-953-4100 Tel: 1-848-225-8100 Fax: 1-647-953-4101 Fax: 1-848-225-8101 Innovatech SPE International 4701 Allmond Ave Honeyholes Lane...
Need help?
Do you have a question about the Innovatech Terminator Infinity 2.0 and is the answer not in the manual?
Questions and answers