Table of Contents
Advertisement
Quick Links
Advertisement
Table of Contents

Related Manuals for Eliminator Lighting INDY HEX PAR


Summary of Contents for Eliminator Lighting INDY HEX PAR
- Page 1 INDY HEX PAR User Guide...
- Page 2 All non-Eliminator brands and product names are trademarks or registered trademarks of their respective companies. Eliminator Lighting and all affiliated companies hereby disclaim any and all liabilities for property, equipment, building, and electrical damages, injuries to any persons, and direct or indirect economic loss associated with the use or reliance of any information contained within this document, and/or as a result of the improper, unsafe, insufficient and negligent assembly, installation, rigging, and operation of this product.
-
Page 3: Table Of Contents
C O N T E N T S General Information Limited Warranty (USA Only) Safety Guidelines Maintenance Guidelines Overview Installation Guidelines Operation DMX Traits Color Macro Chart Trouble Shooting and Frequently Asked Questions Technical Specifications and Photometric Chart Dimensions... -
Page 4: General Information
G E N E R A L I N F O R M A T I O N INTRODUCTION Please read and understand all instructions in this manual carefully and thoroughly before attempting to operate this product. These instructions contain important safety and use information. UNPACKING: This product has been thoroughly tested and has been shipped in perfect condition. -
Page 5: Limited Warranty (Usa Only)
L I M I T E D W A R R A N T Y ( U S A ) A. Eliminator Lighting, an ADJ Products, LLC brand, hereby warrants, to the original purchaser, ADJ Products, LLC products to be free of manufacturing defects in material and workmanship for a prescribed period from the date of purchase (see specific warranty period on reverse). -
Page 6: Safety Guidelines
To guarantee a smooth operation, it is important to follow all instructions and guidelines in this manual. ELIMINATOR LIGHTING is not responsible for injury and/or damages resulting from the misuse of these devices due to the disregard of the information printed in this manual. Only qualified and/or certified personnel should perform installation of these devices and only the original rigging parts included with these devices should be used for installation. - Page 7 S A F E T Y G U I D E L I N E S DO NOT TOUCH fixture housing during operation. DO NOT shake fixture, avoid brute force when installing and/or operating fixture. DO NOT operate fixture if the power cord is frayed, crimped, damaged and/or if any of the power cord connectors are damaged and do not insert into the fixture securely with ease.
-
Page 8: Maintenance Guidelines
Regular inspections are recommended to insure proper function and extended life. There are no user serviceable parts inside these devices, please refer all other service issues to Eliminator Lighting. Should you need any spare parts, please order genuine parts from Eliminator Lighting. Please refer to the following points during routine inspections: A detailed review by an approved electrical engineer every three months, to make sure the circuit contacts are in good condition and prevent overheating. -
Page 9: Overview
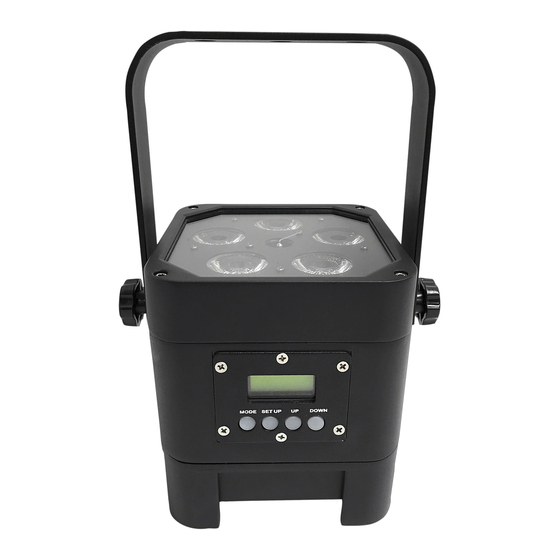
O V E R V I E W INCLUDED ITEMS (1) Indy Hex Par Lamp (1) Power Cord 10 11 12 1. Indy Hex Par 5. Yoke 9. Mode Button 2. Power In 10. Set Up Button 6. Power Out 3. -
Page 10: Installation Guidelines
I N S T A L L A T I O N G U I D E L I N E S FLAMMABLE MATERIAL WARNING Keep devices minimum 5.0 feet (1.5m) away from flammable materials and/or pyrotechnics. ELECTRICAL CONNECTIONS A qualified electrician should be used for all electrical connections and/or installations. OVERHEAD RIGGING REQUIRES EXTENSIVE EXPERIENCE, INCLUDING AMONGST OTHERS CALCULATING WORKING LOAD LIMITS, INSTALLATION MATERIAL BEING USED, AND PERIODIC SAFETY INSPECTION OF ALL INSTALLATION MATERIAL. - Page 11 I N S T A L L A T I O N G U I D E L I N E S INSTALLATION The unit should be mounted using a mounting clamp (not provided), affixing it to the mounting bracket that is provided with the unit. Always ensure that the unit is firmly fixed to avoid vibration and slipping while operating.
-
Page 12: Operation
O P E R A T I O N POWER SUPPLY The Indy Hex Par contains an automatic voltage switch, which will auto sense the voltage when it is plugged into the power source. With this switch there is no need to worry about the correct power voltage, this unit can be plugged in anywhere. - Page 13 “XXX” represents either ON or OFF. Press the UP or DOWN buttons so that OFF is displayed. Now the display light will turn off after 30s. Press any button to turn the display on again. Operating Modes: The Indy Hex Par has six operating modes: Static Color Mode - There are 63 colors to choose from. •...
- Page 14 This function also allows you to use your fixtures as spotlights. The Indy Hex Par has 4 DMX modes: 6 Channel mode, 7 Channel mode, 8 Channel mode, and 11 Channel mode. See pages 19-21 for each mode’s DMX traits.
- Page 15 3. Press the SET UP button and “SPEED:XX” will be displayed. Use the UP and DOWN buttons to adjust the speed of the color fade. Auto Run Mode: In this mode the Indy Hex Par will run an auto program. 1. Plug the fixture in and press the MODE button until “AUTO RUN FAD+SNAP” is displayed.
- Page 16 O P E R A T I O N Indy Hex RF: This function is used to activate and deactivate the Indy Hex RF (Sold Separately). When this function is activated you can control the fixture using the Indy Hex RF. Please see the next page for Indy Hex RF controls and functions.
- Page 17 O P E R A T I O N Master-Slave Configuration: This function will allow you to link units together to run in a Master- Slave setup. In a Master-Slave set up one unit will act as the controlling unit and the others will react to the controlling units built-in programs.
- Page 18 INDY HEX RF REMOTE (sold separately): The remote has many different functions and allows you to control your Indy Hex Par from long distance. The Indy Hex RF remote can control your system up to 150 ft. To use the remote you must first activate the fixtures receiver, to activate the receiver please see the instructions on page 16.
-
Page 19: Dmx Traits
D M X T R A I T S DMX C HANNELS / V ALUES / F UNCTIONS Channel M ode ( 6, 7 , 8 o r 1 1) / C hannel Value ... - Page 20 D M X T R A I T S DMX C HANNELS / V ALUES / F UNCTIONS Channel M ode ( 6, 7 , 8 o r 1 1) / C hannel Value ...
-
Page 21: Color Macro Chart
C O L O R M A C R O C H A R T VALUE COLOR VALUE COLOR 128-131 G+B+W 132-135 G+B+A 8-11 Green 136-139 G+B+UV 12-15 Blue 140-143 G+W+A 16-19 White 144-147 G+W+UV 20-23 Amber 148-151 G+A+UV 24-27 152-155 B+W+A 28-31... -
Page 22: Trouble Shooting And Frequently Asked Questions
If none of these solutions work, please contact Eliminator Lighting. F R E Q U E N T L Y A S K E D Q U E S T I O N S Listed below are a few answers to common questions users may have. -
Page 23: Technical Specifications And Photometric Chart
T E C H N I C A L S P E C I F I C A T I O N S Voltage: 100V ~ 240V 50/60Hz LEDs: 4x10W Hex LEDs (RGBWA+UV 6-in-1) Beam Angle: 25 Degrees IP Rating: IP65 Power Draw: 58W Power Cord Daisy Chain: Up to 10 fixtures max Battery Charge Time: 6 Hours (with LOAD Off) -
Page 24: Dimensions
D I M E N S I O N S 6.35” 162 mm 8.96” 228 mm 8.59” 218 mm 2.01” 52.5 mm 7.26” 184.5 mm 8.96” 228 mm...
Need help?
Do you have a question about the INDY HEX PAR and is the answer not in the manual?
Questions and answers