Table of Contents
Advertisement
Quick Links
Advertisement
Table of Contents

Related Manuals for Eliminator Lighting MEGA BAR RGBA EP


Summary of Contents for Eliminator Lighting MEGA BAR RGBA EP
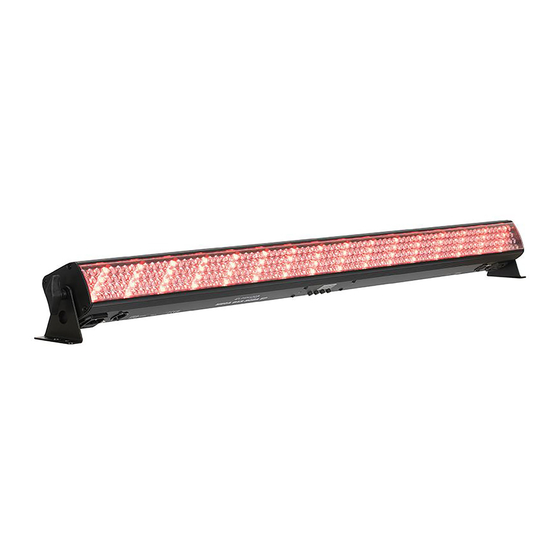
- Page 1 MEGA BAR RGBA EP User Manual...
- Page 2 All non-Eliminator brands and product names are trademarks or registered trademarks of their respective companies. Eliminator Lighting and all affiliated companies hereby disclaim any and all liabilities for property, equipment, building, and electrical damages, injuries to any persons, and direct or indirect economic...
-
Page 3: Table Of Contents
C O N T E N T S General Information Limited Warranty (USA Only) Warranty Registration | Features Safety Guidelines Overview Installation Guidelines ADJ RFC Operation System Menu Operation Instructions DMX Setup Primary Secondary Configuration DMX Traits Color Macros Chart Power Linking | Fuse Replacement | Trouble Shooting | Cleaning Dimensional Drawings Specifications... -
Page 4: General Information
G E N E R A L I N F O R M AT I O N INTRODUCTION This device is a DMX intelligent, LED bar fixture that can be used in stand alone mode or connected in a Primary/Secondary configuration. This unit has five operating modes: Sound Active Mode, Auto Mode, RGB mode, Static Color mode, and DMX control mode. -
Page 5: Limited Warranty (Usa Only)
ADJ Products, LLC Service Department at 800-322-6337. Send the product only to the Eliminator Lighting factory. All shipping charges must be pre-paid. If the requested repairs or service (including parts replacement) are within the terms of this warranty, Eliminator Lighting will pay return shipping charges only to a designated point within the United States. -
Page 6: Warranty Registration | Features
WA R R A N T Y R E G I S T R AT I O N This device carries a 2 year limited warranty. Please fill out the enclosed warranty card to validate your purchase. All returned service items, whether under warranty or not, must be freight pre-paid and accompanied by a return authorization (R.A.) number. -
Page 7: Safety Guidelines
S A F E T Y G U I D E L I N E S • To reduce the risk of electrical shock or fire, do not expose this unit rain or moisture. • Do not spill water or other liquids into or on to your unit. •... -
Page 8: Overview
O V E R V I E W Mounting Bracket Bracket Adjustment Knob Power Mode Button Setup Button Button Display Screen Down Button Power Bracket Adjustment Mounting Knob Bracket... -
Page 9: Installation Guidelines
I N S TA L L AT I O N G U I D E L I N E S ELECTRICAL CONNECTIONS A qualified electrician should be used for all electrical connections and/or installations. DO NOT INSTALL THE FIXTURE IF YOU ARE NOT QUALIFIED TO DO SO! Fixture MUST be installed following all local, national, and country commercial electrical and construction codes and regulations. - Page 10 I N S TA L L AT I O N G U I D E L I N E S CLAMP MOUNTING This device features a mounting bracket at each end, near the adjustment knobs (see illustration below). When mounting the fixture to a truss or any other suspended or overhead installation, align the hole on an appropriately rated clamp (not included) with the hole on the fixture’s bracket, then insert a bolt of the appropriate size and rating through the hole and secure in place with an appropriately rated nut.
- Page 11 I N S TA L L AT I O N G U I D E L I N E S RIGGING Overhead rigging requires extensive experience, including but not limited to: calculating working load limits, understanding the installation material being used, and periodic safety inspection of all installation material and the fixture itself.
-
Page 12: Adj Rfc Operation
A D J R F C O P E R AT I O N The ADJ RFC remote (sold seperately) has many different functions and allows you to control your Mega Bar RGBA at a distance of up to 150 ft. The device’s RF (remote function) receiver must be switched on in order to use the RFC remote. - Page 13 A D J R F C O P E R AT I O N WIRELESS DMX INSTALLATION GUIDELINES For best results, position the fixture so that the display screen is oriented in the direction of the transmitter device or remote. Wireless signal can penetrate walls, glass, metal, and most objects.
-
Page 14: System Menu
S Y S T E M M E N U To reset the unit to factory default settings, press MODE and SET UP button at the same time. To set the display to remain on, press the MODE and UP buttons at the same time. To set the display to turn off after 20 seconds, press the MODE and DOWN buttons at the same time. -
Page 15: Operation Instructions
O P E R AT I N G I N S T R U C T I O N S DMX MODE: Press MODE button and select DMX mode. When the display shows, “d.×××”, press SETUP button to choose DMX Address Set Mode, “d.×××”; DMX channels; and “CH.-×”. •... - Page 16 O P E R AT I N G I N S T R U C T I O N S STATIC COLOR SELECT MODE: Press MODE button to select Static Color Select Mode. When the 4Display shows, “C0.××”, press UP or DOWN to select static colors (0-15).Then press SET UP button to choose the flash speed set mode.
-
Page 17: Dmx Setup
D M X S E T U P Power Supply: The ADJ Mega Bar RGBA contains an automatic voltage switch, which will automati- cally sense the voltage when it is plugged into the power source. With this switch, there is no need to worry about the correct power voltage, this unit can be plugged in almost anywhere. - Page 18 D M X S E T U P Notice: Be sure to follow figures two and three when making your own cables. Do not use the ground lug on the XLR connector. Do not connect the cable’s shield conductor to the ground lug or allow the shield conductor to come in contact with the XLR’s outer casing.
- Page 19 D M X S E T U P All fixtures should be given a DMX starting address when using a DMX controller, so the correct fixture responds to the correct control signal. This digital starting address is the channel number from which the fixture starts to “listen”...
-
Page 20: Primary Secondary Configuration
P R I M A R Y S E C O N D A R Y C O N F I G U R AT I O N This function allows you to link units together to run in a Primary-Secondary set-up, in which one unit will act as the controlling unit and the others will react to the controlling unit’s built-in programs. -
Page 21: Dmx Traits
D M X T R A I T S CHANNEL FUNCTION VALUES 4 CH 6 CH 9 CH 10 CH 18 CH 34 CH Red, dim to bright 000 - 255 Green, dim to bright 000 - 255 Blue, dim to bright 000 - 255 Amber, dim to bright 000 - 255... - Page 22 D M X T R A I T S CHANNEL FUNCTION VALUES 4 CH 6 CH 7 CH 9 CH 10 CH 18 CH 34 CH Green 3, dim to bright 000 - 255 Blue 3, dim to bright 000 - 255 Amber 3, dim to bright 000 - 255 Red 4, dim to bright...
- Page 23 D M X T R A I T S CHANNEL FUNCTION VALUES 4 CH 6 CH 7 CH 9 CH 10 CH 18 CH 34 CH Programs (continued) 106 - 115 Program 10 116 - 125 Program 11 126 - 135 Program 12 136 - 145 Program 13...
-
Page 24: Color Macros Chart
C O L O R M A C R O C H A R T RGBA COLOR INTENSITY RGBA COLOR INTENSITY Color Color Value Value GREEN BLUE AMBER GREEN BLUE AMBER Color 1 Color 25 136 - 140 000 - 020 (off) Color 26 141 - 145... -
Page 25: Power Linking | Fuse Replacement | Trouble Shooting | Cleaning
P O W E R L I N K I N G This feature allows multiple units to be linked together by way of the power input and output sockets. The maximum number of devices that can be connected in this manner is 20 units. After this quantity has been reached, a new power outlet must be used to accommodate additional devices. -
Page 26: Dimensional Drawings
D I M E N S I O N A L D R AW I N G S 2.81in (71.48mm) 3.7in (93.8mm) 2.6in (65mm) 2.9in (70mm) -
Page 27: Specifications
S P E C I F I C AT I O N S • 1-Meter (42-inch) indoor Linear Fixture with 320, 10mm RGBA LEDs (64 Red, 96 Green, 96 Blue & 64 Amber) • 7 DMX Channel modes: 4, 6, 7, 9, 10, 18 or 34 channel modes •...
Need help?
Do you have a question about the MEGA BAR RGBA EP and is the answer not in the manual?
Questions and answers