Table of Contents
Advertisement
Quick Links
RCP 101 D • Setup Guide
Overview
The RCP 101 D is a remote control panel with backlit transport controls for SMP series products. It carries out the same functions
as the SMP front panel transport controls and the USB type A port supports USB flash drives and external USB portable drives.
The RCP 101 D can be mounted in walls and furniture in any standard 1-gang US opening. It is available with black and white
faceplates to compliment a wide range of environments.
This guide provides basic instructions for an experienced installer to install the RCP 101 D and contains the following sections:
RCP 101 D Front Panel Features
•
•
•
•
•
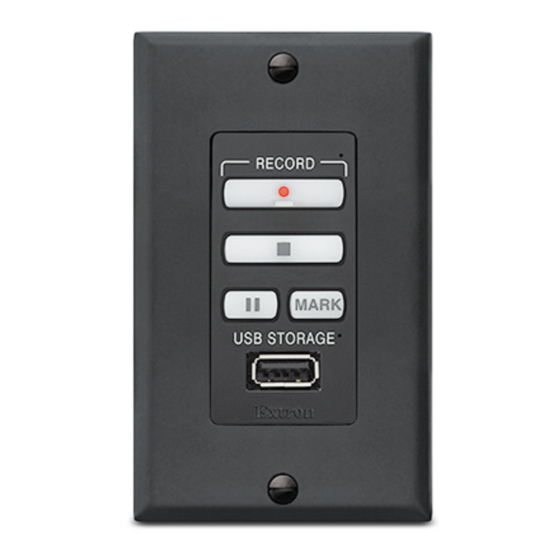
RCP 101 D Front Panel Features
The recording controls have backlit buttons that indicate the current state of the recording
operation. Inactive buttons are backlit dimly to help identify them in low ambient lighting.
A
Record button — Press this button to record one or more of the selected inputs. The
button lights red and remains lit during active recording. The button has a nub that
can be felt with the fingertips.
B
Activity LED — This LED blinks green once when a button press is detected. It blinks
red when a display or notify alarm on the attached SMP is triggered.
C
Stop button — Press this button to stop the active recording. As the recorded file is
finalized, the button blinks. Once the file is finalized, the button lights solidly.
D
Pause button — Press this button to pause the active recording. While the recording
is paused, this button blinks.
Record
Pause
Press
or
E
Mark button — Press this button to place a chapter marking in the recorded file.
When pressed during active recording, the button momentarily blinks.
The button also lights when JPG thumbnails are created. By default, thumbnails are
created automatically and the interval between the creation of each thumbnail can be
changed by the user on the SMP embedded webpage.
F
USB storage port — Connect a USB compatible media storage device to this port.
This storage device can be any standard external hard drive or USB flash drive
formatted with a compatible file system.
NOTE: SMP models can detect and record to USB storage devices that use FAT32, VFAT long file name extensions,
EXT2, EXT3, EXT4 file system, or NTFS-formatted storage volumes.
G
USB Storage LED — This LED indicates the status of the storage port:
It lights green solidly when the recording destination is set to
•
ready for the next recording. The LED does not turn on if less than 10 minutes of recording space remain on the storage
device.
It blinks green during a recording to indicate data transfer activity.
•
It turns off when no USB storage device is detected or the attached storage is disconnected.
•
Front Panel Lockout (Executive Mode)
When front panel lockout is on, all the buttons on the RCP 101 D are disabled. To toggle between enabling or disabling front panel
lockout, press and hold the
As front panel lockout is enabled, all buttons and the red activity LED (
all the buttons and the green activity LED (
blink three times.
to resume recording. Press
Pause
Mark
and
buttons simultaneously for three seconds.
B
) blink three times. If a button is pressed while front panel lockout is on, all buttons
Stop
to end the recording.
RCP USB
Auto
or
B
) blink three times. As front panel lockout is disabled,
Product Category
B B
RECORD
A A
C C
E E
D D
MARK
G G
USB STORAGE
F F
Extron
RCP 101 D Front Panel
Figure 1.
and the attached storage device is
1
Advertisement
Table of Contents

Subscribe to Our Youtube Channel
Related Manuals for Extron electronics RCP 101 D


Summary of Contents for Extron electronics RCP 101 D
- Page 1 SMP front panel transport controls and the USB type A port supports USB flash drives and external USB portable drives. The RCP 101 D can be mounted in walls and furniture in any standard 1-gang US opening. It is available with black and white faceplates to compliment a wide range of environments.
- Page 2 Cable anchor — Use a zip tie to secure the USB cable to this anchor. Power input — The RCP 101 D can be powered with a 12 VDC, 1.5 A power supply or by connecting it to the SMP unit.
- Page 3 Extron recommande d’installer le RCP 101 D dans un boîtier d’encastrement électrique mis à la terre, listé UL. • If the RCP 101 D will be installed into fine furniture, it is best to hire a licenced, bonded craftsperson to cut the access hole and perform the physical installation so the surface will not be damaged.
- Page 4 Removing the RCP 101 D If you need to remove the RCP 101 D from the wall, you can do so by reversing the steps shown in figure 4 or figure 5: Disconnect the RCP 101 from the power source.
- Page 5 SMP Web Page The RCP 101 D can be configured from the SMP web page. Use a PC connected to the same subnet as the SMP. Open a Web browser and enter the IP address of the SMP (see the User Guide for your SMP model).
- Page 6 SMP embedded web page under When the remote control panel is first connected to the SMP, the SMP checks the firmware version on the RCP 101 D and, if necessary automatically updates the panel firmware to a compatible version.
Need help?
Do you have a question about the RCP 101 D and is the answer not in the manual?
Questions and answers