Table of Contents
Advertisement
Quick Links
TLP Pro 725C Series • Setup Guide
Overview
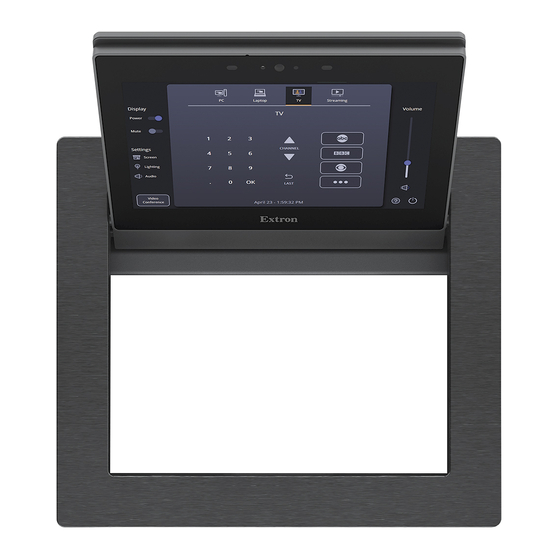
The Extron TLP Pro 725C is a 7 inch Cable Cubby touchpanel with a flip-up, 1024x600 (WSVGA) LCD touchscreen with
24-bit color depth. The TLP Pro 725C NC is a streamlined version of the touchpanel, with a set of features designed to adhere
to government and military security protocols. Either model is ideal for any AV application requiring a full-size, Cable Cubby
touchpanel with a customizable interface. This guide provides instructions for experienced installers to mount and install the
TLP Pro 725C series touchpanels. For more complete instructions, see the TLP Pro 725C User Guide, at www.extron.com.
Setup Checklist
Get Ready
Download and install the latest version of the following software:
…
GUI Designer — For designing layouts for Extron TouchLink
…
…
Global Configurator
processor and touchpanel.
…
Toolbelt — Provides device discovery, device information, firmware updates, and configuration of network settings,
system utilities, and user management for TouchLink Pro devices.
…
Global Scripter
NOTE:
All four software programs are available from www.extron.com.
…
Obtain the following network information from your network administrator:
…
DHCP status — (on or off). If DHCP is off, you must also obtain:
…
IP address
User name — This can be either
…
…
Password — By default, this is
…
Make a note of the touchpanel MAC address.
Make sure you are familiar with all the included parts and have all the necessary tools (see page 2) for installing the cable
…
cubby.
Included Parts
Check that all the following parts are included when the touchpanel is received.
TLP Pro 725C (1)
Included Parts (and Number Provided)
Figure 1.
NOTE:
Active or Passive AAPs must be purchased separately (www.extron.com).
Professional and Global Configurator Plus — For setting up and configuring the control
®
— Provides an integrated development environment for Extron control systems programming.
®
…
Subnet mask
admin
or
user
(for either admin or user).
extron
8-cable Cable
Pass-through Plate (2)
1/4" Hole Plug (4)
#4-40 Screw (8)
Pro touchpanels and third party touch interfaces.
®
…
Gateway
.
3-space
AAP Frame (2)
3/8" Hole Plug (12)
#6-32 Screw (8)
#6 Star Washer (8)
3-space
Connectivity
Bracket (2)
1
Advertisement
Table of Contents

Related Manuals for Extron electronics TLP Pro 725C Series


Summary of Contents for Extron electronics TLP Pro 725C Series
-
Page 1: Included Parts
TLP Pro 725C Series • Setup Guide Overview The Extron TLP Pro 725C is a 7 inch Cable Cubby touchpanel with a flip-up, 1024x600 (WSVGA) LCD touchscreen with 24-bit color depth. The TLP Pro 725C NC is a streamlined version of the touchpanel, with a set of features designed to adhere to government and military security protocols. -
Page 2: Tools Required For Installation
Do not power on the touchpanels or control processors until you have read the Attention in the “Rear Panel Features” • section of the TLP Pro 725C Series User Guide. Ne branchez pas les écrans tactiles ou les contrôleurs avant d’avoir lu la mise en garde dans la section « Rear Panel •... -
Page 3: Product Category
(see “Preparing the Table” in the TLP Pro 725C Series User Guide). There are three methods for cutting the hole in the table: Using a hand router Recommended method —... - Page 4 TLP Pro 725C Series • Setup Guide (Continued) Step 3 — Run all Cables Run all cables necessary to support the AC connector, the cables stored in the cubby, and all planned AAP connectors. Run the cables below the table and through the hole that was cut in Step 2 —...
-
Page 5: Step 7 - Install Modules
Product Category Step 7 — Install Modules Figure 7 shows how to install a power module. The cable pass- through module and AAP module are installed in the same way. The TLP Pro 725C has three triple spaces available for installing modules. -
Page 6: Step 8 - Mounting The Enclosure
TLP Pro 725C Series • Setup Guide (Continued) Step 8 — Mounting the Enclosure NOTE: Use the setup menu to configure the touchpanel before installing it (see Setup Menu on page 8). Once the enclosure is permanently mounted, the button is under the table and may be difficult to access. -
Page 7: Front Panel Features
Do not power on the touchpanel until you have read the Attention in the “Base Features” section of the TLP Pro 725C • Series User Guide. Ne branchez pas l’écran tactile avant d’avoir lu la mise en garde dans la section « Base Features » du TLP Pro 725C Series • User Guide. -
Page 8: Reset Modes: A Brief Summary
Reset Modes: a Brief Summary These touchpanels provide the following reset modes (see the TLP Pro 725C Series User Guide for complete information): Use Factory Firmware — With the unit powered off, press and hold the Reset button (see figure 11, ) while reapplying power •...
Need help?
Do you have a question about the TLP Pro 725C Series and is the answer not in the manual?
Questions and answers