Welch Allyn RetinaVue 100 Imager Directions For Use Manual
Hide thumbs
Also See for RetinaVue 100 Imager:
- Directions for use manual (58 pages) ,
- Directions for use manual (116 pages)
Table of Contents
Advertisement
Advertisement
Table of Contents

Related Manuals for Welch Allyn RetinaVue 100 Imager


Summary of Contents for Welch Allyn RetinaVue 100 Imager
- Page 1 Welch Allyn RetinaVue™ 100 Imager Directions for use Software version 4.6.XX...
- Page 2 © 2016 Welch Allyn. All rights are reserved. To support the intended use of the product described in this publication, the purchaser of the product is permitted to copy this publication, for internal distribution only, from the media provided by Welch Allyn. No other use, reproduction, or distribution of this publication, or any part of it, is permitted without written permission from Welch Allyn.
-
Page 3: Table Of Contents
Skip an image capture while in Auto exam mode ..........35 Perform a manual image capture while in Manual exam mode ......36 Update the RetinaVue 100 Imager software ............. 38 Viewing or changing the RetinaVue 100 Imager settings ........39 Troubleshooting ..................41 Maintenance ..................45 Clean and disinfect ..................... - Page 4 Contents Welch Allyn RetinaVue™ 100 Imager...
-
Page 5: Symbols
Symbols Documentation symbols WARNING The warning statements in Caution The caution statements in this this manual identify conditions or manual identify conditions or practices practices that could lead to illness, injury, that could result in damage to the or death. Warning symbols will appear equipment or other property, or loss of with a grey background in a black and data. - Page 6 2 Symbols Welch Allyn RetinaVue™ 100 Imager • No connection (X) Shipping, storing, and environment symbols Temperature limit Keep Dry Fragile Separate collection of Electrical and Electronic Equipment. Do not dispose as unsorted municipal waste. Atmospheric pressure limitation Humidity limitation...
- Page 7 Directions for use Symbols 3 Battery charge level indicators Device is running on battery and is fully Device is running on battery and charge charged. is below 75 percent. Device is running on battery and charge Device is running on battery and charge is below 50 percent.
- Page 8 4 Symbols Welch Allyn RetinaVue™ 100 Imager...
-
Page 9: Introduction
Introduction Intended use The Welch Allyn RetinaVue 100 Imager is a digital hand-held eye-fundus camera used to record digital photographs of the fundus (including retina, macula and optic disc) of the human eye and surrounding area. About warnings and cautions Warning and caution statements can appear on the RetinaVue 100 Imager device, the packaging, the shipping container, or in this Directions for use. - Page 10 CAUTION Do not sterilize the device. CAUTION All servicing of this equipment is to be performed by Welch Allyn, Inc. or by a center approved by Welch Allyn, Inc. CAUTION This device needs to be installed and put into service according to the EMC information provided herein.
-
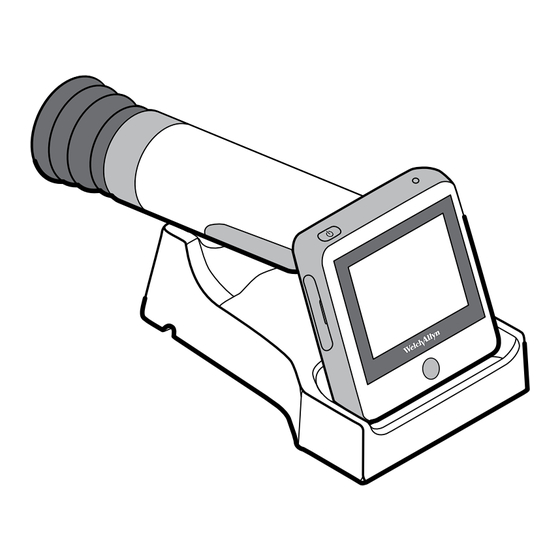
Page 11: Controls And Connectors
Controls and connectors No. Feature Description Docking station Charges the RetinaVue 100 Imager and enables data transfer to a PC running the RetinaVue™ Network software. (Requires optional software). Connect to an electrical outlet or to a USB port of a computer. -
Page 12: Retinavue 100 Imager Home Screen
8 Introduction Welch Allyn RetinaVue™ 100 Imager RetinaVue 100 Imager Home screen The RetinaVue 100 Imager Home screen includes the following areas: Item Area Device status Content Device Status Area The Device Status Area, located at the top of the Home screen, displays the Battery condition. - Page 13 The Content Area includes four workflow selection buttons. Touching one of the four buttons navigates to the next screen associated with that workflow. • Patients: Presents a list of patients created on the RetinaVue 100 Imager or transferred from the RetinaVue™ Network (requires optional software). •...
- Page 14 Image inspection: Navigation controls in the Review mode and Settings mode The Navigation area is located at the bottom of the RetinaVue 100 Imager screen. The navigation control for the Review mode and the Settings mode includes the back button.
- Page 15 Directions for use Introduction 11 Image Pre-acquisition controls (Auto mode) From the Home screen touch Exam. The Exam Pre-acquisition screen appears. No. Feature No. Feature START enters automatic image acquisition mode. Navigates to the Home screen. (Image Acquisition Settings) navigates to MANUAL switches to advanced image capture the Advanced image capture settings screen.
- Page 16 12 Introduction Welch Allyn RetinaVue™ 100 Imager About image quality scores Good quality If the image is of good quality, it is very likely to be read by a specialist. green (Scores of 40 +) Acceptable quality If the image is of good enough quality, it is likely to be read by a specialist.
- Page 17 Directions for use Introduction 13 Use the RetinaVue 100 Imager touchscreen inspection control to navigate to the Inspection screen, then zoom in or out with a pinch or pull. Touch (Close) to return to the Post-acquisition screen and accept or reject the acquired image.
- Page 18 14 Introduction Welch Allyn RetinaVue™ 100 Imager Image accepted, quality OK. Quality scores ranging from 20 — 39. Touch (Rejected) to view that image. Image rejected. Quality scores ranging from 0 — 19. Touch SAVE to accept all images and to return to the Home screen.
- Page 19 Directions for use Introduction 15 About the Auto and Manual Exam modes Auto Mode Auto Mode is the default image capture mode. Available automatic features include: • Image capture • Focus • Flash brightness • Sequential image capture order of the right and left eye •...
- Page 20 16 Introduction Welch Allyn RetinaVue™ 100 Imager Manual mode contains advanced image capture options. Note A manual touch of the capture button is required to obtain an image. Available manual features include: • Focus adjustment (values range from -1 to +1) •...
-
Page 21: Using The Retinavue 100 Imager
Using the RetinaVue 100 Imager View images saved to the RetinaVue 100 Imager on the LCD touchscreen. The images saved on the SD card are encrypted. To view the images on the PC, install the RetinaVue Network software. For information on the RetinaVue Network Software visit www.RetinaVue.com. - Page 22 Install the battery/replace the battery Set the RetinaVue 100 Imager on a flat, clean surface with the LED display facing down. WARNING Personal injury risk. Improper handling of the battery can lead to heat generation, smoke, explosion, or fire.
- Page 23 Directions for use Using the RetinaVue 100 Imager 19 4. For first-time setup of the RetinaVue 100 Imager, insert the battery into the battery compartment. For battery replacement, remove the existing battery and then insert the new replacement battery into the battery compartment.
- Page 24 1. Remove the lens cap from the RetinaVue 100 Imager. 2. Slide the eye cup over the bezel on the RetinaVue 100 Imager. 3. Use the eye cup to cover the patient's examined eye and allow them to focus on the...
- Page 25 Using the RetinaVue 100 Imager 21 Hold the RetinaVue 100 Imager for a patient exam The RetinaVue 100 Imager must be held level and in line with your patient’s eye. There are two recommended techniques to properly hold the RetinaVue 100 Imager for a...
- Page 26 Make micro adjustments with your guide hand to fine tune the focus of the RetinaVue 100 Imager. Hold the patient end of the RetinaVue 100 Imager with just the thumb and forefinger. Use the small and ring finger to steady the RetinaVue 100 Imager by anchoring them...
-
Page 27: Docking Station
(Optional) Plug the USB cable into an open USB port on a computer. 4. Place the RetinaVue 100 Imager on the docking station charger with the contact pins of the RetinaVue 100 Imager touching the contact pins of the docking station... - Page 28 24 Using the RetinaVue 100 Imager Welch Allyn RetinaVue™ 100 Imager 5. Before the first use, allow the RetinaVue 100 Imager to charge for 8 hours on the docking station charger. Note The power indicator light turns amber to indicate that the RetinaVue 100 Imager is in the processing of charging.
-
Page 29: Patient Data Management
Directions for use Using the RetinaVue 100 Imager 25 Patient data management To create a new patient: 1. From from the Home screen, touch Patients. The Patients screen appears. 2. Touch (New patient). The New Patient screen appears. Required fields are noted with a red asterisk. - Page 30 26 Using the RetinaVue 100 Imager Welch Allyn RetinaVue™ 100 Imager 5. Enter the patient's Date of Birth. (Touch within the DOB/Gender field to launch the on-screen keyboard and to enter the patient's Date of Birth.) Touch OK. 6. Enter the patient's gender using the radio button to select male or female.
- Page 31 Directions for use Using the RetinaVue 100 Imager 27 Review patient tests: 1. From the Home screen, touch Review. The patient's Review screen appears. 2. Touch on a patient's information to review the patient demographics and to view images associated with a patient.
-
Page 32: Perform An Eye Exam Using The Auto Exam Mode
• Keep the RetinaVue 100 Imager lens the same height as the patient's examined eye. • Approach the patient from directly in front of the examined eye. - Page 33 • Make slight, micro adjustments with your guide hand to fine tune the position of the RetinaVue 100 Imager. Do not use your hand on the LCD side to make minor adjustments. For additional information about techniques to capture the highest quality Note image, see the Technique guide that came with the RetinaVue 100 Imager.
- Page 34 Welch Allyn RetinaVue™ 100 Imager The Exam acquisition screen appears. 5. Hold the patient end of the RetinaVue 100 Imager two to three inches directly in front of the patient's examined eye. Continue forward to compress the eye cup against the examined eye.
- Page 35 7. Look for a white circular reflection at the top of the eye's image on the LCD touchscreen. This is your initial target. 8. Guide the green circle on the RetinaVue 100 Imager LCD touchscreen towards the initial target by slowly moving the RetinaVue 100 Imager towards the eye.
- Page 36 9. Once the reflection has filled the screen, push slightly forward until a “bubble” appears. 10. Keep the RetinaVue 100 Imager in line. Slightly adjust the RetinaVue 100 Imager away from any shadows that appear. 11. Move the patient end of the RetinaVue 100 Imager toward the bubble.
- Page 37 Directions for use Using the RetinaVue 100 Imager 33 13. An audible tone alerts you that the image has been captured. The acquired image appears on the LCD touchscreen for review in about five seconds. 14. Touch (Accept) to begin the second exam of the patient's left eye (L1) and...
-
Page 38: Perform A Manual Image Capture While In Auto Exam Mode
34 Using the RetinaVue 100 Imager Welch Allyn RetinaVue™ 100 Imager Note Touch to review the current image. Images with a red ) denote low quality images. Touch dispose of an image and touch START to begin a capture of a replacement image. -
Page 39: Skip An Image Capture While In Auto Exam Mode
Directions for use Using the RetinaVue 100 Imager 35 Skip an image capture while in Auto exam mode 1. From the Home screen, touch Exam. The Pre-acquistion screen appears. 2. Touch (Next) or touch (Image Order) to skip to the next image in the sequence. -
Page 40: Perform A Manual Image Capture While In Manual Exam Mode
36 Using the RetinaVue 100 Imager Welch Allyn RetinaVue™ 100 Imager Perform a manual image capture while in Manual exam mode 1. From the Home screen, touch Exam. The Pre-acquistion screen appears. 2. Touch MANUAL to enter Image acquisition mode and begin the exam of the patient's eye. - Page 41 4. Hold the patient end of the RetinaVue 100 Imager two to three inches directly in front of the patient's examined eye. Continue forward to compress the eye cup against the examined eye.
-
Page 42: Update The Retinavue 100 Imager Software
Welch Allyn RetinaVue™ 100 Imager Update the RetinaVue 100 Imager software Note Patient list changes will only be made to the RetinaVue 100 Imager after it is undocked from the docking station charger. (Transferring patient list information requires the optional RetinaVue Network software.) -
Page 43: Viewing Or Changing The Retinavue 100 Imager Settings
Directions for use Using the RetinaVue 100 Imager 39 Viewing or changing the RetinaVue 100 Imager settings To view or change the settings Touch Settings. Modify the settings as desired. • Touch Volume. Touch (up) or (down) to adjust the device sound volume. Touch (Back) to return to the Settings screen. - Page 44 40 Using the RetinaVue 100 Imager Welch Allyn RetinaVue™ 100 Imager...
-
Page 45: Troubleshooting
Welch Allyn. To correct an error, follow these instructions or contact Welch Allyn Technical Support: www.welchallyn.com/service. Troubleshooting image quality... -
Page 46: Error Messages
42 Troubleshooting Welch Allyn RetinaVue™ 100 Imager Problem Solution Dark semi-circle on top Move the patient side of the RetinaVue 100 Imager down and away from dark semi-circle. Dirty lens Clean the lens with an appropriate cleaning cloth. Error messages... - Page 47 Directions for use Troubleshooting 43 Error message/problem Solution Camera is docked. Please lift the camera before saving, deleting Remove the camera from the docking station. or starting an acquisition. The battery is running low. Please recharge. When the battery charge level is between eleven and twenty-five percent, the low battery error message appears.
- Page 48 44 Troubleshooting Welch Allyn RetinaVue™ 100 Imager...
-
Page 49: Maintenance
CAUTION Do not use chemicals other than isopropyl or ethyl alcohol on the lens. The RetinaVue 100 Imager can be cleaned and an intermediate-level of disinfection can be achieved using the following method. Cleaning the RetinaVue 100 Imager lens Wipe the surface of the lens with a cleaning cloth or a lens cleaning tissue such as Thorlabs Inc.. - Page 50 46 Maintenance Welch Allyn RetinaVue™ 100 Imager Approved cleaning agents Use only the following approved cleaning agents on the RetinaVue 100 Imager: • 10 percent chlorine bleach solution • 70 percent isopropyl alcohol Welch Allyn has validated these instructions as being capable of preparing the RetinaVue 100 Imager for re-use.
-
Page 51: Specifications
Specifications Specifications View Angle 45 Degree (Typical) Diopter -20 ~ +20D (Typical) Dimensions L 8.8 inches (224.2 mm) × W 4.2 inches (106.7 mm) × H 4.1 inches (105.2 mm) Weight 565 Grams ±5% Search Fundus Infrared LED Lighting Camera / video Natural White Light Emitting Diode (LED) flash light Captures... - Page 52 Firmware updates and support may require an annual subscription service after the initial one (1) year warranty period. The expected battery life is at least one (1) year. If the RetinaVue 100 Imager device fails to hold a charge, a new battery can be ordered.
-
Page 53: Device Radio
Device radio The RetinaVue 100 Imager's radio operates on Welch Allyn FlexNet™ or other 802.11 networks. For information regarding the configuration of network connections and recommended settings, see the best practices documents at www.welchallyn.com/ promotions/Network_Installation_Best_Practices.htm. Note: Your model might not contain all of these features. - Page 54 Note Some countries restrict the use of 5-GHz bands. The 802.11a radio in the RetinaVue 100 Imager uses only the channels indicated by the access point with which the radio associates. The hospital IT department must configure access points to operate with approved domains.
-
Page 55: General Compliance And Standards
Electrical Equipment (WEEE). If this product is contaminated, this directive does not apply. For more specific disposal or compliance information, see www.welchallyn.com/weee, or contact Welch Allyn Customer Service at +44 207 365 6780. General radio compliance Note Your model might not contain all of these features. - Page 56 This booklet is available from the U.S. Government Printing Office, Washington, D.C. 20402. Stock No. 004-000-0034504. Welch Allyn is not responsible for any radio or television interference caused by unauthorized modification of the devices included with this Welch Allyn product, or the substitution or attachment of connecting cables and equipment other than specified by Welch Allyn.
- Page 57 Directions for use General compliance and standards 53 • However, it is good practice to avoid using the 901103 Imager in extremely close proximity to other equipment. • It is not safe to operate the 901103 Imager in the presence of high-frequency surgical equipment.
- Page 58 54 General compliance and standards Welch Allyn RetinaVue™ 100 Imager Electromagnetic immunity Surge ± 1 kV differential ± 1 kV differential Mains power quality should be that of a typical mode mode commercial or hospital environment. IEC 61000-4-5 ± 2 kV common mode ±...
- Page 59 Directions for use General compliance and standards 55 Electromagnetic immunity assess the electromagnetic environment due to fixed RF transmitters, an electromagnetic site survey should be considered. If the measured field strength in the location in which the 901103 is used exceeds the applicable RF compliance level above, the 901103 should be observed to verify normal operation.
- Page 60 56 General compliance and standards Welch Allyn RetinaVue™ 100 Imager...
-
Page 61: Approved Accessories
WARNING Use only Welch Allyn approved accessories and use them according to the manufacturer’s directions for use. Using unapproved accessories with the RetinaVue 100 Imager can affect patient and operator safety and can compromise product performance and accuracy, and void the product warranty. - Page 62 Service Part number Description S1-RV100-1 Welch Allyn Partners in Care Comprehensive Partnership Program Service Agreement for RetinaVue 100 Imager; 1 year S1-RV100-2 Welch Allyn Partners in Care Comprehensive Partnership Program Service Agreement for RetinaVue 100 Imager; 2 year S1-RV100-5 Welch Allyn Partners in Care Comprehensive Partnership Program Service Agreement for RetinaVue 100 Imager;...
-
Page 63: Warranty
Warranty Welch Allyn warrants the product to be free of defects in material and workmanship and to perform in accordance with manufacturer's specifications for the period of one year from the date of purchase from Welch Allyn or its authorized distributors or agents. - Page 64 Material No. 411492...
Need help?
Do you have a question about the RetinaVue 100 Imager and is the answer not in the manual?
Questions and answers