Air Lift WirelessONE 25870 Installation Manual
Key fob activated
compressor system
Hide thumbs
Also See for WirelessONE 25870:
- User manual (24 pages) ,
- Installation manual (20 pages) ,
- Installation manual (15 pages)
Table of Contents
Advertisement
Advertisement
Table of Contents

Related Manuals for Air Lift WirelessONE 25870


Summary of Contents for Air Lift WirelessONE 25870
- Page 1 WirelessONE Kit 25870 Key Fob Activated Compressor System INSTALLATION GUIDE For maximum effectiveness and safety, please read these instructions completely before proceeding with installation . Failure to read these instructions can result in an incorrect installation.
-
Page 3: Table Of Contents
TABLE OF CONTENTS Introduction . . . . . . . . . . . . . . . . . . . . . . . . . . . . . . . . . . . . . . . 2 Important Safety Notice . -
Page 4: Introduction
. Air Lift Company reserves the right to make changes and improvements to its products and publications at any time. Contact Air Lift Company at (800) 248-0892 for the latest version of this manual . -
Page 5: Installation Schematics
WirelessONE Installation - Electrical Schematic fig. 1 MN-751... -
Page 6: Pneumatic Schematic
WirelessONE Installation - Pneumatic Schematic fig. 2 MN-751... -
Page 7: Hardware & Tool Lists
1/4 ATC/ATO tap in fuse .....1 17173 #14-1/4”x3/4” Self Tapping Screws ..2 Missing or damaged parts? Call Air Lift customer STOP! service at (800) 248-0892 for a replacement part. -
Page 8: Installing The Wirelessone System
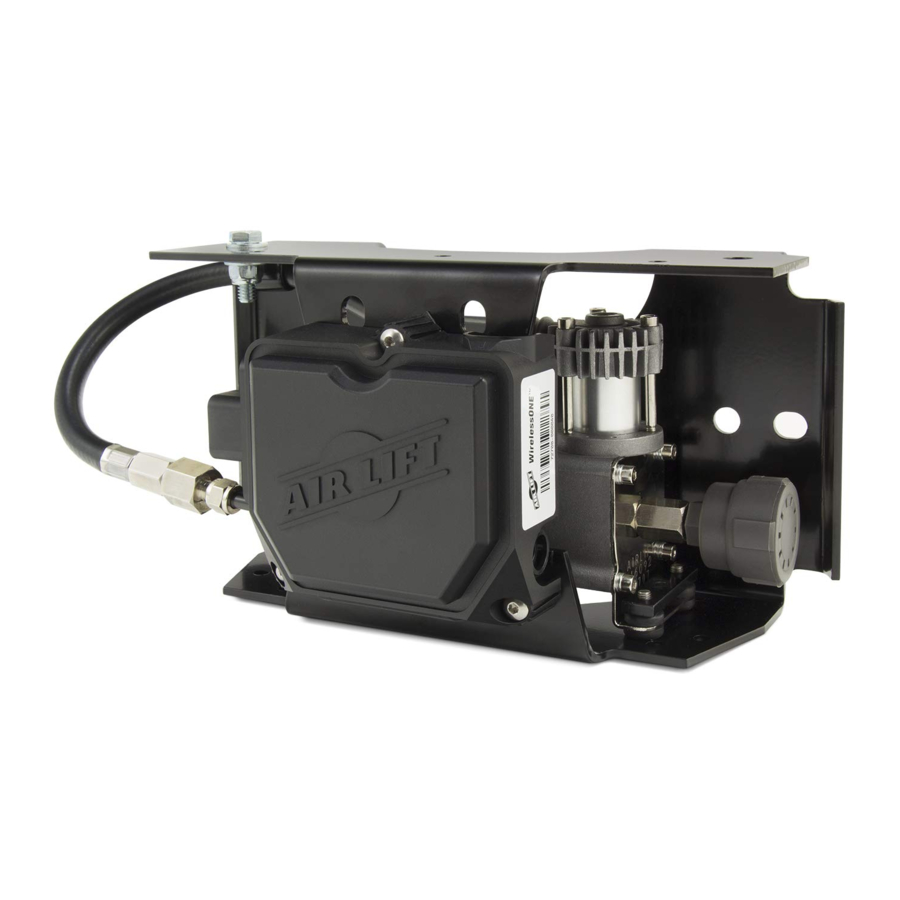
WirelessONE Installing the WirelessONE System INSTALLING THE COMPRESSOR Select a rigid mounting location for the compressor on the vehicles frame or cross member (fig. 3) that shields the compressor from the elements and heat sources. NOTE The electrical harness will force the compressor to be within 24” of the manifold in order to make electrical connections. -
Page 9: Installing The Harness
WirelessONE INSTALLING THE HARNESS fi g. 6 Connect electrical connector to manifold (B). a. Push down till fully seated. b. Push red secondary lock down. 2.Connect compressor to harness. a . Cut off terminal on compressor red wire . b. Strip ¼” insulation off compressor red wire. c. -
Page 10: Attaching The Air Lines
WirelessONE • Heat buttsplice to seal connection . e. Select the appropriate type of fuse tap in terminal for your application (fig. 7). Adapter Adapter #1 Fuse fig. 7 Adapter #2 * * Uses 3/16 (smaller) Female Push On Connector f . -
Page 11: Settings Mode
WirelessONE when the battery is getting low . Settings Mode: Mode in which the user can change the backlighting color, alter the unit of measure (psig, or BAR). Settings Mode Press and hold the Up and Down buttons for 5 seconds to enter the settings mode. Once in the settings mode the display will display “SE”... -
Page 12: Saving And Recalling Memory 1
WirelessONE 3. Pressing the down arrow will decrease the desired pressure by 1 psig, or 0.1BAR depending on the unit of measure selected . • When the user releases the button the new desired pressure will be transmitted to the receiver . 4. -
Page 13: How To Sync The Receiver To The Transmitter
WirelessONE • Upon the press of the M1 & M2 buttons the display will display “M3”. • Once the buttons are released the display will display the new desired pressure Saving to Memory • Press and hold M1 & M2 buttons for 5 seconds to set the desired pressure to memory 3. -
Page 14: Warranty And Returns Policy
Air Lift 1000 ....Lifetime Limited Load Controller (I) ... . 2 year Limited RideControl . -
Page 15: Replacement Parts And Returns
.airliftcompany .com/downloads .html . Step 2 If your dealer does not have the part in stock, call Air Lift directly and we can ship you the part you need, the same day, in the U .S . or Canada . -
Page 16: Contact Information
We’re delighted to be a part of your air suspension solution. Air Lift Company is dedicated to ensuring that you have the best possible experience with our products . If you have any questions, concerns or even a suggestion, please feel free to contact us . -
Page 17: Templates
DRILL TO HOLE PATTERN FOR CREATE HOLE BOTTOM OF WirelessONE COMPRESSOR 2.1000 Templates 16060 COMPRESSOR USE 1/4" DRILL TO CREATE HOLE 8.0000 HOLE PATTERN FOR HOLE PATTERN FOR BOTTOM OF MANIFOLD SIDE OF MANIFOLD DRILL TO HOLE PATTERN FOR DRILL TO CREATE HOLE BOTTOM OF CREATE HOLE... - Page 18 WirelessONE IMPORTANT: To Avoid Cold Weather Freeze-up Add 4 oz . (1/2 cup) of “GUNk” Brand AIR BRAkE ANTI FREEZE Directly into each flex member. Remove the air line and/or fitting from the air bag and fill directly. Gunk Brand Air Brake Anti-Freeze may be purchased at an automotive parts store or truck supply store .
- Page 20 Thank you for purchasing Air Lift products — the professional installer’s choice! Air Lift Company • 2727 Snow Road • Lansing, MI 48917 or PO Box 80167 • Lansing, MI 48908-0167 Toll Free (800) 248-0892 • Local (517) 322-2144 • Fax (517) 322-0240 • www.airliftcompany.com...
Need help?
Do you have a question about the WirelessONE 25870 and is the answer not in the manual?
Questions and answers