Table of Contents
Advertisement
Quick Links
Advertisement
Table of Contents

Related Manuals for Microsemi SyncServer S80


Summary of Contents for Microsemi SyncServer S80
- Page 1 SyncServer S80 NTP Server User Guide Part Number 098-00777-000 Revision A...
- Page 2 SyncServer S80 NTP Server...
-
Page 3: Table Of Contents
2 Installation of SyncServer S80 ........ - Page 4 Returning the SyncServer S80 ........
- Page 5 Table of Contents Customer Assistance Center ..............73 Technical Support .
- Page 6 SyncServer S80 NTP User Guide 09 8- 007 77 -0 00 Re v. A...
-
Page 7: Overview
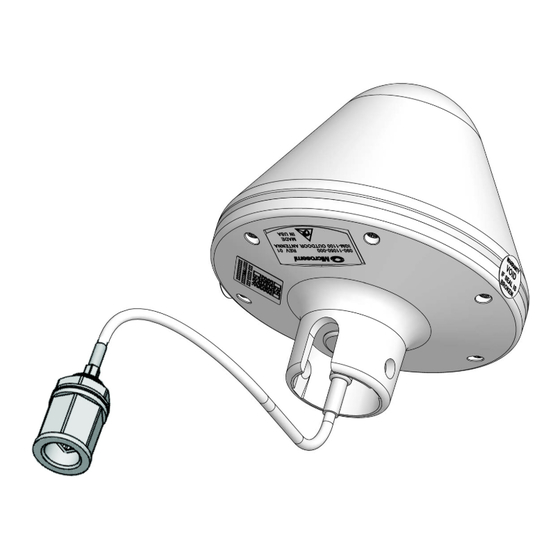
The SyncServer S80 consists of a fully integrated GPS/GLONASS receiver, NTP server, and PoE interface. All connections for the SyncServer S80 are through the RJ45 Ethernet jack via a cable on the 09 8- 007 77 -0 00 Re v. A... - Page 8 Overview bottom of the unit. See Figure 1-1. Figure 1-1 • RJ45 Port on SyncServer S80 09 8- 007 77 -0 00 Re v. A...
-
Page 9: Installation Of Syncserver S80
2 – Installation of SyncServer S80 Chapter .This chapter details the installation of the SyncServer S80. Requirements The SyncServer S80 requires the following for proper installation and function: • Mounting site outdoors with GNSS satellites visibility • Network connection with 1 Gigabit Ethernet capacity •... - Page 10 Installation of SyncServer S80 Figure 2-1 • SyncServer S80 Connection Diagram 09 8- 007 77 -0 00 Re v. A...
-
Page 11: Installation Tools And Equipment
Cat 7 waterproof cables (lengths depends on layout) Unpacking the Unit The SyncServer S80 (p/n 090-15200-080) is packaged to protect them from normal shock, vibration and handling damage. (Each unit is packaged separately.) Unpack and inspect the unit as follows: 1. -
Page 12: Mounting Site Location
Figure 2-2 • Surge Protection with Indoor PoE Surge Protection for Outdoor PoE Using an outdoor PoE only makes sense for more than 1 outdoor device, for instance 1 SyncServer S80 and 1 outdoor security camera. Suggested Microsemi PoEs include the 2 port PDS-102GO or 4 port... -
Page 13: Power Requirements
PoE Class 3. Network Connection The Ethernet port available through the cable on the bottom of the SyncServer S80 unit accepts an RJ- 45 connector, which links the unit to your 1 Gigabit Ethernet LAN. See Figure 2-4. The SyncServer S80 unit also receives power through the Ethernet cable from a POE power injector. -
Page 14: Recommended Tasks
Microsemi recommends using a static IP address. Whenever any IP address or mode is changed, the S80 must be rebooted. Users are not recommended to use DHCP for the SyncServer S80 because there is no convenient method for retrieving assigned DHCP address for the management port after reboot. -
Page 15: Installing The Syncserver S80 Outdoors
Ethernet system into the top of the mounting pole. Continue until the top of the mounting pole fits into the Antenna. 10. Attach the SyncServer S80 unit to the top of the mounting pole, and secure it using the screw and washer from the Installation Kit (093-00741-000). - Page 16 2-1. 28. Plug the Power Input of the power injector or POE midspan repeater into an approved 100- to 240-VAC outlet or other suitable power source. Figure 2-5 • SyncServer S80 09 8- 007 77 -0 00 Re v. A...
- Page 17 SyncServer S80 NTP User Guide Figure 2-6 • SyncServer S80 Dimensions Figure 2-7 • Mounting Kit for SyncServer S80 09 8- 007 77 -0 00 Re v. A...
- Page 18 Installation of SyncServer S80 Figure 2-8 • Installation Bracket for SyncServer S80 09 8- 007 77 -0 00 Re v. A...
- Page 19 SyncServer S80 NTP User Guide Figure 2-9 • Cable Routing Before Final Assembly 09 8- 007 77 -0 00 Re v. A...
- Page 20 Installation of SyncServer S80 Figure 2-10 • Connecting Customer Cable to Antenna Detail - Sealant Strip 09 8- 007 77 -0 00 Re v. A...
- Page 21 SyncServer S80 NTP User Guide Figure 2-11 • Attaching SyncServer S80 to Pole 09 8- 007 77 -0 00 Re v. A...
- Page 22 Installation of SyncServer S80 Figure 2-12 • Attaching SyncServer S80 and Pole to Bracket 09 8- 007 77 -0 00 Re v. A...
- Page 23 SyncServer S80 NTP User Guide Figure 2-13 • Mounting SyncServer S80 to a Mast Figure 2-14 • Mounting SyncServer S80 to a Vertical Surface 09 8- 007 77 -0 00 Re v. A...
- Page 24 Installation of SyncServer S80 Figure 2-15 • Surge Protector Dimensions 09 8- 007 77 -0 00 Re v. A...
- Page 25 SyncServer S80 NTP User Guide Figure 2-16 • Connecting Surge Protector 09 8- 007 77 -0 00 Re v. A...
- Page 26 Installation of SyncServer S80 Figure 2-17 • Mounting Surge Protector on Pole Figure 2-18 • Mounting Surge Protector on Outdoor Wall 09 8- 007 77 -0 00 Re v. A...
-
Page 27: Cli Commands
3 – CLI Commands This chapter describes how to use CLI commands to manage the SyncServer S80. Using CLI Commands The Command Line Interface (CLI), also called the ASCII command set, can be used to control the S80 from a terminal connected to the Ethernet port. See below for an overview of the command set. -
Page 28: S80 Command Set
CLI Commands 1. User class, with read-only permission, can change own password 2. Config class, with read-write rights, can change own password 3. Administrator class, with read-write rights, can change own password and can also change password for config and user login. S80 Command Set This section provides an alphabetical listing and details of all CLI commands that are available while in CLI mode. -
Page 29: Show Alarm
SyncServer S80 NTP User Guide show alarm Use this command to display the system's standing (active) alarms and events. Command Syntax: show alarm Level: User, Config and Admin Example: S80> show alarm Response: Alarms: Date-Time ID index Severity Descriptions 2017-04-17 11:48:55, 098, index = 000, ALARM SEVERITY: EVENT,GNSS PPS... -
Page 30: Show Alarm-Config
CLI Commands show alarm-config: Displays the alarm configuration including alarm ID, severity, state, reporting delay and description for S80 alarms. This also displays if the alarm is transitory. Command Syntax: show alarm-config Level: User, Config and Admin Example: S80> show alarm-config Response: ID Severity State Delay Event/Alarm Descriptions 1 Minor enable 0 "Entered time/frequency warm-up state"... - Page 31 SyncServer S80 NTP User Guide – 4 - Minor – 5 - Event • To provision the reporting delay of the specified Alarm number in seconds: set alarm-config delay {alarm [1 to 163] | all}value [0 to 500000] Level: Config and Admin...
-
Page 32: Show Bridge-Time
CLI Commands show bridge-time: Use this command to display the bridging time that is used to allow the frequency servo to coast through short periods when the system does not have qualified GPS/GLONASS reference. The bridging time is in seconds. Command Syntax: show bridge-time Level:... -
Page 33: Show Clock
SyncServer S80 NTP User Guide show clock This command displays the system date, time, and leapseconds in several formats. • Current system date and time • Accumulated leapseconds between TAI and UTC time • Pending leapseconds Command Syntax: show clock... -
Page 34: Set Configuration
CLI Commands set configuration: Use this command to set the current configuration to factory settings. Factory removes all attributes. Use of this command results in reboot of the S80. Command Syntax: set configuration factory Level: Config and Admin Example 1: To set the factory configuration S80>... -
Page 35: Show Gnss
SyncServer S80 NTP User Guide show gnss This command displays the GNSS port state and elevation mask value. Command Syntax: • To show antenna-current qualification: show gnss antenna-current: • To show GNSS configuration: show gnss config • To show GNSS status: show gnss status •... -
Page 36: Set Gnss
If GNSS is disabled, the S80 still shows satellites tracked but doesn’t provide valid time and freq. • To set the GNSS elevation mask: set gnss mask {5 to 60} Note: SyncServer S80 • To set the GNSS cable delay value: set gnss cable-delay {0 to 9999} •... -
Page 37: Show Hostname
LLDP frame will get changed based on hostname. Microsemi recommends setting a hostname. In the event that IP address is lost. you will be able to identify the correct unit when retrieving the IP with LLDP utility. See "Provisioning for... -
Page 38: Show Inventory
CLI Commands Level User, Config, and Admin Example 1: To set the hostname to Sync_R52 - S80> set hostname Sync_R52 show inventory Use this command to display product information for the S80. • Product Model • Part Number • Clei Number •... -
Page 39: Show Ip
SyncServer S80 NTP User Guide show ip Use this command to display the status and current IP settings for the Ethernet interface. Command Syntax: • To view configuration of the specified network interface: show ip config • To view status of the specified network interface... - Page 40 CLI Commands Note: The 128 bits of an IPv6 address are represented in 8 groups of 16 bits each. Each group is written as 4 hexadecimal digits and the groups are separated by colons (:). For convenience, an IPv6 address may be abbreviated to shorter notations by application of the following rules, where possible.
-
Page 41: Show License
SyncServer S80 NTP User Guide show license Use this command to display the current feature-level licenses. Command Syntax: show license Level: Config and Admin Example: S80>show license Response: ntp-packets-capacity-500, NTP with capacity of 500 packets per second If no license is installed, the S80 unit shows NTP packet capacity of 500 (default). -
Page 42: Set Lldp
IP address of the unit as there is no serial port connection available. Caution:Microsemi does not recommend disabling LLDP, becuase you will lose access to the method of retrieving a lost IP address. See "Recovering Lost IP Address with LLDP Utility"... -
Page 43: Set Log
SyncServer S80 NTP User Guide Apr 17 11:56:52 S80 local4.notice syslog: 181, index = 000, ALARM SEVERITY: EVENT,NTP Passive mode Apr 17 12:27:52 S80 local4.notice syslog: 181, index = 000, ALARM SEVERITY: EVENT,NTP Passive mode Apr 17 12:45:55 S80 local4.notice syslog: 157, index = 002, ALARM SEVERITY: EVENT,NO_SATS_GT60 Apr 17 21:54:53 S80 local4.notice syslog: 181, index = 000, ALARM SEVERITY: EVENT,NTP... -
Page 44: Logout
CLI Commands Command Syntax: set log-config size {alarm-event | command | security} <size-value> Level Config, and Admin Example 1: To set the alarm-event log size to 30 kilobytes - S80> set log-config size alarm-event 30 Example 2: To set the command log size to 50 kilobytes - S80>... -
Page 45: Password
SyncServer S80 NTP User Guide • To set the TTL value - set ntp ttl <value> • To set the Alarm Threshold value - set ntp alarmthresh [1-100] • To set the IP version to IPv4 or IPv6 - set ntp ipver {4 | 6} •... -
Page 46: Reboot
Sent SIGKILL to all processes Requesting systRestarting system. U-Boot 2010.03-00002-gb955030 (May 26 2015 - 08:55:58) CPU : SmartFusion2 SoC (Cortex-M3 Hard IP) Freqs: CORTEX-M3=166MHz,PCLK0=83MHz,PCLK1=83MHz Board: Falcon Rev 1A, www.microsemi.com SW : Rev 1.2.8 DRAM: 128 MB In: serial Out: serial... -
Page 47: Show Snmp
SyncServer S80 NTP User Guide show snmp Use these commands to display the SNMP Manager assigned to the agent, all assigned users (username only), and the SNMP trap version and SNMP trap user. Command Syntax: • To show SNMP Manager assignment: show snmp manager •... -
Page 48: Set Snmp
Example 2: S80> set snmp add manager 192.168.1.100 Example 3: S80> set snmp add v2-community testteam Example 4: S80> set snmp add trapuser microsemi securelvl priv Response 4: Enter SNMPv3 user security details : _________________________________________ minlevel : noauth or auth or priv... -
Page 49: Show Status
SyncServer S80 NTP User Guide show status Use this command to display the following system status information: • Assigned System Name • System Date And Time • System Uptime • Time Traceable • Clock Frequency Status • Clock Timing Status •... - Page 50 CLI Commands 09 8- 007 77 -0 00 Re v. A...
-
Page 51: Configuration
4 – Configuration This chapter describes how to configure the SyncServer S80 with CLI via SSH. It also describes how to test the S80 unit before deployment. Overview • "Establishing a Connection to the S80" • "Configuring the IP Address"... -
Page 52: Establishing A Connection To The S80
Configuration Establishing a Connection to the S80 To set up and manage the S80 with a terminal or a computer with terminal emulation, you must establish an SSH connection. Note: The S80 default IP address is 192.168.100.11, the subnet mask is 255.255.255.0, and the gateway address is 0.0.0.0 (no gateway). -
Page 53: Managing The User Access List
3. Type your user name and press Enter. The system prompts for a password. 4. Type your password and press Enter. The system prompt appears. Note: The default user name is “admin” and the default password is "Microsemi". To avoid unauthorized access, you should change from the default password. Changing a User’s Password Use the following procedure to change a user’s password. -
Page 54: Provisioning Ntp Parameters
Configuration Example To provision the S80 for a GNSS reference with a cable delay of 315 ns, mask value of 30, with GLONASS track-mode enabled (GPS + GLONASS), and dynamic position mode set to 0 (automotive), perform the following steps: 1. -
Page 55: Disabling Specific Alarms
SyncServer S80 NTP User Guide Figure 4-1 • Set Alarm-Config Command Hierarchy Disabling Specific Alarms The Set Alarm-Config command allows you to enable or disable specified alarms. Example To disable the GNSS antenna open-circuit alarm (alarm #33), enter the following: 1. -
Page 56: Provisioning For Snmp
Configuration Provisioning for SNMP The Simple Network Management Protocol (SNMP) is an application layer protocol that allows you to manage network devices. SNMP is based on a client-server query-response mode that requires an Ethernet connection. A manager application (software installed on a computer) is the client generating the queries, and an agent (software on the S80) is the server generating responses. -
Page 57: Adding And Removing V2 Communities
SyncServer S80 NTP User Guide Adding and Removing v2 Communities Use the set snmp add v2-community command to add a SNMP v2 community. Use the set snmp delete v2-community command to remove an existing SNMP v2 community. The S80 will support a maximum of ten v2 communities. -
Page 58: Provisioning For Lldp
Configuration _________________________________________ minlevel : noauth or auth or priv authentication : MD5 or SHA authentication key : [Only chars {a-z, A-Z, 0-9, ! ( ) - _ . ? ~ * @ ^ + = : / %} are accepted] privacy protocol : DES or AES privacy key... - Page 59 SyncServer S80 NTP User Guide Example 2: To set the LLDP state to enable - S80> set lldp enable Example 3: S80> show lldp config Response 3: LLDP State : enable Below is a screenshot from Wire Shark which shows typical LLDP frames and the information contained in the frames..
- Page 60 Configuration 09 8- 007 77 -0 00 Re v. A...
-
Page 61: Troubleshooting
5 – Troubleshooting Chapter This chapter provides troubleshooting information for the SyncServer S80. Status of the S80 can be determined by the CLI "show status" command and SNMP trap messages. The SNMP trap manager IP address and associated settings must be configured with the "set snmp"... - Page 62 Troubleshooting Table 5-1 • S80 System Messages (continued) Event Default Description Severity Transient Message Text Corrective Action Entered Minor Entered time/frequency • Check input time/frequency holdover state references holdover state • Check configuration for correct reference selection • Check reference status •...
- Page 63 SyncServer S80 NTP User Guide Table 5-1 • S80 System Messages (continued) Event Default Description Severity Transient Message Text Corrective Action GNSS receiver Minor GNSS receiver • Reboot communications communicationsfailed • If problem persists failed call SGS for support. No action required...
-
Page 64: Recovering Lost Ip Address With Lldp Utility
Troubleshooting Table 5-1 • S80 System Messages (continued) Event Default Description Severity Transient Message Text Corrective Action PLL synthesizer Critical PLL synthesizer unlock • If alarm persists unlock power cycle/reboot • Call SGS support if it persists after reboot/power cycle. PLL unlock cleared No action required Temperature out of... -
Page 65: Returning The Syncserver S80
Figure 5-1 • LLDP Frame Captured by Network Pack Analyzer.. Returning the SyncServer S80 You should return the equipment to Microsemi only after you have exhausted the troubleshooting procedures described earlier in this chapter and Microsemi FTD Services and Support has advised you to return the unit. Note: Please retain the original packaging for re-shipping the product. -
Page 66: User's Guide Updates
Manual updates are available at: www.microsemi.com/ftdsupport Note: If you are downloading a product manual for the first time, you will need to register with Microsemi for a username and password. If you are currently registered, login and download the manual update. -
Page 67: Specifications And Factory Defaults
Appendix A – Specifications and Factory Defaults This chapter describes the specifications and factory defaults for the SyncServer S80. Specifications Mechanical Table A-1 • Mechanical Specifications Parameter Specification Mounting Roof Diameter 6.0 inches (15.24 cm) Height 6.0 inches (15.24 cm) Weight 1.5 lbs. -
Page 68: Compliance & Certifications
Compliance & Certifications Table A-4 • Compliance Specifications and Certifications Parameter Specification Safety Certifications UL60950-1/CSA C22.2, IEC60950- 1:2005(2nded)/AM 1:2009/AM 2:2013, EN60950-1: 2ed. 2006/A11:2009/A1:2010/A12:2011/A2:2013 EMC Compliance • EN 300386 v1.6.1; • CISPR 32: 2102, Class B limits; • CISPR 24: 2010; •... -
Page 69: Inputs
SyncServer S80 NTP User Guide Table A-5 • Clock Performance Specification Parameter Specification Accuracy <100 ns to UTC (locked GPS with full sky view) Holdover 400 microseconds per day Inputs Table A-6 • Input Specification Parameter Specification GNSS • 72-channel GPS/GLONASS receiver, time traceable to UTC •... -
Page 70: Factory Defaults
Factory Defaults Management IP Parameters Table A-8 • Management IP Parameters Parameter Value Default Value Range IPv4 State enable enable | disable | restart IPv6 State enable enable | disable | restart Address Mode Static | DHCP IPv4 Network Address 192.168.2.100 Valid IPv4 address IPv4 Network Mask... -
Page 71: Ntp Parameters
SyncServer S80 NTP User Guide NTP Parameters Table A-11 • SNMP Parameters Parameter Value Default Value Range State enable enable | disable NTPr IP Mode IPv4 IPv4 | IPv6 1 to 255 DSCP 0 to 63 Alarm Threshold (percentage) 1 to 100 SNMP Parameters Table A-12 •... -
Page 72: Log Configuration Parameters
Log Configuration Parameters Table A-13 • Log Configuration Parameters Parameter Value Default Value Range Size for Alarm-Event Log (kb) 1 to 100 Size for Command Log (kb) 1 to 100 Size for Security Log (kb) 1 to 100 09 8- 007 77 -0 00 Re v. A... -
Page 73: Product Support
Many answers available on the searchable web resource include diagrams, illustrations, and links to other resources on the website. Website You can browse a variety of technical and non-technical information on the Microsemi Timing & Frequency Services home page, at www.microsemi.com/ftdsupport. Contacting the Customer Assistance Center Highly skilled engineers staff the Customer Assistance Center. -
Page 74: Outside The U.s
Outside the USA: +1 (949) 380-6100 Sales: +1 (949) 380-6136 © 2017 Microsemi Corporation. All rights reserved. Microsemi and the Microsemi logo are trademarks of Fax: +1 (949) 215-4996 Microsemi Corporation. All other trademarks and service marks are the property of their respective owners.
Need help?
Do you have a question about the SyncServer S80 and is the answer not in the manual?
Questions and answers