Advertisement
Table of Contents
- 1 Important Safety Instructions
- 2 Table of Contents
- 3 Introduction
- 4 Mechanical Features
- 5 Xanbus System Control Panel Installation
- 6 Xanbus-Enabled Device Configuration Using the SCP
- 7 Operation of the Xanbus System Control Panel
- 8 Troubleshooting
- 9 Specifications
- 10 Warranty and Return Information
- Download this manual
See also:
Installation Manual
Advertisement
Table of Contents

Subscribe to Our Youtube Channel
Related Manuals for Xantrex Xanbus System Control Panel


Summary of Contents for Xantrex Xanbus System Control Panel
- Page 1 Owner’s Guide PN: 809-0921 Xanbus System Control Panel (SCP) ™...
- Page 3 USA Inc. All rights reserved. No part of this document may be reproduced in any form or disclosed to third parties without the express written consent of: Xantrex Technology USA Inc., 541 Roske Drive, Suite A, Elkhart, Indiana USA 46516.
- Page 4 A qualified technician or electrician has this knowledge and STATEMENT OF HAZARD experience. Contains statements of avoidance or strict compliance. Failure to follow these instructions can result in minor or moderate injury. Xanbus System Control Panel (SCP) Owner’s Guide...
- Page 5 Related Information You can find more information about Xantrex Technology USA Inc. as well as its products and services at www.xantrex.com. The product marking on the left when found imprinted on electrical and electronic units and appliances means that you are to refer to this guide for cautions and warnings.
-
Page 6: Important Safety Instructions
This chapter contains important safety and installation instructions for the are designed to provide reasonable protection against harmful interference Xanbus System Control Panel (SCP). Each time, before using the SCP, in a residential installation. This equipment generates, uses, and can radiate... -
Page 7: Table Of Contents
Operation of the Xanbus System Control Panel........ -
Page 9: Introduction
Xantrex. System requirements System component The Xanbus SCP is part of a network communications protocol developed by Xantrex, to communicate its settings and activity to other Xanbus-enabled devices. The SCP requires a Xanbus power supply to operate. Network power is carried by the network cables, and can be supplied by a Xanbus-enabled product (such as an inverter/charger) or an external Xanbus power supply. - Page 10 Non-volatile memory—preserves all its settings if network power is interrupted or network communication is disrupted. Material List The Freedom Sequence ships with the following items: • one Xanbus System Control Panel (SCP) unit, • owner’s guide, • mounting template, network terminator •...
- Page 11 25-ft cable The Xantrex Automatic Generator Start automatically starts and stops a generator using dry contact relays to operate the auto-start function of a generator. The Freedom Sequence Intelligent Power Manager is a fully integrated...
-
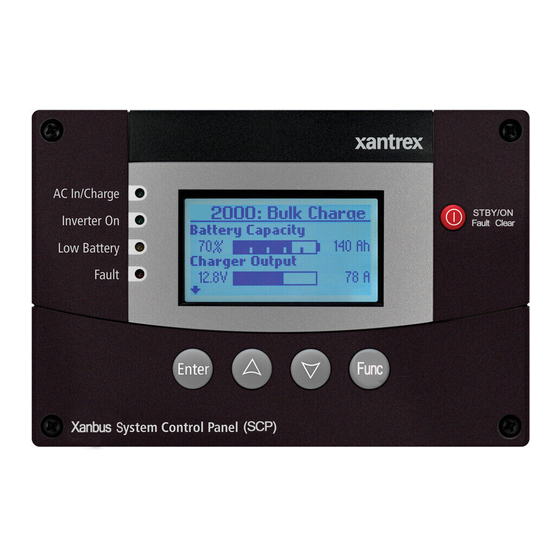
Page 12: Mechanical Features
STBY/ON Fault Clear button puts all devices in the system into Safe mode. Hold for five seconds to activate Safe mode. Press momentarily to clear active faults. Screen shows menus, settings, and system information. Figure 1 SCP Front Panel Xanbus System Control Panel (SCP) Owner’s Guide... - Page 13 Mechanical Features Back panel features Two network connector inputs on the back panel let you connect the SCP to other Xanbus-enabled devices. See Figure 2. 8-pin RJ-45 network ports Figure 2 SCP Back Panel 97-0022-01-01...
- Page 14 BATTERY System Control Panel Automatic Generator Start Freedom SW Inverter/Charger Xanbus Automatic Generator Start Xanbus System Control Panel Inverter Load Panel network terminator network terminator Generator AC Loads Figure 3 Sample Network Diagram Xanbus System Control Panel (SCP) Owner’s Guide...
-
Page 15: Xanbus System Control Panel Installation
Xanbus System Control Panel Installation Choosing a Location The Xanbus System Control Panel (SCP) is designed to be wall mounted and requires no connections other than Xanbus network cables or a terminator plugged into the back of the unit. Choose a location that allows unobstructed access to the SCP screen and Because you cannot access the SCP network inputs once the unit is buttons. - Page 16 8. If more cables or a different length are required, these standard properly terminated at each end with network terminators. If the cables can be purchased from Xantrex Technology USA Inc. or any network is not properly terminated, signal quality is degraded and computer supply store.
- Page 17 Xanbus System Control Panel Installation Network Layout Guidelines for Routing the Xanbus Cables Xanbus-enabled devices are linked with separate lengths of Xanbus cable, depending on the distances between the components. To ensure communication signal quality, each end of the network must be ELECTRICAL SHOCK HAZARD terminated.
- Page 18 Connect the Xanbus cable (or two Xanbus cables, if the SCP is located between two Xanbus-enabled devices) to a Xanbus network input in the SCP. Route and connect the cable(s) to the nearest Xanbus-enabled device(s). For additional devices, continue connecting cable as described above. Xanbus System Control Panel (SCP) Owner’s Guide...
- Page 19 Xanbus System Control Panel Installation Mounting the System Control Panel The SCP can be flush mounted through an opening in a wall and secured To flush mount the SCP: with four mounting screws. Take out the mounting template. Use the template to mark the location for the area to be cut out.
- Page 20 See Figure 3 on page 6. Place the unit in the opening and secure it with four mounting screws. Figure 7 Flush Mounting the SCP Peel off the protective plastic film covering the screen and indicator light. Xanbus System Control Panel (SCP) Owner’s Guide...
-
Page 21: Xanbus-Enabled Device Configuration Using The Scp
Xanbus-Enabled Device Configuration Using the SCP Using SCP Buttons The SCP can display and change the settings for any Xanbus-enabled device in the Xanbus system. The SCP has four buttons for moving between status screens and menus, highlighting settings you want to change, selecting and changing configurable values for Xanbus-enabled devices. - Page 22 -257A Device menu. BatLev Invert Load 120V The top level screens on the Xanbus System Control Panel (SCP) are the AC In menu EnInv EnChg Startup screen, the System Status screen, and the Select Device Setup screens. After power is applied and the Startup screen appears, the SCP displays the System Status screen.
- Page 23 Changeable settings are identified by the square brackets [ ] around values in the right-hand column. IMPORTANT: If you are uncertain which Xanbus System Control Panel To display the Setup menu for a device: (SCP) screen or menu you are viewing, you can always return to the ◆...
- Page 24 Press Enter to highlight the current value of that changeable setting. Failure to follow these instructions can result in death or serious The previously set value appears with an asterisk (*) beside it. injury. Xanbus System Control Panel (SCP) Owner’s Guide...
- Page 25 Xanbus-Enabled Device Configuration Using the SCP FSW3012 00: Setup Inverter [*Enabled] Search Mode [Disabled] Charger [Enabled] Force Chg Press the up arrow or the down arrow button to change the value. Hold down the button to scroll through a large range of values quickly. Press Enter to select the value or Func to cancel the value selection.
- Page 26 Allows you to customize the name of the SCP as it is displayed on the customizing the name. setup menu and the Select See “Setting the Device Device menu. Name” on page 20. Xanbus System Control Panel (SCP) Owner’s Guide...
- Page 27 Xanbus-Enabled Device Configuration Using the SCP Menu item Description Values/Action Default Clears active faults and warnings Press Enter to clear faults Clear generated by the SCP. and warnings. Faults/ Warnings Press Enter to view log. View Fault Displays the Fault Log, containing the last 20 SCP faults.
- Page 28 Device names should be limited to 10 characters or less. To customize the SCP name: Select Name on the SCP Setup menu. Press Enter. The last letter of “XSCP” is highlighted. XSCP: Setup Brightness [100%] Contrast [60%] Button Beep [Off] Name [XSCP] Xanbus System Control Panel (SCP) Owner’s Guide...
- Page 29 Xanbus-Enabled Device Configuration Using the SCP Using the Clock Menu Clock Menu Configuration Items Use the Clock menu to set the clock, the date, and the time format Menu item Description Values Default you prefer. The clock is listed as a separate device on the Select Device menu. Sets reference time for the power 12:00 AM–11:59 PM, Set Time...
- Page 30 If you make an error, press Func to move back to the value you need to reset. If you decide to abandon resetting the date, press Func repeatedly until you return to the Clock menu. Xanbus System Control Panel (SCP) Owner’s Guide...
- Page 31 Xanbus-Enabled Device Configuration Using the SCP Using the System Settings Menu The System Settings menu displays information related to the operation Menu item Description Values/Action Default of the entire Xanbus system. System Mode Places all the devices in the system in Operating, Standby Operating To view the System Settings menu: the selected mode.
- Page 32 Model # 815-3012 Serial # 0000URCR8Z F/W Rev. 1.00.00 Press the down arrow button to view information for each Xanbus- enabled device on the system. Press Func to return to the System Settings menu. Xanbus System Control Panel (SCP) Owner’s Guide...
-
Page 33: Operation Of The Xanbus System Control Panel
Operation of the Xanbus System Control Panel System Modes The system modes described in this section affect the performance and generator starting activity stops. Selecting Standby mode stops the behavior of the SCP and all other Xanbus-enabled devices. You will have to... - Page 34 Operation of the Xanbus System Control Panel Using the STBY/ON Fault Clear Button Warnings and Faults The STBY/ON Fault Clear button has two functions. This section describes how fault and warning messages behave, and what you should do when they appear. For a complete list of fault and warning...
- Page 35 Operation of the Xanbus System Control Panel Types Clearing Warning Messages There are two types of warning messages: manual and automatic. Automatic warning messages clear when the warning condition on the SCP Each differs in its behavior and appearance. For a list of SCP warnings and disappears or when the criteria for clearing the warning are met.
- Page 36 Operation of the Xanbus System Control Panel To view the warning list: On the Select Device menu, highlight System Settings and Warning Log: XSCP press Enter. May/13 10:58PM On the System Settings menu, highlight View Warning List and May/10 10:15AM press Enter.
- Page 37 Operation of the Xanbus System Control Panel Fault Messages Viewing the SCP Fault Log The fault log lists the most recent SCP faults, up to a total of 20. On each Fault messages appear when the SCP’s operation is affected by a condition line, the log shows the fault code, the date the fault occurred, and the time that requires immediate attention.
- Page 38 Operation of the Xanbus System Control Panel Viewing Multiple Fault Messages Viewing Individual Fault Messages from the Fault Log On the fault log, you can also select an individual fault and view its details. If several faults occur before you can acknowledge or clear them, the SCP To view details for a fault: displays the accumulated messages on a fault list.
-
Page 39: Troubleshooting
Troubleshooting Types of Faults and Warnings Warning Reference Table The various types of fault and warning messages behave differently, and Table 1 Warning Reference Table give you the option to treat them differently when they appear. For more information about the types of fault and warning messages, see “Types” on Warning number Message... - Page 40 W258 Device instance Manual Two networked Select a different is duplicated. devices of the same instance ID on one of type have the same the devices’ Setup instance. menu. Xanbus System Control Panel (SCP) Owner’s Guide...
- Page 41 Troubleshooting Fault Reference Table Table 2 Fault Reference Table Table 2 Fault Reference Table Fault Fault number Message Type Cause Action number Message Type Cause Action Internal reset. Manual The real-time clock Reset the SCP by F503 F250 System clock Manual On initial startup, Set the clock to the correct...
-
Page 42: Specifications
Weight 208 g (0.46 lb) Shipping weight 780 g (1.72 lb) Environmental Specifications Operating temperature -20 to 50 °C (-4 to 122 °F) Storage temperature -40 to 85 °C (-40 to 185 °F) Xanbus System Control Panel (SCP) Owner’s Guide... - Page 43 Fault Clear Low Battery Fault 3.53 4.03 3.04 [77] [90] [102] Enter Func Xanbus System Control Panel 5.5 [140] .96 [24] [10] 6 [152] 1.18 [30] ALL DIMENSIONS IN INCHES [mm] 5 [127] 0.125 [3] TYP. Figure 15 Xanbus SCP Dimensions...
-
Page 44: Warranty And Return Information
Xantrex maintains a network of regional Authorized Service Centers. Call through inspection establishes the existence of such a defect and that it is Xantrex or check our website to see if your product can be repaired at one covered by this Limited Warranty. - Page 45 REVENUES FAILURE TO REALIZE EXPECTED SAVINGS OR OTHER COMMERCIAL OR the product if repairs have been done to it other than by Xantrex or its ECONOMIC LOSSES OF ANY KIND EVEN IF XANTREX HAS BEEN ADVISED OR HAD authorized service centers (hereafter “ASCs”);...
- Page 46 TO PROVINCE OR JURISDICTION TO JURISDICTION • A brief description of the problem. Ship the unit prepaid to the address provided by your Xantrex customer Return Material Authorization Policy service representative. If you are returning a product from outside of the USA or...
- Page 47 Warranty and Return Information Information About Your System As soon as you open your Xanbus System Control Panel (SCP) package, record the following information and be sure to keep your proof of purchase. ❐ ______________________ Serial Number ❐ 809-0921 Product Number/s ❐...
- Page 50 Xantrex Technology USA Inc. 1 800 670 0707 Tel 1 800 994 7828 Fax www.xantrex.com 97-0022-01-01 Printed in China.
Need help?
Do you have a question about the Xanbus System Control Panel and is the answer not in the manual?
Questions and answers