
Subscribe to Our Youtube Channel
Related Manuals for KanexPro EXT-NETAVTX


Summary of Contents for KanexPro EXT-NETAVTX
- Page 1 NetworkAV™ over IP Sender & Receiver w / Central Control & EXT-NETAVTX EXT-NETAVRX All Rights Reserved EXT-NETAVRX_V1.0...
- Page 2 ● Unplug the power cord when left unused for a long period of time. ● Refer all servicing to qualified service personnel. Customer Service We provide limited warranty for the product within three years. Contact us at (888)-975-1368 For more details, please contact your distributor or dealer. Or email us directly to support@kanexpro.com...
- Page 3 EXT-NETAVRX_V1.0 Surge protection device recommended This product contains sensitive electrical components that may be damaged by electrical spikes, surges, electric shock, lightning strikes, etc. Use of surge protection systems is highly recommended in order to protect and extend the life of your equipment. Revision History Version No.
-
Page 4: Table Of Contents
EXT-NETAVRX_V1.0 Table of Contents 1. Introduction................. 2. Features..................3. Package Contents............... 4. Specifications................5. Operation Controls and Functions..........6. Connection Diagram..............7. Installation & Setup..............10-22... -
Page 5: Introduction
EXT-NETAVRX_V1.0 1. Introduction The KanexPro EXT-NETAV is a total solution package for those looking to distribute multiple HD content to multiple HD displays over IP with an easy to use built-in controller over a standard 1G network switch. Compliant with HDCP, this set of Sender and Receiver offers configurable high quality, low-bandwidth H.264 compression video supporting resolutions... -
Page 6: Specifications
EXT-NETAVRX_V1.0 4. Specifications Technical HDMI Compliance HDMI 1.4b HDCP Compliance HDCP 1.4 Video Bandwidth 4.95Gbps Video Resolutions 640x480p@60Hz ~ 1920x1080p@60Hz Output Video Type H.264/MPEG-4 AVC Encoding Data Rate Up to 30Mbps, configurable Color Space RGB, YCbCr 4:4:4, YCbCr 4:2:2 Color Depth 8-bit HDMI Audio Formats LPCM 2CH, 48KHz L/R Audio Formats... -
Page 7: Operation Controls And Functions
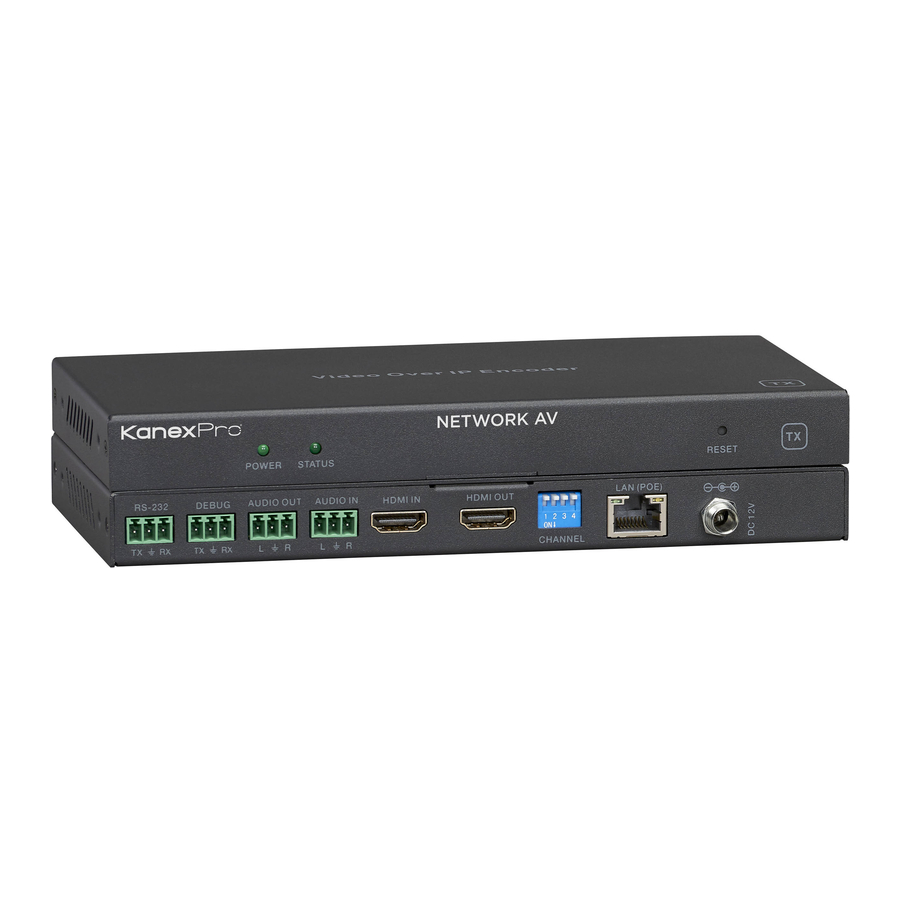
EXT-NETAVRX_V1.0 Power Consumption Sender: 5.7W (Max), Receiver: 5.6W (Max) Operation Temperature 32 - 104°F / 0 - 40°C Storage temperature -4 - 140°F / -20 - 60°C Relative Humidity 20 - 90% RH (no condensation) 5. Operation Controls and Functions 5.1 Sender Items Name... - Page 8 EXT-NETAVRX_V1.0 DEBUG System debug port AUDIO OUT Analog stereo audio output AUDIO IN Analog stereo audio input HDMI IN HDMI input port, connect to HDMI source device HDMI loop out (default video only no audio, you can enable HDMI OUT audio from Web GUI or API) 10 CHANNEL Reserved use LAN(POE)
- Page 9 EXT-NETAVRX_V1.0 System reset button. Short pressing (<5 seconds) will reset product. RESET Long pressing (over 5 seconds) will let product enter firmware upgrade mode. Connect third-party control system to control this product utilizing our API commands or control other devices be connected to our RS-232 products (including Senders and Receivers) via RS-232 port (this is called RS-232 pass-through).
-
Page 10: Connection Diagram
EXT-NETAVRX_V1.0 6. Connection Diagram... -
Page 11: Installation & Setup
EXT-NETAVRX_V1.0 7. Installation & Setup 7.1 Basic Instructions 1. The set of sender and receiver can form a complex AV over IP system that supports Web-based GUI controlling and management. 2. Any Sender can be turn into master controller just by selecting the master controller option from the web-based GUI management system. - Page 12 EXT-NETAVRX_V1.0 Note: If you have configured the connection as described above then please have only one Sender (Master controller) connected to the switch. All Senders have the same default IP address: 192.168.1.28. All Receivers have the same default IP address: 192.168.1.38. Kindly update the IP address of sender which you have decided to make the master controller.
- Page 13 EXT-NETAVRX_V1.0 As per the screen shot of the Dashboard below, please click searching devices icon (Right to the Device List) to search all Senders and Receivers in the network.
- Page 14 EXT-NETAVRX_V1.0 Please go to Setup page and change the default sender IP address to any other IP Address. For instance, 192.168.1.61 as shown in the image below.
- Page 15 EXT-NETAVRX_V1.0 Once the Main controller (Sender) IP address is changed then you can change the other sender and receiver IP address. Note: During changing Senders and Receivers IP address, you can see their MAC address on the Web page (as below picture). Receiver will display its own IP address and firmware version information on the corresponding display.
- Page 16 EXT-NETAVRX_V1.0 Rename Sender/ Receiver You can also label the sender and receiver IP address for as per your sources and display connected. Please use the Field NAME on the right of New IP address.
- Page 17 EXT-NETAVRX_V1.0 (4) Now you can put other Senders into system, and click “searching devices” icon:...
- Page 18 EXT-NETAVRX_V1.0 Please change every one’s IP address and name like above steps:...
- Page 19 EXT-NETAVRX_V1.0 (5) Please set video wall parameters according to your system setup. For instance set to 2x2. Go to Main page, you can see below 3x3 video wall layout, and you should drag each Receiver (put your cursor on the RX’s IP address position) to each window position firstly.
- Page 20 EXT-NETAVRX_V1.0 You can drag one video source cross to 4 RX windows (max up to 4x4 16 RX windows) to create a video wall like below.
- Page 21 EXT-NETAVRX_V1.0 You also can set multi-view mode by clicking 4x or 5x icon for each Receiver box: (6) After you complete all system configurations, current settings would be saved into current Controller box, it will be run automatically at next system power up.
- Page 22 EXT-NETAVRX_V1.0 7.2 Firmware Update Open the Update tab to update the firmware of sender and receiver. Firmware update can be done for all the sender and receiver by selecting option ALL. Firmware update can also be performed as per each sender or receiver.
- Page 23 EXT-NETAVRX_V1.0 7.3 Control Using Third-party controller Please contact supplier for the API commands documents. Customer Services The return of a product to our Customer Service implies the full agreement of the terms and conditions hereinafter. There terms and conditions may be changed without prior notice.
- Page 24 Remarks: For further assistance or solutions, please contact your local distributor or email directly to us at support@kanexpro.com Brea, California www.kanexpro.com...
Need help?
Do you have a question about the EXT-NETAVTX and is the answer not in the manual?
Questions and answers