Table of Contents
Advertisement
Quick Links
Download this manual
See also:
Installation Manual
Advertisement
Table of Contents

Related Manuals for Eneo MCB-72M2712M0A


Summary of Contents for Eneo MCB-72M2712M0A
- Page 1 User Manual 1/2,8" HD Camera, Day&Night, 1920x1080, Infrared, WDR, 2,7-12mm, 12/24V, IP67 MCB-72M2712M0A...
-
Page 2: Table Of Contents
Table of content Parts supplied ....................... 5 Part names ......................6 Installation instructions ..................7 Operating instructions ..................11 Using OSD controller ..........................11 OSD menu startup ............................ 12 OSD menu table ............................12 OSD Menu Setup ....................14 1. LENS ................................. 14 2. - Page 3 Safety instructions General safety instructions • Before switching on and operating the system, rst read this safety advice and the operating instructions. • Keep the operating instructions in a safe place for later use. • Installation, commissioning and maintenance of the system may only be carried out by authorised individuals and in accordance with the installation instructions - ensuring that all applicable standards and guidelines are followed.
- Page 4 Class A device note This is a Class A device. This device can cause malfunctions in the living area; in such an event, the operator may need to take appropriate measures to compensate for these. WEEE (Waste Electronical & Electronic Equipment) Correct Disposal of This Product (Applicable in the European Union and other European countries with separate collection systems).
-
Page 5: Parts Supplied
Parts supplied • Camera • Operating Instruction • Mounting Template • Plastic Anchor: 6 x 30mm (4x) • Mounting Screw: 4 x 30mm (4x) • Hex Wrench: 3mm (1x) • Hinge Pin (1x) • Cable Tie (2x) • Grommet (2x) •... -
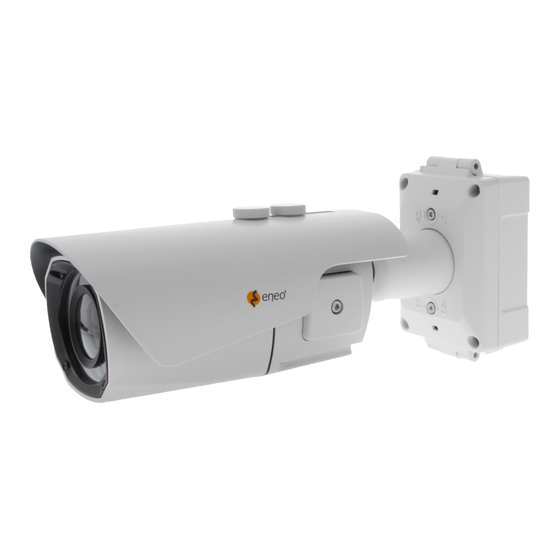
Page 6: Part Names
Part names Sunshield bolt Sunshield Junction Box Top Junction Box Base Bracket Body Case Dual window Hinge Pin 2x Water drain 2x Lock/Unlock Screw Inside of Opening Cover SUB-OUT OSD Control Joy Stick ZOOM Video Sub-out Connector CAUTION: Extreme care should be taken NOT to scratch the window in front of lens Care should be taken the cable is NOT to be damaged, kinked or exposed in the hazardous area. -
Page 7: Installation Instructions
Installation instructions Using Grommet Tear o the cocks of grommets properly and pull up the grommet so that sealing can wrap the cable properly as illustrated. If it doesn’t wrap the cable properly, it could cause the water leakage problem. Recommended cable length into the Junction box base •... - Page 8 Install the mount onto a strong structure. Prepare the Junction box base and the accessaries for installation. 1. Locate the mounting template at the installation position and drill the ceiling or wall if needed. 2. Route the Power/Video cables through the grommets from the wall. Insert the grommets onto the Junction box base.
- Page 9 6. Hook up the Junction box top with the Junction box base by the hinge pin. 7. Connects the Power/Video cables from camera as illustrated. Fix the Power/Video cables from camera to junction box base using the supplied screw. Hinge pin Junction Box Top 8.
- Page 10 9. Set the camera’s orientation and tighten the Lock/Unlock screws using hex wrench. 10. If necessary, open the opening cover and connect the video sub-out cable for OSD menu setting. 11. After all the setting, close the Opening cover and tighten it. 12.
-
Page 11: Operating Instructions
Adjustment of viewing angle with a bracket Hex wrench Operating instructions Using OSD controller Setup menu can be accessed and controlled by OSD control joy stick on the side of camera unit. Five commands are available with the joy stick. SUB-OUT Video Sub-out Connector... -
Page 12: Osd Menu Startup
ANALOG OUT0 should be set to TVI MODE, AHD MODE or CVI MODE to get CVBS video in sub-out. If it is set to CVBS, there is no CVBS video in sub-out port. (SYSTEM> OUTPUT> ANALOG OUTPUT0) If CVBS video is enabled through ANALOG OUT0 or Sub-out port, WDR and 3D-NR functions are disabled in all video outputs. - Page 13 ANALOG OUT0 TVI MODE, AHD MODE, CVBS, CVI MODE ANALOG OUT0 TVI MODE 0~10 AHD MODE 0~10 CVI MODE 0~10 SHARPNESS MAIN OUTPUT ANALOG OUT1 CVBS ANALOG OUT1 SDI&CVBS 0~10 HD-SDI, EX-SDI 1.0, SDI OUTPUT SDI OUTPUT EX-SDI 2.0, OFF IMAGE SDI&CVBS 0~10...
-
Page 14: Osd Menu Setup
OSD menu Startup Press the ‘OSD menu SET key’ down to access the setup menu mode. • EXIT : Enters ‘EXIT’ menu with save current setting or without save. • RETURN : Returns to the previous menu. MENU V1. XX 1. -
Page 15: Exposure
2. ZOOM/FOCUS 2. ZOOM/FOCUS AF MODE AF MODE ZOOMPUSH MANUAL MODE CHANGE MODE CHANGE ENABLED NOT USED SCANNING SCANNING HALF HALF ONEPUSHAF ONEPUSHAF SYNC TDN SYNC TDN INITIAL INITIAL RETURN RETURN AF MODE Changes to MANUAL automatically after 3 hrs when MODE CHANGE is ENABLED. 2-3. -
Page 16: Backlight
3-1. BRIGHTNESS Adjusts the brightness of video (0~20). 3-2. SHUTTER Selects AUTO or set manually. If SHUTTER set to MANUAL modes, SENS-UP mode is inactivated. 3-2-1. AUTO: Optimizes the video level by controlling the iris and the shutter speed automatically. 3-2-2. - Page 17 H-POS V-POS H-SIZE V-SIZE RETURN 4-2. BLC (Backlight Compensation) This function is used to brighten an image in the foreground with a highly light area behind it such as sunlight, limiting the a ect of silhouette. BLC has a target window for compensation and its size and position can be set by H-POS, V-POS, H-SIZE and V-SIZE.
-
Page 18: Day & Night
4-3-2. TARGET-BRT : LOW, MIDDLE, HIGH Selects the brightness value that you set the target area in MODE. 4-3-3. WEIGHT : LOW, MIDDLE, HIGH Selects the WDR value that you set the target area in MODE. If CVBS video is enabled through ANALOG OUT0 or Sub-out port, WDR and 3D-NR functions are disabled in all video outputs. - Page 19 5-1-4. IR LED CTL IR LED Control(AUTO/OFF) is available with IR LED model only. If it is set to OFF, IR LED will be turned OFF but DAY or NIGHT is still determined by the built-in light photo sensor. 5-2. AUTO Used when DAY or NIGHT is 5.
-
Page 20: Color
6. COLOR 6. COLOR AUTO COLOR GAIN llllllllllllllllllllll RETURN 6-1. AWB (Auto White Balance) Automatically tracks the changes of color temperature and continuously adjusts the white balance. AUTO, AUTOext, PRESET and MANUAL modes are available. 6-1-1. AUTO : Optimized for Indoor installation and more easily compensates AWB for low color temperature such as incandescent lights. -
Page 21: Image
8. IMAGE 8. IMAGE SHARPNESS SHARPNESS ANALOG OUT0 MAIN OUTPUT 0.55 GAMMA TVI MODE ANALOG OUT0 MIRROR SDI&CVBS llllllllllllllllllllll FLIP CVI MODE llllllllllllllllllllll D-WDR TVI MODE llllllllllllllllllllll DEFOG AHD MODE llllllllllllllllllllll PRIVACY RETURN RETURN 8-1. SHARPNESS Sets the Sharpness level 0~10. Increases or decreases the sharpness of the picture. Too much sharpness can make image harsh and show more noise as well as line icker at the edge of object in the picture. -
Page 22: Motion
8-7. PRIVACY Sets ON/OFF for enabling/disabling PRIVACY mask. 16 privacy areas are available and each area is programmable in size, color, position and transparency. PRIVACY ZONE NUM ZONE DISP H-POS V-POS H-SIZE V-SIZE Y-LEVEL llllllllllllllllllllll CB LEVEL llllllllllllllllllllll CR LEVEL llllllllllllllllllllll TRANS RETURN... - Page 23 9. MOTION DET WINDOW DET WINDOW WINDOW ZONE DET TONE WINDOW USE MDRECT FILL DET H-POS SENSITIVITY llllllllllllllllllllll DET V-POS MOTION OSD DET H-SIZE TEXT ALARM DET V-SIZE RETURN RETURN 9-2. DET TONE Sets the detection zone 0 to 4 display types which window use setting ON. 0 : Set the 100% opacity level of video background except detection window zone.
-
Page 24: System
A. SYSTEM Sets the system related functions. A. SYSTEM OUTPUT RESOLUTION 1080 25P TV SYSTEM EU(PAL) COMM. LANGUAGE CAM TITLE RESET RETURN HD-ANALOG OUTPUT ANALOG OUT0 MAIN OUTPUT ANALOG OUT0 TVI MODE HD-SDI SDI OUTPUT Y GAIN llllllllllllllllllllll TVI MODE ANALOG OUT0 CB GAIN llllllllllllllllllllll... -
Page 25: Exit
: Exits SETUP MENU and returns to the normal display. B-1. SAVE : Save all the setting and exit the setup menu. B-2. CANCEL : Exit the setup menu without save. Further information The manual is also available from the eneo web site at www.eneo-security.com. - Page 28 VIDEOR E. Hartig GmbH Exclusive distribution through specialised trade channels only. VIDEOR E. Hartig GmbH Carl-Zeiss-Straße 8 63322 Rödermark/Germany Tel. +49 (0) 6074 / 888-0 Technical changes reserved Fax +49 (0) 6074 / 888-100 www.videor.com...
Need help?
Do you have a question about the MCB-72M2712M0A and is the answer not in the manual?
Questions and answers