Check Point 4200 Getting Started Manual
4000 series
Hide thumbs
Also See for 4200:
- Getting started manual (55 pages) ,
- Getting started manual (47 pages) ,
- Mounting instructions (19 pages)

Related Manuals for Check Point 4200


Summary of Contents for Check Point 4200
- Page 1 14 January 2016 Check Point 4000 Appliances Getting Started Guide Models: T-120, T-140, T-160 and T-180 Classification: [Protected] P/N: 706623...
- Page 2 Check Point. While every precaution has been taken in the preparation of this book, Check Point assumes no responsibility for errors or omissions. This publication and features described herein are subject to change without notice.
-
Page 3: Important Information
Latest Documentation The latest version of this document is at: http://supportcontent.checkpoint.com/documentation_download?ID=12688 To learn more, visit the Check Point Support Center http://supportcenter.checkpoint.com. For more about this appliance, see the 4000 Appliances home page (http://supportcontent.checkpoint.com/solutions?id=sk68681). Revision History Date... - Page 4 Date Description 15 August 2011 First release of this document Feedback Check Point is engaged in a continuous effort to improve its documentation. Please help us by sending your comments mailto:cp_techpub_feedback@checkpoint.com?subject=Feedback on Check Point 4000 Appliances Getting Started Guide.
-
Page 5: Safety, Environmental, And Electronic Emissions Notices
The battery cell may heat up under these conditions and present a burn hazard. Warning - DANGER OF EXPLOSION IF BATTERY IS INCORRECTLY REPLACED. REPLACE ONLY WITH SAME OR EQUIVALENT TYPE RECOMMENDED BY THE MANUFACTURER. DISCARD USED BATTERIES ACCORDING TO THE MANUFACTURER’S INSTRUCTIONS. Check Point 4000 Appliances Getting Started Guide... - Page 6 Safe Drinking Water and Toxic Enforcement Act of 1986, California Health & Safety Code s. 25249.5, et seq. ("Proposition 65"), that is "known to the State to cause cancer or reproductive toxicity" (see http://www.calepa.ca.gov) Check Point 4000 Appliances Getting Started Guide...
- Page 7 Internet, the information required by this section may be included in the manual in that alternative form, provided the user can reasonably be expected to have the capability to access information in that form. Check Point 4000 Appliances Getting Started Guide...
- Page 8 This product is herewith confirmed to comply with the requirements set out in the Council Directive on the Approximation of the Laws of the Member States relating to Electromagnetic Compatibility Directive (2004/108/EC). For the evaluation regarding the Electromagnetic Compatibility (2004/108/EC) Check Point 4000 Appliances Getting Started Guide...
- Page 9 For more information about where you can drop off your waste equipment for recycling, please contact your local city office or your household waste disposal service. Check Point 4000 Appliances Getting Started Guide...
-
Page 10: Remarques Relatives À La Sécurité, L'environnement Et Les Émissions Électroniques
éteint. • Il ne faut jamais court-circuiter la pile au lithium qui alimente l'horloge temps-réel. Elle risque de s'échauffer et de causer des brûlures. Check Point 4000 Appliances Getting Started Guide... - Page 11 Matériau perchloraté: Manipulation spéciale potentiellement requise. Voir http://www.dtsc.ca.gov/hazardouswaste/perchlorate. L'avis suivant est fourni conformément au California Code of Regulations, titre 22, division 4.5, chapitre 33. Meilleures pratiques de manipulation des matériaux perchloratés. Ce produit, cette Check Point 4000 Appliances Getting Started Guide...
- Page 12 Augmenter la distance entre l’appareil et le récepteur. • Brancher l’appareil sur une prise appartenant à un circuit différent de celui sur lequel est branché le récepteur. • Consulter le distributeur ou un technicien radio/télévision qualifié pour obtenir de l’aide. Check Point 4000 Appliances Getting Started Guide...
- Page 13 Pour obtenir plus d'informations sur les lieux où déposer vos équipements mis au rebut, veuillez contacter votre municipalité ou le service de gestion des déchets. Check Point 4000 Appliances Getting Started Guide...
- Page 14 Remarques Relatives à la Sécurité, l'environnement et les Émissions Électroniques Check Point 4000 Appliances Getting Started Guide...
-
Page 15: Table Of Contents
Expansion Line Cards ................... 33 Rear Panel Components ................... 33 Main Power Switch ..................34 Redundant Power Supply Units (Check Point 4800) ........34 Replacing and Upgrading Components ............. 34 Restoring Factory Defaults ................. 35 Restoring Using the WebUI ................35 Gaia ...................... - Page 16 Registration and Support ..................39 Registration ....................... 39 Support ......................39 Where To From Here?..................39 Compliance Information ..................41 Declaration of Conformity .................. 41...
-
Page 17: Introduction
429-4391. For additional technical information about Check Point products, consult the Check Point Support Center http://supportcenter.checkpoint.com. Welcome to the Check Point family. We look forward to meeting all of your current and future network, application and management security needs. Check Point 4000 Appliances Getting Started Guide... -
Page 18: 4000 Appliances Overview
Operating System that combines the best of Check Point's SecurePlatform and IPSO, the operating system from the Nokia security products. Gaia supports the full portfolio of Check Point Software Blades, Security Gateway and Security Management products. Key Features: •... -
Page 19: Shipping Carton Contents
Security Management Server and downloaded to the gateway. • SmartConsole: GUI applications that are used to manage various aspects of security policy enforcement. For example, SmartView Tracker is a SmartConsole application that manages logs. Check Point 4000 Appliances Getting Started Guide... - Page 20 SmartDashboard: A SmartConsole GUI application that is used by the system administrator to create and manage the security policy. Locally Managed Deployment: When all Check Point components responsible for both • the management and enforcement of the security policy (the Security Management Server and the gateway) are installed on the same machine.
-
Page 21: Mounting The 4000 Appliances In A Rack
(available as an optional accessory). See Rack Mounting for Check Point Appliances http://downloads.checkpoint.com/dc/download.htm?ID=26435 for the installation procedures. Appliance Physical Specifications These are the physical specifications of the Check Point appliance models that can be mounted in the rack. Appliance Width Depth... -
Page 22: Appliance Air Vents
The appliance and rack rails have been tested in extreme conditions and do not block air flow to the appliance. These appliances are specifically designed to install with these rails. Check Point 4000 Appliances Getting Started Guide... -
Page 23: Configuring 4000 Appliances
2. On the back panel, turn on the Power button to start the appliance. Note - For the Check Point 4800, when a power supply fails or is not connected to the outlet, an alarm sounds continuously. If you hear the alarm, replace the faulty power supply immediately, and connect the new unit to an A/C outlet. -
Page 24: Available Software Images
This interface is preconfigured with the IP address 192.168.1.1 Note - Make sure that the management interface on the computer is on the same network subnet as the appliance. For example: IP address 192.168.1.x and Netmask 255.255.255.0 Check Point 4000 Appliances Getting Started Guide... -
Page 25: Configuration Options
There are different First Time Configuration Wizard options for the Gaia and the SecurePlatform operating systems. See the Installation and Upgrade Guide related to the software version. Search for the guide with the applicable software version in the Support Center documentation section Check Point 4000 Appliances Getting Started Guide... -
Page 26: Creating The Network Object
Connection parameters for the appliance are: 9600 bps, no parity, 1 stop bit (8N1). • Set the Flow Control to None. • An SSH connection to the management interface (if SSHD is configured). Check Point 4000 Appliances Getting Started Guide... -
Page 27: 4000 Appliances Hardware
4000 Appliances Hardware In This Section: Front Panel Components ................Rear Panel Components ................. Replacing and Upgrading Components ............Front Panel Components This section describes the features and components located on the appliance front panel. Check Point 4000 Appliances Getting Started Guide... -
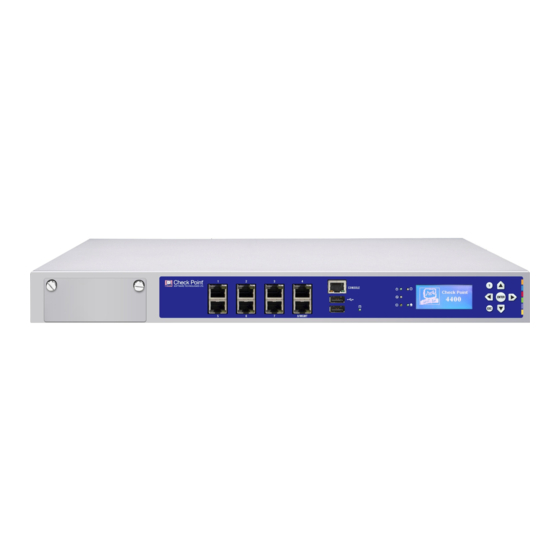
Page 28: Check Point 4200 Front Panel
Management configuration port - Ethernet connection to a remote management workstation USB ports Console port - A serial connection to the appliance using a terminal emulation program such as HyperTerminal or PuTTY Power indicator LED LCD display screen Keypad Check Point 4000 Appliances Getting Started Guide... -
Page 29: Check Point 4400 And 4600 Front Panel
4000 Appliances Hardware Check Point 4400 and 4600 Front Panel Item Description Expansion line card slot Built in Ethernet ports (ETH1 - ETH7) Management configuration port - Ethernet connection to a remote management workstation USB ports Console port - A serial connection to the appliance using a terminal emulation program... -
Page 30: Check Point 4800 Front Panel
Keypad Lights Out Management The Check Point Lights Out Management (LOM) card lets you use a dedicated management channel to remotely control Check Point appliances. Lights Out Management can also work when the appliance is turned off or not responding. - Page 31 Set the management interface default gateway. System Reboot Reboot the appliance. LCD Panel Buttons Press Enter the main menu Navigate the menu Change a number Select a menu option Go back to previous menu Check Point 4000 Appliances Getting Started Guide...
- Page 32 If DHCP was enabled - DHCP is disabled on the management interface. Configuring Management IP Addresses You can use the LCD panel to configure these management interface IP addresses for the appliance: • Management IP address Check Point 4000 Appliances Getting Started Guide...
-
Page 33: Expansion Line Cards
This section describes components located on the rear panel of the appliance. Important - Only use the appliance when the Security Acceleration Module or the placeholder tray is in the upper slot to make sure the appliance is cooled correctly. Check Point 4000 Appliances Getting Started Guide... -
Page 34: Main Power Switch
The main power switch controls power to the entire unit. Redundant Power Supply Units (Check Point 4800) The Check Point 4800 has an optional redundant power supply unit. Located at the left rear of the appliance, two hot-swappable power supply units give built-in power redundancy. Each power supply connects to an electrical outlet. -
Page 35: Restoring Factory Defaults
2. Log in to the WebUI of the appliance using the administrator username and password. 3. In the WebUI, click Maintenance > Factory Defaults. The Factory Defaults window opens. 4. Select the image version that you are restoring. 5. Click Apply. Check Point 4000 Appliances Getting Started Guide... -
Page 36: Secureplatform
4. Define the serial port settings: 9600 BPS, 8 bits, no parity, 1 stop bit. 5. From the Flow control list, select None. 6. Connect to the appliance. 7. Turn on the appliance. Check Point 4000 Appliances Getting Started Guide... -
Page 37: Restoring Using The Lcd Panel
2. When the countdown begins, press any of the arrow keys. The Boot menu appears. 3. Using the arrow buttons, scroll to the relevant default factory image. 4. Press 5. Confirm the reset by pressing Check Point 4000 Appliances Getting Started Guide... - Page 38 During the restore, a message shows continuously: Reverting image. Do not turn off. When the appliance is restored to its default factory configuration, it reboots. On Gaia the Reverting message shows. On SecurePlatform the Initializing message shows. Check Point 4000 Appliances Getting Started Guide...
-
Page 39: Registration And Support
Check Point software. Check Point documentation is available on the Check Point Support Center http://supportcenter.checkpoint.com. Be sure to also use the online help when you are working with the Check Point SmartConsole clients. Check Point 4000 Appliances Getting Started Guide... - Page 40 Registration and Support Check Point 4000 Appliances Getting Started Guide...
-
Page 41: Compliance Information
Disturbance Characteristics VCCI V-3, Class A Information Technology Equipment - Radio Disturbance Characteristics AS/NZS CISPR22, Class A Information Technology Equipment - Radio Disturbance Characteristics ICES-003, Class A Information Technology Equipment - Radio Disturbance Characteristics Check Point 4000 Appliances Getting Started Guide... - Page 42 EN 60950-1:2006/A11:2009 Safety of Information Technology Equipment The product herewith complies with the requirements of the EU Directive 2006/95/EC and the EMC Directive 2004/108/EC Date and Place of issue: July, 2011, Tel Aviv, Israel Check Point 4000 Appliances Getting Started Guide...
- Page 43 Caution Any changes or modifications not expressly approved by the grantee of this device could void the user’s authority to operate the equipment. Check Point 4000 Appliances Getting Started Guide...
- Page 44 Check Point 4000 Appliances Getting Started Guide...
- Page 45 14 de enero de 2016 Dispositivos Check Point 4000 Guía de introducción Modelos: T-120, T-140, T-160 and T-180 Clasificación: [Protected] Nº. de pieza: 706623...
- Page 46 Check Point. Pese a que en la preparación de este manual se tomaron todas las precauciones posibles, Check Point no asume responsabilidad alguna por errores u omisiones.
- Page 47 Documentación más reciente La versión más reciente de este documento se encuentra en: http://supportcontent.checkpoint.com/documentation_download?ID=12688 Para más información, visite el Centro de soporte de Check Point http://supportcenter.checkpoint.com. Para más información sobre este dispositivo, consulte la página de inicio de los dispositivos 4000 (http://supportcontent.checkpoint.com/solutions?id=sk68681).
- Page 48 Restaurar utilizando el menú de arranque de la consola (en la página 36) 15 de agosto de 2011 Primera versión de este documento Retroalimentación Check Point hace continuos esfuerzos para mejorar su documentación. Ayúdenos enviando sus comentarios mailto:cp_techpub_feedback@checkpoint.com?subject=Feedback en la Guía de introducción de los dispositivos 4000 de Check Point.
- Page 49 Maneje la placa solo por sus bordes. No toque sus componentes, sus chips periféricos, los módulos de memoria o los contactos dorados. • Al manejar chips de procesadores o módulos de memoria, evite tocar sus clavijas o sus contactos de borde dorados. Guía de introducción de los dispositivos 4000 de Check Point | 5...
- Page 50 En relación con este problema, se debe prestar la atención necesaria a las capacidades nominales en la placa de identificación del equipo. 6 | Guía de introducción de los dispositivos 4000 de Check Point...
- Page 51 La manipulación del cable de este producto le expondrá a plomo, sustancia química que el Estado de California considera como causante de cáncer y de defectos congénitos u otros daños reproductivos. Lávese las manos después de manipularlo. Guía de introducción de los dispositivos 4000 de Check Point | 7...
- Page 52 Conectar el equipo en una salida en un circuito distinto de aquél al el receptor está conectado. • Para obtener ayuda, consulta al distribuidor o a un técnico de radio o televisión experimentado. 8 | Guía de introducción de los dispositivos 4000 de Check Point...
- Page 53 Directiva del Consejo relativa a la aproximación de las legislaciones de los Estados miembros en relación con la Directiva sobre compatibilidad electromagnética (2004/108/EC). Para la evaluación concerniente a la compatibilidad electromagnética (2004/108/EC) Guía de introducción de los dispositivos 4000 de Check Point | 9...
- Page 54 10 | Guía de introducción de los dispositivos 4000 de Check Point...
- Page 55 Tarjetas de línea de expansión ..............32 Componentes del panel trasero ..............32 Interruptor de alimentación principal ............33 Unidades de fuentes de alimentación redundantes (Check Point 4800) ... 33 Reemplazo y actualización de componentes ..........33 Restauración de valores predeterminados de fábrica ........35 Restablecer utilizando la interfaz web del usuario (WebUI) ......
- Page 56 Soporte ......................39 ¿Hacia dónde vamos desde aquí? ..............39 Información de cumplimiento ................. 41 Declaración de conformidad ................41...
- Page 57 Check Point para garantizar que usted saque el máximo partido de su inversión en seguridad.
-
Page 58: Introducción
SecurePlatform de Check Point y de IPSO, el sistema operativo de los productos de seguridad de Nokia. Gaia es compatible con la cartera completa de los productos Software Blades, de pasarela de seguridad y de administración de seguridad de Check Point. -
Page 59: Actualización Del Dispositivo
• Un cable serial de consola Documentación • Guía de inicio rápido • Guía de introducción • Guía de gestión de imágenes • Contrato de licencia del usuario Guía de introducción de los dispositivos 4000 de Check Point | 15... -
Page 60: Terminología
• Implementación con administración centralizada: cuando la pasarela y el servidor de administración de seguridad están instalados en máquinas distintas. 16 | Guía de introducción de los dispositivos 4000 de Check Point... -
Page 61: Montaje De Los Dispositivos 4000 En Un Bastidor
(que se ofrecen como accesorio opcional). Para obtener los procedimientos de instalación, vea Montaje en bastidores de dispositivos de Check Point http://downloads.checkpoint.com/dc/download.htm?ID=26435. Especificaciones físicas del dispositivo Estas son las especificaciones físicas de los modelos de dispositivos Check Point que se pueden montar en el bastidor. Dispositivo Ancho... -
Page 62: Rejillas De Ventilación Del Dispositivo
Los rieles de electrodomésticos y de los bastidores se han probado en condiciones extremas y no bloquean el flujo de aire hacia el dispositivo, que está diseñados específicamente para instalar con estos rieles o guías. 18 | Guía de introducción de los dispositivos 4000 de Check Point... -
Page 63: Configuración De Dispositivos 4000
2. En el panel posterior, active el botón Power (Alimentación) para poner en marcha el dispositivo. Nota: En el caso de 4800 de Check Point, cuando una fuente de alimentación falla o no está conectada a la toma de corriente, una alarma suena continuamente. -
Page 64: Imágenes De Software Disponible
Para más información sobre las imágenes de software, consulte la página de inicio de los dispositivos 4000 http://supportcontent.checkpoint.com/solutions?id=sk68681. Nota: Gaia se ofrece para la versión R75.40 y posteriores. 20 | Guía de introducción de los dispositivos 4000 de Check Point... -
Page 65: Configuración Inicial
Se abre la página de inicio de sesión. 3. Inicie sesión en el sistema utilizando el nombre de conexión y la contraseña predeterminados: admin/admin y haga clic en Login. Guía de introducción de los dispositivos 4000 de Check Point | 21... - Page 66 Gaia y distintas de Gaia. Por ejemplo, en el caso de la versión R77.10 de la plataforma Gaia, vea Guía de instalación y actualización de plataformas Gaia versiones R77. 22 | Guía de introducción de los dispositivos 4000 de Check Point...
-
Page 67: Creación Del Objeto De Red
(CLI). Nota: El menú sysconfig solo está disponible después de ejecutar el Asistente de configuración inicial en la interfaz web del usuario (WebUI). Guía de introducción de los dispositivos 4000 de Check Point | 23... -
Page 68: Conexión Con La Interfaz De Línea De Comandos (Cli)
(8N1). • Fije el Flow Control (Control de flujo) en None (Ninguno). • Una conexión SSH a la interfaz de administración (siempre y cuando el SSHD esté configurado). 24 | Guía de introducción de los dispositivos 4000 de Check Point... -
Page 69: Hardware De Dispositivos 4000
..............Reemplazo y actualización de componentes ..........Componentes del panel delantero En esta sección se describen las características y los componentes situados en el panel delantero del dispositivo. Guía de introducción de los dispositivos 4000 de Check Point | 25... -
Page 70: Panel Delantero De Check Point 4200
Puertos USB Puerto de consola: conexión en serie al dispositivo mediante un programa de emulación de terminal, como HyperTerminal o PuTTY Indicador LED de alimentación Pantalla LCD Teclado 26 | Guía de introducción de los dispositivos 4000 de Check Point... -
Page 71: Panel Delantero De Check Point 4400 Y 4600
Puertos USB Puerto de consola: conexión en serie al dispositivo mediante un programa de emulación de terminal, como HyperTerminal o PuTTY Indicador LED de alimentación Pantalla LCD Teclado Guía de introducción de los dispositivos 4000 de Check Point | 27... -
Page 72: Panel Delantero De Check Point 4800
Teclado Lights Out Management Mediante la tarjeta Lights Out Management (LOM) de Check Point puede utilizar un canal de administración dedicado para controlar de forma remota los dispositivos Check Point. Lights Out Management también puede funcionar cuando el dispositivo está apagado o no responde. -
Page 73: Uso Del Panel Lcd
Definir la máscara de red (Netmask) de la interfaz de administración. Set Default GW Definir la pasarela predeterminada de la interfaz de administración. Sistema Reinicio Reiniciar el aparato. Guía de introducción de los dispositivos 4000 de Check Point | 29... - Page 74 Aprobar el cambio cuando el cursor se encuentra en el último dígito Cancelar el cambio de IP cuando el cursor se encuentra en el primer dígito Cambiar el dígito actual 30 | Guía de introducción de los dispositivos 4000 de Check Point...
- Page 75 Para configurar la dirección IP de administración mediante el panel LCD: 1. Presione Enter El panel indica Select > Network (Seleccionar > Red). 2. Presione Enter El panel indica Network > DHCP (Red > DHCP). Guía de introducción de los dispositivos 4000 de Check Point | 31...
-
Page 76: Tarjetas De Línea De Expansión
Importante: Utilice el dispositivo únicamente cuando el módulo Security Acceleration o la bandeja del marcador de posición está en la ranura superior, para garantizar que el dispositivo se enfríe correctamente. 32 | Guía de introducción de los dispositivos 4000 de Check Point... -
Page 77: Interruptor De Alimentación Principal
Unidades de fuentes de alimentación redundantes (Check Point 4800) El Check Point 4800 tiene una fuente de alimentación redundante. Las dos fuentes de alimentación intercambiables en caliente, situadas en la parte posterior del dispositivo, brindan una redundancia de alimentación incorporada. Cada fuente de alimentación se conecta a una toma de corriente. - Page 78 Para obtener más información acerca de la instalación de estas piezas y componentes, consulte la página de inicio del dispositivo (http://supportcontent.checkpoint.com/solutions?id=sk68681). A menos que se lo indique el soporte técnico de Check Point, los acuerdos de garantía y soporte le prohíben reemplazar piezas. 34 |...
-
Page 79: Restauración De Valores Predeterminados De Fábrica
3. En la interfaz web del usuario (WebUI), haga clic en Maintenance > Factory Defaults (Mantenimiento > Configuración de fábrica). Se abre la ventana Configuración de fábrica. 4. Seleccione la versión de imagen en proceso de restauración. Guía de introducción de los dispositivos 4000 de Check Point | 35... -
Page 80: Secureplatform
4. Defina la configuración del puerto de serie: 9600 BPS, 8 bits, sin paridad, 1 bit de parada. 5. En la lista Flow control (Control de flujo), seleccione None (Ninguno). 6. Conectarse con el dispositivo. 7. Encienda el dispositivo. 36 | Guía de introducción de los dispositivos 4000 de Check Point... - Page 81 Boot. 9. En el menú Boot, seleccione la imagen de Reset to factory defaults (Restablecer la configuración de fábrica) pertinente. 10. Presione Intro. Guía de introducción de los dispositivos 4000 de Check Point | 37...
-
Page 82: Restauración Del Uso Del Panel Lcd
Cuando el dispositivo se restaura a su configuración de fábrica, se reinicia. En Gaia se abre el mensaje Reverting . En SecurePlatform, se abre el mensaje Initializing (Inicializando). 38 | Guía de introducción de los dispositivos 4000 de Check Point... -
Page 83: Registro Y Soporte
Ya dispone de lo básico para empezar. El siguiente paso es conocer más a fondo el software Check Point. La documentación de Check Point está disponible en el Centro de soporte de Check Point http://supportcenter.checkpoint.com. Asegúrese de utilizar también la ayuda en línea al trabajar con los clientes SmartConsole de Check Point. - Page 84 Registro y soporte 40 | Guía de introducción de los dispositivos 4000 de Check Point...
- Page 85 VCCI V-3, Clase A Equipo de tecnología de la información: características de las perturbaciones de radio AS/NZS CISPR22, Clase A Equipo de tecnología de la información: características de las perturbaciones de radio Guía de introducción de los dispositivos 4000 de Check Point...
- Page 86 Equipo de tecnología de la información: inmunidad a sobretensión EN61000-4-6 Equipo de tecnología de la información: inmunidad a RF conducida EN61000-4-11 Equipo de tecnología de la información: inmunidad a caídas de tensión e interrupciones breves Guía de introducción de los dispositivos 4000 de Check Point...
- Page 87 Precaución Cualquier cambio o modificación no aprobados expresamente por el cesionario de este dispositivo podría anular la autoridad del usuario para operar el equipo. Guía de introducción de los dispositivos 4000 de Check Point...
- Page 88 Guía de introducción de los dispositivos 4000 de Check Point...
- Page 89 14 Января 2016 Check Point 4000 Устройства Руководство По Началу Работы Mодели: T-120, T-140, T-160 and T-180 Классификация документа: [Protected] P/N: 706623...
- Page 90 каким-либо образом без предварительного письменного согласия компании Check Point. Несмотря на то, что при подготовке настоящего руководства были приняты все меры предосторожности, компания Check Point не принимает на себя никакой ответственности за ошибки или упущения. Данная публикация и описанные в ней свойства продукта могут...
- Page 91 Последняя версия документации Последняя версия настоящего документа доступна по адресу: http://supportcontent.checkpoint.com/documentation_download?ID=24489 Для получения дополнительной технической информации посетите Центр поддержки Check Point (http://supportcenter.checkpoint.com). Более подробная информация об этом устройстве Check Point 4000 приводится на главной странице (http://supportcontent.checkpoint.com/solutions?id=sk68681). История редакций Дата Описание...
- Page 92 Не касаться выводов или позолоченных контактов микросхем процессора или модулей памяти. • Вернуть системную плату и периферийные микросхемы устройства связи в антистатический пакет, если они не используются или не установлены в корпус. Устройства Check Point 4000 Руководство по началу работы...
- Page 93 механической нагрузки. 4. Перегрузка проводников. Подключение оборудования к сети не должно приводить к перегрузке проводников и устройств защиты от бросков тока. При определении оптимальных параметров подключения руководствуйтесь электротехническими характеристиками на маркировке изделия. Устройства Check Point 4000 Руководство по началу работы...
- Page 94 ПРИМЕЧАНИЕ. Это оборудование прошло испытания и признано отвечающим нормам для цифровых устройств класса B согласно части 15 Правил Федеральной комиссии связи. Эти нормы призваны обеспечить разумную защиту от недопустимых помех в жилых помещениях. Это оборудование генерирует, потребляет и излучает Устройства Check Point 4000 Руководство по началу работы...
- Page 95 Этот цифровой аппарат класса B соответствует требованиям канадского стандарта ICES-003. Cet appareil numérique de la classe A est conforme à la norme NMB-003 du Canada. Заявление о соответствии требованиям (Япония): Класс A Устройства Check Point 4000 Руководство по началу работы...
- Page 96 бытовых отходов поможет сохранить природные ресурсы и переработать отходы безопасным для здоровья и окружающей среды способом. За дополнительной информацией о местах приема отработавшего оборудования для переработки следует обратиться в местную службу по вывозу и утилизации отходов. Устройства Check Point 4000 Руководство по началу работы...
- Page 97 Общие сведения о Check Point 4000 ...............11 Обновление устройства ................12 Комплект поставки ....................13 Термины ......................14 Монтаж Check Point 4000 в стойке ..............15 Appliance Physical Specifications ...............15 Вентиляционные отверстия устройства ............16 Настройка Check Point 4000 ................17 Включение питания ..................17 Доступные...
- Page 98 Регистрация ...................... 37 Поддержка ......................37 Дополнительные справочные ресурсы ............37 Сведения о соответствии .................. 39 Декларация о соответствии ................39...
-
Page 99: Введение
1(800) 429-4391. Дополнительную техническую информацию о продукции Check Point см. в Check PointЦентре поддержки (http://supportcenter.checkpoint.com). Желаем Вам приятной работы с продуктами Check Point. Будем рады помочь вам в решении всех текущих и будущих задач по обеспечению безопасности сетей, приложений и управления. -
Page 100: Обновление Устройства
— единая унифицированная операционная система сетевой защиты, объединяющая лучшие возможности операционных систем SecurePlatform компании Check Point и IPSO (используется в системах обеспечения безопасности Nokia). Gaia поддерживает весь спектр Check Point Software Blades, Security Gateway, а также продукты Security Management. Основные возможности. -
Page 101: Комплект Поставки
Кабель электропитания • Стандартный сетевой кабель RJ-45 (1 шт.) • Кабель последовательной консоли (1 шт.) Документация • Краткое руководство • Руководство по началу работы • Руководство по управлению образами • Лицензионное соглашение Устройства Check Point 4000 Руководство по началу работы... -
Page 102: Термины
• пользователя, используемое системным администратором для создания и управления политикой безопасности Locally Managed Deployment: Все компоненты системы Check Point, ответственные • как за управление, так и за реализацию политики безопасности (сервер Security Management Server и шлюз), установлены на одном компьютере. -
Page 103: Монтаж Check Point 4000 В Стойке
Глава 2 Монтаж Check Point 4000 в стойке Вы можете установить Check Point 4000 с телескопическими направляющими. Инструкцию см. в брошюре Установка телескопических направляющих (http://downloads.checkpoint.com/dc/download.htm?ID=26435). В этой главе Appliance Physical Specifications Вентиляционные отверстия устройства Физические Характеристики Устройства На выдвижные направляющие устанавливаются модели устройств Check Point со... -
Page 104: Вентиляционные Отверстия Устройства
Важно. Перекрытие вентиляционных отверстий может привести к перегреву и повреждению устройства. По результатам испытаний даже в самых жестких условиях эксплуатации направляющие устройства и стойки не преграждают доступ воздуха к устройству. Конструкция устройств предусматривает их монтаж с помощью этих направляющих. Устройства Check Point 4000 Руководство по началу работы... -
Page 105: Настройка Check Point 4000
Основные действия по настройке Check Point 4000: 1. Подсоединить кабели и включить питание устройства. 2. Настроить устройство помощью мастера начальной настройки. 3. Добавить объект Check Point 4000 в SmartDashboard и установить политику. В этой главе Включение питания Доступные образы программного обеспечения... -
Page 106: Доступные Образы Программного Обеспечения
выводится состояние устройства: Устройство готово к эксплуатации, когда на экране отображается номер модели. Доступные образы программного обеспечения В комплект поставки Check Point 4000 входит несколько образов программного обеспечения. Выберите необходимый образ. Установка образа программного обеспечения занимает несколько минут. Подключившись к устройству с помощью последовательной консоли, можно проследить... - Page 107 сохранить файл маркера входа в безопасном месте. 6. Запускается мастер начальной настройки. Опции конфигурации Для операционных систем Gaia и SecurePlatform предусмотрены разные варианты Первоначальный мастер. См. Руководство по установке и обновлению для Устройства Check Point 4000 Руководство по началу работы...
-
Page 108: Создание Сетевого Объекта
только для основных версий, для Gaia и других платформ. Например, для версии R77.10 для платформы Gaia см. Руководство по установке и обновлению версии R77 для платформ Gaia. Создание сетевого объекта Объект Check Point 4000 задается как объект шлюза в базе данных Security Management Server. Порядок создания сетевого объекта вSmartDashboard: 1. Запустите SmartDashboard. -
Page 109: Подключение К Интерфейсу Командной Строки
Настройка Check Point 4000 Подключение к интерфейсу командной строки По завершении работы Первоначальный мастер можно подключиться к интерфейсу командной строки Check Point 4000. Для этого используются. • Кабель последовательной консоли (DTE-DTE) из комплекта поставки • Программное обеспечение эмуляции терминала, например HyperTerminal и PuTTY (из... - Page 110 Настройка Check Point 4000 Устройства Check Point 4000 Руководство по началу работы...
- Page 111 Глава 4 Аппаратная часть устройств Check Point 4000 В этой главе Компоненты на передней панели Компоненты на задней панели Замена и обновление компонентов Устройства Check Point 4000 Руководство по началу работы...
-
Page 112: Аппаратная Часть Устройств Check Point 4000
Порт настройки управления для подключения Ethernet к рабочей станции удаленного управления Порты USB Консольный порт для последовательного подключения к устройству с помощью программы эмуляции терминала, например HyperTerminal или PuTTY Индикатор блока питания ЖК-дисплей Кнопочная панель Устройства Check Point 4000 Руководство по началу работы... -
Page 113: Передняя Панель Check Point 4400 И 4600
Порт настройки управления для подключения Ethernet к рабочей станции удаленного управления Порты USB Консольный порт для последовательного подключения к устройству с помощью программы эмуляции терминала, например HyperTerminal или PuTTY Индикатор блока питания ЖК-дисплей Кнопочная панель Устройства Check Point 4000 Руководство по началу работы... -
Page 114: Check Point 4800 Front Panel
Порт настройки управления для подключения Ethernet к рабочей станции удаленного управления Порты USB Консольный порт для последовательного подключения к устройству с помощью программы эмуляции терминала, например HyperTerminal или PuTTY Индикатор блока питания ЖК-дисплей Кнопочная панель Устройства Check Point 4000 Руководство по началу работы... -
Page 115: Использование Жк-Дисплея
Аппаратная часть устройств Check Point 4000 Lights Out Management Плата (LOM) Check Point Lights Out Management позволяет удаленно управлять устройствами Check Point с помощью выделенного канала управления. Lights Out Management также доступно, если устройство выключено или не отвечает. Более подробная информация об использовании Lights Out Management приводится в... - Page 116 Войти в загрузочное меню или Перейти к следующей цифре Вернуться к предыдущей цифре Подтвердить изменение когда курсор находится на последней цифре Отменить изменение IP когда курсор находится на первой цифре Изменить текущую цифру или Устройства Check Point 4000 Руководство по началу работы...
- Page 117 Маска подсети • Шлюз по умолчанию Порядок настройки IP-адреса управления управления с помощью ЖК-дисплея: 1. Нажмите Enter На дисплее появится Select > Network. 2. Нажмите Enter На дисплее появится Network > DHCP. Устройства Check Point 4000 Руководство по началу работы...
-
Page 118: Гнезда Линейных Плат Расширения
пока на дисплее не появится логотип устройства. Гнезда линейных плат расширения С устройством можно использовать различные линейные платы расширения. Для получения более подробной информации о линейных платах расширения обратитесь к Check Point 4000 главная страница (http://supportcontent.checkpoint.com/solutions?id=sk68681). Устройства Check Point 4000 Руководство по началу работы... -
Page 119: Компоненты На Задней Панели
Главный переключатель питания контролирует подачу питания на оборудование. Резервные блоки питания (Check Point 4800) В Check Point 4800 предусмотрен один дополнительный резервный блок питания. Два блока питания с поддержкой замены во время работы, расположенные в задней части устройства слева, представляют собой резервную систему питания. Каждый блок... - Page 120 Подробнее об установке этих компонентов см. на главной странице (http://supportcontent.checkpoint.com/solutions?id=sk68681) устройства. На протяжении гарантийного срока и периода действия соглашений о технической поддержке замена и установка деталей допускается только с разрешения службы технической поддержки Check Point. Устройства Check Point 4000 Руководство по началу работы...
-
Page 121: Восстановление Заводских Настроек
WebUI: 1. Откройте в браузере IP-адрес управления: https://<appliance_ip_address> 2. Введите имя пользователя и пароль администратор для входа в WebUI устройства. 3. В WebUI выберите Maintenance > Factory Defaults. Откроется окно Factory Defaults. Устройства Check Point 4000 Руководство по началу работы... -
Page 122: Secureplatform
В программе PuTTY выбрать тип подключения Serial. • 4. Задайте параметры последовательного порта: 9600 бит/с, 8 бит, без бита четности, 1 стоповый бит. 5. В списке Flow control выберите None. 6. Подключитесь к устройству. 7. Включите устройство. Устройства Check Point 4000 Руководство по началу работы... -
Page 123: Восстановление Через Жк-Дисплей
1. Перегрузите или включите устройство. 2. Когда начнется обратный отсчет, нажмите любую клавишу со стрелкой. Откроется меню Boot. 3. С помощью кнопок со стрелками выбрать образ с заводскими настройками. 4. Нажмите 5. Подтвердите сброс нажатием Устройства Check Point 4000 Руководство по началу работы... - Page 124 6. Подтвердив сброс, подождите, пока на устройстве восстановится образ с заводскими настройками. Восстановление стандартного образа сопровождается сообщением: Reverting image don't turn off (идет восстановление образа, не отключать). После восстановления заводских настроек устройство перезагрузится, и на дисплей будет выведено сообщение об инициализации. Устройства Check Point 4000 Руководство по началу работы...
-
Page 125: Регистрация И Поддержка
В этой главе Регистрация Поддержка Дополнительные справочные ресурсы Регистрация Для использования устройства требуется лицензия Check Point для конкретной модели. Получить лицензию и зарегистрироваться можно на странице Регистрации устройств (http://register.checkpoint.com/cpapp) Check Point. Подключитесь к WebUI устройства и найдите MAC-адрес, необходимый для получения лицензии. - Page 126 Регистрация и поддержка Устройства Check Point 4000 Руководство по началу работы...
- Page 127 — характеристики радиопомех VCCI V-3, Class A Оборудование информационных технологий — характеристики радиопомех AS/NZS CISPR22, Оборудование информационных технологий Class A — характеристики радиопомех ICES-003, Class A Оборудование информационных технологий — характеристики радиопомех Устройства Check Point 4000 Руководство по началу работы...
- Page 128 Оборудование информационных технологий — устойчивость к кондуктивным помехам, наведенным радиочастотными полями EN61000-4-11 Оборудование информационных технологий — устойчивость к провалам, кратковременным прерываниям и изменениям напряжения Безопасность CAN/CSA, C22.2 Безопасность оборудования информационных No. 60950-1-07 технологий Устройства Check Point 4000 Руководство по началу работы...
- Page 129 вызвать недопустимые помехи. В этом случае пользователь должен будет устранить помехи за свой счет. Предупреждение Внесение любых изменений в конструкцию изделия без специального разрешения изготовителя настоящего изделия может лишить владельца права использовать устройство по назначению. Устройства Check Point 4000 Руководство по началу работы...
- Page 130 Сведения о соответствии Устройства Check Point 4000 Руководство по началу работы...
Need help?
Do you have a question about the 4200 and is the answer not in the manual?
Questions and answers