Fasel Elektronik FCU2000 Operating Manual
Series fcu2x00/fcu3x00/fcu4x00
Hide thumbs
Also See for FCU2000:
- Operating manual (47 pages) ,
- Installation instructions manual (40 pages) ,
- Installation instructions manual (36 pages)
Table of Contents
Advertisement
Quick Links
Series FCU2x00/FCU3x00/FCU4x00
Operating manual
Sauna control
only Sauna
Series FCU2000
Series FCU3000
Series FCU4000
Doc-ID:B_FCUxxxx_EN
Version: V 2.09
Technical changes and errors excepted, illustration similar
with Sauna with humidity
FCU2200
FCU3200
FCU4200
with IR
---
FCU3400
FCU4400
certificated
Advertisement
Table of Contents

Related Manuals for Fasel Elektronik FCU2000


Summary of Contents for Fasel Elektronik FCU2000
- Page 1 Series FCU2x00/FCU3x00/FCU4x00 Operating manual Sauna control only Sauna with Sauna with humidity with IR Series FCU2000 FCU2200 Series FCU3000 FCU3200 FCU3400 Series FCU4000 FCU4200 FCU4400 Doc-ID:B_FCUxxxx_EN Version: V 2.09 certificated Technical changes and errors excepted, illustration similar...
- Page 2 FASEL GmbH Germany Operating manual Sauna control FCU2x00/FCU3x00/FCU4x00 Version V 2.09...
-
Page 3: Table Of Contents
Table of contents Table of contents Safety..........................5 Explanations of symbols ................5 Demands on the operator and technicians...........6 Intended use ....................6 Changes and modifications ................7 Operational safety and special dangers ............7 Information on the operating and installation manual........8 Identification ........................9 Nameplate ....................9 Technical Data:........................9 Design and function......................10 Function ......................10... - Page 4 Table of contents "Basic settings" menu ....................31 "Basic settings" - general ................31 6.1.1 Time and Weekday................31 6.1.2 Weekly timer ON/OFF (only for FCU4xxx) ........... 32 6.1.3 Program the weekly timer ..............32 6.1.4 Select program (only for FCU4xxx) ............34 6.1.5 Adjust display lighting (not for FCU2xxx)..........
-
Page 5: Safety
Safety Safety Explanations of symbols Warnings Warnings in this operating manual are indicated through symbols. The instructions are introduced through signal words, which express the degree of danger. Follow these instructions strictly and take care to avoid accidents, personal injuries and property damage. -
Page 6: Demands On The Operator And Technicians
Safety Demands on the operator and technicians This appliance can be used by children aged from 8 years and above and persons with reduced physical, sensory or mental capabilities or lack of experience and knowledge if they have been given supervision or instruction concerning use of the appliance in a safe way and understand the hazards involved. -
Page 7: Changes And Modifications
Safety Changes and modifications Changes and modifications to the control unit or to the installation could lead to unpre- dictable dangers. The written approval of the manufacturer must be obtained before making any technical changes and enhancements to the Sauna control. Operational safety and special dangers Pay attention to the safety and warning notes in the following chapters of this manual to minimize health hazards and to avoid dangerous situations. -
Page 8: Information On The Operating And Installation Manual
Safety Improper WARNING! operation Improper operation can result in serious injuries! Therefore: – read and note the operating manual. Information on the operating and installation manual An operating manual as well as an installation manual are available for the FASEL con- trol unit. -
Page 9: Identification
VDE mark (for devices that are approved by VDE) RoHS marking CE mark Protection category Technical Data: Label Type Series FCU2000 Series FCU3000 Series FCU4000 Ambient temperature 0 to +40 ° C Rel. humidity max. 80 % r.H., non condensing Table 1: Technical Data Operating manual Sauna control FCU2x00/FCU3x00/FCU4x00 Version V 2.09... -
Page 10: Design And Function
Design and function Design and function Function Depending on the model, the control unit is suitable for the following modes: Sauna Sauna with humidity Infrared 4.1.1 Sauna In the "Sauna" mode, the cabin is heated to the desired temperature (set point tempera- ture) using an oven. -
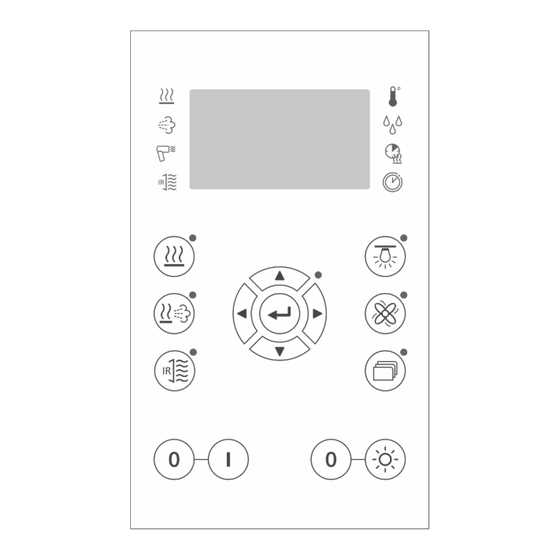
Page 11: Operating And Display Elements
Design and function Operating and display elements 4.2.1 FCU4x00 design and FCU4x00 design glass Fig. 2: Operation FCU4x00 design and FCU4x00 design glass view Status display "Heater" symbol "Set temperature" Status display "Evaporator" symbol "Set humidity " Status display "Drying function” symbol "Set remaining or heating time"... -
Page 12: Control Keys Sauna Control
Design and function 4.2.2 Control keys Sauna control The sauna control is equipped with the following control keys: Description key "Sauna mode" Depending on the status of the green lamp, the "Sauna mode" key has different func- tions. Status lamp next to the key Meaning Does not light up Mode is not selected. - Page 13 Design and function Description key "Infrared mode" (only FCUx400) Depending on the status of the green lamp, the "Infrared mode" key has different func- tions. Status lamp next to the key Meaning Does not light up Mode is not selected. The lamp flashes after pressing the "Infrared mode"...
- Page 14 Design and function Description Change mode ON: (the green lamp next to navigation keys lights up): Move cursor to the left. Change mode OFF: (the green lamp next to navigation keys does not light up): Go back to the parent menu. Change mode ON: (the green lamp next to navigation keys lights up): Move cursor to the right.
-
Page 15: Explanation Of The Display Fcu2X00
Design and function 4.2.3 Explanation of the display FCU2x00 Fig. 3: Explanation of the FCU2xxx display indicates which symbol or status display is currently enabled. Colour wheel indicates whether colour light option is available. Auto / manual 11-14 Colour lamps 1-4 Supply to the colour box Thermometer is visible as soon as a value is shown on the bar graph. -
Page 16: Display Symbols
Design and function Display symbols The following symbols can appear in the display of the FCU4x00 control: Display elements Description Temperature Humidity Heating time Remaining heating time Time Flavor Colour light Light ... -
Page 17: Operation
Operation Operation Safety and instructions Electric DANGER! potential Danger to life due to electric potential! Touching live parts can cause immediate danger to life. Therefore: – Control unit should be opened only by authorised electricians. – Electrical work on the machine should be carried out only by qualified electricians. -
Page 18: Turn Sauna Control On And Off
Operation NOTE! The temperature and humidity values displayed on the control unit may vary from that displayed on the thermometers and hygrometers mounted additionally in the cabin. This may be because of the following reasons: Depending on the cabin, temperatures differences of up to 60K and dif- ferences in the relative humidity of up to 40% can occur from the floor to ceiling or from the heater to the opposite wall. -
Page 19: Select Or Start The Mode
Operation A mode is selected. The corresponding green lamp lights up. Press the key of the selected mode. The green lamp next to the key flashes. The green lamp of the selected mode flashes. Turn off the sauna control using the "Control unit OFF"... -
Page 20: Adjust "Sauna" Mode
Operation Fig. 4: "Sauna" view (example) Press the key. The symbol (adjust the temperature) lights up. → See page 22, chapter 5.3.3. Press the key. The symbol (adjust heating / remaining heating time) lights up. Depending on the status of the lamp next to the mode key, adjust the heating time or the remaining heating time. -
Page 21: Adjust "Sauna With Humidity" Mode (Only Fcux200 And Fcux400)
Operation 5.3.2 Adjust "Sauna with humidity" mode (only FCUx200 and FCUx400) PLEASE NOTE! Cabin damage for e.g. mould growth due to premature stopping of the drying function! After completion of the "sauna with humidity" mode (min. 10 minutes operation), the cabin is automatically dried for a certain time at a certain temperature. -
Page 22: Adjust "Infrared" Mode (Only Fcu3400 And Fcu4400)
Operation 5.3.3 Adjust "Infrared" mode (only FCU3400 and FCU4400) The control unit is turned on. Press the key (infrared mode) if required In the mode “Infrared” additionally the base temperature of the oven can be adjusted. Press the key until the symbol (adjust temperature) lights up Press the key again (symbol... -
Page 23: Maximum Allowed Heating Time
Operation The timer may be enabled or disabled depending on the setting. In the series FCU2x00 and FCU3x00, weekly timer is not available. The "Sauna" (Fig. 4), "Sauna with humidity" (Fig. 5) or "Infrared" (Fig. 6) view is displayed. Press the key till the symbol (adjust temperature) lights up. -
Page 24: Day Timer
Operation Day timer Press the -key until the symbol (adjust timer) lights up. Adjust desired time (see above) Press the key to adjust the value. Press the mode-key (flashes) Symbol flashes. 6. For turning off the timer, please turn off the control unit or press mode-key once for starting and once again for stopping. -
Page 25: Adjust The Cabin Fan Speed (Not For Fcu2Xxx)
Licht2000. In this menu you can set the brightness of the RGB-LEDs. -Press the key until you see the following view: Not available with FCU2000 and FCU3000! Operating manual Sauna control FCU2x00/FCU3x00/FCU4x00 Version V 2.09... -
Page 26: Colour Light Mode (Including Parameter Description)
Operation Fig. 10: View "RGB-LED brightness" Press key. Select RGB-LED brightness. Digit flashes. Press the key: Increase value. Press the key: Reduce value. There are 4 brightness levels possible. Press the key. The selection is saved. 5.8.2 Colour light mode (including parameter description) NOTE! The "Colour light mode"... - Page 27 Operation Fig. 11: View "colour light mode" Press key or -key. Following view is displayed: Fig. 12: View "Set colour light – change mode" (example) Select one of the following lines with the key: ...
-
Page 28: Colour Light Start (Only For Menu "Pro")
Operation Key: without function Key: Select "auto". – "auto" is enabled. The symbol "auto" (symbol no. 10) appears in the display. Key: Select "manual". Key: without function 11. Press the key. The selection is saved. 12. Exit the menu using the key or select the next line with the key. - Page 29 Operation Option Description FCU4x00 FCU2x00/FCU3x00 If power on Start, as soon as control device is switched on. On heat-up phase Start, as soon as a mode is active. If bath is ready Start, as soon as the set point temperature is reached.
-
Page 30: Adjust The Flavour Feed
Operation 5.8.4 Adjust the flavour feed The control unit is turned on. Press the (Adjust flavour) key or key till the following view is displayed. Fig. 15: " flavour feed" view (example) Press the key. -
Page 31: "Basic Settings" Menu
"Basic settings" menu "Basic settings" menu "Basic settings" - general 6.1.1 Time and Weekday In this menu you can set the time and the weekday. Press key (basic settings). The lamp next to the key must light. The weekday appears only, if the weekly timer is released. The following view is shown: ... -
Page 32: Weekly Timer On/Off (Only For Fcu4Xxx)
(the menu does not appear). In the series FCU2x00 and FCU3x00 is no weekly timer. Following view is displayed: Not available with FCU2000 and FCU3000 ... - Page 33 Press (basic settings) key. The lamp next to the key must light up. - Press the key until you see the following view: Not available with FCU2000 and FCU3000 Fig. 20: "Program the weekly timer" view Press the key.
-
Page 34: Select Program (Only For Fcu4Xxx)
1. Press key “basic settings”. The lamp next to the key must light. 2. Press -key until the following view is shown: Not available with FCU2000 and FCU3000 Abb. 22: View "select program" (example) 3. -
Page 35: Adjust Display Lighting (Not For Fcu2Xxx)
"Basic settings" menu 6.1.5 Adjust display lighting (not for FCU2xxx) In this menu you adjust the brightness of the display. Press (basic settings) key. The lamp next to the key must light up. Press the key until you see the following view: ... -
Page 36: Light Settings (Only For Menu "Pro")
"Basic settings" menu 6.1.7 Light settings (only for menu "Pro") In this menu you can set the time, when the light should go on and how long it should stay on after the end of a mode. Press (basic settings) key. -
Page 37: Fan Settings (Only For Menu "Pro")
"Basic settings" menu 10. Press the key. The selected line is enabled. 11. Option "light ON after heat-up phase" is enabled. Cursor flashes on the selected line. Press the key. Check mark is set (option selected). Press the key: Check mark is deleted (option not selected). 12. - Page 38 "Basic settings" menu Fig. 28: "Fan settings – change mode" view (example) Select one of the following lines with the key: – Fan ON at sauna (→ point 7) ...
-
Page 39: Basic Settings" For Options
Press key (basic settings). The lamp next to the key must light. - Press the key until you see the following view: Not available with FCU2000 and FCU3000! Fig. 29: "RGB-LED settings" view Press the key. -
Page 40: Colour Light Automatic (Only For Menu "Pro")
"Basic settings" menu Press the key. The selected line is enabled. Select hand. Cursor flashes on the selected line. Press the key: Increase value. Press the key: Reduce value. There is a maximum time period of 3 seconds possible. Press the key. - Page 41 "Basic settings" menu Fig. 32: "Colour light automatic – change mode" view (example) Select one of the following lines with the key: – Colour program no. (→ point 7) –...
-
Page 42: Key Manual Infusion (Only For Menu "Pro")
"Basic settings" menu 18. Exit the menu using the key. 6.2.3 Key manual infusion (only for menu "Pro") In this menu can be the time programmed as long as the oven heats to the maximum temperature. This menu is only available if the corresponding option is enabled. Press key (basic settings). - Page 43 "Basic settings" menu Fig. 35: "HW and SW versions" view (example) With the key you can navigate within the menu. The following information is displayed here: – Software version of the control board and the keyboard PCB –...
-
Page 44: Options Menu
Options menu Options menu Small/professional The control unit offers two menu navigations "small" and "professional". The menu "small" includes the main menu items. The menu "professional" includes all menu items. Typically, the menu navigation "small" is sufficient. You can change the menu as follows: Press the key. -
Page 45: Maintenance
Maintenance Maintenance The sauna controls are maintenance free. Cleaning Aggressive PLEASE NOTE! cleaning agents Device damage possible! Aggressive cleaning agents and additives can damage or destroy the additives electrical components and cable. Therefore: – Do not use cleaning agents and additives with aggressive sub- stances. -
Page 46: Messages And Instructions On The Display
Malfunctions WARNING! If a short circuit occurs in a 230V/400V load, the relay contact can be fused by the high short-circuit current. This can lead to the continuous operation of the load. Turn off the circuit breaker in the junction box. Contact the customer service. -
Page 47: Malfunction Messages
Malfunctions Malfunction messages Possible malfunctions and troubleshooting measures are described in this chapter. Contact the installer or the dealer of your sauna systems for malfunctions that are not described below. See the invoice, delivery note or the reverse of this manual for the ad- dress. -
Page 48: Acknowledge Malfunction Message
Decommissioning and disposal Malfunction Possible causes Troubleshooting To be carried out by Disconnect mains, wait for Service engi- I ² C error Error on I ² C bus some time and turn on again. neer If error occurs again then con- tact the service technician. -
Page 49: General Information
General Information 11 General Information 11.1 Liability limitation All the details and instructions in this manual have been compiled taking into considera- tion the relevant standard specifications and stipulations and the state-of-the-art tech- nology as well as our knowledge and experience of many years. The manufacturer does not take any liability for damages caused by: Non-compliance to the operating and installation manual Improper use... -
Page 50: Spare Parts
General Information 11.4 Spare parts CAUTION Danger of injury due to incorrect spare parts Incorrect or defective spare parts could lead to damage, incorrect func- tioning or total breakdown and can impair the safety. Therefore: – Use only original spare parts of the manufacturer. –... -
Page 51: Setting Value
** For Austria, the temperature can be limited to 45 ° C 13 Declaration of Conformity The electronics of the FCU2000 and FCU3000 equipment are identical to the FCU4400 equipment. The current Declaration of Conformity can be found on the Internet at www.fasel-gmbh.de under „Control units for wellness, sauna and spa / Service / Downloads“... -
Page 52: Index
Index Index Sauna ............. 12 Sauna with humidity ........12 Assembly instructions ...........8 Liability limitation ..........49 Basic operation menu .........13 Maintenance............45 Cabin light ............13 Malfunction messages ........48 Cabin light settings ..........36 Malfunctions ............45 Cleaning..............45 Messages and instructions ........ 46 Cleaning light ............14 Mode Conformity declaration........51... - Page 53 Index Weekly timer ...........32 Turning off............19 Setting value ............51 Turning on............18 Special dangers ............7 Symbols Versions and data..........42 Display ............16 Warnings...............5 Technical Data:.............9 Turn off sauna control unit........18 Turn on sauna control unit........18 Sauna control FCU2x00/FCU3x00/FCU4x00 Version V 2.09...
-
Page 54: Notes
Notes: Notes: Sauna control FCU2x00/FCU3x00/FCU4x00 Version V 2.09... - Page 55 Notes: Sauna control FCU2x00/FCU3x00/FCU4x00 Version V 2.09...
- Page 56 Address of the installer or dealer of the sauna system:...
Need help?
Do you have a question about the FCU2000 and is the answer not in the manual?
Questions and answers