Table of Contents
Advertisement
Advertisement
Table of Contents

Related Manuals for Winterhalter GS630


Summary of Contents for Winterhalter GS630
- Page 1 GS 630...
-
Page 3: Table Of Contents
Table of contents Operating Manual Winterhalter GS 630 Utensil Washer Table of contents Table of contents---------------------------------------------------------------------------------------------------------- 25 Safety notes ---------------------------------------------------------------------------------------------------------------- 25 Before working with the machine------------------------------------------------------------------------------------ 27 Rinse aid and detergent ------------------------------------------------------------------------------------------------ 28 Machine description ----------------------------------------------------------------------------------------------------- 30 Operation -------------------------------------------------------------------------------------------------------------------- 32... - Page 4 (main switch). Only then is the machine without power. Contact the Winterhalter Customer Service in case of defects that are not caused due to the local water or the current supply line. In case of defects resulting from an unknown cause, switch off the machine, and switch it on again only when the defect has been rectified ...
-
Page 5: Before Working With The Machine
Winterhalter Gastronom stainless steel cleaners and stainless steel supports. Before working with the machine Get the machine installed by your service engineer or authorised Winterhalter dealer. More information is provided in chapter 12. If the install location is not frost-free, adhere to chapter 8. -
Page 6: Rinse Aid And Detergent
Wear protective clothing, protective gloves and protective goggles when handling chemicals. Warning Use only products that are suitable for industrial dish washers. Such products are appropriately marked. We recommend Winterhalter products. These are especially adapted to Winterhalter dish washers. Caution Do not mix different detergents in order to prevent efflorescence which could destroy the detergent dosing device (... - Page 7 The dosing pipe and the detergent dosing device must be thoroughly rinsed with water before the new detergent is used. Assign the required work to a service engineer authorised by Winterhalter to attain good results. If this is not done, the warranty and product liability of Winterhalter Gastronom GmbH expires.
-
Page 8: Machine Description
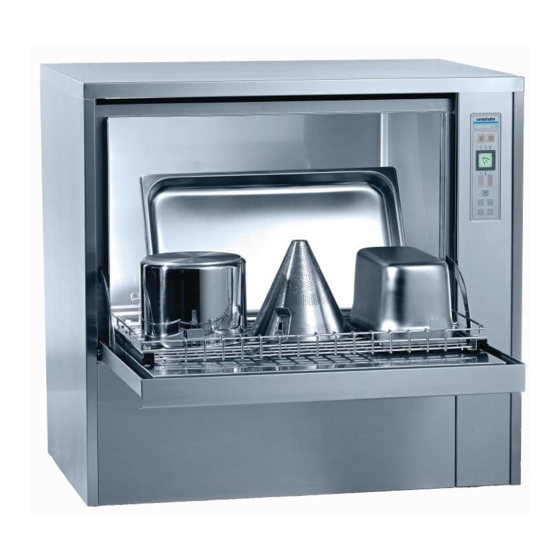
Machine description Machine description 5.1 Operating panel The operating panel is to the right of the machine door. On-off switch Tank draining / self-cleaning Indicator light for defect Indicator light for insufficient detergent or rinse aid Indicator light for exhausted water supply if this can be determined from the water consumption Normal washing cycle Temperature indicator for boiler (when the machine is... -
Page 9: Washing Programmes
Machine description Programme steps Wash: The circulating pump supplies the detergent solution from the tank to the dishes via the wash arms and nozzles. Here, the wash arms move which ensures powerful and effective cleaning of the dishes. During rotation, detergent solution is constantly supplied via a filter system and the patented Mediamat Cyclo (separator for suspended parts). -
Page 10: Operation
Operation Operation 6.1 Switching on 6.1.1 Before switching on the machine Open the local water shut-off valve. Switch on the local mains disconnector. For your safety, test the local fault current circuit breaker (FI) by pressing the test button. ... - Page 11 Operation 6.2 Washing 6.2.1 Sorting the dishes Adhere to the following: Soak the dried residues Position plate racks and other racks with the Soak the cutlery till it is rinsed outer dimension 500 x 500 mm on the utensil ...
- Page 12 Operation 6.2.4 Washing with special programmes Press the function key (9). The special programmes (10, 11, 12, 13) are also available in addition to the normal programmes (6). The number depends on the design of the machine. All lit keys can be selected. ...
- Page 13 Using the error table in chapter 9.1, check whether the error can be rectified by you If no, forward the error message to the Winterhalter service engineer Switch on the machine only after the error has been rectified ...
-
Page 14: Servicing And Maintenance
Servicing and maintenance 6.3 Switch off the machine Press the on/off key (1). The keys are no longer lit and the machine is switched off. The tank remains filled but the temperature is not maintained. The machine is without power only if the local mains disconnector has been actuated. Warning ... - Page 15 Servicing and maintenance 7.1.2 Manual cleaning of the machine interior Open the machine Fold the lower Remove the lower Remove the filter door rinsing pipes and upper wash cassette and the upward arms strainers Clean the filter Clean the strainers Clean the wash cassette arms...
- Page 16 Regular removal of these layers is absolutely essential. In order to be able to descale all water lines and the boiler properly, assign this work to a Winterhalter service engineer. You can descale parts of the interior of the machine yourself with the help of the following notes.
-
Page 17: Decommissioning For Long Durations
Decommissioning for long durations 7.3 Maintenance by the Customer Service We recommend that you have a Winterhalter service engineer carry out the maintenance of the machine at least twice a year so that venerable parts can be checked and replaced accordingly. -
Page 18: Malfunctions
This chapter explains the remedies in case of malfunctions. The causes and remedies have been specified in the tables. Contact the Winterhalter service engineer if you cannot eliminate the error yourself. DANGER! Danger of life due to components that are energised! Do not open any machine covers or machine parts if it requires tools. - Page 19 Display Meaning Remedy The temperature in the boiler or the tank is above 95°C. Forward the error message to the Winterhalter Switch off the machine service engineer immediately. The error code Err 2 Flashes in or Err 3 is displayed.
-
Page 20: Emission Values
Contact your dealer so that the materials in the machine can be supplied back to the material circuit at the earliest. 12 Installation Notes for the service engineer or dealer authorised by Winterhalter: Observe the connection diagram on page 46. The installation site must be frost-resistant so that the water supply systems do not freeze. -
Page 21: Electrical Connection
In case of water hardness of more than 3°d total hardness (GH), we recommend that you connect a water preparation system upstream so that the machine is not scaled and an optimum washing and drying result can be attained. The service engineer authorised by Winterhalter is always at your service. 14 Electrical connection... -
Page 22: Position Of The Dosing Points (Detergent, Rinse Aid, Defoamer)
DANGER! Danger of life due to components that are energised! Get the dosing device installed and commissioned by a service engineer authorised by Winterhalter. Danger Disconnect the machine during all electrical work from the mains and check if it is without power. -
Page 23: Connecting External Dosing Devices
Connecting external dosing devices 16 Connecting external dosing devices The terminal strip X3 for connecting external dosing devices is located in the plinth of the machine (position 2 in chapter 15). A maximum current drain of 0.5 A is permissible at the terminal strip. Assignment of terminals (from left to right) WASH Permanent signal if the circulating pump is active FILL... -
Page 24: Connection Diagram Gs 630
Connection diagram GS 630 17 Connection diagram GS 630 Dimensions The machine height decreases by 4 mm when the feet are turned in completely. For niche dimensions for the installation of the machine into a counter, see page 48. Position of the connections (rear view) Side view Port for hoses (detergent / rinse aid / defoamer) and cables TWw Drinking water connection (G ¾“, external thread) -
Page 25: Installation Plan Gs 630
Installation plan GS 630 18 Installation plan GS 630 Important! Provide the local connections on the left or the right beside the machine. Observe both the local and country-specific regulations when conducting electrical and hydraulic connection work. Only when the local mains disconnector is switched off, the machine is without power. -
Page 26: Total Connected Loads Gs 630
Total connected loads GS 630 19 Total connected loads GS 630 Tank Boiler Pumps + Control Total connected Voltage Fuse heating heating unit load 380 – 415 V 3 N~ 16 A 5.3 kW 5.3 kW 1.8 kW 7.1 kW 230 V 20 A 4.9 kW... - Page 28 Winterhalter Gastronom GmbH Winterhalter Gastronom GmbH Gewerbliche Spülsysteme Commercial Dishwashing Systems Tettnanger Straße 72 Tettnanger Straße 72 88074 Meckenbeuren 88074 Meckenbeuren · Germany Telefon +49 (0) 75 42 / 4 02-0 Telephon +49 (0) 75 42 / 4 02-0 Telefax +49 (0) 75 42 / 4 02-1 87...
Need help?
Do you have a question about the GS630 and is the answer not in the manual?
Questions and answers