Table of Contents
Advertisement
Operating instructions
C50 rack conveyor warewasher
(Original operating instructions)
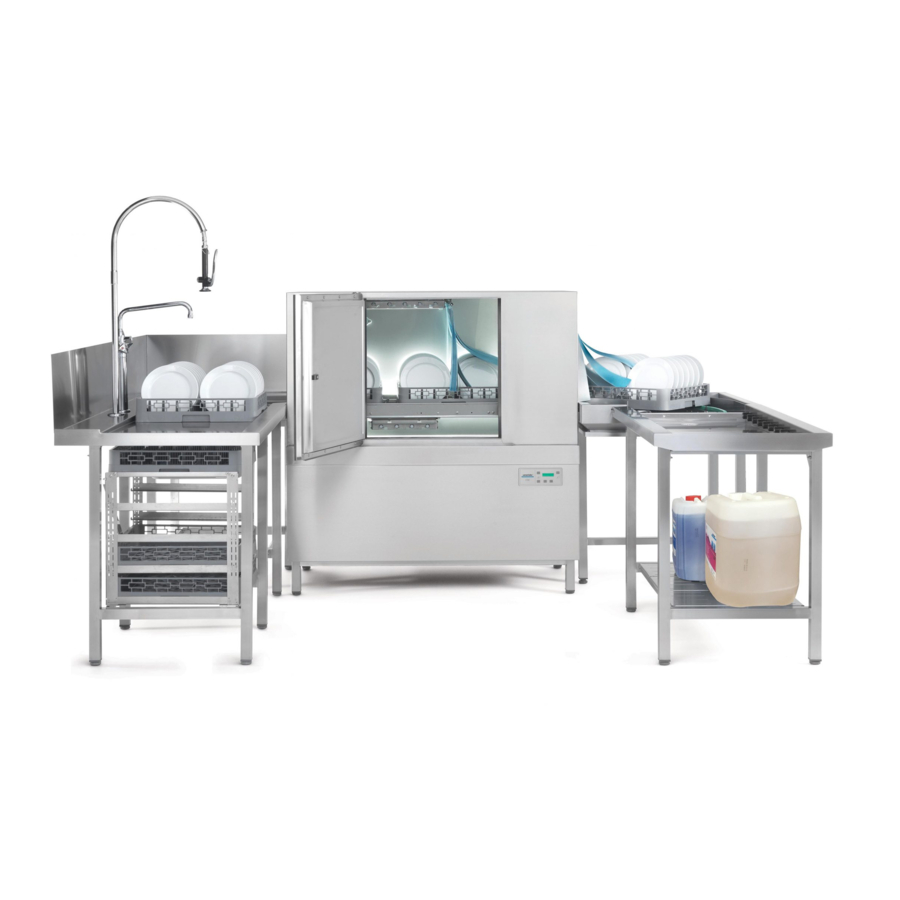
Basic machine with single rinse and a pass-through direction of "left-right".
Optional machine versions can be found on page 7. The table system and accessories
such as racks are not included in the scope of delivery of the machine.
Advertisement
Table of Contents

Subscribe to Our Youtube Channel
Related Manuals for Winterhalter C50


Summary of Contents for Winterhalter C50
- Page 1 Operating instructions C50 rack conveyor warewasher (Original operating instructions) Basic machine with single rinse and a pass-through direction of “left-right”. Optional machine versions can be found on page 7. The table system and accessories such as racks are not included in the scope of delivery of the machine.
-
Page 3: Table Of Contents
Contents About this manual ......................2 Proper use ........................2 Safety notes ......................... 3 Before working with the machine ................. 4 Mode of operation ......................5 Overview ........................5 Curtain plan ......................... 6 Machine versions ......................7 Operating panel and display ..................8 Menu levels........................ -
Page 4: About This Manual
Always operate the machine as described in the operating instructions. Winterhalter Gastronom GmbH does not assume liability for any damage caused due to improper use of the warewasher. -
Page 5: Safety Notes
Only use the warewasher after you have read and understood the operating instructions. Allow the Winterhalter Customer Service Department to provide information about the operation and functioning of the warewasher. Train the operating personnel as regards handling the machine and inform them about the safety notes. -
Page 6: Before Working With The Machine
Have the machine connected as per the locally applicable standards and the regulations of the authorised mechanics (water, waste water, electrical system). After connecting the water and the power properly, contact the relevant Winterhalter dealer or your dealer for the commissioning of the machine and for providing training in its operation. -
Page 7: Mode Of Operation
Mode of operation After the machine is switched on, the boiler and the tank are filled and warmed up to the operating temperature. Once the operating temperatures are reached, the machine is ready for use. The wash racks are transported through the machine by means of push bars. Overview Figure: Basic machine with single rinse and a pass-through direction of “left-right”. -
Page 8: Curtain Plan
Curtain plan The pass-through direction shown here is “left-right”. On machines with pass-through direction “right-left” the position of the curtains is mirror-inverted. C50 (basic machine) C50 with pre-cleaning zone C50 with drying zone C50 with pre-cleaning zone and drying zone... -
Page 9: Machine Versions
Machine versions With single rinse With dual rinse Number of exhaust air vents (optional) C50 (basic machine) 1 or 2 C50 with pre-cleaning zone 1 or 2 C50 with drying zone C50 with pre-cleaning zone and drying zone... -
Page 10: Operating Panel And Display
Operating panel and display Item Description On/Off button Home button (PIN Menu) Drainage programme Starting/stopping the rack conveyor Briefly press: Standard programme Pictogram (>) lights up in the display. Press again: Stops the programme Press and hold: Intensive programme Pictogram (>) flashes in the display. -
Page 11: Menu Levels
10 Menu levels The following levels are available: Main level The preselected rack conveyor speed or error pictograms will appear in the display ( 17). Info level Machine name 85° 60° Temperature in the boiler 10030308 Temperature in the main washing tank Machine serial number (A) (B) Error memory... -
Page 12: Pin Menu
11 PIN Menu Explanation of the buttons Button Function Cursor left or reduce value Cursor right or increase value Confirm Back Briefly press: Back Press and hold: Jump to main level Accessing the PIN Menu Press the button three times. ... - Page 13 Date and time = Start screen Confirm with the button. The current date (YYYY-MM-DD) and time are shown. If date and time are correct, leave the menu by briefly press- ing the button. Otherwise press the button.
-
Page 14: Rinse Aid And Detergent
To attain good wash results, assign the required work to an authorised service techni- cian. If this is not done, the Winterhalter Gastronom GmbH warranty and product liability will be void. Rinse aid A rinse aid is necessary to ensure that water on the dishes drains off after washing and dries off after a short while. - Page 15 Suction tube with level control Only use the suction tube with sufficiently stable containers. Narrow and tall containers can tip if the suction tube is pulled. Do not place the suction tube for the rinse aid in the container with de- Caution tergent or vice versa.
-
Page 16: Before Switching On The Machine
13 Before switching on the machine Switch on the mains voltage. Check, that the following parts are inserted: Wash arms (4a) top: 5; bottom: 4 Curtains (4b) Follow the curtain plan ( 7) Strainer (4c) Pump inlet filter (6d) ... -
Page 17: Washing
15 Washing Possible risk of scalding from hot lye-mixed water Keep children away from the warewasher. The lye-mixed water is at a temperature of approx. 62 °C (HighTemp: 73 °C). Warning Do not open the door while the machine is washing. There is a risk of the hot wash water spilling out. - Page 18 Slide the wash rack into the machine. Plate top oriented towards the front. For machines with a corner inlet: Do not overfill the wash racks. INFO If you wait longer than approx. 2 minutes to insert a rack, first the circulating pump and then the rinse shut off.
-
Page 19: Exchanging The Tank Water
Removing the wash racks from the outlet table a: Table limit switch on the Winterhalter outlet table Remove the wash rack from the outlet table before the table limit switch is actuated (Image 2). INFO The table limit switch stops the rack conveyor and prevents a blockage if the racks are not removed from the outlet table. -
Page 20: Malfunctions
17 Malfunctions Malfunctions are shown in the display in the form of pictograms. With some malfunctions washing is still possible, however, the wash result will be impaired. Therefore resolve any malfunction as soon as possible. Category 1 malfunction Resolve the malfunction. ... - Page 21 Pictogram Cause/meaning Remedy Remove the wash rack from the Table limit switch actuated outlet table. Remove the block (e.g. jammed Rack conveyor is blocked dishes). Water drain is blocked or Contact an authorised service tech- drain pump is defective nician. Remove, clean and re-insert the Strainer in the tank is strainer.
-
Page 22: Servicing And Maintenance
Possible Cause Remedy Contact an authorised service technician to set the dosing amount. No or low rinse aid dosing Check dosing hose (for The dishes do not dry on kinks, breakage, ...) their own Replace the storage con- tainer if empty. Contact an authorised Rinse temperature is too service technician to set... - Page 23 Cleaning the strainer Regularly clean the strainer during the working day. Additionally for machines with dual rinse Cleaning the air baffle INFO Only for machines with exhaust air vents Clean the air baffle at the end of the working day.
- Page 24 Drainage programme Switch off the machine daily using the drainage programme. IMPORTANT Check, that Re-insert the filters and wash there is no arms. water in the Re-insert the curtains. tank. Follow the curtain plan ( 7).
- Page 25 Additionally for machines with dual rinse Remove and clean the strainer and wash arms. Re-insert the strainer and wash arms after cleaning. When inserting the wash arms, pay attention to the different jets. 5a: Wash arm in the rinse zone 5b: Wash arm in the main wash zone / pre-cleaning zone Additionally for machines with pre-cleaning zone ...
-
Page 26: Fast Drainage Programme
19 Fast drainage programme Using the fast drainage programme the machine is only drained. As soon as the machine is drained, it switches off automatically. 20 Decommissioning the machine for a period of disuse If the machine needs to be out of operation for a long duration (holidays, seasonal busi- ness), proceed as follows: ... -
Page 27: External Dosing Devices
22 External dosing devices Danger to life. Live components. Get the dosing devices installed and commissioned by an authorised ser- vice technician. Danger Terminals Item Description Rinse aid dosing point Detergent dosing point Transfer strip Drill hole for conductivity electrode... - Page 28 Left and right at the sides of the machine Left and right at the rear of the machine 6 hose connectors for inserting hoses and 3 perforations for the installation of cables screwed cable glands Electrical connection When connecting an external dosing device to the control board, there must be no short circuit.
-
Page 29: Installing The Machine And Tables
Press and hold the button to exit the menu. 23 Installing the machine and tables Notes for the service technician or dealer authorised by Winterhalter: Observe the connection diagram for detailed information. The installation site must be frost-resistant so that the water systems do not freeze. -
Page 30: Location Of The Connections On The Machine
24 Location of the connections on the machine Rear view (independent of the pass-through direction) Screwed cable gland for mains cable Waste water connection Ø 40 mm / Ø 50 mm G ¾”, external thread Inlet water connection Connection for on-site equipotential bonding system 25 Water connection The machine and any other relevant additional devices must be connected by an authorised specialist company in relation to local standards and regu-... -
Page 31: Electrical Connection
Connecting the supply hose The hose may not be shortened or damaged. Old existing hoses may not be re-used. Do not bend the hose when laying it. Caution The supply hose and dirt trap are located in the machine. INFO The dirt trap prevents particles from the water supply line entering the machine thus preventing extraneous rust on the cutlery and in the machine. - Page 32 Mains cable Select the cable cross section of the mains cable in accordance with the total connected load of the machine as indicated on the machine rating plate. The mains cable must be an oil-resistant, encased and flexible wire. We recommend the wire type H07RN-F.
-
Page 33: Technical Data
27 Technical data General Minimum flow pressure 150 kPa (1.5 bar) Maximum inlet pressure (back 600 kPa (6.0 bar) pressure) 10 – 60 °C Inlet water temperature Voltage Total connected load see rating plate Fuse protection Operating conditions Operating temperature 0 - 40 °C Relative humidity <... - Page 34 Winterhalter Gastronom GmbH Commercial Dishwashing Systems Winterhalterstrasse 2–12 88074 Meckenbeuren Germany Telephone +49 (0) 75 42/4 02-0 www.winterhalter.com info@winterhalter.com 89014408-00; 2019-01...
Need help?
Do you have a question about the C50 and is the answer not in the manual?
Questions and answers
Showing 41