Table of Contents
Advertisement
Quick Links
Advertisement
Table of Contents

Related Manuals for FOS Technologies 150W LED Spot


Summary of Contents for FOS Technologies 150W LED Spot
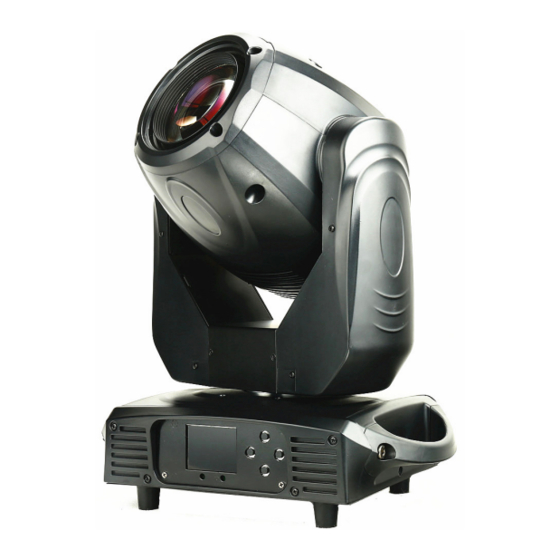
- Page 1 150W LED Spot User Manual PLEASE KEEP THIS MANUAL FOR FUTURE NEEDS...
- Page 2 1. Unpacking Thank you for choosing our products. For your own safety, please read this manual before installing the device. This manual covers the important information on installation and applications. Please install and operate the fixture with following instructions, make sure the power is off before opening the light or repairing. Meanwhile, please keep this manual well for future needs.
-
Page 3: Safety Instructions
2. Safety Instructions This device has left the factory in perfect condition. In order to maintain this condition and to ensure a safe operation, it is absolutely necessary for the user to follow the safety instructions and warning notes written in this user manual. If the device has been exposed to temperature changes due to environmental changes, do not switch it on immediately. -
Page 4: Key Features
3. Key Features Voltage: AC100-240V,50-60Hz Power: 250W Led source: 150W White LED Color Temperature: 7500K-8000K Led Life Time: 50000 Hours Channel: 15 DMX channel Control: DMX/Master-slave/Auto/Sound activated Pan: 540 degree + fine Tilt: 270 degree + fine Dimmer: 0-100% smooth linear dimmer Strobe: 1-25 Hz with pulse effect Color Wheel: 8 colors + open, with rainbow effect Static Gobo Wheel: 7 gobos + open, with rotation and running water effect... -
Page 5: Mounting And Installation
4. Operation Instructions -The moving head is for spot purpose. -Don’t turn on the fixture if it’s been through severe temperature difference like after transportation because it might damage the light due to the environment changes. So make sure to operate the fixture until it is in normal temperature. -This light should be keep away from strong shaking during any transportation or movement. - Page 6 Never stand directly below the device when mounting, removing, or servicing the fixture from a periodic safety inspection of all installation material and the fixture. If you lack these qualifications, do not attempt the installation yourself. Improper installation can result in bodily injury. Be sure to complete all rigging and installation procedures before connecting the main power cord to the appropriate wall outlet.
-
Page 7: Dmx-512 Control Connections
6. DMX-512 control connections Connect the provided XLR cable to the female 3-pin XLR output of your controller and the other side to the male 3-pin XLR input of the moving head. You can chain multiple Moving heads be connected together through serial linking. The cable needed should be two core, screened cable with XLR input and output connectors. - Page 8 7. Display menu control Address 1-512 Standard Standard Channel mode Channel Mode Your edited channel User Mode Sequence mode Edit the channel sequence Channel Edit of User mode Keep Clear UseMode No DMX Mode Auto Music Scene Alone Auto prog Maste Alone Sound prog...
-
Page 9: Dmx Channels
8. DMX Channels 18 Channel Mode Function DMX Value Details 0-255 Pan movement Pan fine 0-255 Pan fine Tilt 0-255 Tilt movement Tilt fine 0-255 Tilt fine Pan/Tilt Speed 0-255 Pan/Tilt speed control from fast to slow Dimmer 0-255 0-100% Dimmer 0-15 No function 16-95... - Page 10 9. Maintenance and Cleaning The following points have to be considered during the inspection: 1. All screws for installing the devices or parts of the device have to be tightly connected and must not be corroded. 2. There must not be any deformations on the housing, color lenses, fixations and installation spots (ceiling, suspension, trussing).
Need help?
Do you have a question about the 150W LED Spot and is the answer not in the manual?
Questions and answers