Table of Contents
Advertisement
Advertisement
Table of Contents
Troubleshooting

Subscribe to Our Youtube Channel
Related Manuals for Newland NLS-NQuire300


Summary of Contents for Newland NLS-NQuire300
- Page 1 NLS-NQuire300 Customer Information Terminal User Guide...
- Page 2 All pictures in this manual are for reference only and actual product may differ. Regarding to the product modification and update, Fujian Newland Auto-ID Tech. Co., Ltd. reserves the right to make changes to any software or hardware to improve reliability, function, or design at any time without notice. The information contained herein is subject to change without prior notice.
-
Page 3: Revision History
Revision History Version Description Date V1.0.0 Initial release. March 31, 2017 1. Added the “Enabling MTP” section in Chapter 2. 2. Added the Code ID editing and RFID programming features in Chapter 3 3. Added a new chapter – Chapter 8 Using an External Barcode V1.0.1 July 6, 2017 Scanner. -
Page 4: Table Of Contents
Table of Contents Revision History ............................- 3 - Chapter 1 About This Guide ........................... 1 Introduction ............................1 Chapter Descriptions ..........................1 Chapter 2 Getting Started ..........................2 Introduction to the NQuire ........................2 Unpacking ............................. 2 Product Outline ............................. 4 LEDs on the NQuire .......................... - Page 5 Return to Desktop ........................28 Query Configuration ........................29 Customizing Configuration Barcodes ................... 29 Chapter 4 Using the NQuire.......................... 31 Introduction ............................31 Scanning Barcodes with NQuire301 ....................31 Scanning Barcodes with NQuire302/304 ..................... 32 Reading RFID Tags ..........................32 Chapter 5 ESC Commands ...........................
- Page 6 Troubleshooting ........................... 54 Appendix ................................ 55 Sample Barcodes ..........................55 Code ID Table ............................56...
-
Page 7: Chapter 1 About This Guide
Chapter 1 About This Guide Introduction This guide provides instructionsfor installing, programming and operating the NLS-NQuire300 seriescustomer information terminal (hereinafter referred to as “the NQuire”). Chapter Descriptions Chapter 1 About This Guide Provides general description of this manual. Chapter 2 Getting Started Provides information on getting the NQuire up and running for the first time. -
Page 8: Chapter 2 Getting Started
Chapter 2 Getting Started Introduction to the NQuire The NQuire (including NQuire301/302/304) is designed to read/scan, inform and interact with your customer. This small and attractive information terminal reads multiple data carriers; from 1D barcodes (such as EAN/UPC) to complex 2D barcodes displayed on mobile phones. It also comes with unprecedented RFID reading capabilities. - Page 9 Power adapter x 1, plug x 5 VESA 75 mount x1, screwdriver x 1, port cover x 2 Plastic wall anchor x 4, GPIO connector x 4, small screw x 6, large screw x 4 Quick Start Guide x 1...
-
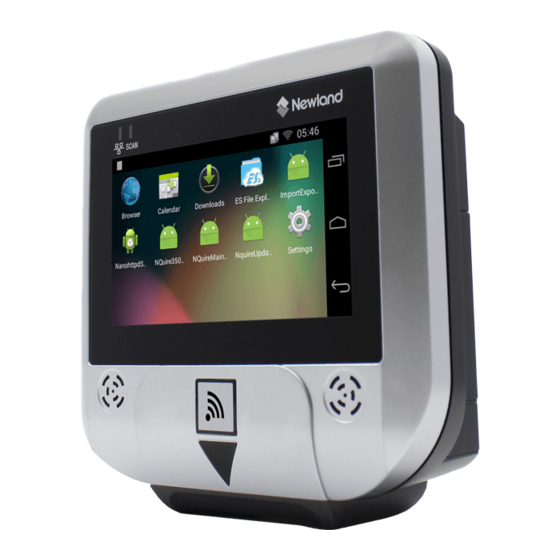
Page 10: Product Outline
Product Outline Network LED Good Read LED LCD (Touch) Display Speaker “Where to Scan Barcode” Arrow RFID Antenna USB Host/Slave Port USB Host Port Power Jack Ethernet Port GPIO Connectors Cable Trough LEDs on the NQuire Network LED Blue LED on Wifi/ Ethernet/ Bluetooth is available Good Read LED Green LED flashes once... -
Page 11: Work Procedure
Work Procedure 1. The NQuire receives its input via: 1D barcode scan engine (NQuire301) or 2D barcode scan engine (NQuire302/ NQuire304) or RFID reader. 2. The NQuire sends the input to application program which runs on a remote PC or server. 3. -
Page 12: Wiring
Wiring Physical Ports on the NQuire Power jack: It uses the center pin for positive and the outer tab for ground. Input power requirement: DC 9-25V, 2A Ethernet port: Description Tx_D1+ Tx_D1- Rx_D2+ BI_D3+/ PoE BI_D3- / PoE Rx_D2- BI_D4+ / PoE BI_D4-/ PoE... - Page 13 Step 5: Connect the other end of the Ethernet cable to a PoE power module or a PoE switch (NOT supplied by Newland). The NQuire supports both the Mid-span and End-span PoE protocol. Step 6: Connect DC power to either the third-party PoE power module or PoE switch if required.
-
Page 14: Installing The Micro Sd Card
Installing the Micro SD Card Step 1: Loosen the screw on the back cover of the NQuire and remove the back cover. Slide the slot cover rightward and lift the left end of it. Step 2: Insert the Micro SD card into the slot, with its metal contacts facing down. Step 3: Close the slot cover and slide it leftward until it clicks. - Page 15 Step 3: Tap “Storage”. and then “USB computer connection”. Step 4: Tap...
- Page 16 Step 5: Select “Media device (MTP)”.
-
Page 17: Chapter 3 Configuring The Nquire
Chapter 3 Configuring the NQuire Introduction You may configure the NQuire with the web-based tool or by scanning programming barcodes. Configuring the NQuire with the Web-based Tool The NQuire has a built-in web server which can be used for device configuration. This configuration method effectively bypasses the restrictions imposed by operating system. -
Page 18: Network Settings
3. Click a menu item on the left pane and set the parameters as per your needs. When you finish making changes to the parameters in a box, click “Apply settings” to save the changes. For the details, see the following sections. -
Page 19: Messages Settings
Use DHCP: If DHCP is used, an IP address will be automatically assigned to the NQuire; if DHCP is not used, the NQuire has a fixed IP address. NQuire protocol settings: Set the connect mode, UDP/TCP port and IP address of the server the NQuire is going to connect to. - Page 20 Idle message: You can specify what message (containing three lines of text) to be displayed when nothing is scanned. You can define how long the NQuire wait before displaying the idle message after a scan by setting the idle message timeout, as instructed in the “Miscellaneous Settings” section. X Pos/ Y Pos: Set the x and y positions (x: 0-239;...
-
Page 21: Scanner Settings
Scanner Settings When you click “Scanner” in the menu, the following page opens. You can configure barcode scanner and Mifare scanner parameters here. Barcodes 1. Output mode Output via API: Application acquires scanned data by receiving system broadcasts. For the preinstalled CIT app, you should select this output mode. - Page 22 4. Add a line feed: Choose whether to add a line feed after each barcode scanned. 5. Enable barcode ID: Choose whether to add Code ID before each barcode scanned; customize the Code IDs for symbologies. To add Code ID before scanned data, select “Yes” beside the “Enable barcode ID”...
- Page 23 Mifare scanner: Besides scanning barcodes, the CIT app that comes preinstalled on the NQuire also allows users to read from and write to Mifare Classic Mini/1K/2K/4K tags/cards. The following provides instructions for setting the Mifare scanner parameters. 1. Rfid message prefix: Enter the character(s) (up to 5 characters) you want to add before RFID message.
-
Page 24: Miscellaneous Settings
Miscellaneous Settings When you click “Miscellaneous” in the menu, the following page opens. You can configure scanner parameters here. - Page 25 Device name: Type a random name used for your own administration. Authentication: You can set a username and password to allow only authorized personnel to log in to the NQuire configuration tool. Programming barcode security 1. Programming mode timeout: The period of time allowed to elapse before the NQuire returns to idle state when no programming barcode is scanned in seconds.
- Page 26 Interaction 1. Disable beep after scan: Enable or disable the emission of good read beep. 2. Enable launch CIT on boot: Choose whether to start built-in CIT app on boot or not. 3. Enable persistent immersive: If you disable the persistent immersive mode by selecting “No”, the status bar and navigation bar will appear with an inward swipe from the top or right edge of the screen when the CIT app is in the immersive mode.
-
Page 27: Log Settings
Log Settings When you click “Log” in the menu, the following page opens. You can configure and manage log level settings here. Note: When you finish making changes to the parameters, do not forget to click “Apply settings” to save the changes. -
Page 28: Backup
Backup When you click “Backup” in the menu, the following page opens. You can import/export configuration data here. Backup: Export all settings from the configuration tool into a json file. Restore: Import a configuration file into the NQuire. -
Page 29: Time
Time When you click “Time” in the menu, the following page opens. You can set date and time here. Time Automatic date & time: Choose whether to automatically adjust the date and time of the NQuire or not. Make sure the NQuire is properly connected to the Internet before using this feature. Timezone Automatic time zone: Choose whether to automatically adjust the time zone of the NQuire or not. -
Page 30: Update
Update When you click “Update” in the menu, the following page opens. When you want to update system via FTP, you can set the FTP server here. Note: When you finish making changes to the parameters, do not forget to click “Apply settings” to save the changes. -
Page 31: Reboot
Reboot When you click “Reboot” in the menu, the following page opens. You can reboot the NQuire and reset it to factory settings here. Resetting the NQuire to factory settings will delete all data in user space, including user-defined settings and user-installed apps. -
Page 32: Configuring The Nquire With Programming Barcodes
Configuring the NQuire with Programming Barcodes The NQuire can be configured by scanning programming barcodes which are created in the format of Code 128. Enter/Exit the Setup Mode Scanning the Enter Setup barcode can enable the NQuire to enter the setup mode. Then you can scan a number of programming barcodes to configure the NQuire. -
Page 33: Screen Brightness
Screen Brightness Level 1 (Low) Level 2 (Medium) Level 3 (High) Level 4 (Extra High) Scanner Sensitivity Normal High... -
Page 34: Beeper
Beeper Beeper OFF Beeper ON Reboot Reboot Restore Factory Settings & Reboot Return to Desktop Return to Desktop... -
Page 35: Query Configuration
Query Configuration Query Configuration Customizing Configuration Barcodes To streamline the programming process, you may as well create 2D Data Matrix barcodes using existing JSON configuration files or those (cit.json) exported from the web-based NQuire configuration tool. Refer to the “Backup” section in this chapter to learn how to export configuration files from the tool. Note that the data of a customized configuration barcode should be a valid JSON object. - Page 36 To put a user-defined configuration barcode into use, scan the following barcodes. (Use the example above.) Enter Setup Enable User-Defined Configuration Barcode Batch Barcode Exit Setup...
-
Page 37: Chapter 4 Using The Nquire
Chapter 4 Using the NQuire Introduction The NQuire receives its input via: 1D barcode scan engine (NQuire301) or 2D barcode scan engine (NQuire302/ NQuire 304) or RFID reader. To scan a barcode or read an RFID tag with the NQuire, follow the instructions below. You may scan a barcode in the “Sample Barcodes”... -
Page 38: Scanning Barcodes With Nquire302/304
Scanning Barcodes with NQuire302/304 NQuire302/304 is able to read 1D and 2D barcodes. It emits a red crosshair aiming pattern to help the user to easily position the target barcode within the terminal’s field of view to increase scan efficiency. Omnidirectional Scanning (360°... -
Page 39: Chapter 5 Esc Commands
Chapter 5 ESC Commands Introduction The NQuire supports ESC commands that perform device controls such as controlling cursor, clearing screen and aligning text. Text Display The NQuire uses proportional fonts (every single character has its own specific width) for displaying text. For example, the letter “i”... -
Page 40: Nquire Command Set
NQuire Command Set CHAR DESCRIPTION PARAMETER ESC 24 or 25 36 or 37 $ or % Clear the screen and move the cursor to the top-left corner of the screen. ‘ ESC 27 Set the cursor position <POS> 0x30-0x3F <LINE> 0x30-0x34 ESC 2C Set the current pixel position²... -
Page 41: Examples
<DATA> field has a maximum length of 25 characters. Use 0x03 (ETX) as the last character, if less characters are used. Examples Example 1 COMMAND DESCRIPTION <ESC> 0x42 0x30 Small font <ESC> 0x25 Clear the screen, move cursor to top left corner “Cheese”... -
Page 42: Chapter 6 System Update
Introduction The NQuire system can be updated using a USB flash drive or via FTP. Updating System with a USB Flash Drive 1. Download the NQuire OTA update zip file from the Newland website at www.newlandaidc.com and save it under the root directory of a USB flash drive. Do not change the file name. -
Page 43: Updating System Via Ftp
Updating System via FTP 1. Ensure that the NQuire and the FTP server are on the same LAN, that network settings are properly configured for the NQuire and that you can connect to the FTP server. Open a web browser and access the NQuire Configuration Tool homepage. - Page 44 3. Create three directories named “ota”, ”config” and ”res” in the nquire300 directory. 4. Download the NQuire OTA update zip file from the Newland website at www.newlandaidc.com and save it in the ota directory. Do not change the file name.
- Page 45 5. Create a text file named md5.sum inside the ota directory. This text file will contain the md5 value of the NQuire OTA update zip file and the fliename of the zip file separated by a space character, as shown below.
- Page 46 7. If you want to upload resource files such as pictures and video clips to the NQuire, place the files and a text file named md5.sum in the res directory. This text file will contain the md5 value and filename of each resource file separated by a space character.
- Page 47 8. Enable FTP service and reboot the NQuire. Then the NQuire will attempt to connect to the FTP server and perform the following steps: i. If the NQuire detects that there is a later version available on the FTP server, it will automatically reboot and begin the update process.
-
Page 48: Chapter 7 Adb Debug
Chapter 7 ADB Debug Introduction ADB (Android Debug Bridge) tool can be used to debug apps developed for the NQuire. The following section describes how to use the ADB. Using the ADB 1. Turn on the NQuire. If it displays other screen other than the desktop, scan the Enter Setup barcode then Return to Desktop barcode to return to the desktop. - Page 49 3. Tap “About tablet”. 4. Tap “Build number” 7 times to become a developer. 5. Tap to return to the previous screen.
- Page 50 6. Tap “Developer options”. 7. Select “Enable OTG”. 8. Connect the USB Host/Slave port on the NQuire to PC with a USB cable (purchase separately). USB Host/Slave port...
- Page 51 9. Tap “OK”.
-
Page 52: Chapter 8 Using An External Barcode Scanner
Connecting a Barcode Scanner to the NQuire Users can connect one of the Newland barcode scanners listed in this Chapter to the USB Host/Slave port or the USB Host port on the NQuire with a USB cable (purchase separately). When using the USB Host/Slave port, OTG must be disabled by unselecting “Enable OTG”... -
Page 53: Configuring Nls-Hr100
Configuring NLS-HR100 Use the barcode scanner to scan the barcodes below row by row, starting with the top left Enter Setup barcode, going from left to right, and ending with the Exit Setup barcode. Enter Setup Restore All Factory Defaults Enter Setup USB COM Port Emulation Enable AIM ID Prefix... -
Page 54: Configuring Nls-Hr22
Configuring NLS-HR22 Use the barcode scanner to scan the barcodes below row by row, starting with the top left Enter Setup barcode, going from left to right, and ending with the Exit Setup barcode. Enter Setup Restore All Factory Defaults Enter Setup USB COM Port Emulation Enable AIM ID Prefix... -
Page 55: Configuring Nls-Hr11 Plus
Configuring NLS-HR11 Plus Use the barcode scanner to scan the barcodes below row by row, starting with the top left Enter Setup barcode, going from left to right, and ending with the Exit Setup barcode. Enter Setup Restore All Factory Defaults Enter Setup USB COM Port Emulation Enable AIM ID Prefix... -
Page 56: Configuring Nls-Hr42
Configuring NLS-HR42 Use the barcode scanner to scan the barcodes below row by row, starting with the top left Enter Setup barcode, going from left to right, and ending with the Exit Setup barcode. Restore All Factory Defaults Enter Setup USB COM Port Emulation Enter Setup Enable AIM ID Prefix... -
Page 57: Configuring Nls-Hr3290 (Corded)
Configuring NLS-HR3290 (Corded) Use the barcode scanner to scan the barcodes below row by row, starting with the top left Enter Setup barcode, going from left to right, and ending with the Exit Setup barcode. Enter Setup Restore All Factory Defaults Enter Setup USB COM Port Emulation Enable AIM ID Prefix... -
Page 58: Configuring Nls-Hr15 (Corded)
Configuring NLS-HR15 (Corded) Use the barcode scanner to scan the barcodes below row by row, starting with the top left Enter Setup barcode, going from left to right, and ending with the Exit Setup barcode. Enter Setup Restore All Factory Defaults Enter Setup USB COM Port Emulation Enable AIM ID Prefix... -
Page 59: Chapter 9 Maintenance& Troubleshooting
Chapter 9 Maintenance& Troubleshooting Maintenance Keeping the NQuire Dust-free To keep the interior of the NQuire clean and your device at peak performance, please always have the two port covers firmly attached. Cleaning Regularly clean the scan window on the bottom of the NQuire with a non-abrasive glass spray cleaner and a soft lint-free cloth to keep it free of dust, dirt and fingerprints. -
Page 60: Troubleshooting
Troubleshooting Problem Possible Cause Possible Solution The NQuire will not turn No power to the NQuire Power adapter solution: Connect the approved power adapter to an AC power source and to the power jack on the NQuire. PoE solution: 1. Connect one end of an Ethernet cable to the Ethernet port on the NQuire. -
Page 61: Appendix
Appendix Sample Barcodes Code 128 UCC/EAN-128 UPC-E UPC-A Interleaved 2 of 5 Code 39 QR Code PDF 417 Micro QR Data Matrix Chinese Sensible Code... -
Page 62: Code Id Table
Code ID Table Symbology Code ID Code 128 EAN128 AIM128 EAN-8 EAN-13 UPC-E UPC-A ISBN ISSN Code 39 Code 93 Codabar Interleaved 2 of 5 Deutsche 14 (Deutsche Post Leitcode) Deutsche 12 (Deutsche Post Identcode) Standard 25 Matrix 2 of 5 Industrial 25 Code 11 MSI-Plessey... - Page 63 Newland Auto-ID Tech. Co., Ltd. (Headquarters) 3F, Building A, No.1, Rujiang West Rd., Mawei, Fuzhou, Fujian, China 350015 Tel: +86 - (0) 591-83978605 Fax: +86 - (0) 591-83979216 E-mail: contact@nlscan.com Web: www.newlandaidc.com Newland Europe BV Rolweg 25, 4104 AV Culemborg, The Netherlands...
Need help?
Do you have a question about the NLS-NQuire300 and is the answer not in the manual?
Questions and answers