Advertisement
Quick Links
Advertisement

Related Manuals for Hollyland HLWH009


Summary of Contents for Hollyland HLWH009
- Page 1 Wireless HD Video Transmission System HLWH009 User manual...
-
Page 2: Table Of Contents
Preface ....................1 1. Cautions ....................2 2. About ....................3 3. Installation ..................8 4. Operation instruction ................. 13 5. Maintenance ..................18 6. Truble shooting .................. 18... -
Page 3: Preface
Preface Thanks for purchasing our Long Range Wireless HDMI HD Video Transmission Suite. Before using this product, read this user manual carefully please. Follow the instruction to keep your safety and avoid products damage. This user manual might be modified irregularly because of updated products. -
Page 4: Cautions
1. Cautions Logo and meaning Careful, warning, dangerous, Pay attend to following items. Cautions Do not use this product in the extreme hot, cold, dusty or humid environments. Prevent friction with hard objects. Avoid the product falling down from a high place, or it may damage the hardware. -
Page 5: About
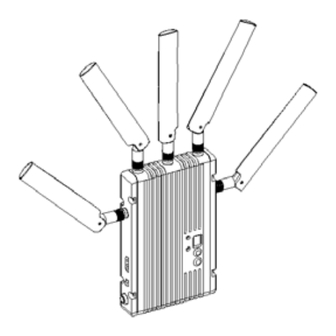
Product model and standard HLWH009 the Long Range Wireless HDMI Transmission Suite utilize today’s most advanced wireless video transmission technology, which can realize the broadcast-class and uncompressed HDMI HD video signal transmitted with no compression and zero delay. The suite includes one transmitter and one receiver, both provide HDMI interface. - Page 6 Performance and indicators: Transmitter Receiver Interface HDMI Input ( Type A Female ) ; 5 HDMI Output (Type A female); 5 Antenna port(RP-SMA male ) ; DC Antenna port(RP-SMA male); DC input; input; mini USB interface mini USB interface Supply voltage 7--36V DC 7-36V DC...
- Page 7 Power Receiver -75dBm Sensitivity Broadcast mode Point to point Point to point Transmission HDMI Standard; WDMI standard Standard; HDCP 1.2 protocols(HDMI 1.4 3D option) Occupied 20/40MHz 20/40MHz Bandwidth Temperature 0 ~ 40°C (operating condition); 40°C (operating condition); Range -20~60°C(Storage) -20~60°C(Storage) Compliance FCC;...
- Page 8 5. Confirm button 6. Matching button 7. Mini USB interface 8. HDMI input interface 9. DC power switch 10. DC 7-36V power input interface Receiver: 1. RSSI(Wireless received signal strength indicator), 4 Blue LEDs 2. Digital Tube, display frequency point 3.
- Page 9 8. HDMI Output interface 9. DC power switch 10. DC 7-36V power input interface Packing list 5G high gain antennas *10pcs DC 12V/1A Adaptor *2pcs User Manual *1 piece...
-
Page 10: Installation
3. Installation Installation details and cautions Transmitter side a) Install 5 Omni-directional and high efficiency antennas to Transmitter’s antenna connectors. b) There are 5 1/4-20 screw nuts in transmitter metal case, so the user... - Page 11 can choose appropriate location threaded holes to fix transmitter on the installation bracket in the computer Transmitter side: c) Use 12V/1A adaptor insert into receiver DC power interface, unplug power switch, make it “on” location, then transmitter shell panel digital tube will show the corresponding frequency point which shows power working normally.
- Page 12 Installation details and cautions Receiver side: a) Install 5 Omni-directional and high efficiency antennas to Receiver’s antenna connectors. b) There are 5 1/4-20 screw nuts in receiver metal case, so the user can choose appropriate location threaded holes to fix receiver on the installation bracket in the computer or fix it on the tripod...
- Page 13 Receiver side: c) Use 12V/1A adaptor insert into receiver DC power interface, unplug power switch, make it “on” location, then receiver shell panel digital tube will show the corresponding frequency point which shows power working normally. d) Use the HDMI cable connect with LED monitor or HD monitor Note: Please ensure that the receiver and transmitter’s digital tube display frequency point is the same.
- Page 14 Typical connection instruction Connect PC,DVD and camera HDMI output to transmitter HDMI input port, and connect HDMI output port of the receiver to HDMI port of the HD monitor. Make sure all antennas,batteries and video cable are equipped normally. See below figure.
-
Page 15: Operation Instruction
4. Operation instruction Getting started After finishing all steps above, system is workable, follow below steps. a) Ensure the video source output of the camera is OK, and the HD monitor is power on and switched to connected video input port. b) Ensure all input, output HDMI cables are connected. - Page 16 toggle power switch of transmitter and receiver to ‘ON’ respectively, and ‘Power’ indicator will light. then receiver shell panel digital tube will show the corresponding frequency point which shows power working normally. e) Ensure the frequency knobs of transmitter and receiver are set with the same number, and this will make sure the transmitter and receiver work with same RF frequency.
- Page 17 The system will spend 20-30 seconds on constructing communication link, and real link period will depend on the current wireless channel condition. When wireless link is set up, “LINK” and “VIDEO” will light and “RSSI” indicate current received wireless signal strength. When “Video” light which show receiving the normal video signal, and then connected HD monitor will display the video and audio accordingly.
- Page 18 RSSI indicators The receiver will calculate received RF signal strength internally and 4 “RSSI” LEDs will be used to indicate wireless signal power and quality. The user can observe the RSSI LED status to know if the current wireless link is reliable or not.
- Page 19 Frequency selection and configuration The wireless suite can work in 5.1-5.9GHz frequency band and be flexibly software configured to licensed or ISM band of global different regions, as well as the side panel of both transmitter and receiver has been installed a frequency select knob.
-
Page 20: Maintenance
5. Maintenance Storage conditions Products storage temperature should be -20°C~60°C. For long time storage requirement, please use original carbon boxes, and avoid from high humid, acid base or dusty place. Maintenance Warning To ensure your safety, place choose well-known brand DC batteries, and guarantee suitable work conditions that battery manual mentioned. - Page 21 e) Check video output format to LED monitor or HD monitor is compatible with TX and RX; 2) Poor output video quality a) Check if HDMI input or output cable is plugged well or not; b) Then checks how many receiver side ‘RSSI’ LEDs are lit, there should be 2-3 RSSI LEDs lit if the user want to get better video quality;...
- Page 22 i) Check TX’s HDMI cable is plugged well or not; j) Check PC,DVR or camera is powered on, and output video normally,here can check it with HDMI cable to connect to LED monitor or HD monitor; k) Ensure TX and RX’s location should not be less than 1.5m from the ground;...
Need help?
Do you have a question about the HLWH009 and is the answer not in the manual?
Questions and answers