Table of Contents
Advertisement
Quick Links
Advertisement
Table of Contents

Subscribe to Our Youtube Channel
Related Manuals for Hollyland LARK M2


Summary of Contents for Hollyland LARK M2
- Page 1 LARK M2 Quick Guide V1.0...
- Page 2 Foreword Thank you for choosing our product. Prior to usage, please read this Quick Guide carefully. We wish you a pleasant experience. To obtain Quick Guide and User Manual information in other languages, please scan the QR code below. Vielen Dank, dass Sie sich für unser Produkt entschieden haben. Bitte lesen Sie diese Kur- zanleitung vor der Verwendung sorgfältig durch.
- Page 3 Foreword Agradecemos por escolher nosso produto. Antes do uso, leia este Guia rápido com atenção. Desejamos que você tenha uma experiência agradável. Para obter informações sobre o Guia rápido e o Manual do usuário em Português, leia o código QR abaixo. 感謝您選擇我們的產品。...
-
Page 4: Product Overview
Product Overview TX:Transmitter Built-in Microphone Status Indicator Clip Magnet Power/Noise- cancellation/Pairing Button Charging Contacts... - Page 5 Product Overview Mobile Version RX: Receiver (Lightning/USB-C) USB-C Port Status Noise-cancellation/ Indicator Pairing Button Status Indicator *The plug has Lightning and USB-C versions.
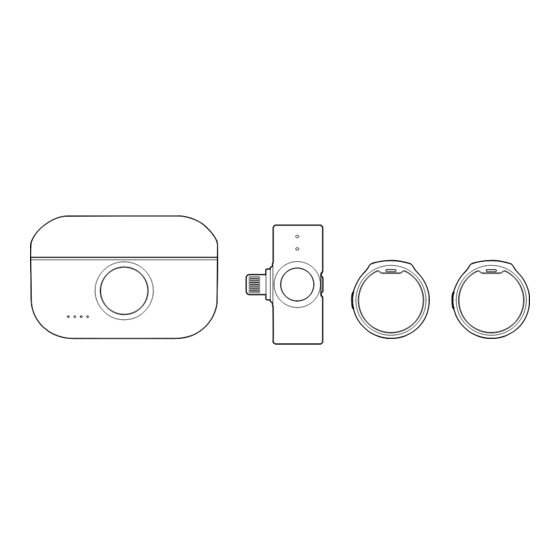
- Page 6 Product Overview Camera Version RX: Receiver Status Indicator Volume Knob 3.5mm Audio USB-C Port Output Jack Back Clip Power Button Mode Switching/ Pairing Button Volume/Mode Indicator Charging Contacts...
- Page 7 Product Overview Mobile Version RX (Lightning/USB-C) Charging Case...
- Page 8 Product Overview Camera Version Charging Case...
-
Page 9: Product Usage
To start with your LARK M2, first unbox it, remove the TX insulating film, and place them back into the charging case. The LARK M2 has already been paired at the factory, so the TX and RX will automatically pair when you use them for the first time. - Page 10 First Use of Camera Version To start with your LARK M2, first unbox it, remove the TX and RX insulating film, and place them back into the charging case. The LARK M2 has already been paired at the factory, so the TX and RX will automatically pair when you use them for the first time.
- Page 11 Product Usage TX Placement ① The preferred placement for the TX is at the collar. If speaking with a loud vol- ume, you can choose an upper chest position. You can wear it using either the back clip or clip magnet. Place the clip magnet on the back Clip the back clip onto the collar, of the collar, and secure the TX...
- Page 12 Product Usage ② A LARK M2 Necklace Silicone Case magnet necklace for the clip magnet is in- cluded, allowing you to secure TX around your neck. In order to achieve the best possible sound quality during recording, it’s import- ant to place the TX correctly. Make sure that the microphone is not covered by any cloth.
- Page 13 RX Connection ① Plug RX (Lightning) into phone ② Plug RX (USB-C) into phone ③ Charge your phone through the RX for simultaneous charging and usage...
- Page 14 RX Connection Connect RX to Camera Attach the RX to the camera’s hot shoe/cold shoe using the back clip; Connect the RX’s 3.5mm audio output port to the camera’s 3.5mm audio input port using a 3.5mm TRS to TRS cable; Set the camera’s recording volume to the minimum level and the RX’s output volume to the medium level to ensure best recording quality.
-
Page 15: Noise Cancellation
Product Usage Noise-cancellation Press the noise-cancellation button on the TX to turn the function on or off. When noise cancellation is on, the status indicator on the TX turns green. Video Recording Control While shooting with your phone, dou- ble-press the button on the TX to start or stop video recording. - Page 16 Product Usage Volume Adjustment (Camera Mode Switching (Camera Version Version RX Only) RX Only) The fac tory default volume is set at Connected to a phone: The green light medium level, with three levels available: stays on. Only support mono mode. high, medium, and low.
-
Page 17: Charging And Storage
Charging and Storage Automatic Charging When the status indicator on the TX turns into slow flashing red, or when both status indica- tors on the RX turn into fast flashing red, place them in the charging case and they will start charging automatically. - Page 18 Charging and Storage After usage, please promptly place the RX and TX back into the charging case for storage and charging. Charging Case Indicator LED Description One LED ON 25% battery Two LEDs ON 50% battery Three LEDs ON 75% battery Four LEDs ON 100% battery Low battery level and cannot charge the RX...
- Page 19 All copyrights belong to Shenzhen Hollyland Technology Co., Ltd. Without the written ap- proval of Shenzhen Hollyland Technology Co., Ltd., no organization or individual may copy or reproduce part or all of any written or illustrative content and disseminate it in any form.
- Page 20 P/N : 3003080427...
Need help?
Do you have a question about the LARK M2 and is the answer not in the manual?
Questions and answers