Tunstall Caresse Installation And Programming Manual
Hide thumbs
Also See for Caresse:
- Installation and programming manual (11 pages) ,
- Installation and user manual (20 pages)
Table of Contents
Advertisement
Advertisement
Table of Contents

Related Manuals for Tunstall Caresse


Summary of Contents for Tunstall Caresse
- Page 1 Installation and programming guide Caresse and Caresse+ Issue 1.13...
-
Page 2: Table Of Contents
Contact ID Mode Call Handling Functionality (listen in mode) ..........33 Contact ID Mode Call Handling Functionality (Call Back mode) ..........34 List of Contact ID Call codes for Caresse and Caresse +............35 TT21 Location codes and descriptions..............38 Technical Details ......................39 Environmental ........................ -
Page 3: What's In The Box
What’s in the box? When the box is opened for the first time, please ensure it includes all of the following: Caresse Pendants Gem+ Amie+ Wearing options Gem+ Amie+ Neck cord Neck cord Belt clip Wrist strap Wrist strap Cords and adaptors ⓐ... -
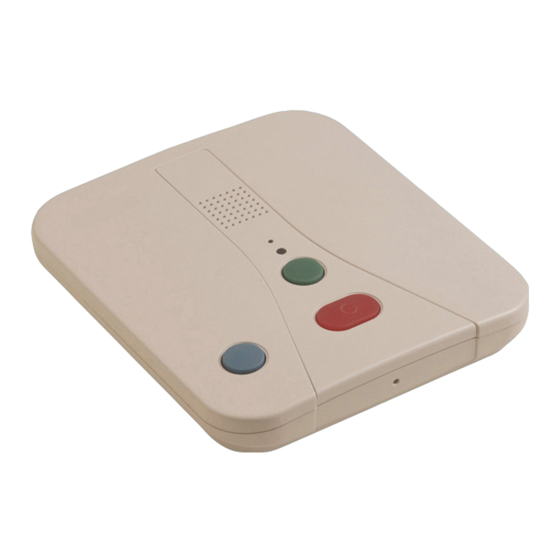
Page 4: The Caresse
The Caresse Front view Status LED (Red/Yellow) Status LED (Green) Speaker Cancel Button (Green) Away Button (Blue) Alarm Button (Red) Back view Wall Mounting Points Battery Compartment Cover Programming Keypad Rubber Feet x 4 Microphone End view Aerial - Telephone Jack AUX –... -
Page 5: For Your Safety - Installation Advice
For your safety - installation advice Installation with RJ31x (CA38A in Canada) The Caresse unit must be able to seize the telephone line and place a call in an emergency situation. It must be able to do this even if other equipment (telephone, answering system, computer modem, etc.) already has the telephone line in use. -
Page 6: How To Install The Caresse
Put it right next to your stove or close to any other heat source. • Set the Caresse in a place where it will get damp, such as a bathroom, or near • house plants that are sprayed at any time. - Page 7 Step E – Stand the aerial upright. Step 2 - Testing Press the red alarm button on the Caresse and ensure it raises a call through to the monitoring center/personal recipient. Also remember to test the Amie+ or Gem+ pendant by pressing its red button and ensuring a call is raised.
-
Page 8: Using The Caresse
Caresse will answer the call and you can speak to and hear the caller hands free via the Caresse. To revert to handset mode, just pick up the handset of the connected telephone. Replacing the handset will end the call. To end a hands free call, press the pendant again. -
Page 9: Status Warnings
AC Power failure monitoring If an AC power failure occurs, the Caresse will continue to work using its backup battery, however, as a warning the green LED will flash once every 4 seconds (see section – the LEDs on the Caresse indicate). -
Page 10: The Leds On The Caresse Indicate
The LEDs on the Caresse indicate Two LEDs on the Caresse provide indications of its status based on the below. LED lights Home unit status Green LED on Normal mode Green LED flash (1 every 4 Normal mode running on battery... -
Page 11: Battery Information
5 years. The battery provides 30 hours of standby operation (15 hours with one 30 minute alarm call). The battery in the Caresse can be tested by pressing the TEST button on the programming keypad (3 bleeps = battery ok, 1 long bleep = fail). -
Page 12: Programming The Caresse
Programming the Caresse Programming of the Caresse and its functions can be achieved using three different methods: Programming Keypad - Basic programming can be achieved by using the • programming keypad on the underside of the Caresse. This includes a simplified way of programming telephone numbers, call codes and the turning on/off of functions of the Caresse. -
Page 13: Frequently Used Keypad Codes
The date and time will also need to be reset. Setting the time There is a real time 24 hour clock in the Caresse which automatically adjusts to Daylight Saving Time. To set the clock press: HH MM HH represents hours 00-23;... -
Page 14: Adjusting The Speaker Volume
Adjusting the speaker volume The Caresse has four volume level settings, which can be adjusted as follows. To increase volume, press: Tone sounds for 10 seconds. Press repeatedly until volume is reached. Then press before the tone ends to save the new volume setting. -
Page 15: Alarm Numbers
Alarm numbers The keypad supports the programming of 9 alarm numbers (10 numbers are supported via the PC Connect or monitoring center). The Caresse automatically selects a call sequence depending upon the type of alarm numbers programmed into it, please see call sequences section for more information. - Page 16 To erase one personal recipient alarm number, press: To erase all personal recipient alarm numbers, press: To erase one information monitoring center number, press: To erase all information monitoring center numbers, press: Testing alarm numbers Tests should always be carried out to ensure that alarm receivers have been programmed correctly along with the correct codes.
- Page 17 Prefix (max 8 digits) Disable Suffix numbers A # can be inserted after all dialed numbers from the Caresse. This feature can be used to instance to terminate a call made to a paging service. This can be achieved by pressing:...
-
Page 18: Call Sequences
Only monitoring center numbers programmed When an alarm is raised, the Caresse firstly calls alarm number 1 twice and thereafter calls alarm numbers 2, 3 and 4 once each. If there is no answer from any of the four numbers, the Caresse calls alarm number 1 again, but this time four times, and then calls the next alarm number etc until the alarm is received. -
Page 19: Unit Id Number
Unit ID number The Caresse sends a unit ID number to the alarm receiver when an alarm is sent. The number identifies which Caresse is sending the alarm. Unit ID number 1 must be programmed into the Caresse in order for an alarm to be sent. The unit ID number may be the same for all monitoring centers and personal recipients. -
Page 20: Pendants And Telecare Sensors
Pendants and telecare sensors Each Caresse can be easily programmed to receive up to 15 (35 for the Caresse+) pendants and telecare sensors, this can be done by pressing: then activate the pendant/sensor. If successful, the Caresse will announce the name of the pendant/sensor programmed. If unsuccessful, a low pitched tone will be heard (e.g. -
Page 21: Turning Features On And Off
Turning features on and off The Caresse units have a wide range of other features that can be turned simply on or off. When these features are turned on they automatically use the default settings listed on the next page. The Xs below relate to the feature number in the feature list (see following page). -
Page 22: Features List
Inactivity monitoring with elapsed time of configuring settings. 16 hrs. See features explained and Entry/exit period = Intruder monitoring configuring settings (Caresse+ 30 sec only). Send every 4 hours Sends alarm when power failure Power failure alarm after first hour. -
Page 23: Features Explained And Configuring Settings
Features explained and configuring settings Periodic test calls The Caresse allows a periodic test call to be generated either at a configurable period or at a fixed time. In the configurable period case, the period between calls can range from seconds through to days. -
Page 24: Inactivity Monitoring
Inactivity monitoring The Caresse can monitor movement around the home and send an alarm call to the monitoring center if no movement is detected within a specific time period. When configured using the keypad, inactivity monitoring is simplified using default settings. -
Page 25: Intruder Monitoring (Caresse+ Only)
Intruder monitoring (Caresse+ only) The Caresse has the ability to provide a simple to use intruder alarm facility, which will alert the monitoring center or personal recipient on detection of an intruder. When configured using the keypad, the intruder monitoring function is simplified and uses a number of default settings. -
Page 26: Reminder Functionality (Caresse+ Only)
Reminder functionality (Caresse+ only) The Caresse allows up to 6 voice reminder messages to be recorded onto the unit and then played back at a given time on a one-off or daily basis. Messages can be recorded locally using the keypad or remotely using an interactive voice response (IVR) system. - Page 27 Step 4 - You will then be prompted to key in the PIN (default 1234) Step 5 - The time currently held on the Caresse’s internal clock will then be confirmed. Step 6 - You will then be given the below menu options. Firstly alter the time* if incorrect (menu option 3) and then follow the menu to configure and record each message.
- Page 28 Setting up via the programming keypad To record a reminder message, press: Then record message Note: (1-6) represents the message number. If a message is already recorded under the number entered, this key sequence will replay the message. To re-record a message, the existing number must be deleted first.
-
Page 29: Critical Visits (Caresse+ Only)
Critical visit monitoring allows scheduled care giver visits to users to be monitored and enables alarms to be raised if the schedule is not met. The Caresse allows up to six daily care giver visits to be monitored. Each care giver visit is defined by a visit time and a time window (centered on the visit time), which is an acceptable time window for the visit to occur. -
Page 30: Personal Recipient Messages
Hard wired input/output connection Pin 1 Pin 8 Input - devices can be hard wired to the Caresse using pins 1 and 8 of the AUX jack. Output – alternatively the Caresse can be connected to other devices e.g. Buzzers using pins 3 and 4 of the AUX jack. PC Connect should be used to configure which events should activate the output. -
Page 31: Contact Id Protocol Compatibility
Osborne Hoffman 2000, and SurGard System III receivers. Call modes The Caresse can work in three modes depending on the type of call. The standard mode is “Listen In” mode for emergency calls that require 2 way voice – Caresse sends a 606 “listen in to follow”... -
Page 32: Contact Id Call Codes
Suspend the call Press # then 3 NOTE: The Caresse must receive at least 150ms of DTMF tone. If a tone of this length is not received then the Caresse will take no action and the unit will not switch speech mode. -
Page 33: Contact Id Mode Call Handling Functionality (Listen In Mode)
The Caresse unit will raise alarm calls in the following manner:- 1. The Initial Alarm Call Caresse unit makes an alarm call and signals a new event code ‘1’. The monitoring station (e.g. Osborne-Hoffman receiver) can either: A: suspend the unit by sending a ‘#’ followed by ‘3’. -
Page 34: Contact Id Mode Call Handling Functionality (Call Back Mode)
(Event code ‘3’ as per the Contact ID spec.). After sending the code, the Caresse will enter suspend mode. The unit will require the operator to call back and to clear the call down using ‘*’ then ‘#’. The ‘help arrived’ reset call will be made to the same telephone number as the original call. -
Page 35: List Of Contact Id Call Codes For Caresse And Caresse
List of Contact ID Call codes for Caresse and Caresse + Ademco code(s) Event Mean. Ademco Zone Mode PENDANTS Personal Trigger activation <101> TT21 Location Personal Trigger activation (LB) <101><384> TT21 Location Personal Trigger AP <603> TT21 Location Background Personal Trigger AP (LB) <603><384>... - Page 36 Bogus Caller AP <603> TT21 Location Background Bogus Caller AP (LB) <603><384><> TT21 Location Background Bogus Caller AP Fail <381> BUTTONS ON CARESSE UNIT Red Button <100> TT21 Location Cancel Button <406> TT21 Location Away Button <140> TT21 Location MISCELANEOUS ALARM and INFORMATION TYPES Intruder Alarm <130>...
- Page 37 For calls transmitted in Background call mode, the Caresse will reset after transferring the • data and receiving an acknowledge. For calls transmitted using Call Back mode, the Caresse will drop the line and wait for a • call back after transferring the data and receiving an acknowledge.
-
Page 38: Tt21 Location Codes And Descriptions
TT21 Location codes and descriptions <unspecified location> <Living Room 2> <Resident 1> <Living Area> <Resident 2> <Living Area> <Resident 3> <Living Area> <unspecified location> <Living Area> <unspecified location> <Living Area> <unspecified location> <Hall/Stairs> <unspecified location> <Hall> <unspecified location> <Landing> <Local Unit> <Stairs>... -
Page 39: Technical Details
Technical Details Weight: 2.5lb (1143g) Dimensions: 7.68” x 8.47” x 1.4” (195 x 215 x 36mm) (WxLxD) AC power: 110 to 120v AC power receptacle Stand-by battery: 1200mAhr capacity (continually internally recharged) Back-up time: 30 hours of stand-by operation with one 30 minute alarm call (minimum expected at date of purchase and when fully charged) Radio frequency:... - Page 40 Our policy of continual development means that product specification and appearance may change without notice. © 2011 Tunstall Group Ltd. ® TUNSTALL is a registered trade mark. Tunstall Canada, 7540 Bath Road, Mississauga, Ontario L4T 1L2 CANADA Tunstall Group Ltd., 2025 Gateway Place, Suite 202, San Jose, California 95110, USA...
Need help?
Do you have a question about the Caresse and is the answer not in the manual?
Questions and answers