
Subscribe to Our Youtube Channel
Related Manuals for Cembre ROLLY 2000


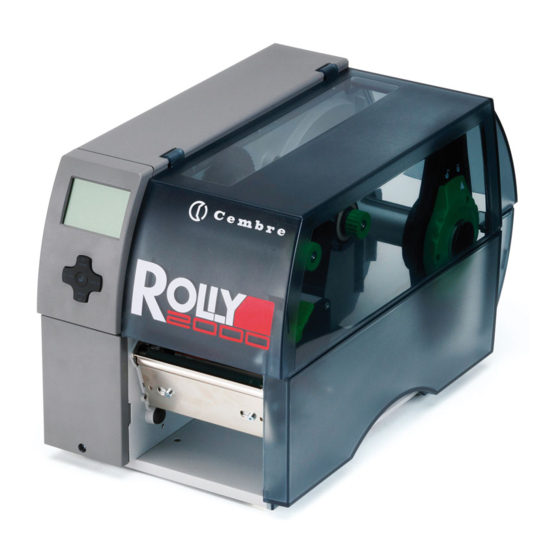
Summary of Contents for Cembre ROLLY 2000
- Page 1 09 M 103 E Certified Quality Certified Environmental Certified Occupational Management System Management System Health & Safety Management System ENGLISH THERMAL TRANSFER PRINTER THERMAL TRANSFER PRINTER OPERATION AND MAINTENANCE MANUAL...
- Page 2 Cembre is designed for the volume printing of cables markers and adhesive labels. Robust and quiet, Rolly2000 provides reliable, intensive operation in office or factory combined with the facility to optimise printer set-up according to the media.
-
Page 3: Table Of Contents
Error messages and fault correction ...................... 21 Media ..............................23 Media dimensions ..........................23 Device dimensions ..........................24 Reflex mark dimensions ......................... 25 Cut-out mark dimensions ........................26 Conformity ............................27 Warranty ..............................27 Return to Cembre for repair ........................ 27 Accessories ............................27... -
Page 4: Introduction
Introduction Instructions Important information and instructions in this documentation are designated as follows: Danger! Draws your attention to an exceptionally grave, impending danger to your health or life. Warning! Indicates a hazardous situation that could lead to injuries or material damage. Attention! Draws attention to possible dangers, material damage or loss of quality. -
Page 5: Environment
Introduction • Risk of crushing when closing the cover. Keep fingers outside when moving the device cover. • Perform only those actions described in this operating manual. Work going beyond this may only be performed by trained personnel or service technicians. •... -
Page 6: Installation
Installation Device overview 1 Cover 2 Core adapter 3 Margin stop 4 Roll retainer 5 Ribbon supply hub 6 Ribbon take-up hub 7 Print mechanics 8 Mounting area for accessories incl. peripheral connector 9 Navigator pad 10 Display Fig. 1 Overview 12 Ribbon guide 13 Printhead locking screw... - Page 7 Installation 23 Power switch 24 Power connection socket 25 Slot for PC Card Type II 26 Slot for CompactFlash memory card 27 Ethernet 10/100 Base-T 28 2 USB master ports for keyboard, scanner or service key 29 USB high-speed port 30 Serial RS-232 C port Fig.
-
Page 8: Unpacking And Setting-Up The Printer
Installation Unpacking and setting-up the printer Lift the label printer out of the box via the straps. Check label printer for damage which may have occurred during transport. Place the printer on a level surface. Check delivery for completeness. Contents of delivery: •... -
Page 9: Control Panel
Control panel Structure of the control panel The user can control the operation of the printer with the control panel. The control panel consists of a graphic display (1) and the navigator pad (2) with five integrated keys. The graphic display indicates the current status of the printer and the print job, Ready indicates faults and shows the printer settings in the menu. -
Page 10: Symbol Displays
Switch the printer off and then on again at the and the type of error power switch or Press cancel key. Call Cembre if the fault occurs persistently. Power Save Mode If the printer is not used for a lengthy period, it automatically switches to power save mode. -
Page 11: Key Functions
Control panel Key functions The key functions depend on the current printer state: - Active functions: Labels and symbols on the navigator pad keys light up. - Active functions light up white in print mode (e. g. menu or feed). - Active functions light up orange in the offline menu (arrows, key ... -
Page 12: Loading Material
Loading material Loading labels from roll 4.1.1 Removing and installing the core adapters Core adapters are mounted for better guidance of the label roll on the roll retainer when using label rolls with a core diameter ≥ 75 mm. Remove core adapters for smaller label rolls as follows. Fig. -
Page 13: Positioning The Label Roll On The Roll Retainer
Loading material 4.1.2 Positioning the label roll on the roll retainer Attention! To guarantee good condition of the labels it is suggested to keep the rolls in their original packing at a normal, even temperature; do not touch the underside of the print head with fingers or pointed objects. ... -
Page 14: Setting The Label Sensor
Loading material 4.1.4 Setting the label sensor Attention! Adjustment of the label sensor is essential to the correct advancement of the printing material. Fig. 11 Setting the label sensor The sensor case (2) can be shifted perpendicular to the direction of material flow for adaptation to the label medium. The label sensor (1) is visible from the front through the print unit and is marked with a indentation in the case retainer. -
Page 15: Setting The Head Locking System
Loading material LABEL SENSOR LABEL SENSOR LABEL SENSOR LABEL SENSOR POSITION POSITION POSITION POSITION In case of continuous film TTF or continuous strip STRIP-ROLL, position the label sensor (1) at any point on the material. For non-recangular labels (e.g. TTL circular), position the label sensor (1) on the central axis. TTF... -
Page 16: Loading Ribbon
Loading material Loading ribbon Notice! The printer is supplied with a ribbon already installed, to replace it proceed as follow. Fig. 15 Feed path of the ribbon 1. Clean printhead before loading the ribbon ( 5.3 on page 18). 2. Turn lever (5) counterclockwise to lift the printhead. 3. -
Page 17: Setting The Feed Path Of The Ribbon
Loading material Setting the feed path of the ribbon Creases in the ribbon can cause printing problems. Adjust the ribbon guide to minimise creasing. Notice! Adjustment of the head locking system may also prevent ribbon creasing ( 4.1.5 on page 15). Fig. -
Page 18: Cleaning
Lift the printhead. Remove media and ribbon from the printer. Remove deposits with roller cleaner and a soft cloth. If the roller appears damaged, replace it Contact Cembre. Cleaning the printhead Cleaning frequency: every ribbon change Contamination may accumulate on the printhead during printing and adversely affect print, e.g. -
Page 19: Cleaning The Label Sensor
Cleaning Cleaning the label sensor Attention! Label sensor can be damaged! Do not use sharp or hard objects or solvents to clean the label sensor. The label sensor can become contaminated. This can adversely affect label detection. Fig. 17 Cleaning the label sensor 1. -
Page 20: Troubleshooting
5.3 on page 26 Temperature too high Decrease temperature via driver. Incompatible combination of media and Use only Cembre media and ribbon. ribbon Printer does not stop after Thermal printing driver selected Set the printer to "Thermal transfer" via ribbon runs out driver. -
Page 21: Error Messages And Fault Correction
Cause Remedy ADC malfunction Hardware error Switch the printer off and then on. If error recurs call Cembre. Battery low Battery the PC card is flat Replace battery on the PC card. Buffer overflow The input buffer memory is full and the Use data transmission via protocol computer is still transmitting data. - Page 22 Do not use the USB device. Unknown device Voltage error Hardware error Switch the printer off and then on. If error recurs call Cembre. Voltage at failure is shown. Please note. Write error Hardware error Repeat the write process, reformat card.
-
Page 23: Media
Media Media dimensions Labels Continuous material Fig. 18 Label / continuous material dimensions Dim. Designation Dim. en mm Label width 4 - 116 Label height 4 - 1000 Tear-off length > 30 Cut length with cutter > 2 with perforation cutter >... -
Page 24: Device Dimensions
Media Device dimensions Gap sensor & Reflective sensor Printhead Peel-off edge Tear-off edge Cut edge Fig. 19 Device dimensions Dim. Designation Dim. en mm Distance printhead - peel-off edge 13,5 Distance printhead - cut edge 18,8 Distance printhead - tear-off edge 13,5 Distance 1st printing point - material edge Print width with printhead 300 dpi... -
Page 25: Reflex Mark Dimensions
Media Reflex mark dimensions Labels with reflex marks Endless material with reflex marks virtual label front edge reflex mark Fig. 20 Reflex mark dimensions Dim. Designation Dim. en mm Label distance > 2 Width of reflex mark > 5 Height of reflex mark 3 - 10 Distance mark - material edge 5 - 53... -
Page 26: Cut-Out Mark Dimensions
Media Cut-out mark dimensions Labels with cut-out marks Continuous material with cut-out marks for marginal cut-out marks minimum liner thickness 0,06 mm Fig. 21 Cut-out mark dimensions Dim. Designation Dim. in mm Label distance > 2 Width of cut-out mark >... -
Page 27: Conformity
Service Centre; if possible, attach a copy of the Test Certificate supplied by Cembre together with the printer or, if no other references are available, indicate the approximate purchase date and serial number.
Need help?
Do you have a question about the ROLLY 2000 and is the answer not in the manual?
Questions and answers