Table of Contents
Advertisement
Quick Links
Advertisement
Table of Contents

Related Manuals for 3D Systems ZPrinter 850


Summary of Contents for 3D Systems ZPrinter 850
- Page 1 ZPrinter ® QUICK START GUIDE Part Number 95030 Rev. B 11/1/12...
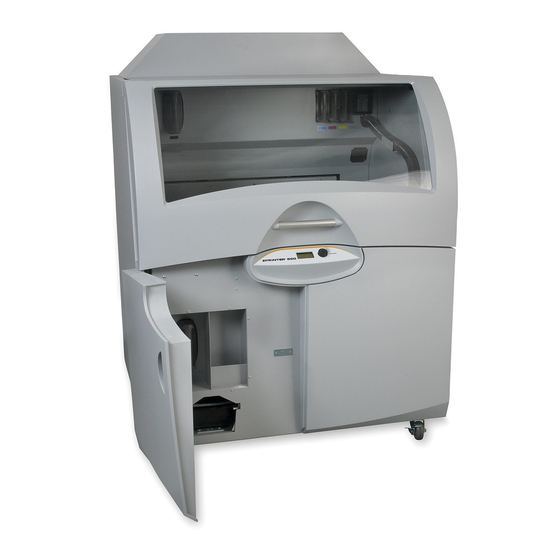
- Page 2 ZPrinter 850 Overview Binder Cartridges Debris Separator Vacuum Hose Fast Axis Heater Vent Service Station (partly hidden) Control Panel Build Bed Printing Storage 3dscentral.3dsystems.com...
- Page 3 Printing Storage Cleaning Quick Start Solution Guide Cartridge Squeeze Replacement Bottle Print Heads and Oil Syringe and Alcohol Tubing Swabs Grease Waste Tray Push the Control Knob once to: • Bring up the printer menu. • Select a menu command. •...
-
Page 4: Quick Start Guide
ZPrinter 850 control familiarize you with your 3D Printer, and lead you through mak- panel. ing a build. Please refer to the ZPrinter 850 User Manual for • Ensure ZPrint™ Software Rev. 7.14 or later is installed and... -
Page 5: Table Of Contents
1.3 Steps To Print Follow the steps outlined in the sections below to print your part. Section Title Page Check The Printer Setup Your Build And Print Gross Powder Removal Fine Powder Removal Routine Cleaning After Every Build Post-Processing With Z-Bond Additional Printer Operations 3dscentral.3dsystems.com... -
Page 6: Check The Printer
2. Check The Printer Open the printer top cover and pull the fast axis out toward Before you start your print job, it’s important that you check the you. printer. A clean, well-maintained printer produces better parts, has less downtime, and needs fewer service calls. Check for loose powder in or around the Build Bed, Fast Axis, and Deck. -
Page 7: Setup Your Build And Print
3. Setup Your Build And Print • Check the Bleed Compensation option, if it isn’t checked already. Now that your printer is clean, you need to open up the 3D file • If you want to print all in one color, check the Print in using ZPrint, and select your printing parameters. - Page 8 ZPrint checks each item in the Printer Status dialog prior to printing to ensure there are enough materials to complete Select File > 3D Print, or click on the Toolbar, to open the build. the Printer Status dialog. • Section 8 of this guide for instructions if you see a message saying any of the items needs attention.
- Page 9 Important: The Empty After Printing option is checked • The layer that is currently printing and the percentage by default. If you are printing a part with especially delicate completed. features, uncheck this option. Also refer to the ZPrinter The Printing dialog also provides: 850 User Manual for information on adding fixtures and •...
-
Page 10: Gross Powder Removal
4. Gross Powder Removal 4.3 Moving Parts By Hand The following steps assume you will be using the Powder 4.1 Automatic Gross Depowdering Recycling Station - Large to fine depowder your parts. When the build is finished, the printer starts an automatic drying Open the glass cover of the Powder Recycling Station. - Page 11 Open the printer top Slide the build plate cover. From the main carefully into the Pow- menu on the LCD der Recycling Station. Alternatively, for small select ACCESS parts, one can also BUILD PLATE carefully move the Raise the cart using parts from the part the foot-operated jack cart into the Station...
-
Page 12: Fine Powder Removal
5. Fine Powder Removal 4.Using the Air Wand or Air Gun, remove all The freshly-printed part will still have powder clinging to it, remaining powder on the which must be removed before proceeding with the post-pro- part. The vacuum will cessing steps. -
Page 13: Routine Cleaning After Every Build
6. Routine Cleaning After Every Build 4.Vacuum all powder from the Build Bed (but not After every build, it is important to clean your printer following under the Fast Axis), and the steps below. from the deck around the Build Bed. Vacuum under A clean, well-maintained printer produces better parts, the Build Plate if that was has less downtime, and needs fewer service calls. -
Page 14: Clean The Parking Caps
6.2 Clean The Debris Separator 6.3 Clean the Parking Caps The purpose of the Debris Separator is to keep any large parti- The Parking Caps keep the print heads from drying out between cles from going back into the Feeder during vacuuming. print jobs. - Page 15 4.Use a dry paper towel to wipe the caps clean. 5.Remove the paper towels from the Deck and wipe up any water on the Fast Axis or Deck. 6.Remove the paper towels from the front overflow and dry it thoroughly. Service Carriage Paper...
- Page 16 6.4 Clean The Rails and Carriage Keeping the Rails and Carriage clean will keep the Carriage mov- ing smoothly and thus optimize printing accuracy. Pull the Fast Axis toward you. Wipe the top and bottom Rails with a paper towel Top Rail dampened with distilled...
-
Page 17: Clean The Service Station
6.5 Clean The Service Station Clean the Service Station after every build to remove residue buildup and to ensure the printer runs optimally for your next Clean Squeegee print job. Before you begin: Clean Spit Plate • Get several dry paper towels and a cotton swab. •... - Page 18 5.Remove the spit plate from the Service Station 1.Place paper towels and clean it with a paper around the Service Sta- towel. Replace the spit tion, and between the plate, using the edge tabs Service Station and the for correct alignment. Build Bed.
-
Page 19: Post-Processing With Z-Bond
Best Practices, and material storage guidelines. While you’re 3D Systems also offers a Z-Bond 101 Dipping Kit, which con- there, visit our 3DS Shop online store for all your 3D printing tains all the supplies needed for post-processing. The Kit pro- supplies. - Page 20 7.2 Using the ZBench available on our 3DS Central Web site: 3dscentral.3dsystems.com. The ZBench provides a convenient way to infiltrate parts with If any Infiltrant drips onto exposed areas of ZBench, wipe ample work area and quiet operation. Follow the steps below to up immediately with paper towels.
- Page 21 7.3 Post-Processing Using the Dipping Quickly and thoroughly wipe any excess liquid off the part with paper towels and place the part on the wax paper. Method • Do not let excess liquid pool on the part as this may Most parts can be infiltrated simply by dipping briefly in the Z- cause its texture to change.
- Page 22 7.4 Post-Processing Using the Drizzle Method • Move the part frequently for the first few minutes. This prevents pooling of Z-Bond under the part and the part Parts with delicate features may be damaged by the handling adhering to the paper. required for the dipping method.
-
Page 23: Additional Printer Operations
ZPrinter 850 and place the At the time of printing of this manual, the only materials powder canister in the build approved for use with the ZPrinter 850 were zp150 powder, zb61 bed. binder, and zc6 cleaning solution. 3D Systems is always evaluat- ing new materials;... -
Page 24: Add Binder
8.2 Add Binder If there is not enough binder in one or more of the cartridges, ZPrint displays BINDER LOW in the Printer Status dialog. Important: Do not add binder unless you are prompted to in the ZPrint Printer Status dialog. To add binder, follow the steps below. -
Page 25: Add Cleaning Solution
8.3 Add Cleaning Solution 8.4 Replace the Waste Tray If there is not enough cleaning solution, ZPrint displays If the Waste Tray is Full, ZPrint displays EMPTY WASTE TRAY CLEANING SOLUTION in the Printer Status dialog. the Printer Status dialog. Important: Do not add cleaning solution unless you are To replace the Waste Tray, follow the steps below. - Page 26 8.5 Change the Print Head(s) Dry with a clean paper towel. The printer checks the status of the print heads before every Select then PRINT HEADS CHANGE PRINT HEADS build. Do not change the print heads unless prompted to in the on the LCD menu.
- Page 27 8.For each printhead being 11. Close the carriage cover by pressing down until you hear it replaced, wipe off all the pogo click shut. Be sure both latches are engaged. pins (inside the carriage) with 12. Close the printer top cover. Select then CONTINUE EXIT...
-
Page 28: Where To Go For More Information
Where To Go For More Information If you need an additional copy of the Quick Start Guide, please visit the Products section of our Web site at 3dscentral.3dsystems.com to view or print the PDF format. For additional information, consult the ZPrinter® 850 User Manual or the ZPrint™... -
Page 29: Copyright And Trademarks
Z, 3D Systems, zp, zb, ZPrinter, ZCast, ZScanner, ZScan and the by 3D Systems, and is to be used solely for the fabrication of 3D Systems logo and design are pending/registered trademarks appearance models and prototypes using new 3D Systems-sup- of 3D Systems. -
Page 30: Change History
Your ZPrinter® system is guaranteed to be free of defects in materials and workmanship, when used for production of early- The following symbols are used on the ZPrinter 850 system and stage appearance models and prototypes and with 3D Systems in this manual. - Page 31 3D Systems Contact Information Technical Support – Asia Pacific If you have any questions about your 3D ZPrinter or the ZPrint/ Phone: +852 8191 2453 ZEdit Software, please contact your local Reseller/Service Pro- Fax: +852 2948 2244 vider. If they are unable to help, contact us directly.
- Page 32 Part and Model Samples 3D Systems Corporation, © 2012 All Rights Reserved...
Need help?
Do you have a question about the ZPrinter 850 and is the answer not in the manual?
Questions and answers