Table of Contents
Advertisement
Quick Links
Advertisement
Table of Contents

Related Manuals for Exerpeutic 1005


Summary of Contents for Exerpeutic 1005
- Page 1 Manual Treadmill with Pulse Item #1005 OWNER’S MANUAL ...
- Page 2 1005.2‐121914 ...
-
Page 3: Table Of Contents
TABLE OF CONTENTS SERVICE ------------------------------------------------------------------------ 2 IMPORTANT LABELS -------------------------------------------------------- 3 PRODUCT SAFETY ---------------------------------------------------------- 4 OVERVIEW DRAWING ------------------------------------------------------ 5 PART LIST ---------------------------------------------------------------------- 6 HARDWARE PACKING LIST & TOOLS --------------------------------- 8 ASSEMBLY --------------------------------------------------------------------- 9 COMPUTER --------------------------------------------------------------------- 16 STORAGE ----------------------------------------------------------------------- 17 ADJUSTMENTS --------------------------------------------------------------- 18 LUBRICATION ----------------------------------------------------------------- 19 TROUBLE SHOOTING &... -
Page 4: Service
SERVICE IMPORTANT: FOR NORTH AMERICA ONLY To request product service and order replacement parts, please call our customer service department at: 1-844-641-7921 Monday through Friday, 8:00 AM-5:00 PM Pacific Standard Time, service@paradigmhw.com or email us at: Please visit our website at www.paradigmhw.com. Please have the following information ready when requesting for service: Your name Phone number... -
Page 5: Important Labels
IMPOR R TANT L LABELS... -
Page 6: Product Safety
PRODUCT SAFETY Basic precautions should always be followed, including the following safety instructions when using this manual treadmill: Read all instructions before using this manual treadmill. 1. Check every part of the equipment before exercise. If there is any defective component, replace it immediately; keep the equipment out of use until repair. -
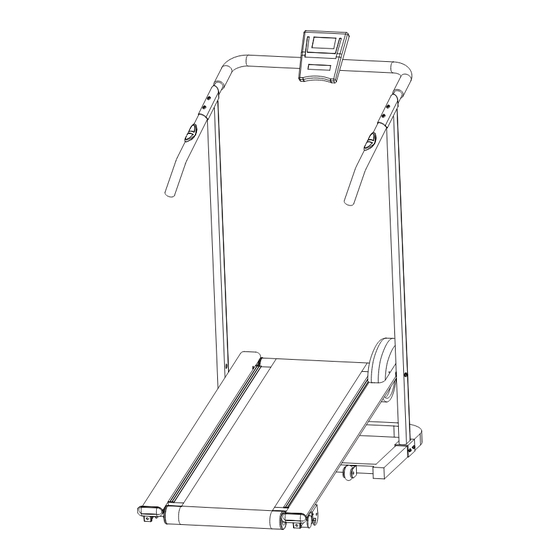
Page 7: Overview Drawing
OVERVIEW DRAWING 60 50 59 46 54 57... -
Page 8: Part List
PART LIST Description Qty No. Description 1 026 Safety Tube B (□25x460) 001 Rear Roller Ø60x395 002 Running Deck 1020x407x12 1 027 Spring Knob Ø8 003 Front Roller Ø60x395 1 028 Transport Wheel Ø50 1 029 Square End Cap (□38) 004 Running Belt 2400x335x1.2 005 Main Frame 1 030 Rubber Pad... - Page 9 PART LIST Description Qty No. Description Handlebar Support Tube End 2 058 Screw ST3x12 Cap Ø28 052 Bolt M5x10mm 2 059 Washer M8 053 C Clip Ø12 3 060 Washer M10 Computer Bracket Foam Grip 054 Nylon Washer Ø8.2xØ16x2T 2 061 Ø23x3Tx390 055 Washer M6 8 062 Handlebar Foam Grip Ø23x3Tx580 2...
-
Page 10: Hardware Packing List & Tools
HARDWARE & TOOLS LIST (45) Bolt M8x45mm (46) Carriage Bolt (47) Bolt M8x16mm 4 PCS M8x55mm 2 PCS 4 PCS (50) Bolt M10x55mm (57) Nylon Nut M8 (59) Washer M8 2 PCS 4 PCS 4 PCS (60) Washer M10 (63) Screw ST4x12 2 PCS 2 PCS Allen Wrench with Phillips Allen Wrench 6mm... - Page 11 SSEMBL Tool: Allen Wren nch with Phil llips Screw wdriver 5mm Wrenc Atta ach both Le eft/Right H Handlebar S Support Tu ubes (10, 1 1) onto the e Base me (7) with h four Carr riage Bolts s (46), four M8 Nylon Nuts (57), , and four...
-
Page 12: Assembly
ASSEMBLY Tool: Allen Wrench with Phillips Screwdriver 5mm Step 2 Attach the Protective Cover (6) onto the Main Frame (5) with two ST4x12 Screws (63). Tighten screws with the 5mm Allen Wrench with Phillips Screwdriver provided. Hardware: (63) Screw S4x12 2 PCS... - Page 13 ASSEMBLY Tool: 50 60 60 50 Wrench Allen Wrench 6mm 54 57 Allen Wrench with 54 57 Phillips Screwdriver 5mm Step 3 Lift the front end of Main Frame (5) up by two or more people and then attach the Main Frame (5) onto the Left/Right Handlebar Support Tubes (10, 11) with two M10x55mm Bolts (50) and two M10 Washers (60).
- Page 14 ASSEMBLY Tighten bolt and nylon nut with the 5mm Allen Wrench with Phillips Screwdriver and Wrench provided. Attach the Safety Tube A (24) onto the Main Frame (5) with one M8x35mm Bolt (44), one Ø8.2xØ16x2T Nylon Washer (54), and one M8 Nylon Nut (57) that were removed.
- Page 15 ASSEMBLY Tool: Allen Wrench with Phillips Screwdriver 5mm Step 4 Connect the Hand Pulse Sensor Wire (12) from Left handlebar (8) to Hand Pulse Sensor Wire(35) from the Computer bracket (14). Connect speed sensor wire (31) from the Right Handlebar (9) to the Speed Sensor Wire(34) from the computer bracket (14).
- Page 16 ASSEMBLY Tool: Allen Wrench with Phillips Screwdriver 5mm Step 5 Connect the Extension Sensor Wire I (33) from the Right Handlebar Support Tube (11) to the Extension Sensor Wire III (31) from the Right Handlebar (9). Attach both Left/Right Handlebars (8, 9) onto both Left/Right Handlebar Support Tubes (10, 11) with two Handlebar Adorners (13) and four M8x45mm Bolts (45).
-
Page 17: Computer
ASSEMBLY Tool: Allen Wrench with Phillips Screwdriver 5mm Step 6 Remove two M5x10mm Bolts (52) from back of the Computer (15). Remove bolts with the 5mm Allen Wrench with Phillips Screwdriver provided. Connect the Extension Sensor Wire II (34) and Extension Hand Pulse Sensor Wires (35) to the wires that come from the Computer (15). - Page 18 OMPUT y function ODE: Displa ay function n selection. . Press a and hold th ODE key for r 2 second ds, all data values wil l clear to z zero cept the OD DO (ODOM METER) da ata values. T: To set g goal values s as exercis...
-
Page 19: Storage
STORAGE FOLDING UP THE TREADMILL To fold up the treadmill, place one hand on the back end of the treadmill and the other hand to pull the Spring Knob. Carefully lift the end of the treadmill up into the upright position until the Spring Knob "pops" down into the locked position. Make sure the deck is securely locked before moving the treadmill. -
Page 20: Adjustments
USTME ENTS usting the e Incline A Adjuster Plac ce one han nd on the r rear end of f the Main Frame, the lift t the rear en nd of the M ain Frame e up and us se the othe nd to remov ve the Loc king Pin. -
Page 21: Lubrication
BRICATI e treadmill has alread dy been sp pread with "Silicone O Oil" in adva ance before leav ving the ma anufacturin ng plant. Silicone o oil is withou ut volatility and has grad dually perm meated thr rough the r running be lt. -
Page 22: Trouble Shooting & Maintenance
TROUBLE SHOOTING & MAINTENCE TROUBLE SHOOTING PROBLEM: Treadmill running belt slips or is not centered on rear roller. SOLUTION: Refer to “Adjusting the Running Belt” section on page 18. PROBLEM: Computer not working correctly SOLUTION: Check to make sure the computer wires are connected securely. SOLUTION: Check the batteries are correctly positioned and battery springs are proper contact with batteries. -
Page 23: Warm Up
WARM U adriceps S Stretch With h one hand d against a a wall for b balance, re ach behind u and pull y your right fo oot up. B Bring your h heel as clo to y your buttoc cks as poss sible. -
Page 24: Warranty
WARRANTY MANUFACTURER’S LIMITED WARRANTY Paradigm Health & Wellness warrants to the original purchaser that this product is free from defects in material and workmanship when used for the purpose intended, under the conditions that it has been installed and operated in accordance with Paradigm’s Owner’s Manual. -
Page 25: Fax Form
FAX FORM PARADIGM HEALTH & WELLNESS, INC. PARTS REQUEST FAX FORM Please fax this form to (1-626-810-2166) OR YOU CAN EMAIL CUSTOMER SERVICE REQUESTS TO service@paradigmhw.com NAME: _______________________________________________________ ADDRESS: ____________________________________________________ CITY ______________ STATE ______________ ZIP ___________________ TELEPHONE: (Day) _____________________________________________ (Night) ____________________________________________ (Email Address) ____________________________________ SERIAL#: __________________________________________ MODEL#: __________________________________________...
Need help?
Do you have a question about the 1005 and is the answer not in the manual?
Questions and answers