Table of Contents
Advertisement
Advertisement
Table of Contents

Related Manuals for Exerpeutic 1020.2-EX


Summary of Contents for Exerpeutic 1020.2-EX
- Page 1 Walk To Fit Treadmill OWNER’S MANUAL ...
- Page 2 1020.2‐071114 ...
-
Page 3: Table Of Contents
TABLE OF CONTENTS SERVICE ------------------------------------------------------------------------- 2 IMPORTANT LABELS -------------------------------------------------------- 3 PRODUCT SAFETY ----------------------------------------------------------- 4 OVERVIEW DRAWING ------------------------------------------------------- 8 PART LIST ----------------------------------------------------------------------- 9 COMPUTER KNOBS INCLUDED & TOOL ------------------------------ 11 ASSEMBLY ---------------------------------------------------------------------- 12 COMPUTER --------------------------------------------------------------------- 15 STORAGE ----------------------------------------------------------------------- 18 ADJUSTMENTS ---------------------------------------------------------------- 19 LUBRICATION ------------------------------------------------------------------ 21 TROUBLE SHOOTING &... -
Page 4: Service
SERVICE IMPORTANT: FOR NORTH AMERICA ONLY To request product service and order replacement parts, please call our customer service department at: 1-844-641-7921 Monday through Friday, 8:00 AM-5:00 PM Pacific Standard Time, service@paradigmhw.com or email us at: Please visit our website at www.paradigmhw.com. Please have the following information ready when requesting for service: Your name Phone number... -
Page 5: Important Labels
IMPORTANT LABELS... -
Page 6: Product Safety
PRODUCT SAFETY Basic precautions should always be followed, including the following safety instructions when using this treadmill: Read all instructions before using this treadmill. DANGER: To reduce the risk of electric shock, please read the following: Always unplug the treadmill from the electrical outlet immediately after using and before cleaning, assembling, or servicing. - Page 7 PRODUCT SAFETY Do not operate the treadmill near a blanket. Excessive heating can occur and cause fire, electrical shock, or injury to user. Keep electrical cord away from heated surfaces. Never insert any object into any opening. Keep the treadmill on a solid, level surface with the minimum safety area clearance of 2000mm x 1000mm of the treadmill.
-
Page 8: Grounding Instructions
PRODUCT SAFETY WARNING: Connect the treadmill to a properly grounded outlet only. See grounding instructions. SAVE THESE INSTRUCTIONS GROUNDING INSTRUCTIONS This product must be grounded. If it should malfunction or break down, grounding provides a path of least resistance for electric current reducing the risk of electric shock. - Page 9 PRODUCT SAFETY This unit must be plugged into a nominal 120 volt, which has a grounding. Keep hands clear of all moving parts. Never place hands, feet under the treadmill. Do not use the treadmill on a carpet that is greater than 1/2 inch in height. ...
-
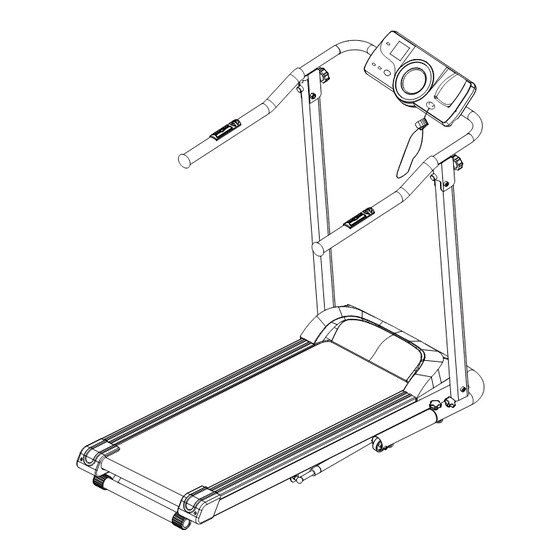
Page 10: Overview Drawing
OVERVIEW DRAWING... -
Page 11: Part List
PART LIST Part # Description Qty Part # Description Main Frame 1 025 Bolt (M8x40mm) Rear Roller Adjustment Bolt 2 026 Safety Tube B Square End Cap (□25.4) (M8x70mm) 003R Rear Right End Cap 1 027 Bolt (M8x60mm) 003L Rear Left End Cap 1 028 Adjustable Leveler (M10xØ28x40) - Page 12 PART LIST Part # Description Qty Part # Description 050R Right Side Rail (79.5x39x895) 1 068 Handlebar (692x793x161) 050L Left Side Rail (79.5x39x895) 1 069 Computer Knob (M5xØ25x55) Deck Bumper (48x32x5) 6 070 Computer Bolt (M8x45mm) 1 071 Safety Tether Key (SD-7934-1) Motor Bracket 1 072...
-
Page 13: Computer Knobs Included & Tool
COMPUTER KNOBS INCLUDED & TOOL (69) Computer Knob (M5xØ25x55) 2 PCS Allen Wrench 1 PC... -
Page 14: Assembly
ASSEMBLY Step 1 Place the treadmill in the upright position and then place one hand on the rear end of Main Frame (1) and use your other hand to pull out the Spring Knob (23). Lower the Main Frame (1) down from the rear of treadmill until the Spring Knob (23) "pops" down into the locked position. - Page 15 ASSEMBLY Step 2 Pull the Short Knob (61) and then lift the Handlebar (68) all the way up. Tighten the Handlebar (68) to the Stabilizer (57) with two Handlebar Knobs (33) and two M10 Washers (74). 2 Computer Knobs (M5xØ25x55) Step 3 Attach the Computer (70) onto the Handlebar (68) with two Computer Knobs (69).
- Page 16 ASSEMBLY Step 4 There are five Adjustable Levelers (28) on the bottom of both Stabilizer Tubes (31) and Stabilizer (57). Turn the Adjustable Leveler (28) as needed to level the treadmill.
-
Page 17: Computer
COMPUTER Quick Start: Flip the Master Power Switch that is located at the front of the treadmill to the ON position. The treadmill will self-test for 2 seconds on startup and then the speed setting will show up after a 2 second long beep. Before beginning a workout session ensure that the Safety Tether Key is properly placed onto the Computer Console and the Safety Clip is securely attached to an article of your clothing. - Page 18 COMPUTER RESET: Press the RESET button to clear data values of TIME, DISTANCE, CALORIES, or PULSE to zero for target pre-setting. Press and hold the RESET button for 2 seconds, all data values will clear to zero. SPEED UP: Press the SPEED UP button to increase walking speed. SPEED DOWN: Press the SPEED DOWN button to decrease walking speed.
- Page 19 COMPUTER CALORIES: Displays the total cumulative calories burned during your workout. Press START/STOP button to start exercising. The walking belt starts moving at speed of 0.4 MPH. You may press the SPEED UP or SPEED DOWN button on the computer console or right handlebar to increase or decrease walking speed during exercise.
-
Page 20: Storage
STORAGE Handlebar Knob Spring Knob Handlebar Short Knob FOLDING THE TREADMILL For your convenience, the treadmill can be folded up and placed in a storage area. To fold the treadmill place one hand on the rear end of main frame and use your other hand to pull out the Spring Knob, then lift the main frame up until the Spring Knob "pops"... -
Page 21: Adjustments
ADJUSTMENTS Belt Adjustment: The belt is adjusted at the factory; it may come loose during transportation and/or from use. After prolong use of the treadmill, the belt will stretch out. If the belt is shifting to the left, turn on the main power switch of treadmill and let the belt run at the speed of 1-1.5 MPH. - Page 22 ADJUSTMENTS Incline Adjustment: Place one hand on the rear end of main frame. Lift the main frame up then adjust the Incline Adjuster to the desired position. 2 Incline Degree Options: 3 % Incline degree when Incline Adjuster at Position A. 6 % Incline degree when Incline Adjuster at Position B.
-
Page 23: Lubrication
LUBRICATION The treadmill has already been coated with "Silicone Oil" in advance. Silicone oil is a non-volatile oil and by the time you receive should have permeated through the belt. There will be no need to re-apply the oil under normal circumstances. To maintain the belt, "Silicone Oil"... -
Page 24: Trouble Shooting & Maintenance
TROUBLE SHOOTING & MANTENANCE WARNING: To prevent electrical shock, please turn off and unplug(ed) the treadmill before cleaning or performing routine maintenance. CLEANING The treadmill can be cleaned with a soft cloth and mild detergent. Do not use abrasives or solvents. Be careful not get excessive moisture on the display panel as this might cause an electrical hazard or electronics to fail. - Page 25 TROUBLE SHOOTING & MANTENANCE Problem Potential Causes Corrections Er 1 (Computer did Bad communication for Check the cables are in good not receive any upper and lower connection. signal for 30 controller. seconds.) The communicate signal Turn off the Master Power from upper or lower Switch to the OFF position, controller is bad by wait 30 seconds, then turn on...
- Page 26 TROUBLE SHOOTING & MANTENANCE Problem Potential Causes Corrections Er 5 (Excessive Check your machine to make Turn off the Master Power Switch drive motor sure the running belt is to the OFF position, wait 30 without any abnormal current.) seconds, then turn on the Master interference.
-
Page 27: Warm Up
WARM UP Quadriceps Stretch With one hand against a wall for balance, reach behind you and pull your right foot up. Bring your heel as close to your buttocks as possible. Hold for 15 counts and repeat with left foot up. Inner Thigh Stretch Sit with the soles of your feet together with your knees pointing outward. -
Page 28: Warranty
WARRANTY MANUFACTURER’S LIMITED WARRANTY Paradigm Health & Wellness warrants to the original purchaser that this product is free from defects in material and workmanship when used for the purpose intended, under the conditions that it has be installed and operated in accordance with Paradigm’s Owner’s Manual. Paradigm’s obligation under this warranty applies to the following: COMPONENT LENGTH OF WARRANTY... -
Page 29: Fax Form
FAX FORM Paradigm Health & Wellness, Inc PARTS REQUEST FAX FORM Please fax this form to (1-626-810-2166) OR YOU CAN EMAIL CUSTOMER SERVICE REQUESTS TO service@paradigmhw.com NAME: _______________________________________________________ ADDRESS: ____________________________________________________ CITY ______________ STATE ______________ ZIP ___________________ TELEPHONE: (Day) _____________________________________________ (Night) ____________________________________________ (Email Address) ____________________________________ SERIAL#: __________________________________________ MODEL#: __________________________________________...
Need help?
Do you have a question about the 1020.2-EX and is the answer not in the manual?
Questions and answers