Table of Contents
Advertisement
WALK TO FIT TREADMILL
WALK TO FIT TREADMILL
WALK TO FIT TREADMILL
WALK TO FIT TREADMILL
IMPORTANT: Read all instructions carefully before using this product. Retain this
owner's manual for future reference.
The specifications of this product may vary from this photo, subject to change without
notice.
ITEM#
ITEM# 1020
ITEM#
ITEM#
OWNER'S MANUAL
1020
1020
1020
Advertisement
Table of Contents

Related Manuals for Exerpeutic 1020


Summary of Contents for Exerpeutic 1020
- Page 1 WALK TO FIT TREADMILL WALK TO FIT TREADMILL WALK TO FIT TREADMILL WALK TO FIT TREADMILL ITEM# ITEM# 1020 1020 ITEM# ITEM# 1020 1020 OWNER’S MANUAL IMPORTANT: Read all instructions carefully before using this product. Retain this owner’s manual for future reference.
- Page 2 IMPORTANT: FOR NORTH AMERICA ONLY To request product service and order replacement parts, please call our customer service department at: 1-866-924-1688 Monday through Friday, 8:00 AM-5:00 PM Pacific Standard Time, service@paradigmhw.com or email us at: Please visit our website at www.paradigmhw.com. Please have the following information ready when requesting for service: Your name Phone number...
-
Page 3: Table Of Contents
TABLE OF CONTENTS WARRANTY -------------------------------------------------------------------------------- 3 WARNING LABEL PLACEMENT ----------------------------------------------------- 4 SAFETY INSTRUCTIONS -------------------------------------------------------------- 5 PARTS LIST -------------------------------------------------------------------------------- 7 COMPUTER KNOBS INCLUDED ---------------------------------------------------- 8 TOOL ----------------------------------------------------------------------------------------- 8 OVERVIEW DRAWING ------------------------------------------------------------------ 9 ASSEMBLY INSTRUCTIONS ---------------------------------------------------------- 10 STORAGE ---------------------------------------------------------------------------------- 12 OPERATING THE COMPUTER ------------------------------------------------------- 13 CARE, MAINTENANCE &... -
Page 4: Warranty
ONE YEAR LIMITED WARRANTY Paradigm Health & Wellness, Inc. warrants to the original purchaser that this product is free from defects in material and workmanship when used for the purpose intended, under the conditions that it has been installed and operated in according to Paradigm’s Owner’s Manual. -
Page 5: Warning Label Placement
WARNING LABEL PLACEMENT... -
Page 6: Safety Instructions
SAFETY INSTRUCTIONS Basic precautions should always be followed, including the following safety instructions when using this treadmill: Read all instructions before using this treadmill. DANGER: To reduce the risk of electric shock, please read the following: Always unplug the treadmill from the electrical outlet immediately after using and before cleaning, assembling, or servicing. - Page 7 This appliance is not intended for use by persons (including children) with reduced physical, sensory or mental capabilities, or lack of experience and knowledge, unless they have been given supervision or instruction concerning use of the appliance by a person responsible for their safety. Children should be supervised to ensure that they do not play with the appliance.
-
Page 8: Parts List
PARTS LIST Part # Description Qty Part # Description Main Frame 1 030 Sensor Cable II (980mm) Rear Roller Adjustment Bolt 2 031 Stabilizer Tube (Ø50.8x300) (M8x70mm) 003R Rear Right End Cap 1 032 Stabilizer Knob (M8xØ40xØ10.5x15.5mm) 003L Rear Left End Cap 1 033 Handlebar Knob (M10xØ50x108) -
Page 9: Computer Knobs Included
PARTS LIST Part # Description Qty Part # Description Foam Grip (Ø30xØ37x537) 2 073 Spring Washer (M8) Transport Wheel (Ø8.5xØ50x23) 2 074 Washer (M10) Short Knob (Ø8xØ20x36) 1 075 Washer (Ø21xØ8.5x1.8t) Hand Pulse Sensor and Speed 1 076 Nut (M8) Button with Wires (1150MM 3P) Hand Pulse Sensor and Mode / 1 077... -
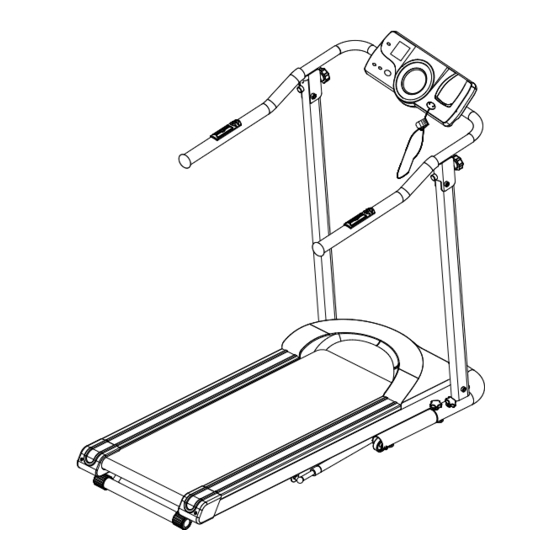
Page 10: Overview Drawing
OVERVIEW DRAWING... -
Page 11: Assembly Instructions
ASSEMBLY INSTRUCTIONS Step 1 Place the treadmill in the upright position and then place one hand on the rear end of Main Frame (1) and use your other hand to pull out the Spring Knob (23). Lower the Main Frame (1) down from the rear of treadmill until the Spring Knob (23) "pops" down into the locked position. - Page 12 62 69 2 Computer Knobs (M5xØ25x55) Step 3 Connect the Sensor Cable II (30), Hand Pulse Sensor and Speed Button Wires (62), and Hand Pulse Sensor and Mode / On Off Button Wires (63) to the wires that come from the Computer (70).
-
Page 13: Storage
STORAGE Handlebar Knob Spring Knob Handlebar Short Knob FOLDING THE TREADMILL For your convenience, the treadmill can be folded up and placed in a storage area. To fold the treadmill place one hand on the rear end of main frame and use your other hand to pull out the Spring Knob, then lift the main frame up until the Spring Knob "pops"... -
Page 14: Operating The Computer
OPERATING THE COMPUTER Quick Start: Flip the Master Power Switch that is located at the front of the treadmill to the ON position. The treadmill will self-test for 2 seconds on startup and then the speed setting will show up after a 2 second long beep. - Page 15 target pre-setting. RESET: Press the RESET button to clear data values of TIME, DISTANCE, CALORIES, or PULSE to zero for target pre-setting. Press and hold the RESET button for 2 seconds, all data values will clear to zero. UP: Press the UP button to increase walking speed. DOWN: Press the DOWN button to decrease walking speed.
-
Page 16: Error Messages
CALORIES: Displays the total cumulative calories burned during your workout. Press START/STOP button to start exercising. The (walking) belt starts moving at speed of 0.4 MPH. (You may press the UP or DOWN button on the computer console or right handlebar to increase or decrease walking speed during exercise.) You may also pre-set target calories in STOP mode before training. -
Page 17: Care, Maintenance & Troubleshooting Guide
To Fix E2 Error In order to reach the sensor, you will need to remove Motor Cover (15) by unscrewing 4 Self-Tapping Screws (M4x50mm) (8). Please do as follow: 1. Make sure the sensor is close to Front Roller’s wheel (46) but not touching it. 2. - Page 18 TROUBLESHOOTING GUIDE Problem Potential Causes Corrections Not plugged in. Put the power plug into the Treadmill will not electrical wall outlet. start. Safety tether key not Install the safety tether key. connected. House circuit breaker Reset or have an electrician tripped.
-
Page 19: Belt Adjustment And Lubrication
BELT ADJUSTMENT AND LUBRICATION Belt Adjustment: The belt is adjusted at the factory; it may come loose during transportation and/or from use. After prolong use of the treadmill, the belt will stretch out. If the belt is shifting to the left, turn on the main power switch of treadmill and let the belt run at the speed of 1-1.5 MPH. -
Page 20: Incline Adjustment
INCLINE ADJUSTMENT Incline Adjustment: Place one hand on the rear end of main frame. Lift the main frame up then adjust the Incline Adjuster to the desired position. 2 Incline Degree Options: 3 % Incline degree when Incline Adjuster at Position A. 6 % Incline degree when Incline Adjuster at Position B. -
Page 21: Warm Up
WARM UP The WARM-UP is an important part of any workout. You should begin every session by stretching your muscles to prepare your body for more strenuous exercise. This will help increasing your circulation and pulse rate, and deliver more oxygen to your muscles. HEAD ROLLS Rotate your head to the right for one count, you should feel a stretching sensation up the left side of your neck. - Page 22 INNER THIGH STRETCH Sit with the soles of your feet together and your knees pointing outward. Pull your feet as close to your groin as possible. Gently push your knees toward the floor. Hold for 15 counts. TOE TOUCHES Slowly bend forward from your waist, letting your back and shoulders relax as you stretch toward your toes.
-
Page 23: Parts Request Fax Form
PARADIGM PARTS REQUEST FAX FORM Please fax this form to (1-626-810-2166) OR YOU CAN EMAIL CUSTOMER SERVICE REQUESTS TO service@paradigmhw.com NAME: ________________________________________________________________ ADDRESS: _____________________________________________________________ CITY ______________ STATE ______________ ZIP __________________ TELEPHONE: (Day) ______________________________________________________ (Night) _____________________________________________________ (Email Address) _____________________________________________ SERIAL#: __________________________________________________ MODEL#: __________________________________________________ PURCHASE DATE: ______________________________________________________ PURCHASE FROM: ______________________________________________________...
Need help?
Do you have a question about the 1020 and is the answer not in the manual?
Questions and answers