Table of Contents
Advertisement
Advertisement
Table of Contents

Related Manuals for John Lewis JLBIOS618


Summary of Contents for John Lewis JLBIOS618
- Page 1 Steam oven JLBIOS618 User Manual...
-
Page 2: Table Of Contents
Contents Extra Time Safety information Automatic programmes Children and vulnerable people safety General Safety Assisted Cooking with Recipe Automatic Assisted Cooking with Weight Automatic Safety instructions Using the accessories Installation Electrical connection Telescopic Runners Accessories for steam cooking Steam Cooking Steam cooking in a dietary baking dish Care and cleaning Direct steam cooking... - Page 3 Pyrolysis Building In Cleaning the water tank Securing the appliance to the cabinet Cleaning the oven door Electrical installation Replacing the lamp Energy efficiency Troubleshooting Product Fiche and information according to EU What to do if... 65-66/2014 Service data Energy saving Installation Repairs - after sales service...
-
Page 4: Safety Information
Safety information Before the installation and use of the appliance, carefully read the supplied instructions. The manufacturer is not responsible if an incorrect installation and use causes injuries and damages. Always keep the instructions with the appliance for future reference. Children and vulnerable people safety This appliance can be used by children aged from 8 years and above •... - Page 5 Ensure that the appliance is switched off before replacing the lamp • to avoid the possibility of electric shock. Do not use a steam cleaner to clean the appliance. • Do not use harsh abrasive cleaners or sharp metal scrapers to clean •...
-
Page 6: Safety Instructions
Safety instructions • The shock protection of live and insulated parts Installation must be fastened in such a way that it cannot be removed without tools. Warning! Only a qualified • Connect the mains plug to the mains socket person must install this only at the end of the installation. -
Page 7: Steam Cooking
• Do not operate the appliance with wet hands Care and cleaning or when it has contact with water. • Do not apply pressure on the open door. Warning! Risk of injury, fire, • Do not use the appliance as a work surface or or damage to the appliance. -
Page 8: Internal Light
residues and construction materials, as such • Cut off the mains cable and discard it. consumers are strongly advised to: • Remove the door catch to prevent children and – provide good ventilation during and after pets to get closed in the appliance. each Pyrolytic cleaning. -
Page 9: Product Description
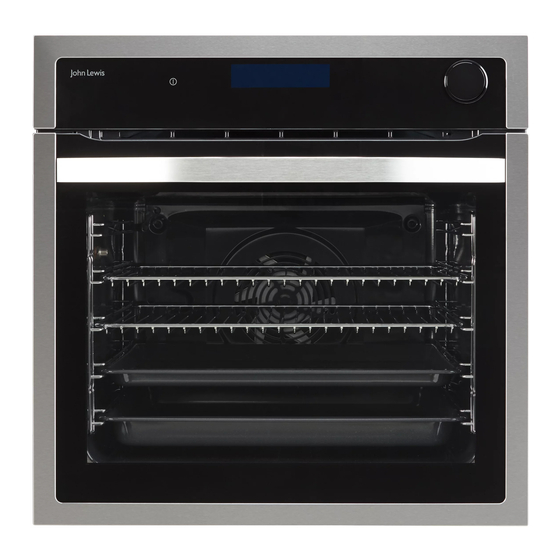
Product description General overview 1. Control panel 2. Electronic programmer 3. Water drawer 4. Heating element 5. Lamp 6. Fan 7. Shelf support, removable 8. Draining pipe 9. Water outlet valve 10. Shelf positions 11. Steam inlet Accessories • Wire shelf For cookware, cake tins, roasts. -
Page 10: Control Panel
Control panel Electronic programmer 9 10 Use the sensor fields to operate the appliance. Sensor Function Comment field ON / OFF To activate and deactivate the appliance. Heating Functions or Touch the sensor field once to choose a heating function or Assisted Cooking the menu: Assisted Cooking. -
Page 11: Display
Sensor Function Comment field Down key To move down in the menu. Time and additional To set different functions. When a heating function operates, functions touch the sensor field to set the timer or the functions: Func- tion Lock, Favourite Programme, Heat + Hold, Set + Go. Minute Minder To set the function: Minute Minder. - Page 12 Symbol Function Heat-up Indicator The display shows the temperature in the appli- ance. Fast Heat Up Indicator The function is active. It decreases the heat up time. Weight Automatic The display shows that the automatic weight system is active or that weight can be changed. Heat + Hold The function is active.
-
Page 13: Before First Use
Before first use Warning! Refer to Safety chapters. Initial Cleaning Remove all accessories and removable shelf supports from the appliance. Refer to "Care and cleaning" chapter. Clean the appliance before first use. Put the accessories and the removable shelf supports back to their initial position. First Connection When you connect the appliance to the mains or after the power cut, you have to set the... -
Page 14: Daily Use
Daily use 2. Press to select the menu option. Warning! Refer to Safety chapters. 3. Press to move to the submenu or accept the setting. At each point you can go back to Navigating the menus the main menu with 1. -
Page 15: Heating Functions
Symbol Submenu Description Display Contrast Adjusts the display contrast by degrees. Display Brightness Adjusts the display brightness by degrees. Set Language Sets the language for the display. Buzzer Volume Adjusts the volume of press-tones and signals by degrees. Key Tones Activates and deactivates the tone of the touch fields. - Page 16 Heating function Application Frozen Foods To make your convenience food like e.g. French Fries, Wedg- es, spring rolls crispy. Turbo Grilling To roast larger meat joints or poultry with bones on 1 shelf position. Also to make gratins and to brown. Fast Grilling To grill flat food in large quantities and to toast bread.
-
Page 17: Activating A Heating Function
Heating function Application Steam Regenerating To reheat already cooked food directly on a plate. 9. Empty the water drawer after the steam Activating a heating function cooking is completed. 1. Activate the appliance. Caution! The appliance is 2. Select the menu: Heating Functions. hot. -
Page 18: Emptying The Water Tank
Emptying the water tank Fast Heat Up Indicator This function decreases the heat-up time. Caution! Make sure that the appliance is cool before you To activate the function, hold for 3 seconds. The start to empty the water heat-up indicator alternates. tank. -
Page 19: Clock Functions
Clock functions Clock functions table Clock function Application Minute Minder To set a countdown (max. 2 h 30 min). This function has no effect on the operation of the appliance. to activate the function. Press to set the minutes and to start. -
Page 20: Extra Time
You can activate or deactivate the function in the menu: Basic Settings. 1. Activate the appliance. 2. Select the heating function. 3. Set the temperature above 80 °C. 4. Press again and again until the display shows: Heat + Hold. 5. -
Page 21: Automatic Programmes
Automatic programmes The automatic programme starts. Warning! Refer to Safety 6. You can change the weight at any time. Press chapters. to change the weight. 7. When the time ends, an acoustic signal sounds. Assisted Cooking with Recipe Press a sensor field to deactivate the signal. Automatic With some programmes turn over the food after 30 minutes. -
Page 22: Using The Accessories
Using the accessories Warning! Refer to Safety chapters. °C Telescopic Runners Keep the installation instructions for the telescopic runners for future use. With telescopic runners you can put in and remove the shelves more easily. Caution! Do not clean the telescopic runners in the Make sure you push back the telescopic runners dishwasher. - Page 23 Glass bowl (A) Injector for direct steam cooking (D) Lid (B) Steel grill (E) • Do not put the hot baking dish on cold / wet The injector and the injector tube surfaces. "C" is the injector tube for steam cooking, "D" is •...
-
Page 24: Steam Cooking In A Dietary Baking Dish
• Do not clean the baking dish with abrasives, scourers and powders. Make sure that you do not crush the injector tube or let it touch a heating element on the top of the oven. 4. Set the oven for the steam cooking function. Steam cooking in a dietary Direct steam cooking baking dish... - Page 25 2. Put the baking dish onto the first or second shelf position from the bottom. Make sure that you do not crush the injector tube or let it touch a heating element on the top of the oven. 3. Set the oven for the steam cooking function. When you cook food such as chicken, duck, turkey, kid or large fish, put the injector (D) directly into the empty part of the meat.
-
Page 26: Additional Functions
Additional functions Favourite Programme Press to go directly to menu: Favourite Programme. You can save your favourite settings, such as duration, temperature or heating function. They Using the Child Lock are available in the menu: Favourite Programme. You can save 20 programmes. The Child Lock prevents an accidental operation of the appliance. -
Page 27: Set + Go
When you deactivate the The Automatic switch-off does not appliance, the function also work with the functions: Light, End deactivates. Time, Duration. Set + Go Brightness of the display The function lets you set a heating function (or a There are two modes of display brightness: programme) and use it later with one press of a •... -
Page 28: Hints And Tips
Hints and tips components when you cook. This can change Warning! Refer to Safety the baking results and cause damage to the chapters. enamel. Baking cakes The temperature and baking times in the tables are guidelines only. • Do not open the oven door before 3/4 of the They depend on the recipes and set cooking time is up. -
Page 29: Baking And Roasting Table
Baking and roasting table Cakes Food Conventional Cooking True Fan Cooking Time (min) Comments Tempera- Shelf posi- Tempera- Shelf posi- ture (°C) tion ture (°C) tion Whisked rec- 3 (2 and 4) 45 - 60 In a cake ipes mould Shortbread 3 (2 and 4) 20 - 30... - Page 30 Food Conventional Cooking True Fan Cooking Time (min) Comments Tempera- Shelf posi- Tempera- Shelf posi- ture (°C) tion ture (°C) tion Biscuits / pas- 140 - 150 2 and 4 35 - 40 In a baking try stripes - tray two levels Biscuits / pas- 140 - 150...
- Page 31 Food Conventional Cooking True Fan Cooking Time (min) Comments Tempera- Shelf posi- Tempera- Shelf posi- ture (°C) tion ture (°C) tion 2 (2 and 4) 25 - 40 6 - 8 rolls in a Bread rolls baking tray 230 - 250 230 - 250 10 - 20 In a baking...
-
Page 32: Grilling
Food Conventional Cooking True Fan Cooking Time (min) Comments Tempera- Shelf posi- Tempera- Shelf posi- ture (°C) tion ture (°C) tion English roast 60 - 70 On a wire beef, medium shelf English roast 70 - 75 On a wire beef, well shelf done... -
Page 33: Turbo Grilling
Food Quantity Tempera- Time (min) Shelf posi- ture (°C) tion Pieces 1st side 2nd side Fillet steaks max. 12 - 15 12 - 14 Beef steaks max. 10 - 12 6 - 8 Sausages max. 12 - 15 10 - 12 Pork chops max. - Page 34 Pork Food Quantity (kg) Temperature Time (min) Shelf position (°C) Shoulder, neck, ham 1 - 1.5 160 - 180 90 - 120 1 or 2 joint Chop, spare rib 1 - 1.5 170 - 180 60 - 90 1 or 2 Meat loaf 0.75 - 1 160 - 170...
-
Page 35: Slow Cooking
Fish Food Quantity (kg) Temperature Time (min) Shelf position (°C) Whole fish 1 - 1.5 210 - 220 40 - 60 1 or 2 Slow Cooking Always cook without a lid when you use this function. Use this function to prepare lean, tender pieces of meat and fish. -
Page 36: Preserving
Food Quantity Defrosting Further defrosting Comments time (min) time (min) Cream 2 x 200 80 - 100 10 - 15 Cream can also be whipped when still slightly frozen in pla- ces. Gateau 1400 Preserving • Fill the jars equally and close with a clamp. •... -
Page 37: Drying
Drying it cool down for one night to complete the drying. • Cover trays with grease proof paper or baking parchment. • For a better result, stop the oven halfway through the drying time, open the door and let Vegetables Food Temperature Time (h) - Page 38 Food Temperature Time (min) Shelf posi- Comments (°C) tion 40 - 50 In a bread tin Plum cake Small cakes 150 - 160 25 - 30 3 (2 and 4) In a baking tray Biscuits 20 - 35 3 (2 and 4) In a baking tray 180 - 200 12 - 20...
-
Page 39: Cooking In The Dietary Baking Dish
Fish Food Quantity Tempera- Time (min) Shelf posi- Comments ture (°C) tion Trout 1500 25 - 35 3 - 4 fish Tuna 1200 35 - 50 4 - 6 fillets Hake 20 - 30 Cooking in the dietary baking dish Use the function: True Fan + Steam. -
Page 40: Pizza Setting
Fish Food Temperature Time (min) Shelf position (°C) Trout 25 - 30 Salmon filet 25 - 30 Side dishes Food Temperature Time (min) Shelf position (°C) Rice 35 - 40 Unpeeled potatoes, medium 50 - 60 Boiled potatoes, quartered 35 - 45 Polenta 35 - 45 Pizza Setting... -
Page 41: Bread Baking
Food Temperature (°C) Time (min) Shelf position Casserole / Gratin 15 - 25 Pasta and sauce 10 - 15 Side dishes (e.g. rice, pota- 10 - 15 toes, pasta) One-plate dishes 10 - 15 Meat 10 - 15 Vegetables 10 - 15 Bread Baking Preheat an empty oven for 10 minutes before cooking. -
Page 42: Care And Cleaning
Care and cleaning Warning! Refer to Safety chapters. Notes on cleaning • Clean the front of the appliance with a soft cloth with warm water and a cleaning agent. • To clean metal surfaces, use a usual cleaning agent. • Clean the appliance interior after each use. Fat 2. -
Page 43: Cleaning The Water Tank
Caution! Before your start the Warning! After the function is cleaning procedure, make completed, the appliance is sure that the water tank is very hot. Let it cool down. empty. Refer to "Emptying There is a risk of burns. the water tank". After the function is completed, the The pyrolytic cleaning door stays locked for the cool... -
Page 44: Cleaning The Oven Door
CALCIUM QUANTITY TABLE INDICATED FROM W.H.O. (World Health Organization) Calcium deposit Water hardness Water classifica- Run decalcifica- tion tion every (French degrees) (German de- grees) 0 - 60 mg/l 0 - 6 0 - 3 Sweet of soft 75 cycles - 2.5 months 60 - 120 mg/l 6 - 12... - Page 45 6. Close the oven door halfway to the first opening position. Then pull forward and remove the door from its seat. 4. Identify the hinge to the left side of the door. 7. Put the door on a soft cloth on a stable surface.
-
Page 46: Replacing The Lamp
90° 10. First lift carefully and then remove the glass panels one by one. Start from the top panel. Make sure that you install the middle panel of glass in the seats correctly. 11. Clean the glass panels with water and soap. Dry the glass panels carefully. - Page 47 Caution! Always hold the halogen lamp with a cloth to prevent grease residue from burning on the lamp. 1. Deactivate the appliance. 2. Remove the fuses from the fuse box or deactivate the circuit breaker. The back lamp 1. Turn the lamp glass cover counterclockwise to remove it.
-
Page 48: Troubleshooting
Troubleshooting Warning! Refer to Safety chapters. What to do if... Problem Possible cause Remedy The oven does not heat up. The oven is deactivated. Activate the oven. The oven does not heat up. The clock is not set. Set the clock. The oven does not heat up. -
Page 49: Service Data
Problem Possible cause Remedy The display shows an error code There is an electrical fault. • Deactivate the oven with the that is not in this table. house fuse or the safety switch in the fuse box and activate it again. -
Page 50: Installation
Installation Securing the appliance to the Warning! Refer to Safety cabinet chapters. Building In min. 550 min. 560 Electrical installation The manufacturer is not responsible if you do not follow the safety precautions from the Safety chapters. This appliance is supplied without a main plug min. -
Page 51: Energy Efficiency
Energy efficiency Product Fiche and information according to EU 65-66/2014 Supplier's name John Lewis Model identification JLBIOS618 Energy Efficiency Index 88.2 Energy efficiency class Energy consumption with a standard load, conventional mode 0.93 kWh/cycle Energy consumption with a standard load, fan-forced mode 0.75 kWh/cycle... - Page 52 • Eco functions - refer to "Heating Functions". Steam oven User Manual...
-
Page 53: Repairs - After Sales Service
John Lewis, Oxford Street 020 7629 7711 information contained within this instruction Peter Jones, Sloane Square 020 7730 3434 manual, the next step is to contact John Lewis technical support on: John Lewis, Brent Cross 020 8202 6535 0844 871 7771... - Page 54 John Lewis electrical appliances are also available in Waitrose Food and Home John Lewis, Stratford (Opening 2011) Canary Wharf 020 7719 0300 John Lewis at home, Swindon 01793 733180 Cheltenham 01242 241425 John Lewis, Trafford 0161 491 4040 Rushden 01933 355099...
-
Page 55: Environment Concerns
ENVIRONMENT CONCERNS marked with the symbol with the household Recycle the materials with the symbol . Put waste. Return the product to your local the packaging in applicable containers to recycle recycling facility or contact your municipal office. it. Help protect the environment and human health and to recycle waste of electrical and electronic appliances. - Page 56 867310399-B-432014 ( Subject to change without notice. )
Need help?
Do you have a question about the JLBIOS618 and is the answer not in the manual?
Questions and answers