Table of Contents
Advertisement
Advertisement
Table of Contents

Related Manuals for John Lewis JLBIOS622


Summary of Contents for John Lewis JLBIOS622
- Page 1 Oven JLBIOS622 User Manual...
-
Page 2: Table Of Contents
Contents Safety information Additional functions Children and vulnerable people safety Cooling fan General Safety Safety thermostat Safety instructions Hints and tips Installation General information Electrical connection Baking cakes Cooking meat and fish Care and cleaning Cooking times Internal light Baking and roasting table Disposal Grilling Service... -
Page 3: Safety Information
Safety information Before the installation and use of the appliance, carefully read the supplied instructions. The manufacturer is not responsible for any injuries or damages that are the result of incorrect installation or usage. Always keep the instructions in a safe and accessible location for future reference. - Page 4 elements. Children less than 8 years of age shall be kept away unless continuously supervised. Always use oven gloves to remove or put in accessories or • ovenware. Before maintenance cut the power supply. • Ensure that the appliance is switched off before replacing the lamp •...
-
Page 5: Safety Instructions
Safety instructions cable need to be replaced, this must be carried Installation out by our Authorised Service Centre. • Do not let mains cables touch or come near the Warning! Only a qualified appliance door, especially when the door is hot. person must install this •... -
Page 6: Care And Cleaning
• Be careful when you open the appliance door Care and cleaning while the appliance is in operation. Hot air can release. Warning! Risk of injury, fire, • Do not operate the appliance with wet hands or damage to the appliance. or when it has contact with water. -
Page 7: Service
• Remove the door catch to prevent children or pets from becoming trapped in the appliance. Service • To repair the appliance contact an Authorised Service Centre. • Use original spare parts only. Oven User Manual... -
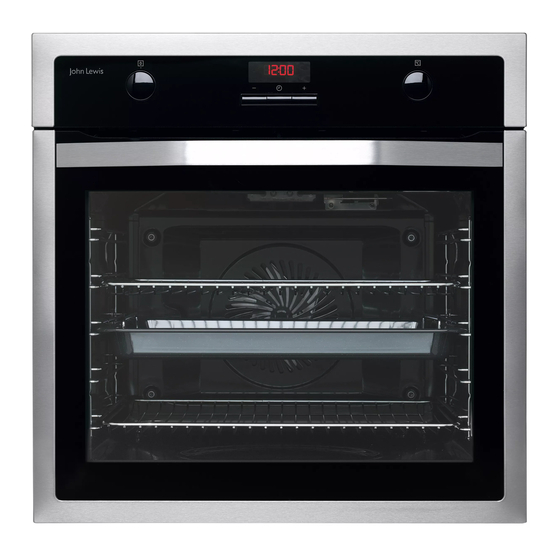
Page 8: Product Description
Product description General overview 1. Control panel 2. Knob for the oven functions 3. Power lamp / symbol 4. Electronic programmer 5. Knob for the temperature 6. Temperature indicator / symbol 7. Heating element 8. Lamp 9. Fan 10. Shelf support, removable 11. -
Page 9: Before First Use
Before first use Warning! Refer to Safety chapters. To set the Time of day refer to "Clock functions" chapter. Initial Cleaning Remove all accessories and removable shelf supports from the appliance. Refer to "Care and cleaning" chapter. Clean the appliance and the accessories before first use. -
Page 10: Daily Use
Daily use 1. Turn the knob for the oven functions to select Warning! Refer to Safety an oven function. chapters. 2. Turn the knob for the temperature to select a temperature. 3. To deactivate the appliance turn the knobs for Retractable knobs the oven functions and temperature to the off position. -
Page 11: Display
Oven function Application Turbo Grilling To roast larger meat joints or poultry with bones on one shelf posi- tion. Also to make gratins and to brown. True Fan Cooking To bake on up to three shelf positions at the same time and to dry food. -
Page 12: Clock Functions
Clock functions Clock functions table Clock function Application TIME OF DAY To set, change or check the time of day. DURATION To set how long the appliance operates. To set when the appliance deactivates. TIME DELAY To combine DURATION and END function. MINUTE MINDER To set countdown time. -
Page 13: Setting The Minute Minder
2. Press again and again until starts to flash. 3. Press to set the time for DURATION. 4. Press 5. Press to set the time for END. 6. Press to confirm. Appliance turns on automatically later on, works for the set DURATION time and stops at the set END time. -
Page 14: Using The Accessories
Using the accessories bars above and make sure that the feet point Warning! Refer to Safety down. chapters. Inserting the accessories Wire shelf: Push the shelf between the guide bars of the shelf support and make sure that the feet point down. - Page 15 2. Put the deep pan into the oven on the necessary shelf position. You can use the trivet to grill flat dishes in large quantities and to toast. 1. Put the trivet into the deep pan so that the supports of the wire shelf point down. 2.
-
Page 16: Additional Functions
Additional functions Cooling fan When the appliance operates, the cooling fan activates automatically to keep the surfaces of the appliance cool. If you deactivate the appliance, the cooling fan can continue to operate until the appliance cools down. Safety thermostat Incorrect operation of the appliance or defective components can cause dangerous overheating. -
Page 17: Hints And Tips
Hints and tips components when you cook. This can change Warning! Refer to Safety the baking results and cause damage to the chapters. enamel. Baking cakes The temperature and baking times in the tables are guidelines only. • Do not open the oven door before 3/4 of the They depend on the recipes and set cooking time is up. -
Page 18: Baking And Roasting Table
Baking and roasting table Cakes Food True Fan Cooking Time (min) Comments Temperature Shelf position (°C) Whisked recipes 3 (2 and 4) 45 - 60 In a cake mould Shortbread dough 3 (2 and 4) 20 - 30 In a cake mould Buttermilk cheese- 60 - 80 In a 26 cm cake... - Page 19 Food True Fan Cooking Time (min) Comments Temperature Shelf position (°C) Meringues- two lev- 2 and 4 80 - 100 In a baking tray 12 - 20 In a baking tray Buns Eclairs - one level 25 - 35 In a baking tray Eclairs - two levels 2 and 4 35 - 45...
- Page 20 Flans Food True Fan Cooking Time (min) Comments Temperature Shelf position (°C) Pasta flan 40 - 50 In a mould Vegetable flan 45 - 60 In a mould 50 - 60 In a mould Quiches 180 - 190 25 - 40 In a mould Lasagne 180 - 190...
-
Page 21: Grilling
Food True Fan Cooking Time (min) Comments Temperature Shelf position (°C) Hare 150 - 200 Cut in pieces Pheasant 90 - 120 Whole Fish Food True Fan Cooking Time (min) Comments Temperature Shelf position (°C) Trout / Sea bream 40 - 55 3 - 4 fish Tuna fish / Salmon 35 - 60... -
Page 22: Turbo Grilling
Food Quantity Tempera- Time (min) Shelf posi- ture (°C) tion Pieces 1st side 2nd side Toast 4 - 6 max. 2 - 4 2 - 3 Turbo Grilling Beef Food Quantity Temperature Time (min) Shelf position (°C) Roast beef or fillet, per cm of thickness 190 - 200 5 - 6 1 or 2... -
Page 23: Defrost
Lamb Food Quantity (kg) Temperature Time (min) Shelf position (°C) Leg of lamb, roast 1 - 1.5 150 - 170 100 - 120 1 or 2 lamb Saddle of lamb 1 - 1.5 160 - 180 40 - 60 1 or 2 Poultry Food Quantity (kg) -
Page 24: Drying - True Fan Cooking
Food Quantity Defrosting Further defrosting Comments time (min) time (min) Cream 2 x 200 80 - 100 10 - 15 Cream can also be whipped when still slightly frozen in pla- ces. Gateau 1400 Drying - True Fan Cooking it cool down for one night to complete the drying. -
Page 25: Care And Cleaning
Care and cleaning • To clean the door gasket, refer to the general Warning! Refer to Safety information about cleaning. chapters. Removing the shelf supports Notes on cleaning and removing the catalytic panels • Clean the front of the appliance with a soft cloth with warm water and a cleaning agent. -
Page 26: Catalytic Cleaning
Catalytic cleaning Caution! Do not use the appliance without the glass Caution! Do not clean the panels. catalytic surface with oven sprays, abrasive cleaning 1. Open the door fully and hold the two door hinges. agents, soap or other cleaning agents. -
Page 27: Replacing The Lamp
When the cleaning is completed, install the glass panels and the oven door. Do the above steps in the opposite sequence. Make sure that you put the glass panels (A and B) back in the correct sequence. The first panel (A) has a decorative frame. - Page 28 Warning! Danger of electrocution! Disconnect the fuse before you replace the lamp. The lamp and the lamp glass cover can be hot. Caution! Always hold the halogen lamp with a cloth to prevent grease residue from burning on the lamp. 1.
-
Page 29: Troubleshooting
Troubleshooting Warning! Refer to Safety chapters. What to do if... Problem Possible cause Remedy The oven does not heat up. The oven is deactivated. Activate the oven. The oven does not heat up. The clock is not set. Set the clock. The oven does not heat up. -
Page 30: Installation
Installation Securing the appliance to the Warning! Refer to Safety cabinet chapters. Building In min. 550 min. 560 Electrical installation The manufacturer is not responsible if you do not follow the safety precautions from the Safety chapters. This appliance is supplied without a main plug min. -
Page 31: Energy Efficiency
Energy efficiency Product Fiche and information according to EU 65-66/2014 Supplier's name John Lewis Model identification JLBIOS622 Energy Efficiency Index 103.5 Energy efficiency class Energy consumption with a standard load, fan-forced mode 0.88 kWh/cycle Number of cavities Heat source Electricity... -
Page 32: Repairs - After Sales Service
John Lewis, Aberdeen 01224 625000 information contained within this instruction John Lewis, Ashford 01233 811010 manual, the next step is to contact John Lewis technical support on: John Lewis, Bluewater 01322 624123 0330 1230106... - Page 33 John Lewis, Nottingham 0115 941 8282 John Lewis, Trafford 0161 491 4040 John Lewis, Oxford Street 020 7629 7711 John Lewis at home, Turnbridge Wells 01892 506830 John Lewis, Peterborough 01733 344644 John Lewis, Watford 01923 244266 John Lewis at home, Poole 01202 756020...
-
Page 34: Environmental Concerns
ENVIRONMENTAL CONCERNS marked with the symbol with the household Recycle the materials with the symbol . Put waste. Return the product to your local the packaging in applicable containers to recycle recycling facility or contact your municipal office. it. Help protect the environment and human health and to recycle waste of electrical and electronic appliances. - Page 35 Oven User Manual...
- Page 36 867339407-A-372016 ( Subject to change without notice. )
Need help?
Do you have a question about the JLBIOS622 and is the answer not in the manual?
Questions and answers