Table of Contents
Advertisement
Advertisement
Table of Contents

Related Manuals for Yeastar Technology N824


Summary of Contents for Yeastar Technology N824
- Page 1 Version: 42.13.0.27...
- Page 2 Declaration of Conformity Hereby, Yeastar Information Technology Co., Ltd.declares that Yeastar N824 is in conformity with the essential requirements and other relevant provisions of the CE, FCC. Warranty The information in this document is subject to change without notice.
-
Page 3: Table Of Contents
N824 User Manual Contents N824 Overview ......................1 Introduction ........................... 1 Feature Highlights ......................... 1 N824 Front Panel ........................2 N824 Rear Panel ........................3 Installation....................... 4 N824 Packing List ......................... 4 Specifications and Operating Environment ................4 Placement Instructions ......................5 Connect Your N824 ....................... - Page 4 Conference ......................56 Configure a Conference Room ................... 56 Join a Conference Room ....................56 Manage the Conference ..................... 57 Managing Voice on N824 ..................58 System Prompt ........................58 Custom Prompt ........................61 Music on Hold ........................62 Voicemail ....................... 64 Voicemail Settings ......................
- Page 5 N824 User Manual Share Recordings ....................... 79 PBX Basic Settings ....................82 General Preferences ......................82 Business Hours ........................83 Business Days ........................ 84 Holidays .......................... 85 SIP Settings......................87 General ..........................87 NAT ............................. 87 Codecs ..........................88 Status and Call Reports..................89 Extension Status .........................
-
Page 6: N824 Overview
Introduction Yeastar N824 is a fully-fledged PBX that delivers advanced communications features of a large system to small office. Yeastar N824 maximizes cost-effectiveness with 8 CO lines, 24 analog extensions, 8 SIP extensions, 4 SIP trunks, and the ability to handle calls with your mobile phone. -
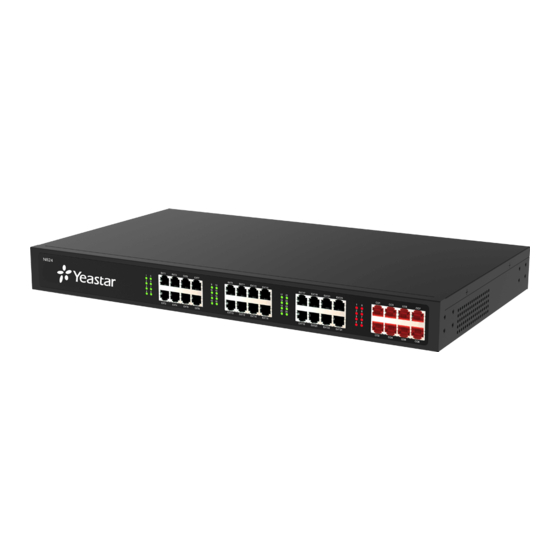
Page 7: N824 Front Panel
Detect the new firmware from cloud server and upgrade automatically. Learn more about N824 here: http://www.yeastar.com/Products/Smart-Analog-PBX-N824 N824 Front Panel Figure 1-1 N824 Front Panel Table 1-1 N824 Front Panel - LED Description LED Status Description Solid Green The port is idle. -
Page 8: N824 Rear Panel
N824 User Manual N824 Rear Panel Figure 1-2 N824 Rear Panel Table 1-3 N824 Rear Panels–Port Description Port Description RJ21 CO Ports For connection of CO lines with an RJ21 to RJ11 cable. For connection of analog phones/fax machines with an RJ21 to RJ21 FXS Ports RJ11 cable. -
Page 9: Installation
N824 User Manual Installation Before getting started with N824, you need to know how to install the device properly. This chapter gives detailed installation instructions. N824 Packing List Specifications and Operating Environment Placement Instructions Connect Your N824... -
Page 10: Placement Instructions
Connection of Ethernet Ports N824 provides one 10/100M adaptive RJ45 Ethernet LAN port. Connect one end of a network cable to the LAN port of the N824, and the other end to any port of company’s LAN switch/router. Connection of FXO Ports N824 supports 8 FXO ports. - Page 11 N824 User Manual Please switch off the power before plugging or unplugging the cables. Connection Diagram Figure 2-1 N824 Front Panel Connection Diagram Figure 2-2 N824 Rear Panel Connection Diagram...
-
Page 12: Application Overview
N824 User Manual Application Overview With N824, in addition to use the functions as traditional PBX, you could expand the communication flexibly with 4 SIP trunks, 8 SIP extensions. You will enjoy the N824 as its easy management that you had never experienced on a traditional PBX. -
Page 13: Getting Started
N824 User Manual Getting Started In this chapter, we guide you through the basic steps to start with a new N824: Accessing Web GUI Web Configuration Panel User Management Making and Receiving Calls Accessing Web GUI N824 provides web-based configuration interface for administrator and account user. -
Page 14: Web Configuration Panel
Default Password: pass+ Extension number (i.e. pass601) Enable Extension User To log in N824 Web GUI using Extension User, you need to enable User Web Interface option for the extension. Login N824, go to PBX→Extensions and Trunks→Extensions, choose an extension and click edit, check the User Web Interface options on Account tab. - Page 15 N824 User Manual Figure 4-2 Enable Extension User Set the privileges of CDR check and Auto Recording check on Management Settings tab. Figure 4-3 Management Settings...
-
Page 16: Making And Receiving Calls
―8.‖and strip 1 digit, users should dial digit 8 before the number. Inbound calls When the user calls the trunk number of the CO lines, N824 would route the call to the analog phone which is connected to the port EXT1. -
Page 17: System Settings
Date and Time Password Settings Network Settings After successfully logging in the N824 Web GUI for the first time with the factory IP address, users could go System→Network Preferences→LAN Settings to configure the network for N824. Figure 5-1 LAN Settings... -
Page 18: Security Center
Security Center Users are strongly recommended to configure firewall and other security options on N824 to prevent the attack fraud and the system failure or calls loss. Security Center All the security settings including Firewall, Service, Port Settings in N824 are displayed in Security Center. -
Page 19: Firewall Rules
N824 User Manual Figure 5-3 Security Center—Service Port In ―Port‖ tab, you can check SIP port and HTTP port. You can also enter the relevant page by clicking the button in ―Setting‖ column. Figure 5-4 Security Center—Port Firewall Rules Firewalls are used to prevent unauthorized Internet users from accessing private networks connected to the Internet, especially intranets. - Page 20 N824 User Manual 1) General Settings Table 5-2 Description of Firewall General Settings Items Description Enable the firewall to protect the device. Enable Firewall Enable this item to drop net ping from remote hosts. Disable Ping When you enable ―Drop All‖ feature, the system will drop all packets or connection from other hosts if there are no other rules defined.
-
Page 21: Ip Blacklist
N824 User Manual Drop: Drop the access from remote hosts. Ignore: Ignore the access. Note: the MAC address will be changed when it’s a remote device, so it will not be working to filter using MAC for remote devices. 3) Auto Defense... -
Page 22: Ami Settings
Asterisk. There are two main types of messages on the Asterisk Manager Interface: manager events and manager actions. The 3 party software can work with N824 using AMI interface. It is disabled by default. If necessary, you can enable it. -
Page 23: Alert Settings
N824 User Manual Figure 5-10 AMI Settings Username & password After enabling AMI, you can use this username and password to log in N824 AMI. IP Restriction You can set which IP is allowed to log in N824 AMI interface. -
Page 24: Password Settings
N824 User Manual Example: ―500;9911‖, if the extension has configured Follow Me Settings, the call would go to the forwarded number directly. The attempts to dial a phone number when there is no answer. Attempts The interval between each attempt to dial the phone number. -
Page 25: Date And Time
3. Save the changes, the user will be automatically logged out. 4. Log in N824 using the new password. Date and Time Please adjust the time of N824 (including the time zone) consistent with your local time. Go to System→System Preferences→Date and Time to configure the system date and time. -
Page 26: Extensions
N824 User Manual Extensions This chapter explains how to create and configure extensions on N824. It supports SIP extensions and FXS extensions, go to PBX→ Extensions and Trunks → Extensions page to configure the extensions. FXS Extensions VoIP Extensions FXS Extensions There are 24 FXS extensions on N824. - Page 27 FXS Extension First Mobile Client Extension First The route is used to connect Linkus and the PBX, so N824 will Connecting Route always use this route to dial Linkus. Password for Linkus The password to register mobile extensions and log in the user and Web Web interface.
- Page 28 Volume Settings Txgain The Volume sent out by the FXS extension. Normally, you choose the ―default‖ option except for using N824 Caller ID Type in Japan, in which case you should choose ―Japan‖. There are 4 spy modes available: ...
- Page 29 N824 User Manual You can hear the call, and can talk with the monitored extension Barge spy You can hear the call and talk with them both Example: If 500 want to monitor extension 501, we need to enable the ―allow being spied‖...
- Page 30 N824 User Manual Figure 6-3 CDR Permissions for FXS Extensions Auto Recordings View Permission: the permission to check auto recordings. Delete Permission: the permission to delete recording files. Download Permission: the permission to download auto recording files.
- Page 31 N824 User Manual Figure 6-5 Timer Settings for FXS Extensions Batch Edit FXS Extensions Users could batch edit the selected FXS extensions’ number, timer settings and other settings. Modify the Number of the Selected Extensions Click to modify the selected extensions.
-
Page 32: Voip Extensions
VoIP Extensions Users could extend VoIP extension by clicking to add on VoIP extension. N824 supports up to 8 VoIP extensions. VoIP Extension Configuration The extension settings are divided into Account, General Settings, Advanced Settings, Management Settings and Timer Settings. - Page 33 SIP Extension First Mobile Client Extension First The route is used to connect Linkus and the PBX, so N824 will Connecting Route always use this route to dial Linkus. Password for Linkus The password to register mobile extensions and log in the user and Web web interface.
- Page 34 If this option is checked, the ―When busy‖ follow me Call Waiting options will not be available. The call waiting function of IP phone has higher priority than N824’s call waiting function. Don’t Disturb. When DND is enabled for an extension, the extension will not be available.
- Page 35 N824 User Manual device whose IP address is 192.168.5.100 is allowed to register this extension number. E.g."192.168.5.0/255.255.255.0" means only the device whose IP address is 192.168.5.XXX is allowed to register this extension number. There are 4 spy modes available: ...
- Page 36 N824 User Manual Figure 6-9 CDR Permissions Auto Recordings View Permission: the permission to check auto recordings. Delete Permission: the permission to delete recording files. Download Permission: the permission to download auto recording files. Allowed Extension for Recordings: choose which extensions’ auto recording files are allowed to be checked/deleted/downloaded by the user.
- Page 37 N824 User Manual Figure 6-11 Timer Settings...
-
Page 38: Trunks
N824 User Manual Trunks External calls can be made through CO lines or via VoIP trunks on N824. In this chapter, we give a simplified guide to the N824 users in setting up trunks. We describe CO lines configurations and how to configure N824 to work with VoIP Providers. - Page 39 N824 will accept any regular sound-silence pattern that Busy Pattern repeats <Busy Count> times as a busy signal. If you specify Busy Pattern, then N824 will further check the length of the tone and silence, which will further reduce the chance of a false positive disconnection.
- Page 40 N824 User Manual detection. When the "ring duration" or the "ring interval duration" detected on N824 is larger than the standard parameters or custom parameters, the call is detected as ANSWERED. *Standard parameters: when you configure the "Tone Zone PBX→Basic Settings→General...
- Page 41 N824 User Manual v23-Japan pure: suitable in Japan DTMF: suitable in Denmark, Sweden, and Holland 5) DNIS Settings DNIS (Dialed Number Identification Service) is a telephone service that identifies for the receiver of a call the number that the caller dialed.
-
Page 42: Voip Trunks
N824 User Manual VoIP Trunks Yeastar N824 provides 2 types of VoIP trunks: VoIP trunk: registration based VoIP trunk. A VoIP trunk requires N412 to register with the provider using an authentication name and password. Service Provider: IP based VoIP trunk. A Service Provider VoIP trunk does not require N412 to register with the provider. - Page 43 N824 User Manual the caller ID set in the ―VOIP trunk‖ page. Please note that not all the service providers support this feature. Contact your service provider for more information. Realm is a string to be displayed to users so they know which Realm username and password to use.
- Page 44 N824 User Manual Figure 7-1 VoIP Trunk DOD Settings Add bulk DOD for bulk extensions in ascending sequence with the ―Begin DOD‖ you fill in. For example, if the Associated Extensions are 100, 101, 102, 103, 104, 105 with ―Begin DOD‖ as 5500100, the corresponding DOD will be 5500100, 5500101, 5500102, 5500103, 5500104, and 5500105.
- Page 45 N824 User Manual Figure 7-2 DOD Settings Table 7-10 Service Provider Trunk-DOD Settings DOD Settings Global direct outward dialing number. Global DOD Direct Outward Dialing Number. The extension make call out via BRI Trunk will display the Associated Extension associated DOD.
-
Page 46: Call Control
Note: N824 compares the number with the pattern that you have defined in your route 1. If matches, it will initiate the call using the selected trunks. If it does not, it will compare the number with the pattern you have defined with route 2 and so on. - Page 47 Enable or disable T.38 FAX on this outbound route. Only for SIP T.38 Support Trunk. Round Robin with memory. If it is enabled, N824 will remember Rrmemory Hunt which trunk was used last time, and then use the next available trunk to call out.
-
Page 48: Seize A Line
N824 User Manual also be prepended to provide a slight delay before dialing. 3) Member Extensions Move the extensions could call through this outbound route to "Selected" Box. Figure 8-1 Outbound Route-Member Extensions 4) Member Trunks Move the trunks that would be used on this outbound route to "Selected" Box. -
Page 49: Incoming Rules
N824 User Manual Incoming Rules When a call comes into N824 from the outside, N824 needs to know where to direct it. It can be directed to an extension, a ring group, a queue or a digital Receptionist (IVR) etc. - Page 50 N824 User Manual Figure 8-5 Inbound Route-Business Days Office Hours Select one defined business days office hours. Office Hours Destination Configure where to route the incoming calls during office hours. Non-office Hours Destination Configure where to route the incoming calls during non-office hours.
-
Page 51: Pin Settings
N824 User Manual 5) Fax Detection Enable or disable the "Fax Detection" functionality on this route. Figure 8-7 Inbound Route-Fax Detection No Detect No attempts are made to auto-determine the call type. All calls are sent to the defined destination. -
Page 52: Blacklist
You can choose to block the number for inbound, outbound or both. If the type is ―inbound‖, then this number can’t be called. If the type is ―outbound‖, then the extensions in N824 can’t call this number. Figure 8-9 Number Blacklist... -
Page 53: Ivr
Auto Attendant. You can create one or more IVR (Auto Attendant) on N824 to achieve it. When calls are routed to an IVR, N824 will play a recording prompting them what options the callers can enter such as ―Welcome to XX, press 1 for Sales and press 2 for Technical Support‖. - Page 54 N824 User Manual Key Press Events Key Press Event Select the destination for each key pressing: digits 0-9, ―#‖, ―*‖, Timeout and Invalid. When the callers press the corresponding key, the call will be routed to: Extension Voicemail ...
-
Page 55: Ring Group
N824 User Manual Ring Group A ring group helps you to ring a group of extensions in a variety of ring strategies. For example, you could define all the technical support guys' extensions in a ring group and ring the support guys one by one. - Page 56 N824 User Manual 2) Ring Group Member Specify the extensions to be part of this ring group. Move the desired ring group members to the "Selected" Box. Figure 10-1 Ring Group Member 3) Destination if No Answer When all members on this group fail to answer the call, system will handle the call according to the selected destination.
-
Page 57: Queue
Once the caller called in N824 and reached the queue, he/she will hear hold music and prompts, while the queue sends out the call to the logged-in and available agents. A number of configuration options on the queue help you to control how the incoming calls are routed to the agents and what callers hear and do while waiting in the line. - Page 58 Caller Position Announcement Whether to announce position of call in the queue or not. Announce Position Enabling this option causes N824 to announce the hold time to Announce Hold the caller periodically based on the frequency timer. The hold Time time will not be announced if the time is less than 1 minute no matter this option is set to yes or no.
- Page 59 N824 User Manual line. Figure 11-3 Periodic Announcements 5) Events Once the events settings are configured, the callers are able to press the key to enter the destination you set. Usually, a prompt should be set on Periodic Announcementsto guide the callers to press the key.
- Page 60 N824 User Manual logged in. No: callers will remain in the queue without any agent. This option controls whether callers can join a call queue that has no agents. Yes: callers can join a call queue with no agents or only...
-
Page 61: Conference
Users on N824 could dial the conference extension to join the conference room. If a password is set for the conference, users would be prompted to enter a PIN. How to join a N824 conference room, if I am calling from outside (i.e. calling from my mobile phone)? -
Page 62: Manage The Conference
N824 User Manual be selected in the inbound route and destination should be set to a conference room. When the outside users dial in the trunk number, the call will be routed to the conference room. Manage the Conference During the conference call, the users could manage the conference by pressing * key on their phones to access IVR menu for conference room. -
Page 63: Managing Voice On N824
N824 User Manual Managing Voice on N824 In this chapter, we introduce how to manage voice on N824, including the following sections: System Prompt Custom Prompt Music on Hold System Prompt N824 ships with a US English prompt set by default. The system supports multiple languages. - Page 64 Spanish Mexico Swedish Thai Turkish TFTP Method If N824 cannot access the internet, please update the system prompts via TFTP. Step1. Download the system prompt to your local PC. Step2. Enable TFTP Server (For example, tftpd on Windows)
- Page 65 2) Configure tftpd32 For the option ―Current Directory‖, click ―Browse‖ button, choose the system prompt file of N824, such as D:\fr.tar.gz Figure 13-3 Configure Tftpd32 Step3. Update via TFTP 1) TFTP Server: fill in IP address of tftpd32 server, such as 192.168.6.42.
-
Page 66: Custom Prompt
N824 User Manual Custom Prompt The default voice prompts and announcements in N824 are suitable for almost every situation. However, you may want to use your own voice prompt to make it more meaningful and suitable for your case. In this case, you need to upload a custom prompt to N824 and apply it to the place you want to change. -
Page 67: Music On Hold
Music on hold (MOH) is the business practice of playing recorded music to fill the silence that would be heard by callers who have been placed on hold. There are 3 default MOH files built in N824, you can also upload the one you want to N824. Upload a Music on Hold Prompt Upload a custom prompt via PBX→Audio Settings→Music on Hold Prompts . - Page 68 N824 User Manual clicked the button , the selected extension will ring. Pick up the phone and listen to the music. Figure 13-8 Play a Music on Hold Prompt...
-
Page 69: Voicemail
N824 User Manual Voicemail In this chapter, we introduce how to manage voicemail system on N824, including the following sections: Voicemail Settings Voicemail to Email How to Check Voicemail? How to Change Voicemail Greetings? Voicemail Settings Users could configure voicemail settings, including general voicemail settings and SMTP settings (which is used for ―Voicemail to Email‖) via PBX →Basic... -
Page 70: Voicemail To Email
SSL/TLS must be selected if you use Gmail or Exchange Server. Voicemail to Email Voicemail is enabled for each extension on N824 by default. If there is no answer for an extension, the call will be forwarded to the extension's voicemail. Email notification of voicemails are supported on N824, simply enable this feature on the desired extension edit page. -
Page 71: How To Check Voicemail
Settings") has been properly configured before using this feature. How to Check Voicemail? There are multiple ways to check voicemail on N824. You can check the voicemail by pressing voicemail feature code on your phone or log in N824 by Extension account to check voicemails. -
Page 72: How To Change Voicemail Greetings
Figure 14-3 Enable User Interface User Name: Extension Number Password: Web Password for the extension Figure 14-4 Login N824 via Extension Account After login, you can check voicemail on "Voicemail" page. 3) Check Voicemail via Email If you have enabled "Voicemail to Email" feature, you can check voicemail on your email. - Page 73 N824 User Manual You can customize your own voicemail greetings. Dial *2 to enter voicemail on your handset. Enter the access password. Press 0 for Mailbox Options. You will then be given the choice what type of message you want to record.
-
Page 74: Business Calling Features
Feature Code Feature Codes are used to enable and disable certain features available in N824. N824 local users can dial feature codes on their phones to use a particular feature. The default feature codes can be checked and changed on PBX→Basic Settings→Feature Codes page. - Page 75 N824 User Manual Default Code: *04. Users may pick up a specific extension’s incoming call by Extension Pickup dialing *04+extension number on their phone. Default Code: *5. Intercom Default Code: *90. Normal Spy In this mode, you can only listen to the extension being spied.
-
Page 76: Call Transfer
Call Pickup is a feature that allows one to answer someone else's call. The feature is accessed by pressing call pickup feature code on N824. If a colleague's phone set is ringing, one can answer that call by picking up one's own set and then using the call... -
Page 77: Group Call Pickup
N824 User Manual pick-up feature, instead of walking to the colleague’s desk. Group Call Pickup The default call pickup for Group Call Pickup is *4. It allows you to pick up a call from a ringing phone which is in the same group as you. -
Page 78: Intercom
500, you need to dial *5500, then the extension 500 will be automatically picked up. N824 allows extension to monitor/barge in other conversation. Once this feature is enabled, the extension has the ability to monitor/barge in other calls using the feature codes for each spy mode. -
Page 79: Call Parking
Sometimes you may just need to call someone quickly without having to look up his/her phone number. You can by simply define a shortcut number. Speed Dial feature is available on N824 that allowing you to place a call by pressing a reduced number of keys. - Page 80 To make a speed dial, e.g. you want to call 15880246258, simply dial *991. The *99 tells N824 that you want to use the Speed Dial and the 1 is the Speed Dial Code for destination number 15880246258. (Check the Speed Dial Setting for 15880246258...
-
Page 81: Auto Recording
N824 User Manual Auto Recording This chapter explains how to configure auto recording on N824 and how to manage the recording files. Auto Recording Settings SD Card Management Store Recordings to Network Disk Share Recordings Auto Recording Settings N824 supports auto recording for an established call. -
Page 82: Sd Card Management
SD Card Management Insert a SD Card to N824, then manage and check the SD check status under System→ Storage Management→ SD Card Management. You can format or clean up the SD card on this page. - Page 83 Figure 16-3 Share the File Before network disk can be properly configured, an SMB share folder accessible from N824 must be set up on a Windows based machine. Once that has been set up, please follow the steps below. 1. Choose a window-based computer that is always in service 2.
-
Page 84: Share Recordings
4. Input the Net-Disk information in ―Connect to Network Disk‖ tab. Figure 16-4 Connect to Network Disk Table 16-2 Network Disk Settings Network Disk Settings Shows if the Net-Disk is successfully mounted to N824. Running Status Yes: Enable Network Disk Enable ... - Page 85 The user name to access the files. User Name The password for the user name. Password Check Shared Recordings Open a file folder on your PC, and type N824 IP address (\\IP Address ) to check the shared recordings. Example: \\192.168.5.149...
- Page 86 N824 User Manual For WIN 7/Win8 Users Please modify the registry before checking the shared file. Start->Run->regedit 2. Modify the value of HKEY_LOCAL_MACHINE\SYSTEM\CurrentControlSet\Control\Lsa\ LmCompatibilityLevelto LmCompatibilityLevel doesn’t exit, create a Dword value LmCompatibilityLevel= 1.
-
Page 87: Pbx Basic Settings
N824 User Manual PBX Basic Settings This chapter explains PBX basic settings, which can be applied globally to N824. The basic settings can be configured under PBX→Basic Settings. General Preferences Business Hours General Preferences 1) General Settings Table 17-1 General Preferences-General General Settings The absolute maximum amount of time permitted for a call. -
Page 88: Business Hours
Select the ring tone type for inbound calls. Inbound Ring Type 2) Web Server N824 supports web server responds to HTTP and HTTPS. By default, users could access the Web GUI via HTTP (default port: 80). You can also access web via HTTPS if HTTPS is enabled. -
Page 89: Business Days
N824 User Manual Hours and Holiday) in which incoming or outgoing calls are checked. The rules specify a time range, by the hour and/or date. Business Hours typically are associated with time conditions, which match destinations for calls based on the time. Outbound routes can also be assigned an Office Hours, making that route only available during times defined in an Office Hours. -
Page 90: Holidays
N824 User Manual Figure 17-4 Business Days Holidays You can set up the holidays here. If a time period is configured as both Holidays and office hours, it will be treated as Holidays. - Page 91 N824 User Manual Figure 17-5 Holidays...
-
Page 92: Sip Settings
N824 User Manual SIP Settings SIP settings can be configured on PBX→Advanced Settings→SIP Settings page. It is wise to leave the default setting as provided on this page. However, for a few fields, you need to change them to suit your situation. -
Page 93: Codecs
Codecs A codec is a compression or decompression algorithm that used in the transmission of voice packets over a network or the Internet. N824 supports G711 a-law, u-law, GSM, SPEEX, iLBC, G722, G726, G729A,G729B and G729AB, Note: If you would like to use G.729, please enter your license. -
Page 94: Status And Call Reports
N824 User Manual Status and Call Reports Users could check the system status on Status→System Status, where Extension Status, Trunk Status, Network Status and System Info can be checked. CDR and Call Recordings can be checked under Status→ Reports. ... -
Page 95: Trunk Status
N824 User Manual Extension is idle Extension is ringing Extension is busy Extension is on hold Display message status of the extension. Format: New/Old Voicemail Example: 1/3 Description: There are 1 new voice message, and 3 old messages. -
Page 96: Network Status
N824 User Manual Down: the CO line is broken. Trunk Name Display the trunk name. PSTN trunk status: Idle: the port is idle. (FXO) Status Busy: the port is in use. Disconnected: there is no line connected to the port. -
Page 97: Call Logs
N824 User Manual Call Logs The call Log captures all call details, including call time, caller number, callee number, call type, call duration,etc. An administrator can search and filter call data by filter the call logs by call date, caller/callee, trunk, duration, billing duration, status, communication type. - Page 98 N824 User Manual Figure 19-6 Record Logs Search The administrator can search and filter record data by specifying the call date, caller/callee, trunk, duration, and communication type. Play Click to play the recording file. Download Click to download the chosen recording file.
-
Page 99: System Maintenance
When update the firmware, please don’t turn off the power. Or the system will get damaged. If you are trying to upgrade through HTTP, please make sure that your N824 is able to visit external network, or it cannot access Yeastar website to get the firmware file, causing the upgrade fail. -
Page 100: Upgrade Through Http
N824 User Manual Never Check Updates: never check updates from the cloud server. Check for Updates and let me choose whether to update: Set when to do check the updates automatically from the cloud server. Click behind the new firmware version to view what is new for the new firmware. -
Page 101: Upgrade Through Tftp
N824 User Manual Upgrade through TFTP Step1.Download firmware file from Yeastar website. Step2. Create a tftp Server (For example, tftpd on Windows). 1) Install tftpd32 software on computer . http://tftpd32.jounin.net/tftpd32_download.html Download link: 2) Configure tftpd32. On option ―Current Directory‖, click ―Browse‖ button, choose the firmware file (BIN file) upgraded patch. -
Page 102: Backup And Restore
1. The backup file only covers the configurations but not the CDR, voicemail and call recordings. 2. When you have updated the firmware version, it’s not recommended to restore using old package. 3. Backup from an earlier version cannot be restored on N824 of a later version. Create a New Backup Click to create a new backup. -
Page 103: System Logs
N824 User Manual Figure 20-7 Reset and Reboot System Logs The N824 supports to monitor important system logs, including hardware log, web log and debug log. Go to Status→Reports→ System Logs to check the system logs. Figure 20-8 System Logs ... -
Page 104: Packet Tool
Packet Tool This feature is used to capture packets for technician. Integrate packet capture tool ―Wireshark‖ in N824. The Packet Tool can be found under Status→Reports→ Packet Tool. Users could specify the destination IP address and port to get the packets.
Need help?
Do you have a question about the N824 and is the answer not in the manual?
Questions and answers