Table of Contents
Advertisement
Quick Links
Advertisement
Table of Contents

Related Manuals for Yeastar Technology MyPBX


Summary of Contents for Yeastar Technology MyPBX
-
Page 1: User Manual
User Manual Version 1.0.1.3 Yeastar Technology Co., Ltd... -
Page 2: Table Of Contents
2.1 C ................7 ONNECTION RAWING 2.2 C ..............8 ONNECTING THERNET 2.3 C ................8 ONNECTING OWER 3. MANAGE MYPBX ................9 3.1 M ..................9 ANAGER OG IN 3.2 S ................10 TATUS ONITOR 3.2.1 Line Status................10 3.3 B ....................11 ASIC 3.3.1 Extension.................. - Page 3 ..................44 EPORTS 3.7.1 Call Logs................... 44 3.7.2 System Info ................45 4. ACCESS MRI ..................47 5. USE MYPBX ..................53 5.1 M ................53 AKE OUTBOUND CALL 5.1.1 Make call via PSTN trunk ............. 54 5.1.2 Make call via VoIP trunk .............. 55 5.2 I...
-
Page 4: Introduction
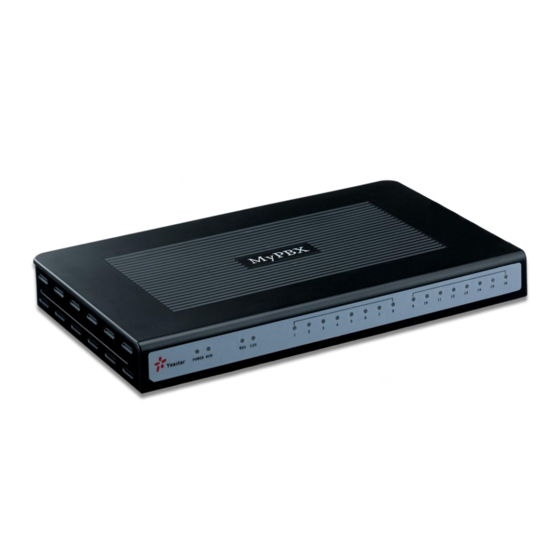
MyPBX — Embedded Hybrid IP-PBX for Small Businesses MyPBX is a standalone embedded hybrid PBX for small businesses and remote branch offices of larger organizations (2-100 users per site). MyPBX also offers a hybrid solution (a combination of VoIP applications using legacy telecom equipment) alternative for enterprises who are not yet ready to migrate to a complete VoIP solution. - Page 5 MyPBX User Manual ①② ③④ ⑤ Figure 1-1 MyPBX Front Panel Picture Identifying Green Light:Indicates the power connection is normal. ① Green Light:Indicates the server system is in working order ② Green Light:Indicates the internet interface0 is in use ③...
-
Page 6: Package Contents
MyPBX User Manual 1.3 Package Contents ▲ 1 unit of MyPBX server ▲ 1 power supply ▲ 1 Internet line ▲ Few telephone cables [RJ-11] Note: If any of the above items is damaged or missing, contact your reseller. www.yeastar.com... -
Page 7: System Set Up
MyPBX User Manual System set up 2.1 Connection Drawing PSTN PSTN 8 FXO Lines IP Provider Router 8 FXS Lines Soft Phone IP Phone Normal Phone www.yeastar.com Page 7... -
Page 8: Connecting Ethernet Line
1. Push the switch on ‘OFF’ on power outlet. 2. Connect one head of the accessory power cable with the power input port on MyPBX’s back panel, and plug the other head of power cable into 220V power socket. 3. Push the switch on ‘ON’ on power outlet. -
Page 9: Manage Mypbx
Double click icon to open the IE browser, and input the IP address of MyPBX server. If user is first time to configure MyPBX by web, please use the MyPBX default IP address to log in: http://192.168.5.150 The default Username is... -
Page 10: Status Monitor
MyPBX User Manual 3.2 Status Monitor 3.2.1 Line Status Figure 3-2 MyPBX Status Description: Extensions: : extension is unregistered : extension is idle 3) : extension is ringing 4) : extension is busy in a call Trunks: SIP Trunk: www.yeastar.com... -
Page 11: Basic
MyPBX User Manual 1) Unregistered — trunk registration failed. 2) Registered — succeed registration, trunk is ready to use. 3) Request Send — Registering. 4)Waiting — Waiting for Authentication. FXO Trunk: FXO: please refer to the LED identifying of front panel. - Page 12 MyPBX before it will recognize a second event. If a second event occurs in less time than defined for Flash, then MyPBX will ignore the event. The default value of Flash is 1000 ms, and it can be configured in 1ms increments.
-
Page 13: Sip Extension
MyPBX User Manual Figure 3-4 3.3.1.2 SIP Extension SIP extension is an SIP Account allows your IP Phone or Soft IP Phone register to the MyPBX. 1. Add SIP Extension Go to Extensions SIP Extensions Create New Extension 1) General ·Extension... - Page 14 3) VoIP Setting ·NAT Try this setting when MyPBX is on a public IP, communicating with devices hidden behind a NAT device (broadband router). If you have one-way audio problems, you usually have problems with your NAT configuration or your firewall's support of SIP+RTP ports.
- Page 15 MyPBX User Manual Figure 3-5 2. Bulk add SIP Extensions Go to Extensions SIP Extensions Bulk add Extensions 1)Choose the extension quantity you want to create 2)The initiative extension number when starting Figure 3-6 3. Edit SIP Extension Click ‘Edit’...
-
Page 16: Trunk
MyPBX User Manual 3.3.2 Trunk Trunk have two types: PSTN Trunk(FXO) and SIP Trunk. Figure 3-7 3.3.2.1 PSTN(FXO) Trunk 1. Edit PSTN(FXO) Trunk On PSTN Trunk administration page, click ‘Edit’ on selected trunk and modify information on prompt window: 1)General ·Trunk Name... -
Page 17: Sip Trunk
Pattern specified, MyPBX will accept any regular sound-silence pattern that repeats <Busy Count> times as a busy signal. If you specify Busy Pattern, then MyPBX will further check the length of the sound (tone) and silence, which will further reduce the chance of a false positive. -
Page 18: Outbound Routes
MyPBX User Manual Service provider’s hostname or IP address. 5060: standard port number used for SIP protocol, Don’t change it if not required. .Domain VoIP provider’s server domain name. ·Username Username of SIP account. Used for SIP trunk registration. .Authorization name Used for SIP authentication. -
Page 19: Create Outbound Route
MyPBX User Manual Figure 3-10 3.3.3.1. Create Outbound Route Click ‘Add Outboud Route’ and fill in the responding information on prompt window. 1)General ·Route Name Name of this Outbound Route. Ex: 'Local' or 'LongDistance' etc. ·Number Prefix Calls to Numbers starting with ·Strip... -
Page 20: Delete Outbuond Route
MyPBX User Manual Defines the Extension that calls, matching the specified pattern, will be placed through. ·Make Outbound Calls on Trunk Defines the Trunk that calls, matching the specified pattern, will be placed through. Figure 3-11 3.3.3.2. Delete Outbuond Route Click ‘Delete’... -
Page 21: Inbound Call Control
3.4 Inbound Call Control 3.4.1 IVR When there’s an incoming call aims at Auto Attendant, MyPBX will play the IVR and guide the caller to the required extensions (such as ‘Welcome to XX company, for sales press 1, for technical support press 2, for operation press 0, or dial ext. - Page 22 MyPBX User Manual Wait for the user to enter a new extension for a specified number of seconds. ·Allow Dialing Other Extensions Check this option if the user want to dial extensions directly. 2)Key Press Events Allow key press events will cause the system to listen for DTMF input from the caller and define the actions that occur when a user presses the corresponding digit.
-
Page 23: Delete Ivr
MyPBX User Manual 3.4.1.2 Delete IVR Select the item you’d like to remove and click ‘Delete’ key. 3.4.2 IVR Prompts Admin can record the IVR by himself according to his own requires: 1)Click ‘Record New IVR Prompt’ 2) Input File Name on prompt windows and choose an extension for recording such as 500. -
Page 24: Ring Groups
2. Ring in order: Take turns ringing each available Extension ·Time Out / Seconds to ring each member 1) Seconds to ring each member How many seconds an Extension's phone will ring before MyPBX tries to ring the next Extension. 2) Time out How many seconds the Extension's phone will ring. -
Page 25: Delete Ring Group
MyPBX User Manual ·Ring Group Members This selection shows all Users. Checking a User here makes them a member of the current Group. ·Destination If No Answer When all people on this group are failed to answer the call, system will handle in this way. -
Page 26: Create Inbound Route
MyPBX User Manual Figure 3-18 3.4.4.1 Create Inbound Route Click ‘New Inbound Route’ to enter to the page. 1)General ·Route Name Name of this Inbound Route. Ex: 'pstncallin' etc. ·Pattern Define the Caller ID Number to be matched on incoming calls. Leave this field blank to match any or no CID info. -
Page 27: Delete Routes
MyPBX User Manual the Inbound Route. 3)During Office Hours You can choose the options for answer incoming calls during office hours. 4)Outside Office Hours You can choose the options for answer incoming calls during offwork time. Figure 3-19 3.4.4.2 Delete Routes Select the item you’d like to remove and click ‘Delete’... -
Page 28: Other Settings
MyPBX User Manual 3.5 Other Settings 3.5.1 Conferencing Clik ‘New Conference Room’ to enter into page ·Extension This is the number dialed to reach this Conference Room. ·Pin Code set an optional pin code, Ex: "somepincode" that must be entered in order to access the Conference Room. -
Page 29: Feature Codes
MyPBX User Manual Figure 3-21 3.5.3 Feature Codes 1. General ·One Touch Record User may do call recording by calling *1 on his phone during a call. (*1 is default setting) ·Extension For Checking Voice Mail User may checking his voice mail by calling *2 on his phone (*2 is default setting) ·Blind Transfer... - Page 30 MyPBX User Manual 3. Call Forward Preferences ·Reset to defaults User may reset the call forward default value by calling *70 on his phone (*70 is default setting) Note: When reset to defaults, the call forward default value will be: Always forward: Disable.
-
Page 31: Paging And Intercom
MyPBX User Manual default setting) ·Enable do not disturb User may enable do not disturb by calling *75 on his phone (*75 is default setting) ·Disable do not disturb User may disable do not disturb by calling *075 on his phone (*075 is default... - Page 32 MyPBX User Manual Figure 3-23 Click ‘New Paging Group’ to enter into page. ·Number for this Paging group This option defines the numbered extension that may be dialed to reach this paging Group. ·Duplex Paging is typically one way for announcements only. Checking this will make the paging duplex, allowing all phones in the paging group to be able to talk and be heard by all.
-
Page 33: System Settings
MyPBX User Manual Figure 3-24 3.6 System Settings 3.6.1 Options 1) General ·Ring Timeout Number of seconds to ring a device before sending to user's Voicemail Box. .MAX call duration The absolute maximum amount of time permitted for a call. A setting of 0 disables the timeout. -
Page 34: Music On Hold Prompts
MyPBX User Manual The default value is 630 to 639 ·Conference Extensions The default value is 640 to 659 ·IVR Extensions The default value is 660 to 689 Figure 3-25 3.6.2 Music on Hold Prompts Admin can upload on hold music as follow: 1) Click ‘Upload Music On hold Prompt’. -
Page 35: Sip Settings
·Extern IP Address that we're going to put in outbound SIP messages if we're behind a NAT ·Extern Host Alternatively you can specify an external host, and MyPBX will perform DNS queries periodically. Not recommended for production environments! external instead. - Page 36 = Assume NAT, don't send rport ·Allow RTP Reinvite MyPBX by default tries to redirect the RTP media stream (audio) to go directly from the caller to the callee. Some devices do not support this (especially if one of them is behind a NAT).
-
Page 37: Voicemail Settings
MyPBX User Manual Figure 3-27 3.6.4 Voicemail Settings General Voicemail Settings ·Maximum messages per folder This select box sets the maximum number of messages that a user may have in any of their folders. ·Max message time This select box sets the maximum duration of a voicemail message in minutes. -
Page 38: Network Setting
The E-mail Address that MyPBX will use to send voicemail to users’ email. ·Password The E-mail password. ·SMTP Server The IP address or hostname of an SMTP server that the MyPBX may connect to, in order to send e-mail notifications of your voicemails; i.e. mail.yourcompany.com Figure 3-28 3.6.5 Network Setting... -
Page 39: Password Settings
MyPBX User Manual ·DHCP If this option is set, MyPBX will use DHCP to get an available IP address from your local network. ·Hostname Set the host name for MyPBX Appliance. ·IP Address Set the IP Address for MyPBX Appliance. -
Page 40: Date And Time
The default password is ‘password’, we need change that first. Enter new password and click update, then the system will prompt you re-login using your new password. Figure 3-30 3.6.7 Date and Time Set the date and time for MyPBX Appliance. www.yeastar.com Page 40... -
Page 41: Backup And Restore
MyPBX User Manual Figure 3-31 3.6.8 Backup and Restore Backup / Restore MyPBX’s Configuration. www.yeastar.com Page 41... -
Page 42: Reset And Reboot
MyPBX User Manual Figure 3-32 3.6.9 Reset and Reboot ·Reboot Appliance Warning: Rebooting the appliance will terminate all active calls. ·Reset to Factory Defaults Warning: By resetting your System to factory defaults, you will lose all your configurations! You can't cut off the electricity during restarting till the RUN state light blink, otherwise it will cause the failure performance. -
Page 43: Firmware Update
MyPBX User Manual Figure 3-33 3.6.10 Firmware Update With new version, we can upgrade the firmware in GUI through a TFTP Server or HTTP URL. Enter your TFTP Server ip address and firmware name, just click ‘start’, you will update your firmware easily. -
Page 44: Reports
MyPBX User Manual Figure 3-34 3.7 Reports 3.7.1 Call Logs Call Log captures all call details: calling time, caller number, callee number, call type, call duration and so on. For administrator’s convenience, admin can search information by calling time, call type and call duration and export them into CSV file. -
Page 45: System Info
MyPBX User Manual Figure 3-35 3.7.2 System Info General: Information about Hardware version, Firmware version and Uptime. Network: Information about Hostname, MAC, IP Address, Mask, Gateway and DNS. Disk Usage: Disk usage information. Memory Usage: Memory usage information. www.yeastar.com Page 45... - Page 46 MyPBX User Manual Figure 3-36 www.yeastar.com Page 46...
-
Page 47: Access Mri
MyPBX User Manual Access MRI MRI(MyPBX Recording Interface: Check Voice Mail).Users may access MRI by using extension number as username and voicemail secret as password. 4.1 Allow users to access MRI Extension’s option hasmanager must be set to yes before it can access to MRI. - Page 48 MyPBX User Manual 4.2 User login Users can use extension number as MRI username, voicemail password as MRI password to access MRI. Figure 4-2 www.yeastar.com Page 48...
- Page 49 MyPBX User Manual 4.3 Voicemail Users can check, delete, move and download voicemail here Figure 4-3 www.yeastar.com Page 49...
- Page 50 MyPBX User Manual 4.4 Record Users can play, delete and download record files here Figure 4-4 www.yeastar.com Page 50...
- Page 51 MyPBX User Manual 4.5 settings Voicemail password: new voicemail box password. Enter again to confirm: confirm new voicemail box password. Send Voice Mail To Email Address: Configure the email address voicemails will be sent to. Figure 4-5 4.6 Follow me Set the mode of call forwarding when there’s incoming call on this extension.
- Page 52 MyPBX User Manual Figure 4-6 www.yeastar.com Page 52...
-
Page 53: Use Mypbx
To make an outbound call, we need to add trunk/service provider first. There are two types of service provider: ·Analog Ports: FXO ports of MyPBX, connect to local PSTN ·SIP Trunk: Connect to remote SIP VOIP service provider server What are FXO and FXS? FXS (Foreign eXchange Station) is an interface wihich drives a telephone or FAX machine. -
Page 54: Make Call Via Pstn Trunk
MyPBX User Manual telephones to your PBX, and FXO interfaces allow you to connect your PBX to real analog phone lines. 5.1.1 Make call via PSTN trunk For our demo, we want all inside extensions dial ‘9’ through the Analog Trunk callout. -
Page 55: Make Call Via Voip Trunk
MyPBX User Manual 5.1.2 Make call via VoIP trunk For our demo, we want all inside extensions dial ‘0’ throw the VoIP service provider Trunk callout. 1. Add VoIP service provider Before we do add this, please make sure you have a VoIP service provider account. - Page 56 MyPBX User Manual Figure 5-3 So far when we have added two calling rules, any call start with 9 will be route to PSTN, and call starts with 0 will be route to voipprovider. www.yeastar.com Page 56...
-
Page 57: Incoming Call
MyPBX User Manual 5.2 Incoming call 5.2.1 Route incoming route to IVR For our demo, we want all incoming call route to the IVR, press ‘0’ route the call to extension 500, press ‘1’ route the call to extension 501. - Page 58 MyPBX User Manual 2. Add Inbound Routes As we can see from the Inbound Route of ‘allin’, all incoming call will be sent to the IVR. Figure 5-5 www.yeastar.com Page 58...
-
Page 59: Appendix A Faq
Step 2: Hold press down for 5 seconds and Watch the lights on the front of the MyPBX. When the status light begins to blink, let go of the reset button. Step 3: When the status light stops blinking the MyPBX will be back to its factory settings. - Page 60 MyPBX User Manual on your computer and then open Internet Explorer and type 192.168.5.150 in the address bar. Step 5: Login to the device with the Username ‘admin’ and the Password ‘password’, in order to reconfigure the device. <Finish> www.yeastar.com...
Need help?
Do you have a question about the MyPBX and is the answer not in the manual?
Questions and answers