Table of Contents
Advertisement
Quick Links
The contents of this guide are
printed on 70% recycled paper.
CANON INC.
30-2, Shimomaruko 3-chome, Ohta-ku, Tokyo 146-8501, Japan
CANON U.S.A., INC.
One Canon Plaza, Lake Success, NY 11042, U.S.A.
CANON CANADA INC.
6390 Dixie Road Mississauga, Ontario L5T 1P7, Canada
CANON EUROPA N.V.
Bovenkerkerweg 59-61 P.O. Box 2262, 1180 EG Amstelveen, The Netherlands
CANON FRANCE S.A.
17,quai du President Paul Doumer 92414 Courbevoie Cedex, France
CANON (U.K.) LTD.
Woodhatch, Reigate, Surrey, RH2 8BF, United Kingdom
CANON DEUTSCHLAND GmbH
Europark Fichtenhain A10, 47807 Krefeld, Germany
CANON LATIN AMERICA, INC.
703 Waterford Way, Suite 400, Miami, Florida 33126, U.S.A.
CANON AUSTRALIA PTY. LTD
1 Thomas Holt Drive, North Ryde, Sydney, N.S.W. 2113, Australia
CANON SINGAPORE PTE. LTD.
79 Anson Road #09-01/06, Singapore 079906
CANON HONGKONG CO., LTD
9/F, The Hong Kong Club Building, 3A Chater Road, Central, Hong Kong
HT1-2205-000-V.1.0
122002NF
CANON INC. 2002
PRINTED IN CHINA
• IPeur_299
PANTONE
Black
299
User'
User
User
User'
'
'
Please read this guide before operating this equipment.
After you finish reading this guide, store it in a safe place for future reference.
ENG
Advertisement
Table of Contents

Related Manuals for Canon Laser Class 2050P


Summary of Contents for Canon Laser Class 2050P
- Page 1 70% recycled paper. CANON INC. 30-2, Shimomaruko 3-chome, Ohta-ku, Tokyo 146-8501, Japan CANON U.S.A., INC. One Canon Plaza, Lake Success, NY 11042, U.S.A. CANON CANADA INC. 6390 Dixie Road Mississauga, Ontario L5T 1P7, Canada CANON EUROPA N.V. Bovenkerkerweg 59-61 P.O. Box 2262, 1180 EG Amstelveen, The Netherlands CANON FRANCE S.A.
- Page 2 Page ii Friday, December 13, 2002 5:07 PM Copyright Copyright © 2002 by Canon, Inc. All rights reserved. No part of this publication may be reproduced, transmitted, transcribed, stored in a retrieval system, or translated into any language or computer language in...
- Page 3 Page iii Friday, December 13, 2002 5:07 PM Trademarks ® ™ Canon is a registered trademark, and UHQ is a trademork of Canon Inc. ® is a registered trademark. ® ® Microsoft and Windows are registered trademarks of Microsoft Corporation.
- Page 4 l-1100.book Page iv Friday, December 13, 2002 5:07 PM LEGAL LIMITATION ON USAGE OF YOUR PRODUCT AND THE USE OF IMAGES Using your product to scan, print or otherwise reproduce certain documents, and the use of such images as scanned, printed or otherwise reproduced by your product, may be prohibited by law and may result in criminal and/or civil liability.
- Page 5 2500 (Touch Tone) or 500 (Rotary/Pulse Dial) telephones. A dedicated extension off a PBX unit without “Call Waiting” can be used with the LASER CLASS 2050P. Key telephone systems are not recommended because they send non-standard signals to individual telephones for ringing and special codes, which may cause a fax error.
-
Page 6: Connection Of The Equipment
Users should contact Canon Authorized Service Facilities for servicing of equipment. Information regarding Authorized Service Facility locations can be obtained by calling the Canon Customer Care Center. (1-800-423- 2366) Preface... -
Page 7: Rights Of The Telephone Company
• Increase the separation between the equipment and receiver. • Connect the equipment into an outlet on a circuit different from that to which the receiver is connected. • Consult your local authorized Canon Facsimile Dealer or an experienced radio/TV technician for help. Preface... - Page 8 If such changes or modifications should be made, you could be required to stop operation of the equipment. Canon U.S.A. Inc. One Canon Plaza, Lake Success, NY 11042, U.S.A. TEL No. 1-800-OK-CANON The Telephone Consumer Protection Act of 1991 makes it unlawful for...
-
Page 9: Users In Canada
2500 (touch tone) or 500 (rotary/pulse dial) telephones]. A dedicated extension off a PBX unit without “Camp On” signals is also permissible with your LASER CLASS 2050P. Key telephone systems are not recommended because they send non-standard signals to individual telephones for ringing and special codes, which may cause a fax error. - Page 10 l-1100.book Page x Friday, December 13, 2002 5:07 PM NOTICE This equipment meets the applicable Industry Canada Terminal Equipment Technical Specifications. This is confirmed by the registration number. The abbreviation, IC, before the registration number signifies that registration was performed based on a Declaration of Conformity indicating that Industry Canada technical specifications were met.
- Page 11 La terminaison sur une interface peut consister en n’importe quelle combinaison d’appareils, à la condition seulement que la somme des Nombres d’équivalence Ringer de tous les appareils ne soit pas supérieure à 5. CANON CANADA INC. 1-800-263-1121 24 HOURS A DAY, SEVEN DAYS A WEEK Preface...
-
Page 12: Safety Information
l-1100.book Page xii Friday, December 13, 2002 5:07 PM Safety Information Laser Safety The machine complies with 21 CFR Chapter 1 Subchapter J as a Class 1 laser product under the U.S. Department of Health and Human Services (DHHS) Radiation Performance Standard according to the Radiation Control for Health and Safety Act of 1968. -
Page 13: Table Of Contents
l-1100.book Page xiii Friday, December 13, 2002 5:07 PM Contents Chapter 1 Introducing the Machine ................1-1 Welcome ......................1-2 The Main Features of the Machine ...............1-3 Plain Paper Fax Features ................1-3 Printer Features..................1-4 Copier Features..................1-5 Telephone Features ...................1-5 Using the Machine With the Printer Driver ..........1-6 System Requirements ................1-6 Using Your Documentation................1-8 How to Use This User’s Guide ..............1-8... - Page 14 l-1100.book Page xiv Friday, December 13, 2002 5:07 PM Front View ....................2-23 Inside View ....................2-24 Rear View ....................2-25 The Operation Panel ................2-26 Special Function Buttons (One-Touch Speed Dialing Panel Open)........2-29 The Toner Cartridge ..................2-31 Handling and Storing Cartridges ............2-31 Installing/Replacing the Toner Cartridge ...........2-33 Loading Recording Paper ................2-39 Loading Paper in the Cassette ............2-41 Loading Paper in the Multi-Purpose Tray ........2-44...
- Page 15 l-1100.book Page xv Friday, December 13, 2002 5:07 PM Loading Envelopes in the Multi-Purpose Tray ........4-13 Changing a Paper Size from Letter- to A4-Size Paper in the Paper Cassette ............4-16 Changing the Paper Size Setting..............4-19 The Paper Cassette ..................4-19 The Multi-Purpose Tray .................4-20 Chapter 5 Speed Dialing ....................5-1 Speed Dialing Methods ..................5-2...
- Page 16 l-1100.book Page xvi Friday, December 13, 2002 5:07 PM Canceling Sending ..................6-23 Removing the Document From the Automatic Document Feeder (ADF) .....................6-24 Redialing ......................6-26 Manual Redialing ..................6-26 Automatic Redialing With Memory Sending ........6-26 Canceling Automatic Redialing............6-27 Setting Up Automatic Redialing .............6-28 Sequential Broadcasting................6-31 Sending a Document to More Than One Destination......6-31 Sending a Document Using Group Dialing.........6-33...
- Page 17 l-1100.book Page xvii Friday, December 13, 2002 5:07 PM Chapter 8 Using the Memory Features .................8-1 Documents Stored in Memory ..............8-2 Printing a List of Documents Stored in Memory........8-2 Printing Documents Stored in Memory..........8-3 Method 1 ....................8-3 Method 2 ....................8-4 Sending Documents Stored in Memory..........8-6 Deleting a Document Stored in Memory ..........8-8 Method 1 ....................8-8...
- Page 18 l-1100.book Page xviii Friday, December 13, 2002 5:07 PM Memory Clear Report...................12-8 Speed Dialing Lists ..................12-9 One-Touch Speed Dial List ..............12-11 Coded Speed Dial List .................12-12 Group Dial List ..................12-13 User’s Data List ...................12-14 Doc Memory List..................12-16 Chapter 13 Frequently Asked Questions ..............13-1 If You Cannot Solve the Problem ...............13-2 Problems Index....................13-3 Paper Jams ....................13-5...
- Page 19 l-1100.book Page xix Friday, December 13, 2002 5:07 PM Chapter 15 The Menu System ..................15-1 Understanding the Menu System...............15-2 Accessing the USER SETTINGS Menu ............15-3 Accessing the REPORT SETTINGS Menu..........15-5 Accessing the TX SETTINGS Menu ............15-7 Accessing the RX SETTINGS Menu ............15-9 Accessing the PRINTER SETTINGS Menu ..........15-11 Accessing the POLLING BOX Menu ............15-13 Accessing the SYSTEM SETTINGS Menu ..........15-15...
- Page 20 l-1100.book Page xx Friday, December 13, 2002 5:07 PM Contents HT1-2205-000-V.1.0 LSL User’s Guide...
- Page 21 l-1100.book Page 1 Friday, December 13, 2002 5:07 PM Chapter 1 Introducing the Machine This chapter introduces you to the main features of the machine. It also explains how to get the most out of the documentation that comes with the machine, and gives important safety instructions.
-
Page 22: Welcome
Page 2 Friday, December 13, 2002 5:07 PM Welcome Thank you for purchasing the new Canon LASER CLASS 2050P. We are sure that your machine will meet your printing and copying needs easily and conveniently, as well as your fax and telephone requirements. -
Page 23: Chapter 1 Introducing The Machine
fit. Plain Paper Fax Features ™ Image Processing System The machine uses Canon’s Ultra High Quality Image Processing System to provide enhanced definition in faxed photos. Error Correction Mode (ECM) Using the machine’s Error Correction Mode (ECM) reduces transmission errors when sending faxes to or receiving faxes from other fax machines that also have ECM capability. -
Page 24: Printer Features
l-1100.book Page 4 Friday, December 13, 2002 5:07 PM Transmission speed The machine uses G3 data encoding methods that increase transmission speed to approximately 3 seconds* per page. Memory sending/receiving The machine can store up to 256* pages (either received or to be sent) in its built-in memory, and can receive documents while printing. -
Page 25: Copier Features
l-1100.book Page 5 Friday, December 13, 2002 5:07 PM Copier Features Up to 99 copies The machine can make up to 99 copies of a document at a time, at a rate of up to 6 copies per minute. Resolution The machine scans documents at 400 ×... -
Page 26: Using The Machine With The Printer Driver
l-1100.book Page 6 Friday, December 13, 2002 5:07 PM Using the Machine With the Printer Driver The printer driver that is included with your machine allows you to use the machine’s printing function directly from your PC. ❏ Use the machine as the default printer for Windows applications For more information on using the printer driver with your machine, refer to the Printer Driver Software User’s Guide also stored on the CD- ROM. - Page 27 l-1100.book Page 7 Friday, December 13, 2002 5:07 PM ❏ Memory • Windows 98/Me: 32 megabytes (MB) of RAM, 64 MB of RAM or more is recommended. • Windows 2000/XP: 64 MB of RAM, 128 MB of RAM or more is recommended.
-
Page 28: Using Your Documentation
❏ Quick Start Guide — This guide provides basic information on how to set up and operate the machine. ❏ LASER CLASS 2050P User’s Guide (this guide) — This guide provides detailed information on how to set up, operate, maintain, and troubleshoot your machine. -
Page 29: Type Conventions Used In This User's Guide
❏ Refer to Appendix for the machine technical specifications. If you still have questions about how to use your machine, contact your local authorized Canon Facsimile Dealer. They will be happy to answer your questions. Type Conventions Used in This User’s Guide This user’s guide follows the conventions below to emphasize certain... -
Page 30: Customer Support
Your machine is designed with the latest technology to provide trouble- free operation. The warranty information that is included with your machine describes Canon’s limited warranty for its products. Be sure to read this warranty information. If you have a problem with the machine’s operation, try to solve it by referring to the information in Chapter 13, “Frequently Asked... -
Page 31: Safety Instructions
❏ Do not use the machine near water. If you spill liquid on or into the machine, disconnect the power cord immediately, and contact your local authorized Canon Facsimile Dealer. ❏ The back of the machine includes slots and openings for ventilation. - Page 32 ❏ Do not allow small objects (such as pins, paper clips, or staples) to fall into the machine. If something does fall into it, disconnect the power cord immediately and call your local authorized Canon Facsimile Dealer. ❏ Do not connect the power cord into an uninterruptible power supply (UPS).
- Page 33 Page 13 Friday, December 13, 2002 5:07 PM Disconnect the power cord and contact your local authorized Canon Facsimile Dealer in any of these situations: ❏ If the power cord or plug is damaged or frayed. ❏ If liquid spills into the machine, or if it is otherwise exposed to rain or liquids.
- Page 34 l-1100.book Page 14 Friday, December 13, 2002 5:07 PM 1-14 Introducing the Machine Chapter 1 HT1-2205-000-V.1.0 LSL User’s Guide...
- Page 35 l-1100.book Page 1 Friday, December 13, 2002 5:07 PM Chapter 2 Setting Up Your Machine This chapter tells you how to unpack, assemble, and connect your machine, install the FX3 cartridge, and load paper— everything you need to know to get your machine ready to use. ❏...
- Page 36 l-1100.book Page 2 Friday, December 13, 2002 5:07 PM Special Function Buttons (One-Touch Speed Dialing Panel Open) ......2-29 ❏ The Toner Cartridge ................2-31 • Handling and Storing Cartridges ..........2-31 • Installing/Replacing the Toner Cartridge ........2-33 ❏ Loading Recording Paper ..............2-39 Loading Paper in the Cassette..........
-
Page 37: Chapter 2 Setting Up Your Machine
l-1100.book Page 3 Friday, December 13, 2002 5:07 PM Choosing a Location for Your Machine Before unpacking your machine, follow these guidelines to choose an appropriate location for it. Please review the information provided in “Safety Instructions,” on page 1-11 to 1-13, to make sure you are installing your machine for safe use. ❏... -
Page 38: Dimensions
(361 mm) BOTTOM VIEW 30" (773 mm) 19" (483 mm) If you need help installing your machine or have any questions about it, contact your local authorized Canon Facsimile Dealer. Setting Up Your Machine Chapter 2 HT1-2205-000-V.1.0 LSL User’s Guide... -
Page 39: Unpacking Your Machine
FX3 CARTRIDGE WARRANTY PAPER LOADING WARNING LABEL SOFTWARE USER'S CD-ROM DESTINATION LABELS If any of the above items are damaged or missing, notify your local authorized Canon Facsimile Dealer immediately. Chapter 2 Setting Up Your Machine HT1-2205-000-V.1.0 LSL User’s Guide... -
Page 40: Lifting The Machine
l-1100.book Page 6 Friday, December 13, 2002 5:07 PM ❏ Important! Save your sales receipt for proof of purchase in case your machine requires warranty service. ❏ In addition to the items shipped with your machine, if you wish to use the machine as a printer, you will need a USB cable, 16.4 feet (5 meters) in length or shorter. -
Page 41: Removing Shipping Materials
l-1100.book Page 7 Friday, December 13, 2002 5:07 PM Removing Shipping Materials In order to protect your machine during shipping, it has been packed with protective material that you must remove before using the machine. Follow these steps: The actual shipping materials may differ in shape, quantity, and position from the ones shown below. - Page 42 l-1100.book Page 8 Friday, December 13, 2002 5:07 PM 3. Open the front cover by lifting the right side release latch of the machine. ❏ Lift the cover forward to its open position. 4. Remove all pieces of shipping tape from the inside of the machine. Setting Up Your Machine Chapter 2 HT1-2205-000-V.1.0 LSL User’s Guide...
-
Page 43: Replaceable Parts
Replaceable Parts The only component of the machine that needs regular service or replacement is the FX3 cartridge. Although Canon manufactures many types of toner cartridges, the FX3 cartridge is the only one designed to be used with your machine. The FX3 cartridge can be purchased at any Canon Facsimile Dealer. -
Page 44: Assembling The Machine
l-1100.book Page 10 Friday, December 13, 2002 5:07 PM Assembling the Machine Use the following instructions to assemble your machine’s main unit and components. To see how the machine will look fully assembled, see “Getting Acquainted with Your Machine,” on page 2-23. Attaching Components Attaching the Paper Loading Warning Label The paper loading warning label is included with your machine. -
Page 45: Attaching The Extension Tray
l-1100.book Page 11 Friday, December 13, 2002 5:07 PM Attaching the Extension Tray To attach the extension tray, insert the tab into the corresponding slot as shown in the illustration below. Pull the inside extension tray towards you. Make sure the tab is inserted securely into the slot. Straightening the Multi-Purpose Tray To straighten the paper rest, hold its center tab and pull it up until it stops. -
Page 46: Attaching The Support Trays
l-1100.book Page 12 Friday, December 13, 2002 5:07 PM Attaching the Support Trays There are two identical support trays. One of the support trays holds paper as it comes out of the face-down delivery slot. To install this support, insert the tabs into the corresponding slots above the face-down delivery slot, making sure that the smaller tab is on the left. -
Page 47: Attaching The Handset To Your Machine
l-1100.book Page 13 Friday, December 13, 2002 5:07 PM Attaching the Handset to Your Machine To attach the handset to your machine, follow these steps: 1. Remove the screws from the plugs and insert the plugs into the holes on the handset cradle. 2-13 Chapter 2 Setting Up Your Machine... - Page 48 l-1100.book Page 14 Friday, December 13, 2002 5:07 PM 2. Insert the plugs with the handset cradle in the holes on the machine. If you have difficulty inserting the plugs, turn the machine so that the left side is facing you and the right side is placed against a wall. This will allow you to insert the plugs without the machine moving.
- Page 49 l-1100.book Page 15 Friday, December 13, 2002 5:07 PM 4. Connect the handset cord to the input jack marked at the left side of the machine. When carrying the machine, do not lift it by the handset cradle as it may break.
-
Page 50: Adjusting The Ringer And Speaker Volume Switches
l-1100.book Page 16 Friday, December 13, 2002 5:07 PM Adjusting the Ringer and Speaker Volume Switches The ringer volume switch allows you to select the ring volume of the handset for incoming calls, and the speaker volume allows you to select the speaker volume of the handset. -
Page 51: Making Connections
Making Connections ❏ Be sure to connect any external device before using your machine. ❏ Canon cannot guarantee that all answering machines will be compatible with your machine, due to varying specifications. ❏ If you have connected an external device to your machine, be sure to set the correct receive mode. -
Page 52: Connecting An Extension Telephone Or Answering Machine
l-1100.book Page 18 Friday, December 13, 2002 5:07 PM Connecting an Extension Telephone or Answering Machine If you have an external device to your machine, connect the end of the extension telephone or answering machine cord to the jack marked 2-18 Setting Up Your Machine Chapter 2... -
Page 53: Connecting The Power Cord
l-1100.book Page 19 Friday, December 13, 2002 5:07 PM Connecting the Power Cord Follow these guidelines when connecting your machine to a power source: ❏ The machine is intended for use in the U.S. and Canada only and requires 120-127 V AC. Do not use it outside the U.S. or Canada. ❏... - Page 54 l-1100.book Page 20 Friday, December 13, 2002 5:07 PM Connect the power cord as follows: 1. Connect the supplied power cord to the power connector on the back of the machine. 2. Connect the other end of the power cord to the outlet. The machine has no power switch, so its power is on as long as the power cord is connected to the machine and to an outlet.
- Page 55 l-1100.book Page 21 Friday, December 13, 2002 5:07 PM If the toner cartridge has not been installed yet, the message CHECK COVER/CART alternates with the standby mode display. In this case, install the toner cartridge. (See “Installing/Replacing the Toner Cartridge,” on page 2-33.) C H E C K C O V E R / C A R T 1 2 / 3 1 / 2 0 0 2 T U E 1 0 : 0 0 F a x T e l...
-
Page 56: Connecting The Machine To Your Pc
l-1100.book Page 22 Friday, December 13, 2002 5:07 PM Connecting the Machine to Your PC Your machine has a USB port that allows you to connect it to a PC. To do this, you need to purchase a USB cable. For best results, use a cable that is 16.4 feet (5 meters) in length or shorter. -
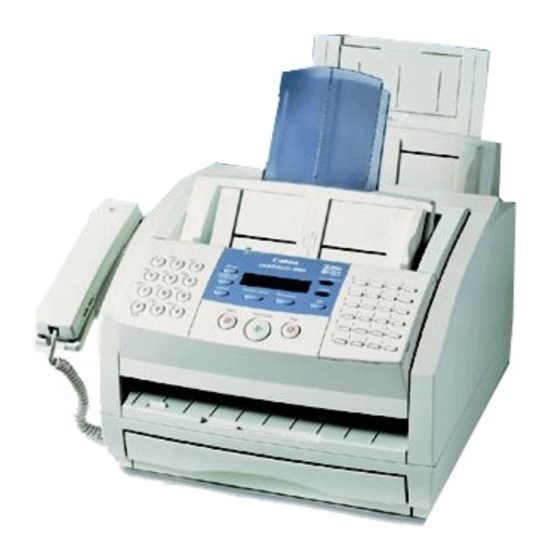
Page 57: Getting Acquainted With Your Machine
l-1100.book Page 23 Friday, December 13, 2002 5:07 PM Getting Acquainted with Your Machine Before using your machine, look over the diagrams on these pages to become familiar with the machine’s components. Front View PAPER REST SUPPORT TRAYS MULTI-PURPOSE TRAY PAPER GUIDE AUTOMATIC RELEASE... -
Page 58: Inside View
l-1100.book Page 24 Friday, December 13, 2002 5:07 PM Inside View FX3 CARTRIDGE COMPARTMENT TRANSFER CHARGING ROLLER (DO NOT TOUCH) PAPER RELEASE LEVER FIXING ASSEMBLY FRONT COVER 2-24 Setting Up Your Machine Chapter 2 HT1-2205-000-V.1.0 LSL User’s Guide... -
Page 59: Rear View
l-1100.book Page 25 Friday, December 13, 2002 5:07 PM Rear View HANDSET REAR COVER POWER CONNECTOR USB PORT TELEPHONE LINE JACK HANDSET JACK EXTENSION TELEPHONE JACK 2-25 Chapter 2 Setting Up Your Machine HT1-2205-000-V.1.0 LSL User’s Guide... -
Page 60: The Operation Panel
l-1100.book Page 26 Friday, December 13, 2002 5:07 PM The Operation Panel LCD display Document feed lever In Use/Memory lamp Pause button Alarm lamp Coded Dial button One-Touch Speed Dialing buttons In Use / Memory Pause Alarm Coded Dial Receive Mode Resolution Redial Hook... - Page 61 l-1100.book Page 27 Friday, December 13, 2002 5:07 PM LCD display The LCD display shows messages and prompts during operation, and displays selections, text, numbers, and names when registering information. In Use/Memory lamp Indicates when the telephone line is being used or a document has been received in memory.
- Page 62 l-1100.book Page 28 Friday, December 13, 2002 5:07 PM Stop button Press this button to cancel sending, receiving, or any other operation. Set button Press this button to select a menu item when registering information. One-Touch Speed Dialing panel Open this panel to access the registration buttons. 2-28 Setting Up Your Machine Chapter 2...
-
Page 63: Special Function Buttons (One-Touch Speed Dialing Panel Open)
l-1100.book Page 29 Friday, December 13, 2002 5:07 PM Special Function Buttons (One-Touch Speed Dialing Panel Open) Data Delayed Memory Registration Transmission Polling Reference Report Space Clear ❏ Data Registration button Use this button to register user’s data, speed dialing, and other important settings for sending and receiving. - Page 64 l-1100.book Page 30 Friday, December 13, 2002 5:07 PM ❏ + button Use this button to enter a + sign when registering fax/telephone numbers. ❏ Space button Use this button to enter a space between letters and numbers. ❏ Clear button Use this button to clear an entire entry.
-
Page 65: The Toner Cartridge
l-1100.book Page 31 Friday, December 13, 2002 5:07 PM The Toner Cartridge Handling and Storing Cartridges ❏ Do not expose the cartridge to direct sunlight or bright light for longer than five minutes. ❏ Do not open the drum protective shutter on the cartridge. If the drum surface is exposed to light and damaged, print quality may deteriorate. - Page 66 l-1100.book Page 32 Friday, December 13, 2002 5:07 PM ❏ Store the cartridge in its protective bag. Do not open the bag until you are ready to install the cartridge in the machine. ❏ Save the protective bag. You may need to repack and transport the cartridge at a later date.
-
Page 67: Installing/Replacing The Toner Cartridge
Page 33 Friday, December 13, 2002 5:07 PM Installing/Replacing the Toner Cartridge The machine uses a Canon FX3 cartridge. The procedure below explains how to install the cartridge for the first time, and how to replace it when the toner runs out. - Page 68 l-1100.book Page 34 Friday, December 13, 2002 5:07 PM Do not open the front cover without lifting the release latch as this may cause damage to your machine. 4. If you are replacing a used cartridge, hold the cartridge by its handle and remove it as shown.
- Page 69 l-1100.book Page 35 Friday, December 13, 2002 5:07 PM 5. Remove the new FX3 cartridge from its protective bag. ❏ Save the protective bag the cartridge comes in. You may need to repack the cartridge later. 6. Gently rock the cartridge from side to side several times to distribute the toner evenly inside the cartridge.
- Page 70 l-1100.book Page 36 Friday, December 13, 2002 5:07 PM 7. Place the cartridge on a flat, clean surface, and steady it with one hand. Remove the seal by gently pulling on the plastic tab with your other hand. ❏ Use a firm, even pull to remove the plastic seal. To avoid breaking the seal, do not jerk on it unevenly.
- Page 71 l-1100.book Page 37 Friday, December 13, 2002 5:07 PM 8. Insert the toner cartridge into the machine. ❏ Align the tabs on the left and right sides of the cartridge with the rails inside the machine. ❏ Slide the cartridge into position. ❏...
- Page 72 l-1100.book Page 38 Friday, December 13, 2002 5:07 PM 10. Close the front cover. ❏ Use both hands to lift the cover back to its closed position. 2-38 Setting Up Your Machine Chapter 2 HT1-2205-000-V.1.0 LSL User’s Guide...
-
Page 73: Loading Recording Paper
l-1100.book Page 39 Friday, December 13, 2002 5:07 PM Loading Recording Paper When the message LOAD PAPER appears in the LCD display, you need to add paper to the paper cassette or the multi-purpose tray. Here are a few tips you should follow when you load paper into the paper cassette or the multi-purpose tray. - Page 74 l-1100.book Page 40 Friday, December 13, 2002 5:07 PM ❏ Do not use damp, curled, wrinkled, or torn paper as these can cause paper jams or poor print quality. ❏ Highly textured, or extremely smooth or shiny paper does not print well.
-
Page 75: Loading Paper In The Cassette
l-1100.book Page 41 Friday, December 13, 2002 5:07 PM Loading Paper in the Cassette Follow these steps to load paper in the paper cassette. 1. Lift the paper cassette slightly and pull it out. ❏ Remove the paper cassette, being careful not to drop it as you pull it out. - Page 76 l-1100.book Page 42 Friday, December 13, 2002 5:07 PM 3. Load the stack of paper into the paper cassette. ❏ Make sure the paper stack is not higher than the limit marks ( on the sides of the cassette. LIMIT MARK ❏...
- Page 77 l-1100.book Page 43 Friday, December 13, 2002 5:07 PM 4. Gently insert the paper cassette into the machine until it clicks into position. ❏ If the paper cassette is not installed correctly, the received document image might shift, or the recording paper might jam. ❏...
-
Page 78: Loading Paper In The Multi-Purpose Tray
l-1100.book Page 44 Friday, December 13, 2002 5:07 PM Loading Paper in the Multi-Purpose Tray Follow these steps to load paper in the multi-purpose tray. Let the paper run out before you refill the multi-purpose tray. (See page 2- 39.) 1. - Page 79 l-1100.book Page 45 Friday, December 13, 2002 5:07 PM 3. Insert the stack of paper—print side facing you and top edge first— into the multi-purpose tray. ❏ Insert the stack until it stops, but do not force it in. 4. Adjust the paper guides to the width of the paper. ❏...
-
Page 80: Testing The Machine
l-1100.book Page 46 Friday, December 13, 2002 5:07 PM Testing the Machine After you have assembled your machine, installed the toner cartridge, and loaded plain paper in the paper cassette or the multi-purpose tray, you can make sure the machine is printing properly by making several copies of a document. -
Page 81: Registering Information In The Machine
l-1100.book Page 1 Friday, December 13, 2002 5:07 PM Chapter 3 Registering Information in the Machine This chapter describes how to enter information in your machine. ❏ Guidelines for Entering Information ..........• Entering Numbers, Letters, and Symbols........Editing Information ..............•... -
Page 82: Guidelines For Entering Information
l-1100.book Page 2 Friday, December 13, 2002 5:07 PM Guidelines for Entering Information The following section explains how to enter user information into the machine. If you pause while entering information and do not make an entry for more than 60 seconds, the machine returns to standby mode and loses all information you had entered up to that point. - Page 83 l-1100.book Page 3 Friday, December 13, 2002 5:07 PM When you are in letter mode, "A" appears in the upper right corner. U N I T N A M E A _ _ When you are in number mode, "1" appears in the upper right corner. U N I T N A M E Entering a single letter For example, enter a lowercase letter “b”...
-
Page 84: Editing Information
l-1100.book Page 4 Friday, December 13, 2002 5:07 PM Entering two letters from the same group To enter two letters from the same group, you have to use the right arrow button ( ). For example, enter “AA” like this: 1. -
Page 85: Using The One-Touch Speed Dialing Button/One-Touch Speed Dialing Panel
l-1100.book Page 5 Friday, December 13, 2002 5:07 PM Using the One-Touch Speed Dialing Button/One-Touch Speed Dialing Panel The One-Touch Speed Dialing buttons allow you to use speed dialing. Using the Special Function Buttons Open the One-Touch Speed Dialing panel to access the Special Function buttons. -
Page 86: Using The Menu System
l-1100.book Page 6 Friday, December 13, 2002 5:07 PM Using the Menu System The machine employs a menu system you can use to register important information or to set up important features. The system includes these items: ❏ DATA REGSTRATION USER SETTINGS Lets you enter the information that prints on the documents you send, set the scanning contrast, and enter other basic data. - Page 87 l-1100.book Page 7 Friday, December 13, 2002 5:07 PM Use the Special Function buttons to display and select items from the menu system, as follows: 1. Open the One-Touch Speed Dialing panel. 2. Press Data Registration. Data Registration R E G I S T R A T I O N 1 .
-
Page 88: Personalizing Your Machine
l-1100.book Page 8 Friday, December 13, 2002 5:07 PM Personalizing Your Machine Identifying Your Documents FCC rules governing the use of fax equipment require you to include your name or company name, your fax number, and the date and time of transmission on each fax you send. -
Page 89: Entering The Date And Time
l-1100.book Page 9 Friday, December 13, 2002 5:07 PM Entering the Date and Time Follow these steps to enter the date and time. 1. Open the One-Touch Speed Dialing panel. 2. Press Data Registration. Data Registration R E G I S T R A T I O N 1 . -
Page 90: Registering Your Fax Number And Name
l-1100.book Page 10 Friday, December 13, 2002 5:07 PM Registering Your Fax Number and Name Use the following procedure to register your fax/telephone number and name. 1. Open the One-Touch Speed Dialing panel. 2. Press Data Registration. Data Registration R E G I S T R A T I O N 1 . - Page 91 l-1100.book Page 11 Friday, December 13, 2002 5:07 PM 6. Press Set to save the fax/telephone number. U S E R S E T T I N G S 3 . U N I T N A M E 7. Press Set again, then use the numeric buttons to type in your name or business name.
-
Page 92: Setting The Telephone Line Type
l-1100.book Page 12 Friday, December 13, 2002 5:07 PM Setting the Telephone Line Type Use this procedure if you need to change the telephone line setting. If you are unsure which setting to use, contact your local telephone company. 1. Open the One-Touch Speed Dialing panel. 2. -
Page 93: Setting Daylight Saving Time
l-1100.book Page 13 Friday, December 13, 2002 5:07 PM Setting Daylight Saving Time Some countries adopt the Daylight Saving Time system that shifts the clock time ahead or back according to the change in seasons. You can select if the time information in your machine changes to match your country’s Daylight Saving Time system and set the day and time when Daylight Saving Time starts and ends. - Page 94 l-1100.book Page 14 Friday, December 13, 2002 5:07 PM 7. Press Set three times. M O N T H A P R I L 8. Use to select the month when Daylight Saving Time starts. M O N T H M A R C H 9.
- Page 95 l-1100.book Page 15 Friday, December 13, 2002 5:07 PM 14. Use the numeric buttons to enter the time when Daylight Saving Time starts. T I M E 0 1 : 0 0 OPER SYMBOLS Tone 15. Press Set, and set the month, day, and time when Daylight Saving Time ends in the same manner as setting the start date and time.
- Page 96 l-1100.book Page 16 Friday, December 13, 2002 5:07 PM 3-16 Registering Information in the Machine Chapter 3 HT1-2205-000-V.1.0 LSL User’s Guide...
-
Page 97: Paper Handling
l-1100.book Page 1 Friday, December 13, 2002 5:07 PM Chapter 4 Paper Handling This chapter describes how to select and prepare the print media for the different functions your machine can perform. ❏ Guidelines for Selecting Print Media ..........• Plain Paper ..................•... -
Page 98: Guidelines For Selecting Print Media
l-1100.book Page 2 Friday, December 13, 2002 5:07 PM Guidelines for Selecting Print Media You can produce high quality laser prints on most plain paper, including cotton bond paper and photocopying paper. Your machine does not require special laser paper. You can load the following media in the paper cassette or the multi- purpose tray: Paper Cassette... - Page 99 l-1100.book Page 3 Friday, December 13, 2002 5:07 PM Type Size Weight Capacity CUSTOM1/ 17–24 lb 100* sheets LONG (Max. 0.4 in./10 mm (64–90 g/m 8.5 × 12.5 in. stack height)** to 8.5 × 13.4 in. (216 × 317 mm to 216 ×...
-
Page 100: Plain Paper
l-1100.book Page 4 Friday, December 13, 2002 5:07 PM Plain Paper Follow these guidelines when selecting paper: ❏ The laser printing process uses high temperatures to fuse toner to the paper. Use paper that will not melt, vaporize, discolor, or emit dangerous fumes at temperatures near 338ºF (170ºC). -
Page 101: Labels
l-1100.book Page 5 Friday, December 13, 2002 5:07 PM Labels Sheets of letter or A4-size self-sticking labels should also print without any problems. Labels must meet the requirements listed for plain paper, as well as the following: ❏ Labels must have an ordinary, matte finish similar to copy paper. ❏... -
Page 102: The Paper Path
l-1100.book Page 6 Friday, December 13, 2002 5:07 PM The Paper Path Understanding how paper feeds through the machine will help you to determine how to load paper and handle paper jams. The page travels first to the FX3 cartridge. Here a laser beam “draws” the print image on the drum, then the drum applies toner to the page. - Page 103 l-1100.book Page 7 Friday, December 13, 2002 5:07 PM When you are printing, follow these guidelines: ❏ Always set the paper delivery selector before starting to print. ❏ Do not switch the paper delivery selector until the printout comes out of the delivery slot completely.
-
Page 104: Selecting Paper Delivery
l-1100.book Page 8 Friday, December 13, 2002 5:07 PM Selecting Paper Delivery Received documents, copies, and prints can be delivered through the face-up or face-down delivery slots. Choose paper delivery according to the job the machine is performing and the type of print media you are using. FACE-DOWN DELIVERY FACE-UP... -
Page 105: Face-Down Delivery
l-1100.book Page 9 Friday, December 13, 2002 5:07 PM Face-Down Delivery Face-down delivery is used for most jobs and when using plain paper only (17-24lb or 64-90 g/m ). Printed pages are stacked in the order they are printed in the face-down delivery slot. This slot holds up to approximately 50 sheets of plain paper (20lb or 75 g/m Move the paper delivery selector backward to the mark. -
Page 106: Face-Up Delivery
l-1100.book Page 10 Friday, December 13, 2002 5:07 PM Face-Up Delivery Face-up delivery is mainly used when printing on media other than plain paper, such as transparencies, labels, and envelopes. Be sure to use face-up delivery when feeding print media other than standard plain paper. - Page 107 l-1100.book Page 11 Friday, December 13, 2002 5:07 PM You can also use face-up delivery when printing or receiving a large number of pages. In this case, remove the extension tray and place the machine on the edge of a table. This will allow the pages to fall away from the machine and avoid blocking the face-up delivery slot.
-
Page 108: Loading Paper
l-1100.book Page 12 Friday, December 13, 2002 5:07 PM Loading Paper The Paper Cassette You can stack up to approximately 250 sheets of plain paper (20lb or 75 g/ ) in the paper cassette. The paper cassette holds letter- and A4-size paper, provided that its weight is within the range 17-24lb (64-90 g/m To load the paper, follow the steps in “Loading Recording Paper,”... -
Page 109: Loading Envelopes In The Multi-Purpose Tray
l-1100.book Page 13 Friday, December 13, 2002 5:07 PM Loading Envelopes in the Multi-Purpose Tray Do not use the multi-purpose tray to load envelopes when temperature or humidity levels are high. The glue on the flap may become sticky and stick to the envelope, or cause a paper jam. - Page 110 l-1100.book Page 14 Friday, December 13, 2002 5:07 PM 2. Adjust the paper guides to the approximate width of the stack of envelopes. 3. Insert the stack of envelopes—print side facing you—into the multi- purpose tray. ❏ Insert the stack until it stops, but do not force it. AUTOMATIC DOCUMENT FEEDER(ADF) MULTI-PURPOSE TRAY...
- Page 111 l-1100.book Page 15 Friday, December 13, 2002 5:07 PM 4. Adjust the paper guides to the stack of envelopes. 5. Move the paper delivery selector forward to the mark. FACE-UP DELIVERY ❏ Be sure to use face-up delivery when printing on envelopes. Your machine is now ready to print.
-
Page 112: Changing A Paper Size From Letter- To A4-Size Paper In The Paper Cassette
l-1100.book Page 16 Friday, December 13, 2002 5:07 PM Changing a Paper Size from Letter- to A4-Size Paper in the Paper Cassette 1. Lift the paper cassette slightly and pull it out. 2. Hold the center part of the front paper guide with your finger. Gently move the front paper guide to the rear of the machine, then the tabs of the paper guide will come out of the slots of the paper cassette. - Page 113 l-1100.book Page 17 Friday, December 13, 2002 5:07 PM 4. Move the inside paper guide toward inside of the paper cassette. Insert the tab into the inside slot. The figure below shows inside slots (bottom view). INSIDE SLOT INSIDE SLOT 4-17 Chapter 4 Paper Handling...
- Page 114 l-1100.book Page 18 Friday, December 13, 2002 5:07 PM 5. Tighten the screw clockwise on each side of paper guide. Follow the reverse procedure above to change a paper size from A4- to letter-size paper. 4-18 Paper Handling Chapter 4 HT1-2205-000-V.1.0 LSL User’s Guide...
-
Page 115: Changing The Paper Size Setting
l-1100.book Page 19 Friday, December 13, 2002 5:07 PM Changing the Paper Size Setting The Paper Cassette 1. Open the One-Touch Speed Dialing panel. 2. Press Data Registration. Data Registration R E G I S T R A T I O N 1 . -
Page 116: The Multi-Purpose Tray
l-1100.book Page 20 Friday, December 13, 2002 5:07 PM 8. Press Stop to return to standby mode. Stop 1 2 / 3 1 / 2 0 0 2 T U E 1 0 : 0 0 F a x T e l S T A N D A R D The Multi-Purpose Tray 1. - Page 117 l-1100.book Page 21 Friday, December 13, 2002 5:07 PM 7. Press Set. P R I N T E R S E T T I N G S 3 . E C O N O M Y P R T 8. Press Stop to return to standby mode. Stop 1 2 / 3 1 / 2 0 0 2 T U E 1 0 : 0 0 F a x T e l...
- Page 118 l-1100.book Page 22 Friday, December 13, 2002 5:07 PM 4-22 Paper Handling Chapter 4 HT1-2205-000-V.1.0 LSL User’s Guide...
-
Page 119: Speed Dialing
l-1100.book Page 1 Friday, December 13, 2002 5:07 PM Chapter 5 Speed Dialing This chapter describes how to register and use the speed dialing features of the machine. ❏ Speed Dialing Methods............... ❏ One-Touch Speed Dialing..............• Storing Numbers for One-Touch Speed Dialing ......•... -
Page 120: Speed Dialing Methods
l-1100.book Page 2 Friday, December 13, 2002 5:07 PM Speed Dialing Methods In addition to regular dialing, the machine provides several ways to dial fax/telephone numbers automatically. ❏ One-Touch Speed Dialing Dial a fax/telephone number by pressing the One-Touch Speed Dialing button that the number is assigned to. -
Page 121: One-Touch Speed Dialing
l-1100.book Page 3 Friday, December 13, 2002 5:07 PM One-Touch Speed Dialing Storing Numbers for One-Touch Speed Dialing Your machine can store up to 24 of your most frequently dialed numbers under One-Touch Speed Dialing buttons. Follow this procedure to store One-Touch Speed Dialing numbers and names. - Page 122 l-1100.book Page 4 Friday, December 13, 2002 5:07 PM 6. Press Set. 1 – T O U C H S P D D I A L 1 . T E L E P H O N E N U M B E R 7.
- Page 123 l-1100.book Page 5 Friday, December 13, 2002 5:07 PM 10. Press Set. 1 – T O U C H S P D D I A L 3 . O P T I O N A L S E T T I N G This completes the minimum settings for registering a One-Touch Speed Dialing button.
- Page 124 l-1100.book Page 6 Friday, December 13, 2002 5:07 PM 14. Press Set to store TX TYPE. If you select REGULAR TX, it goes back to 1-TOUCH SPD DIAL. If you want to register another One-Touch Speed Dialing button, repeat the procedure from step 5. To return to standby mode, press Stop.
-
Page 125: Changing A Number/Name Stored Under A One-Touch Speed Dialing Button
l-1100.book Page 7 Friday, December 13, 2002 5:07 PM 20. After you register a number for One-Touch Speed Dialing, write the name of the other party on a destination label and stick it on the One- Touch Speed Dialing panel above the number of the One-Touch Speed Dialing button where the number is registered. - Page 126 l-1100.book Page 8 Friday, December 13, 2002 5:07 PM 6. Press Set twice. 1 – T O U C H S P D D I A L 1 . T E L E P H O N E N U M B E R T E L E P H O N E N U M B E R T E L = 2 0 5 4 5 8 5 4 5 _ To delete a number:...
- Page 127 l-1100.book Page 9 Friday, December 13, 2002 5:07 PM 9. To change the name, use and the numeric buttons to enter the new name over the previous name. N A M E C a n o n C A N A D A _ OPER SYMBOLS Tone...
-
Page 128: Using One-Touch Speed Dialing
l-1100.book Page 10 Friday, December 13, 2002 5:07 PM Using One-Touch Speed Dialing Once you have registered your numbers under One-Touch Speed Dialing buttons, you can use them to send documents as follows: Be sure to adjust the document feed lever before loading your document. See page 6-6 for more details. - Page 129 l-1100.book Page 11 Friday, December 13, 2002 5:07 PM 3. Press Start/Copy. Start / Copy ❏ If you do not press Start/Copy within five seconds of pressing the One-Touch Speed Dialing button, the machine will begin sending automatically. If you do not want the machine to send automatically, you need to change the TIME OUT setting.
-
Page 130: Coded Speed Dialing
l-1100.book Page 12 Friday, December 13, 2002 5:07 PM Coded Speed Dialing Storing Numbers for Coded Speed Dialing You can store up to 100 numbers for coded speed dialing. Follow this procedure to store coded speed dialing numbers and names. 1. - Page 131 l-1100.book Page 13 Friday, December 13, 2002 5:07 PM Using the Coded Dial buttons: 7. Press Coded Dial, then use the numeric buttons to enter the two digit code you want to store. Coded Dial C O D E D S P E E D D I A L ✱...
- Page 132 l-1100.book Page 14 Friday, December 13, 2002 5:07 PM 11. Press Set again, then use the numeric buttons to enter the name you want to store. N A M E C a n o n O P T I C S _ OPER SYMBOLS Tone...
- Page 133 l-1100.book Page 15 Friday, December 13, 2002 5:07 PM The TX TYPE menu includes these items: REGULAR TX Designates the transaction as a normal transmission with no special features. You can cancel the currently set PSWD/SUB- ADDRESS by selecting REGULAR TX. PSWD/SUBADDRESS Allows you to enter an ITU-T password or subaddress for the transmission.
- Page 134 l-1100.book Page 16 Friday, December 13, 2002 5:07 PM 20. Press Set to store a password. C O D E D S P E E D D I A L ✱ 0 5 = 21. To continue registering numbers, names and TX type, repeat steps 7 to 20.
-
Page 135: Changing A Number/Name Stored Under A Coded Speed Dialing Code
l-1100.book Page 17 Friday, December 13, 2002 5:07 PM Changing a Number/Name Stored under a Coded Speed Dialing Code Follow these steps if you want to change the number and/or name registered under a Coded Speed Dialing code, or if you want to delete all information stored under a code. - Page 136 l-1100.book Page 18 Friday, December 13, 2002 5:07 PM Using the Coded Dial button: 7. Press Coded Dial, then use the numeric buttons to enter the two digit code you want to change or delete. Coded Dial C O D E D S P E E D D I A L ✱...
- Page 137 l-1100.book Page 19 Friday, December 13, 2002 5:07 PM To change the number and/or name: 9. To change the number, press Clear and re-enter the number. You can also use to delete the rightmost digit and enter the correct number. T E L E P H O N E N U M B E R T E L = 2 5 0 9 2 1 _ OPER...
- Page 138 l-1100.book Page 20 Friday, December 13, 2002 5:07 PM 13. To change additional numbers and/or names, press Data Registration and repeat steps 7 to 12. -or- If you have finished changing numbers and/or names, press Stop to return to standby mode. Stop 1 2 / 3 1 / 2 0 0 2 T U E 1 0 : 0 0 F a x T e l...
-
Page 139: Using Coded Speed Dialing
l-1100.book Page 21 Friday, December 13, 2002 5:07 PM Using Coded Speed Dialing Once you have registered your numbers under Coded Speed Dialing codes, you can send documents as follows: Be sure to adjust the document feed lever before loading your document. See page 6-6 for more details. - Page 140 l-1100.book Page 22 Friday, December 13, 2002 5:07 PM 4. Press Start/Copy. Start / Copy ❏ If you do not press Start/Copy within five seconds of entering the coded speed dialing code, the machine will begin sending automatically. If you do not want the machine to send automatically, you need to change the TIME OUT setting.
-
Page 141: Group Dialing
l-1100.book Page 23 Friday, December 13, 2002 5:07 PM Group Dialing If you frequently send faxes to the same group of numbers, you can create a “group.” Groups are stored under One-Touch Speed Dialing buttons or Coded Speed Dialing codes and can contain as many as 123 numbers. Creating Groups for Group Dialing The numbers you register in a group must already be stored under One-Touch Speed Dialing buttons or Coded Speed Dialing codes. - Page 142 l-1100.book Page 24 Friday, December 13, 2002 5:07 PM To store a group under a One-Touch Speed Dialing button: 7. Use , or the One-Touch Speed Dialing button to select an unused One-Touch Speed Dialing button (01 to 24). G R O U P D I A L 0 3 = ❏...
- Page 143 l-1100.book Page 25 Friday, December 13, 2002 5:07 PM 8. Press Set twice. G R O U P D I A L 1 . T E L E P H O N E N U M B E R T E L = 9.
- Page 144 l-1100.book Page 26 Friday, December 13, 2002 5:07 PM 10. Press Set twice. G R O U P D I A L 2 . N A M E N A M E 11. Enter the name using the numeric buttons for the group. N A M E U S A G R O U P _ OPER...
-
Page 145: Using Group Dialing
l-1100.book Page 27 Friday, December 13, 2002 5:07 PM Using Group Dialing To send a document to a group of numbers, follow these instructions. Be sure to adjust the document feed lever before loading your document. See page 6-6 for more details. 1. - Page 146 l-1100.book Page 28 Friday, December 13, 2002 5:07 PM ❏ After entering the first One-Touch Speed Dialing button or Coded Speed Dialing code, you have five seconds to enter another speed dialing button or code before the machine begins sending automatically. If you have entered more than one speed dialing button or code, the machine waits for 10 seconds before it begins sending.
-
Page 147: Sending Faxes
l-1100.book Page 1 Friday, December 13, 2002 5:07 PM Chapter 6 Sending Faxes This chapter describes how to use your machine to send faxes. ❏ Preparing to Send a Fax ..............• Document Requirements ............... Scanning Area ................• Selecting Automatic/Manual Document Feed......Loading Documents for Automatic Feed ....... - Page 148 l-1100.book Page 2 Friday, December 13, 2002 5:07 PM ❏ Sequential Broadcasting..............6-31 • Sending a Document to More Than One Destination....6-31 • Sending a Document Using Group Dialing ........ 6-33 ❏ Delayed Sending .................. 6-34 • Sending Other Documents While the Machine is Set for Delayed Sending............
-
Page 149: Preparing To Send A Fax
l-1100.book Page 3 Friday, December 13, 2002 5:07 PM Preparing to Send a Fax Before you can send a fax, you need to load the document into machine. For instructions and information about the types of documents you can fax with machine, see below. Document Requirements The documents you load into machine must meet these requirements: When the document feed lever is set to Automatic Document Feed:... - Page 150 l-1100.book Page 4 Friday, December 13, 2002 5:07 PM Problem documents ❏ To prevent paper jams in the Automatic Document Feeder (ADF), do not use any of the following paper in machine: WRINKLED OR CURLED OR TORN PAPER CREASED PAPER ROLLED PAPER CARBON PAPER OR COATED PAPER...
-
Page 151: Scanning Area
l-1100.book Page 5 Friday, December 13, 2002 5:07 PM Scanning Area The margins of 0.12 in. (3.0 mm) on both sides of the sheet, and 0.16 in. (4.0 mm) on the top and bottom are outside machine’s scanning area. Make sure your document’s text and graphics do not extend into these margins. -
Page 152: Selecting Automatic/Manual Document Feed
l-1100.book Page 6 Friday, December 13, 2002 5:07 PM Selecting Automatic/Manual Document Feed With machine, you can select whether you want to scan documents automatically or manually. Automatic document feed is used when scanning multipage documents on normal paper. Use manual document feed when scanning single-page documents such as photos, business cards, or documents on other special types of paper. -
Page 153: Loading Documents For Automatic Feed
l-1100.book Page 7 Friday, December 13, 2002 5:07 PM Loading Documents for Automatic Feed 1. Make sure the document feed lever is set to automatic document feed. Be sure to pull the feed lever towards you before sliding it to the left. 2. - Page 154 l-1100.book Page 8 Friday, December 13, 2002 5:07 PM 3. Adjust the document guides to the width of the document. 4. Gently insert the document face down (top of the document first) into the Automatic Document Feeder (ADF) until it stops. Sending Faxes Chapter 6 HT1-2205-000-V.1.0 LSL User’s Guide...
- Page 155 l-1100.book Page 9 Friday, December 13, 2002 5:07 PM The document is now ready for scanning. The machine automatically feeds the pages one by one from the bottom of the stack. Wait until all pages of your document have been scanned completely before starting a new job.
- Page 156 l-1100.book Page 10 Friday, December 13, 2002 5:07 PM 2. Gently insert the stack into the Automatic Document Feeder (ADF) until it stops. ❏ If you have further trouble with page jams while feeding, see “Jams in the Automatic Document Feeder (ADF)?,” on page 13-5. ❏...
-
Page 157: Loading Documents For Manual Feed
l-1100.book Page 11 Friday, December 13, 2002 5:07 PM Loading Documents for Manual Feed 1. Make sure the document feed lever is set to manual document feed. 2. Adjust the document guides to the width of the document. 6-11 Chapter 6 Sending Faxes HT1-2205-000-V.1.0 LSL User’s Guide... - Page 158 l-1100.book Page 12 Friday, December 13, 2002 5:07 PM 3. Gently insert the document face down (top of the document first) into the Automatic Document Feeder (ADF) until it stops. The document is now ready for scanning. ❏ Wait until your document has been scanned completely before starting a new job.
-
Page 159: Setting The Resolution And Contrast
Setting the Resolution and Contrast Setting the Scanning Resolution ™ Canon’s Ultra High Quality (UHQ ) imaging technology enables you to send faxes with a print quality that is very close to that of the original document. The machine also lets you adjust the resolution it uses in sending faxes to best suit your particular document. -
Page 160: Setting The Scan Contrast
l-1100.book Page 14 Friday, December 13, 2002 5:07 PM 3. Continue with the operation you wish to complete. ❏ If you do not proceed with any other operation, the LCD display returns to standby mode after about 10 seconds. 1 2 / 3 1 / 2 0 0 2 T U E 1 0 : 0 0 F a x T e l S T A N D A R D Setting the Scan Contrast... -
Page 161: Sending Methods
l-1100.book Page 15 Friday, December 13, 2002 5:07 PM 6. Press to select the scan contrast you wish to set. S C A N C O N T R A S T S T A N D A R D ❏... - Page 162 l-1100.book Page 16 Friday, December 13, 2002 5:07 PM Since machine is multitasking, you can even scan a document into the memory while sending a document, receiving a document, or printing a report. 6-16 Sending Faxes Chapter 6 HT1-2205-000-V.1.0 LSL User’s Guide...
-
Page 163: Dialing Methods
l-1100.book Page 17 Friday, December 13, 2002 5:07 PM Dialing Methods There are several ways of dialing the number of the party you want to send to: ❏ Regular Dialing Use the numeric buttons to dial the recipient’s fax number. ❏... -
Page 164: Sending Documents
l-1100.book Page 18 Friday, December 13, 2002 5:07 PM Sending Documents This section describes the different ways to send faxes with machine. Manual Sending Via the Handset You can send faxes manually. This allows you to talk to the other party via the handset before sending the fax, which can be useful if the other party uses a single line for both voice and fax transmissions. - Page 165 l-1100.book Page 19 Friday, December 13, 2002 5:07 PM 3. If a person answers, you can converse normally. When you hear the other party answer, pick up the handset so you can talk if you have not already done so. Then go to step 4. -or- If you hear a high pitched signal, instead of the other party’s voice, they are ready to receive your document.
-
Page 166: Memory Sending
l-1100.book Page 20 Friday, December 13, 2002 5:07 PM Memory Sending Memory sending is a quick and easy way to send a fax. The machine scans the document into its memory as it dials the fax number. If the line is free, machine begins sending the fax as it scans the rest of the document. - Page 167 l-1100.book Page 21 Friday, December 13, 2002 5:07 PM 3. Press Start/Copy. Start / Copy ❏ The machine then begins scanning the document into memory and dials the number. After a few seconds, the display shows the number of pages it has scanned.
-
Page 168: Adding Pages To The Document In The Automatic Document Feeder (Adf)
l-1100.book Page 22 Friday, December 13, 2002 5:07 PM Adding Pages to the Document in the Automatic Document Feeder (ADF) The machine Automatic Document Feeder (ADF) can hold up to 30 letter- size, 30 A4-size, or 20 legal-size pages at a time when the document feed lever is set to automatic document feed. -
Page 169: Canceling Sending
l-1100.book Page 23 Friday, December 13, 2002 5:07 PM Canceling Sending If you want to stop sending before the transmission is finished, do the following. Press Stop. Stop ❏ If you are sending manually, the transmission is canceled immediately. ❏ If you are sending from memory, the following appears in the display: C A N C E L D U R I N G T X / R X ? Y E S = ( ✱... -
Page 170: Removing The Document From The Automatic Document Feeder (Adf)
l-1100.book Page 24 Friday, December 13, 2002 5:07 PM Removing the Document From the Automatic Document Feeder (ADF) 1. Open the operation panel by gently pulling it toward you. 2. Remove the document by pulling it out from the top or bottom. ❏... - Page 171 l-1100.book Page 25 Friday, December 13, 2002 5:07 PM 3. When you are finished, close the operation panel by pressing it down from the center as shown. Be sure to close the operation panel until it locks into place. Otherwise the machine will not function properly.
-
Page 172: Redialing
l-1100.book Page 26 Friday, December 13, 2002 5:07 PM Redialing Manual Redialing To redial the last number dialed with the numeric buttons, press Redial. To cancel manual redialing, simply press Stop. Automatic Redialing With Memory Sending With memory sending, you can set machine to automatically dial the fax number again if the receiving machine does not answer or if the line is busy. -
Page 173: Canceling Automatic Redialing
l-1100.book Page 27 Friday, December 13, 2002 5:07 PM When it begins redialing, it alternately displays CALLING, the transaction number (TX/RX NO.), and the fax number you dialed. 1 2 / 3 1 / 2 0 0 2 T U E 1 0 : 0 0 D I A L I N G 1 2 / 3 1 / 2 0 0 2 T U E 1 0 : 0 0 8 3 3 4 4 2 4... -
Page 174: Setting Up Automatic Redialing
l-1100.book Page 28 Friday, December 13, 2002 5:07 PM 3. To cancel the redialing, press ❏ The machine beeps and alternates the following displays: 1 2 / 3 1 / 2 0 0 2 T U E 1 0 : 0 0 T X / R X N O . - Page 175 l-1100.book Page 29 Friday, December 13, 2002 5:07 PM Follow the procedure below to adjust the automatic redialing settings. 1. Open the One-Touch Speed Dialing panel. 2. Press Data Registration. Data Registration R E G I S T R A T I O N 1 .
- Page 176 l-1100.book Page 30 Friday, December 13, 2002 5:07 PM 9. Press Set again, then use , or the numeric buttons to select the time interval between redialings (2 to 99 minutes). R E D I A L I N T E R V A L 2 M I N .
-
Page 177: Sequential Broadcasting
l-1100.book Page 31 Friday, December 13, 2002 5:07 PM Sequential Broadcasting Sending a Document to More Than One Destination The machine’s sequential broadcasting feature allows you to send a fax to a sequence of up to 125 fax numbers, using any combination of dialing methods as follows: ❏... - Page 178 l-1100.book Page 32 Friday, December 13, 2002 5:07 PM ❏ Coded Speed Dialing: Press Coded Dial, then enter the two-digit code (00-99) using the numeric buttons. Coded Dial • Be sure to press Coded Dial before each code. ❏ Regular Dialing: Enter the number using the numeric buttons or press Redial.
-
Page 179: Sending A Document Using Group Dialing
l-1100.book Page 33 Friday, December 13, 2002 5:07 PM 3. When you finish entering numbers, press Start/Copy to begin sending, or wait a few seconds for machine to begin sending automatically. Start / Copy ❏ The machine then scans the document into memory, and begins sending it to the destinations in numerical order, starting with the one-touch speed dialing numbers, then the coded speed dialing numbers, and finally the number dialed with the numeric... -
Page 180: Delayed Sending
l-1100.book Page 34 Friday, December 13, 2002 5:07 PM Delayed Sending Your machine allows you to scan a document into its memory and send it automatically at a preset time. By using this feature, you can take advantage of lower long distance rates at night, for example. Be sure to adjust the document feed lever before loading your document. - Page 181 l-1100.book Page 35 Friday, December 13, 2002 5:07 PM 4. Press Set. D E L A Y E D T X S E L E C T L O C A T I O N S T E L = 5.
-
Page 182: Sending Other Documents While The Machine Is Set For Delayed Sending
l-1100.book Page 36 Friday, December 13, 2002 5:07 PM Sending Other Documents While the Machine is Set for Delayed Sending The machine is a multitasking unit, so you can send, receive, print, and copy other documents even when you have set machine for delayed sending. -
Page 183: Receiving Faxes
l-1100.book Page 1 Friday, December 13, 2002 5:07 PM Chapter 7 Receiving Faxes This chapter describes how to use your machine to receive documents. ❏ Different Ways to Receive a Fax............FAX/TEL AUTO SW..............FAX ONLY MODE ..............DRPD (Distinctive Ring Pattern Detection) ......•... -
Page 184: Different Ways To Receive A Fax
l-1100.book Page 2 Friday, December 13, 2002 5:07 PM Different Ways to Receive a Fax The machine provides you with several modes for receiving documents. To decide which mode will best suit your requirements, consider how you want to use the machine: FAX/TEL AUTO SW You can select Fax/Tel Mode, MANUAL MODE, or ANS. - Page 185 l-1100.book Page 3 Friday, December 13, 2002 5:07 PM ❏ FAX ONLY MODE Use this mode if the machine is connected to a separate telephone line used only for transmitting faxes. The machine then answers all calls, and receives all documents automatically. ❏...
-
Page 186: Setting The Rx Mode
l-1100.book Page 4 Friday, December 13, 2002 5:07 PM Setting the RX MODE Set the machine RX MODE as follows: 1. Open the One-Touch Speed Dialing panel, then press Data Registration. Data Registration R E G I S T R A T I O N 1 . -
Page 187: Setting The Receive Mode
l-1100.book Page 5 Friday, December 13, 2002 5:07 PM Setting the Receive Mode Set the machine receive mode as follows: 1. Press Receive Mode. Receive Mode ❏ The LCD display shows the current receive mode setting. 2. If you want to change the receive mode, press Receive Mode until the mode you want appears. - Page 188 l-1100.book Page 6 Friday, December 13, 2002 5:07 PM ❏ F/T RING TIME When your machine is set to receive both fax and telephone calls automatically, it rings to alert you to pick up the handset if the call is from a person.
-
Page 189: What Happens When Fax/Tel Mode Is Selected
l-1100.book Page 7 Friday, December 13, 2002 5:07 PM What Happens When Fax/Tel Mode is Selected Type of call Telephone Sending document Sending document manually automatically Telephone charges The machine answers without ringing begin for caller. The machine listens for fax tone (For 8 sec.) RING START TIME fax tone... - Page 190 l-1100.book Page 8 Friday, December 13, 2002 5:07 PM Set the Fax/Tel Mode options as follows: 1. Open the One-Touch Speed Dialing panel, then press Data Registration. Data Registration R E G I S T R A T I O N 1 .
- Page 191 l-1100.book Page 9 Friday, December 13, 2002 5:07 PM 8. Press Set. F A X / T E L A U T O S W 2 . F / T R I N G T I M E 9. Press Set again, then use , or the numeric buttons to enter a time between 10 and 45 seconds.
-
Page 192: Receiving Faxes Manually: Manual Mode
l-1100.book Page 10 Friday, December 13, 2002 5:07 PM Receiving Faxes Manually: MANUAL MODE To use this mode, you must have the handset or a telephone connected to the machine. See “Attaching the Handset to Your Machine,” on page 2-13. In MANUAL MODE, the machine rings every time it receives a call, whether the call is from a telephone or a fax machine. -
Page 193: Receiving Faxes Automatically: Fax Only Mode
l-1100.book Page 11 Friday, December 13, 2002 5:07 PM ❏ If you do not hang up after pressing Start/Copy or the two-digit ID code, the machine beeps intermittently for a few seconds after you receive the document. (You can turn the beeping off by disabling the OFFHOOK ALARM in the USER SETTINGS menu. -
Page 194: Using An Answering Machine: Ans.machine Mode
“Connecting an Extension Telephone or Answering Machine,” on page 2-18. Canon does not recommend using an “answering service” (like those offered by local telephone companies that provide voice mail) on the telephone line you are connecting to the machine. If you do subscribe to an answering service, you may want to dedicate a separate line for fax communication only and connect that line to the machine. -
Page 195: Documents Received In Memory
l-1100.book Page 13 Friday, December 13, 2002 5:07 PM Documents Received in Memory The machine will automatically receive incoming faxes into its memory if it encounters a problem that prevents it from printing normally. The LCD will display a message showing the problem. See below the error messages, their cause, and the action you need to take to correct the problem. -
Page 196: Receiving While Registering, Copying, Or Printing
l-1100.book Page 14 Friday, December 13, 2002 5:07 PM Cause: Over capacity in the face-down delivery slot. Action: Take out sheets from delivery slot and clear the paper jam. See “Paper Jams,” on page 13-5. C L E A R P A P E R J A M Once you have corrected the problem, the machine automatically prints the documents stored in memory. -
Page 197: Canceling An Incoming Fax
l-1100.book Page 15 Friday, December 13, 2002 5:07 PM Canceling an Incoming Fax To cancel an incoming fax, follow this procedure: 1. Press Stop. Stop C A N C E L D U R I N G T X / R X ? Y E S = ( ✱... -
Page 198: Distinctive Ring Pattern Detection (Drpd) Feature
l-1100.book Page 16 Friday, December 13, 2002 5:07 PM Distinctive Ring Pattern Detection (DRPD) Feature Some telephone companies offer a distinctive ring pattern (DRP) service whereby they assign two or more telephone numbers with distinctive ring patterns to a single telephone line. If your telephone company offers such a service, you can have both a fax number(s) and a telephone number(s) for your machine using only one telephone line. -
Page 199: Setting Up Drpd Mode
l-1100.book Page 17 Friday, December 13, 2002 5:07 PM You can set the machine to select among the following ring patterns: ❏ Normal ring: Ring type of normal telephone line ❏ Double ring: Two short rings at regular intervals ❏ Short-short-long: Short-short-long at regular intervals ❏... - Page 200 l-1100.book Page 18 Friday, December 13, 2002 5:07 PM 7. Use to select a ring pattern. D R P D 1 . N O R M A L R I N G D R P D 2 . D O U B L E R I N G D R P D 3 .
- Page 201 l-1100.book Page 19 Friday, December 13, 2002 5:07 PM 11. Press Set again, then use the numeric buttons to enter the name you want to store. U N I T N A M E OPER SYMBOLS Tone ❏ For details on entering letters, see page 3-2. ❏...
- Page 202 l-1100.book Page 20 Friday, December 13, 2002 5:07 PM 18. Press Set again, then use , , or the numeric buttons to enter a time between 0 and 30 seconds. R I N G S T A R T T I M E 8 S E C OPER SYMBOLS...
- Page 203 l-1100.book Page 21 Friday, December 13, 2002 5:07 PM ❏ Select RECEIVE to receive the call, and DISCONNECT to disconnect the call. 23. Press Set. R X S E T T I N G S 3 . I N C O M I N G R I N G 24.
-
Page 204: How Drpd Responds To Calls
l-1100.book Page 22 Friday, December 13, 2002 5:07 PM How DRPD Responds to Calls When there is an incoming call, the machine checks the incoming ring pattern and determines the type of pattern being received. The machine may require up to 10 seconds to determine the pattern type, and during this time the machine does not ring. -
Page 205: Chapter 8 Using The Memory Features
l-1100.book Page 1 Friday, December 13, 2002 5:07 PM Chapter 8 Using the Memory Features This chapter shows you how to use the memory features of the machine. ❏ Documents Stored in Memory ............• Printing a List of Documents Stored in Memory ....... •... -
Page 206: Documents Stored In Memory
❉ ❉ ❉ ❉ ❉ ❉ ❉ ❉ ❉ ❉ ❉ ❉ ❉ ❉ ❉ ❉ ❉ ❉ ❉ ❉ ❉ ❉ ❉ ❉ ❉ ❉ ❉ ❉ TX/RX NO MODE CONNECTION TEL/ID PGS . SET TIME ST. TIME 0051 DEL SQ BDCST 01] CANON 12/31 09:30 09:45 516 328 5000 09:45 Using the Memory Features Chapter 8 HT1-2205-000-V.1.0 LSL User’s Guide... -
Page 207: Printing Documents Stored In Memory
l-1100.book Page 3 Friday, December 13, 2002 5:07 PM Printing Documents Stored in Memory When you print a document stored in memory using the following procedure, the print is reduced to 90% of the original. Method 1 1. Open the One-Touch Speed Dialing panel, then press Memory Reference. -
Page 208: Method 2
l-1100.book Page 4 Friday, December 13, 2002 5:07 PM 6. Press for the first page only or # for all pages. SYMBOLS T X / R X N O . 0 0 0 3 P R I N T I N G P . - Page 209 l-1100.book Page 5 Friday, December 13, 2002 5:07 PM 5. Press Set. 1 S T P G O N L Y ? Y E S = ( ✱ ) N O = ( # ) 6. Press for the first page only or # for all pages. SYMBOLS D E L A Y E D T X P R I N T I N G...
-
Page 210: Sending Documents Stored In Memory
l-1100.book Page 6 Friday, December 13, 2002 5:07 PM Sending Documents Stored in Memory 1. Open the One-Touch Speed Dialing panel, then press Memory Reference. Memory Reference M E M O R Y R E F E R E N C E 1 . - Page 211 l-1100.book Page 7 Friday, December 13, 2002 5:07 PM 6. Enter the destination(s) using any of the following three methods. ❏ One-Touch Speed Dialing: Press the desired One-Touch Speed Dialing button(s). ❏ Coded Speed Dialing: Press Coded Dial, then enter the two-digit code (00-99) using the numeric buttons.
-
Page 212: Deleting A Document Stored In Memory
l-1100.book Page 8 Friday, December 13, 2002 5:07 PM Deleting a Document Stored in Memory Follow this procedure to delete a document from memory. Method 1 1. Open the One-Touch Speed Dialing panel, then press Memory Reference. Memory Reference M E M O R Y R E F E R E N C E 1 . -
Page 213: Method 1
l-1100.book Page 9 Friday, December 13, 2002 5:07 PM 6. Press to delete the document, or # to cancel deleting. SYMBOLS 7. Press Stop to return to standby mode. Stop 1 2 / 3 1 / 2 0 0 2 T U E 1 0 : 0 0 F a x T e l S T A N D A R D Method 2... - Page 214 l-1100.book Page 10 Friday, December 13, 2002 5:07 PM 6. Press to delete the document, or # to cancel deleting. SYMBOLS 7. Press Stop to return to standby mode. Stop 1 2 / 3 1 / 2 0 0 2 T U E 1 0 : 0 0 F a x T e l S T A N D A R D 8-10...
-
Page 215: Chapter 9 Setting Up And Using Polling
l-1100.book Page 1 Friday, December 13, 2002 5:07 PM Chapter 9 Setting Up and Using Polling This chapter shows you how to set up and use polling sending and receiving. Polling is useful when one or both parties cannot be in the office at the same time. -
Page 216: What Is Polling
❏ If the other party’s machine does not support ITU-T subaddress/ password transactions, you can ask them to set the polling ID to 255 or 11111111 binary when the other party’s machine is a Canon fax. Setting Up and Using Polling Chapter 9 HT1-2205-000-V.1.0 LSL User’s Guide... -
Page 217: Polling To Receive Faxes
l-1100.book Page 3 Friday, December 13, 2002 5:07 PM Polling to Receive Faxes The machine polling feature allows you to request a document to be faxed to you from another machine. The sender only needs to make sure the document is on his machine and ready to be sent: when your machine polls that machine, the document is sent automatically. - Page 218 l-1100.book Page 4 Friday, December 13, 2002 5:07 PM 5. Enter the destination(s) using any of the following three methods. ❏ One-Touch Speed Dialing: Press the desired One-Touch Speed Dialing button(s). ❏ Coded Speed Dialing: Press Coded Dial, then enter the two-digit code (00-99) using the numeric buttons.
-
Page 219: Canceling A Polling
l-1100.book Page 5 Friday, December 13, 2002 5:07 PM Canceling a Polling To cancel an incoming fax, follow this procedure: 1. Press Stop. Stop C A N C E L D U R I N G T X / R X ? Y E S = ( ✱... -
Page 220: Setting Up Polling Sending
l-1100.book Page 6 Friday, December 13, 2002 5:07 PM Setting Up Polling Sending This section shows you how to set up your machine to store and hold a document until it is polled by another machine to send it. Before You Can Be Polled to Send Before you set up your polling box, contact the parties who are going to poll your machine to receive documents and confirm the following points:... - Page 221 l-1100.book Page 7 Friday, December 13, 2002 5:07 PM 3. Press Set, then use to select 6.POLLING BOX. D A T A R E G S T R A T I O N 1 . U S E R S E T T I N G S D A T A R E G S T R A T I O N 6 .
- Page 222 l-1100.book Page 8 Friday, December 13, 2002 5:07 PM 9. Press Set. S E T U P F I L E 3 . T X P A S S WO R D 10. If you don’t want to enter the ITU-T password, press the display the next item and go to step 13.
-
Page 223: Scanning A Document Into Memory For Polling Sending
l-1100.book Page 9 Friday, December 13, 2002 5:07 PM 15. Press Set. P O L L I N G B O X 2 . C H A N G E D A T A 16. Press Stop to return to standby mode. Stop 1 2 / 3 1 / 2 0 0 2 T U E 1 0 : 0 0 F a x T e l... - Page 224 l-1100.book Page 10 Friday, December 13, 2002 5:07 PM ❏ If no password is registered for the document in the polling box and the other party’s polling request contains a password, then the document is not sent. 9-10 Setting Up and Using Polling Chapter 9 HT1-2205-000-V.1.0 LSL User’s Guide...
-
Page 225: Changing The Polling Box Setup
l-1100.book Page 11 Friday, December 13, 2002 5:07 PM Changing the Polling Box Setup Follow this procedure to change the setup of a polling box. 1. Open the One-Touch Speed Dialing panel. 2. Press Data Registration. Data R E G I S T R A T I O N Registration 1 . - Page 226 l-1100.book Page 12 Friday, December 13, 2002 5:07 PM 8. Press Set. C H A N G E D A T A 1 . F I L E N A M E 9. Use to display the item you want to change. 10.
-
Page 227: Canceling A Polling Box
l-1100.book Page 13 Friday, December 13, 2002 5:07 PM Canceling a Polling Box Follow this procedure to cancel a polling box. You cannot cancel a polling box when the polling box is holding a document for polling sending. 1. Open the One-Touch Speed Dialing panel. 2. - Page 228 l-1100.book Page 14 Friday, December 13, 2002 5:07 PM 7. Press Set, then enter the four-digit password using the numeric buttons. D E L E T E F I L E P A S S WO R D OPER SYMBOLS Tone 8.
-
Page 229: Chapter 10 Special Features
l-1100.book Page 1 Friday, December 13, 2002 5:07 PM Chapter 10 Special Features This chapter describes the special features of the machine. ❏ Special Dialing..................10-2 • Dialing Through a Switchboard............ 10-2 • Long Distance Dialing ..............10-3 How to Enter Pauses..............10-3 •... -
Page 230: Special Dialing
l-1100.book Page 2 Friday, December 13, 2002 5:07 PM Special Dialing This section explains special dialing features, such as dialing through a switchboard and dialing international numbers. Dialing Through a Switchboard A PBX (Private Branch Exchange) is an on-site telephone switchboard. If your machine is connected through a PBX or other telephone switching system, you have to dial the outside line access number first, and then dial the number of the party you are calling. -
Page 231: Long Distance Dialing
l-1100.book Page 3 Friday, December 13, 2002 5:07 PM Long Distance Dialing When you register a long distance number, you may have to insert a pause either within or after the number. For long distance dialing, the location and length of the pause may differ depending on the telephone system. -
Page 232: Using Tone Dialing On A Pulse Line
l-1100.book Page 4 Friday, December 13, 2002 5:07 PM Using Tone Dialing On a Pulse Line Even if you have a pulse line, the machine enables you to use tone dialing once you have connected to the number you are calling. This lets you take advantage of many services that require tones, such as selecting options from telephone “touch-tone”... - Page 233 l-1100.book Page 5 Friday, December 13, 2002 5:07 PM When registering One-Touch Speed Dialing and Coded Speed Dialing numbers, if you enter Tone after the number, you will switch to tone dialing after the phone connection is made. Example: Operation Pause Pause Pause...
-
Page 234: Restricting Reception
l-1100.book Page 6 Friday, December 13, 2002 5:07 PM Restricting Reception By enabling this feature, you can restrict reception of faxes to only the numbers registered for speed dialing on your machine. This feature is useful to prevent reception of unsolicited faxes (e.g. junk mail). Follow this procedure to enable or disable receiving restriction: 1. - Page 235 l-1100.book Page 7 Friday, December 13, 2002 5:07 PM ❏ To disable restriction, select OFF, then go to step 10. 8. Press Set. R X C O N D I T I O N R E G I S T E R E D S E N D R 9.
- Page 236 l-1100.book Page 8 Friday, December 13, 2002 5:07 PM 10-8 Special Features Chapter 10 HT1-2205-000-V.1.0 LSL User’s Guide...
-
Page 237: Chapter 11 Making Copies
l-1100.book Page 1 Friday, December 13, 2002 5:07 PM Chapter 11 Making Copies This chapter describes how to make copies with your machine. ❏ Making Copies ..................11-2 11-1 Chapter 11 Making Copies HT1-2205-000-V.1.0 LSL User’s Guide... -
Page 238: Making Copies
l-1100.book Page 2 Friday, December 13, 2002 5:07 PM Making Copies One of the machine’s convenient features is its ability to make up to 99 high-quality copies of a document. To make copies, do the following: Be sure to adjust the document feed lever before loading your document. - Page 239 l-1100.book Page 3 Friday, December 13, 2002 5:07 PM 3. If you want to reduce the size of the copies, open the One-Touch Speed Dialing panel, and use to select the reduction percentage you want. C O P Y 1 0 0 % C A S S E T T E L T R ❏...
- Page 240 l-1100.book Page 4 Friday, December 13, 2002 5:07 PM 6. Press Start/Copy to begin copying. Start / Copy C O P Y I N G ❏ To stop copying, press Stop. You may then need to lift the operation panel to remove the document. See “Jams in the Automatic Document Feeder (ADF)?,”...
- Page 241 l-1100.book Page 1 Friday, December 13, 2002 5:07 PM Chapter 12 Reports and Lists This chapter describes how to print reports and lists. These include activity reports (transmission and reception reports), lists of registered numbers, list of user’s data registered in the machine and the memory clear report.
-
Page 242: Activity Report
l-1100.book Page 2 Friday, December 13, 2002 5:07 PM Activity Report The Activity Report is printed out automatically by the machine after every 20 sending and receiving transactions. This report lists the details of the documents you have sent or received so that you can keep track of the transaction operations your machine has performed. -
Page 243: Chapter 12 Reports And Lists
l-1100.book Page 3 Friday, December 13, 2002 5:07 PM 1 2 / 3 1 / 2 0 0 2 0 9 : 5 8 FA X 8 3 3 4 4 2 3 W O R L D E S TAT E , I N C . 0 0 1 ❉... -
Page 244: Transmission (Tx) Reports
l-1100.book Page 4 Friday, December 13, 2002 5:07 PM Transmission (TX) Reports The machine normally prints a report only when an error occurs during sending (TX Error Report). However, you can set the machine to print a report every time you send a document (TX Report). If you send a document using memory, you can also select whether the first page of the document is printed with the report. -
Page 245: Tx Report
l-1100.book Page 5 Friday, December 13, 2002 5:07 PM TX Report 1 2 / 3 1 / 2 0 0 2 0 9 : 5 8 FA X 8 3 3 4 4 2 3 WORLD ESTATE,INC. ❉ ❉ ❉ ❉ ❉ ❉ ❉ ❉ ❉ ❉ ❉ ❉ ❉ ❉ ❉ ❉ ❉ ❉ ❉ ❉ ❉ ❉... -
Page 246: Multi Tx/Rx Report
l-1100.book Page 6 Friday, December 13, 2002 5:07 PM PGS. SENT When OK appears under RESULT (see below), PGS.SENT represents the number of pages that were successfully transmitted when an error did not occur in the first attempt or in consequent retries. When NG appears under RESULT (see below), PGS.SENT indicates the pages after this page were not sent. -
Page 247: Reception (Rx) Report
l-1100.book Page 7 Friday, December 13, 2002 5:07 PM Reception (RX) Report Normally the machine does not print a reception report (RX Report) unless you set it to do so. You can set the machine to print the RX Report every time you receive a document or only if an error occurs during receiving. -
Page 248: Memory Clear Report
l-1100.book Page 8 Friday, December 13, 2002 5:07 PM Memory Clear Report If you experience a power failure, all documents stored in memory can be saved for up to approximately 1 hour. If power is not restored to the machine within 1 hour, the documents in memory will be lost. If this time limit has elapsed by the time power is restored to the machine, as soon as power is restored a list of documents deleted from the memory as a result of the power failure is printed automatically. -
Page 249: Speed Dialing Lists
l-1100.book Page 9 Friday, December 13, 2002 5:07 PM Speed Dialing Lists Your machine can print speed dialing lists. These lists allow you to review the numbers and names registered under One-Touch Speed Dialing buttons and Coded Speed Dialing codes (including Group Dialing numbers). - Page 250 l-1100.book Page 10 Friday, December 13, 2002 5:07 PM 6. Use to select YES or NO. S O R T E D O U T P U T 1 . N O S O R T E D O U T P U T 2 .
-
Page 251: One-Touch Speed Dial List
l-1100.book Page 11 Friday, December 13, 2002 5:07 PM One-Touch Speed Dial List 1 2 / 3 1 / 2 0 0 2 1 0 : 3 2 FA X 8 3 3 4 4 2 3 WORLD ESTATE,INC. ❉ ❉ ❉ ❉ ❉ ❉ ❉ ❉ ❉ ❉ ❉ ❉ ❉ ❉ ❉ ❉ ❉ ❉ ❉ ❉ ❉ ❉ ❉ ❉ ❉ ❉ ❉ ❉ ❉ ❉ ❉ ❉ ❉ ❉ ❉ ❉... -
Page 252: Coded Speed Dial List
l-1100.book Page 12 Friday, December 13, 2002 5:07 PM Coded Speed Dial List 1 2 / 3 1 / 2 0 0 2 1 0 : 3 2 FA X 8 3 3 4 4 2 3 WORLD ESTATE,INC. ❉ ❉ ❉ ❉ ❉ ❉ ❉ ❉ ❉ ❉ ❉ ❉ ❉ ❉ ❉ ❉ ❉ ❉ ❉ ❉ ❉ ❉ ❉ ❉ ❉ ❉ ❉ ❉ ❉ ❉ ❉ ❉ ❉ ❉ ❉ ❉... -
Page 253: Group Dial List
GROUP DIAL LIST ❉ ❉ ❉ ❉ ❉ ❉ ❉ ❉ ❉ ❉ ❉ ❉ ❉ ❉ ❉ ❉ ❉ ❉ ❉ ❉ ❉ ❉ ❉ ❉ ❉ ❉ ❉ ❉ ❉ ❉ CANON GROUP 01] 876 2398 CANON TX... -
Page 254: User's Data List
l-1100.book Page 14 Friday, December 13, 2002 5:07 PM User’s Data List You can print a list of the data registered in your machine. This list is useful when you want to review the user data information you may have entered (such as your name and number, the date and time) and all other settings currently selected. - Page 255 l-1100.book Page 15 Friday, December 13, 2002 5:07 PM 1 2 / 3 1 /2002 13:36 8334423 WORLD ESTATE,INC. ❉ ❉ ❉ ❉ ❉ ❉ ❉ ❉ ❉ ❉ ❉ ❉ ❉ ❉ ❉ ❉ ❉ ❉ ❉ ❉ ❉ ❉ ❉ ❉ ❉ ❉ ❉ ❉ ❉...
-
Page 256: Doc Memory List
❉ ❉ ❉ ❉ ❉ ❉ ❉ ❉ ❉ ❉ ❉ ❉ ❉ ❉ ❉ ❉ ❉ ❉ ❉ ❉ ❉ ❉ ❉ ❉ ❉ ❉ ❉ ❉ TX/RX NO MODE CONNECTION TEL/ID PGS . SET TIME ST. TIME 0051 DEL SQ BDCST 01] CANON 1 2 / 3 1 09:30 09:35 516 328 5000 09:35 12-16 Reports and Lists Chapter 12 HT1-2205-000-V.1.0 LSL User’s Guide... -
Page 257: Frequently Asked Questions
l-1100.book Page 1 Friday, December 13, 2002 5:07 PM Chapter 13 Frequently Asked Questions If your machine is not operating properly, use the information and suggestions in this chapter to try to solve the problem. ❏ If You Cannot Solve the Problem............13-2 ❏... -
Page 258: If You Cannot Solve The Problem
If the machine makes strange noises, or emits smoke or strange smells, disconnect the power cord immediately and contact your local authorized Canon Facsimile Dealer. Do not attempt to disassemble or repair the machine yourself. Attempting to repair the machine yourself may void the limited warranty. -
Page 259: Problems Index
l-1100.book Page 3 Friday, December 13, 2002 5:07 PM Problems Index Problem See page Paper Jams....................13-5 Jams in the Automatic Document Feeder (ADF)?......13-5 Jams in the Output Slots?..............13-7 Jams in the Paper Cassette? ............... 13-8 Jams Inside the Machine? ..............13-10 Jams in the Front Area of the Machine?........... - Page 260 l-1100.book Page 4 Friday, December 13, 2002 5:07 PM Problem See page Telephone Problems................... 13-31 The machine cannot dial? ..............13-31 Copying Problems..................13-32 The machine will not make a copy?..........13-32 MEMORY FULL appears in the LCD display when you are making multiple copies?............
-
Page 261: Paper Jams
l-1100.book Page 5 Friday, December 13, 2002 5:07 PM Paper Jams On occasion, the document feeding into the machine Automatic Document Feeder (ADF) or the paper in the paper cassette/the multi- purpose tray may misfeed or jam. If this happens, you can usually fix the problem using one of the following procedures. - Page 262 3. Remove the jammed page by pulling it in either direction. If the paper does not pull out easily, do not force it. Contact your local authorized Canon Facsimile Dealer. 4. When you are finished, close the operation panel by pressing it down from the center as shown.
-
Page 263: Jams In The Output Slots
l-1100.book Page 7 Friday, December 13, 2002 5:07 PM Jams in the Output Slots? Use this procedure if the recording paper jams or misfeeds in the output slots. If this happens, the message CLEAR PAPER JAM appears in the LCD display. 1. -
Page 264: Jams In The Paper Cassette
l-1100.book Page 8 Friday, December 13, 2002 5:07 PM Jams in the Paper Cassette? If the recording paper jams or misfeeds while you are printing or copying, check the following areas in the order described below. Be sure to remove any documents or printed pages from the machine before removing the paper jam. - Page 265 l-1100.book Page 9 Friday, December 13, 2002 5:07 PM 4. Remove the stack of paper from the cassette and do the following: a. Fan the stack of paper, and tap it on a flat surface to even out the stack. b.
-
Page 266: Jams Inside The Machine
l-1100.book Page 10 Friday, December 13, 2002 5:07 PM Jams Inside the Machine? 1. Open the front cover by lifting the release latch on the right side of the machine. ❏ Lift the cover forward to its open position. Do not open the front cover without lifting the release latch as this may cause damage to your machine. - Page 267 l-1100.book Page 11 Friday, December 13, 2002 5:07 PM 2. Hold the cartridge by its handle and remove it from the machine. ❏ Cover the cartridge with its original protective bag or a cloth to protect it from the light. HANDLE 3.
- Page 268 l-1100.book Page 12 Friday, December 13, 2002 5:07 PM 4. Locate the jammed piece of paper. ❏ First check the inside of the machine and then the front area. The fixing assembly (shaded) becomes extremely hot when the machine is in use. Be very careful not to touch it. 13-12 Frequently Asked Questions Chapter 13...
- Page 269 l-1100.book Page 13 Friday, December 13, 2002 5:07 PM If the paper has jammed near the multi-purpose tray slot Hold the machine steady and pull the jammed paper straight out from the machine. ❏ Do not tear the jammed paper. If the paper tears, remove the paper scraps from the machine.
- Page 270 l-1100.book Page 14 Friday, December 13, 2002 5:07 PM If the top edge of the paper is in the fixing assembly First move the jammed paper towards the machine 1; then pull it towards you to remove it 2. FIXING ASSEMBLY Be very careful not to touch the fixing assembly (shaded) as it becomes extremely hot during use.
-
Page 271: Jams In The Front Area Of The Machine
l-1100.book Page 15 Friday, December 13, 2002 5:07 PM Jams in the Front Area of the Machine? If the top edge of the paper has passed through the fixing assembly 1. Pass the paper under the roller as shown. 2. Use both hands to carefully pull the jammed paper. ❏... - Page 272 l-1100.book Page 16 Friday, December 13, 2002 5:07 PM If the paper has jammed near the face-up delivery slot Hold the front cover and gently pull the sheet through the exit slot. Do not close the front cover while removing a jammed sheet of paper. This will return the paper release lever to its locked position.
- Page 273 l-1100.book Page 17 Friday, December 13, 2002 5:07 PM ❏ The fixing assembly (shaded) becomes extremely hot when the machine is in use. Be very careful not to touch it. ❏ When removing the jammed paper, be careful not to touch the transfer charging roller as its surface is very delicate and susceptible to finger oil and scratches, which may lead to print quality deterioration.
-
Page 274: Jams In The Rear Cover Of The Machine
l-1100.book Page 18 Friday, December 13, 2002 5:07 PM Jams in the Rear Cover of the Machine? 1. Open the rear cover. Lift the paper cassette slightly and pull it out a little to help pulling out jammed paper. 2. Gently pull out any jammed paper from the rear area, being careful not to tear it. - Page 275 l-1100.book Page 19 Friday, December 13, 2002 5:07 PM 3. Close the rear cover (make sure it clicks in place). Gently insert the paper cassette into the machine until it clicks into position. 13-19 Chapter 13 Frequently Asked Questions HT1-2205-000-V.1.0 LSL User’s Guide...
-
Page 276: After Clearing A Paper Jam
l-1100.book Page 20 Friday, December 13, 2002 5:07 PM After Clearing a Paper Jam After removing the jammed paper, follow these steps: 1. Install the FX3 cartridge back in the machine (see page 2-33). 2. Move the paper release lever back to its original position (toward the front). -
Page 277: Problems Feeding Paper Into The Machine
l-1100.book Page 21 Friday, December 13, 2002 5:07 PM Problems Feeding Paper into the Machine If you are having problems feeding paper into the machine, check the following table. If you are using the multi-purpose tray, whenever you correct one of these problems, be sure to remove the paper from the multi-purpose tray and reload it. - Page 278 l-1100.book Page 22 Friday, December 13, 2002 5:07 PM Problem Possible cause Solution Several sheets feed The multi-purpose tray may Make sure the multi- through the multi- contain too many sheets. purpose tray is not filled purpose tray at once? past the limit.
- Page 279 l-1100.book Page 23 Friday, December 13, 2002 5:07 PM Problem Possible cause Solution Envelopes will not feed? The envelopes may not be Make sure the envelopes are loaded correctly. loaded properly. See page 4-13. Make sure there are no more than 7 envelopes in the multi-purpose tray.
-
Page 280: Faxing Problems
l-1100.book Page 24 Friday, December 13, 2002 5:07 PM Faxing Problems Use the following tables to solve problems that can occur when sending and receiving faxes with the machine. Sending Faxes Problem Possible cause Solution Cannot send a fax? The machine may have If you suspect this, overheated and shut itself disconnect the power cord... - Page 281 If none of the above solve the problem, try disconnecting the power cord for at least five seconds, then reconnecting it. If the problem persists, contact your local authorized Canon Facsimile Dealer. Please note that any documents stored in memory will be erased unless you reconnect it within 1 hour.
- Page 282 l-1100.book Page 26 Friday, December 13, 2002 5:07 PM Problem Possible cause Solution The machine cannot send a ECM receiving on the If the receiving machine fax using ECM? receiving machine may be does support ECM (continued) turned off. reception, call the other party and have them check if ECM reception is turned ECM sending on the machine...
-
Page 283: Receiving Faxes
l-1100.book Page 27 Friday, December 13, 2002 5:07 PM Receiving Faxes Problem Possible cause Solution The machine cannot The machine may not be set For the machine to receive receive faxes to receive automatically. faxes automatically, it must automatically? be in FAX ONLY MODE, ANS.MACHINE MODE, or Fax/Tel Mode. - Page 284 l-1100.book Page 28 Friday, December 13, 2002 5:07 PM Problem Possible cause Solution The machine will not An error may have occurred Check the LCD display for switch between during reception. an error message. See page telephone and fax calls 13-38 for a listing of the automatically? machine’s error messages.
- Page 285 l-1100.book Page 29 Friday, December 13, 2002 5:07 PM Problem Possible cause Solution See also “Printing Problems,” on page 13-33. The machine cannot The sending machine may If the sending fax does not receive faxes using not support ECM. support ECM, then the ECM? machine receives the fax in normal mode without error...
- Page 286 l-1100.book Page 30 Friday, December 13, 2002 5:07 PM Problem Possible cause Solution Errors occur frequently The telephone lines may be Lower the speed at which while receiving? in poor condition, or you the machine receives faxes may have a bad connection. in the RX START SPEED setting.
-
Page 287: Telephone Problems
l-1100.book Page 31 Friday, December 13, 2002 5:07 PM Telephone Problems Problem Possible cause Solution The machine cannot The telephone line may not Make sure the telephone dial? be connected properly. line is securely connected to the machine. See page 2-17. The machine may not be set Make sure the machine is set for the type of telephone line... -
Page 288: Copying Problems
l-1100.book Page 32 Friday, December 13, 2002 5:07 PM Copying Problems Problem Possible Cause Solution The machine will not The document may not be Make sure the document make a copy? placed correctly in the you are copying is set in the Automatic Document Feeder Automatic Document (ADF). -
Page 289: Printing Problems
(standby mode). If the Alarm lamp stays on, call your local authorized Canon Facsimile Dealer. Nothing prints? The power cord may not be Make sure the power cord connected securely. is connected securely to the machine and to a wall outlet. - Page 290 l-1100.book Page 34 Friday, December 13, 2002 5:07 PM Problem Possible cause Solution Printout does not match Paper may not be loaded and Make sure the paper is paper size? aligned correctly in the paper loaded correctly. cassette/the multi-purpose See page 2-39. tray.
-
Page 291: Print Quality Problems
l-1100.book Page 35 Friday, December 13, 2002 5:07 PM Print Quality Problems If the print quality is not what you expect it to be, check the problems and solutions below. Problem Possible cause Solution Print is not clear? The medium you are using Use only print media may not be supported by the specified in “Guidelines for... -
Page 292: General Problems
If the display remains blank, disconnecting the power cord, wait five seconds, then reconnect it. If the display still remains blank, contact your local authorized Canon Facsimile Dealer. 13-36 Frequently Asked Questions Chapter 13 HT1-2205-000-V.1.0 LSL User’s Guide... -
Page 293: If The Power Goes Out
l-1100.book Page 37 Friday, December 13, 2002 5:07 PM If the Power Goes Out If power to the machine is cut off, any documents stored in its memory will be retained for approximately one hour by a built-in battery. While power is out, you can only use the machine to receive telephone calls (if you have the handset or a telephone connected to the machine) and to make calls (if you have a telephone connected to the machine). -
Page 294: Error Codes, Messages, And Solutions
l-1100.book Page 38 Friday, December 13, 2002 5:07 PM Error Codes, Messages, and Solutions This table lists the messages that appear in the machine LCD display and the corresponding error codes that appear in activity reports, and tells what to do for each. Message Error Code Cause... - Page 295 l-1100.book Page 39 Friday, December 13, 2002 5:07 PM Message Error Code Cause Action BUSY/NO SIGNAL #018 The receiving Contact the other (continued) machine did not party and have them answer within 55 check their machine. seconds. You can also try to send the document manually.
- Page 296 l-1100.book Page 40 Friday, December 13, 2002 5:07 PM Message Error Code Cause Action CHECK POLLING ID #021 No subaddress Make sure the and/or password subaddress and/or has been entered on password match the your machine, or settings on the the subaddress other party’s and/or password...
- Page 297 Wait five seconds, then reconnect it. If the message remains in the LCD, contact your local authorized Canon Facsimile Dealer. CHK SUBADDR/ #083/102 You attempted to Contact the other PSWD send a document or...
- Page 298 l-1100.book Page 42 Friday, December 13, 2002 5:07 PM Message Error Code Cause Action ECM RX — The machine is If your local lines are receiving a fax in bad condition, using ECM. ECM receptions may take longer than normal reception.
- Page 299 l-1100.book Page 43 Friday, December 13, 2002 5:07 PM Message Error Code Cause Action MEMORY FULL #037 The machine’s Print out any memory is full documents that are because it has stored in memory. received too many Then start the documents, or a operation again.
- Page 300 l-1100.book Page 44 Friday, December 13, 2002 5:07 PM Message Error Code Cause Action PSWD POLL REJECT #084 You attempted to Contact the other poll a machine with party to check their a password, but the settings. If their other party has not machine does not set a password or support polling with...
- Page 301 l-1100.book Page 45 Friday, December 13, 2002 5:07 PM Message Error Code Cause Action SUBADD TX REJECT #080 You attempted to Contact the other send a document party to check their with a subaddress, settings. If their but the other party’s machine does not machine does not support reception...
- Page 302 l-1100.book Page 46 Friday, December 13, 2002 5:07 PM 13-46 Frequently Asked Questions Chapter 13 HT1-2205-000-V.1.0 LSL User’s Guide...
-
Page 303: Maintaining Your Machine
l-1100.book Page 1 Friday, December 13, 2002 5:07 PM Chapter 14 Maintaining Your Machine Your machine requires no maintenance other than periodic cleaning, and replacing of the toner cartridge as needed. ❏ Cleaning the Machine................. 14-2 • Cleaning the Machine’s Exterior..........14-2 •... -
Page 304: Cleaning The Machine
l-1100.book Page 2 Friday, December 13, 2002 5:07 PM Cleaning the Machine Clean your machine regularly to keep it in good operating condition. Follow these precautions whenever you clean the machine: ❏ When the power cord is disconnected, any documents stored in memory will be erased if you leave the machine disconnected for one hour or more. -
Page 305: Cleaning The Inside Of The Machine
l-1100.book Page 3 Friday, December 13, 2002 5:07 PM Cleaning the Inside of the Machine To prevent toner powder and paper dust from accumulating and affecting the quality of the machine’s printing, clean the inside of the machine periodically as follows. When you disconnect the power cord, any documents stored in memory will be erased if you leave the machine disconnected for one hour or more. - Page 306 l-1100.book Page 4 Friday, December 13, 2002 5:07 PM 3. Hold the cartridge by its handle and remove it as shown. HANDLE ❏ Store the cartridge in its protective bag to avoid exposure to light. 4. Use a clean, soft, dry, lint-free cloth to remove any toner or paper debris from the shaded area.
- Page 307 l-1100.book Page 5 Friday, December 13, 2002 5:07 PM 5. When you have finished cleaning the machine, replace the toner cartridge. ❏ Gently press the cartridge into the machine as far as it will go. Press down and back on the cartridge’s handle. 6.
-
Page 308: Cleaning The Scanner Components
l-1100.book Page 6 Friday, December 13, 2002 5:07 PM Cleaning the Scanner Components Periodically check the scanning glass and rollers. When you disconnect the power cord, any documents stored in memory will be erased if you leave the machine disconnected for one hour or more. - Page 309 l-1100.book Page 7 Friday, December 13, 2002 5:07 PM 3. Use a soft, dry, clean cloth to clean the scanning glass and rollers (shaded areas). ❏ If the document scanning glass and rollers are dirty, the documents you send, copy, or print will also be dirty. ❏...
- Page 310 l-1100.book Page 8 Friday, December 13, 2002 5:07 PM 5. Use a soft, dry, clean cloth to wipe up paper dust around the rollers. 6. When you are finished, close the operation panel by pressing it down from the center as shown. Be sure to close the operation panel until it locks into place.
-
Page 311: Transporting The Machine
l-1100.book Page 9 Friday, December 13, 2002 5:07 PM Transporting the Machine Whenever you plan to transport the machine, you need to prepare it so it will not be damaged during the move. 1. Disconnect the power cord from the wall outlet. 2. - Page 312 l-1100.book Page 10 Friday, December 13, 2002 5:07 PM 14-10 Maintaining Your Machine Chapter 14 HT1-2205-000-V.1.0 LSL User’s Guide...
-
Page 313: The Menu System
l-1100.book Page 1 Friday, December 13, 2002 5:07 PM Chapter 15 The Menu System This chapter summarizes the menu system. Use the information here as a guide to help you customize operations your machine performs. ❏ Understanding the Menu System............. 15-2 ❏... -
Page 314: Understanding The Menu System
l-1100.book Page 2 Friday, December 13, 2002 5:07 PM Understanding the Menu System The machine menu system allows you to customize the way your machine operates. The menu system consists of seven menus, each containing settings that control different functions of your machine. This chapter outlines the various menus and shows you how to use them. -
Page 315: Accessing The User Settings Menu
l-1100.book Page 3 Friday, December 13, 2002 5:07 PM Accessing the USER SETTINGS Menu 1. Open the One-Touch Speed Dialing panel. 2. Press Data Registration. Data Registration R E G I S T R A T I O N 1 . D A T A R E G S T R A T I O N 3. -
Page 316: User Settings
l-1100.book Page 4 Friday, December 13, 2002 5:07 PM USER SETTINGS For details on accessing the settings below, see page 15-3. Setting Description Sub-Settings 1.DATE & TIME Sets the current date and time. (See page 3-9.) – 2.UNIT Enters the fax/telephone number you want to appear –... -
Page 317: Accessing The Report Settings Menu
l-1100.book Page 5 Friday, December 13, 2002 5:07 PM Accessing the REPORT SETTINGS Menu 1. Open the One-Touch Speed Dialing panel. 2. Press Data Registration. Data Registration R E G I S T R A T I O N 1 . D A T A R E G S T R A T I O N 3. -
Page 318: Report Settings
l-1100.book Page 6 Friday, December 13, 2002 5:07 PM REPORT SETTINGS For details on accessing the settings below, see page 15-5. Setting Description Sub-Settings 1.TX REPORT Enables/disables automatic printing of a TX (transmission) PRINT ERROR ONLY REPORT. (See page 12-4.) OUTPUT YES OUTPUT NO PRINT ERROR ONLY: Prints a report only when a... -
Page 319: Accessing The Tx Settings Menu
l-1100.book Page 7 Friday, December 13, 2002 5:07 PM Accessing the TX SETTINGS Menu 1. Open the One-Touch Speed Dialing panel. 2. Press Data Registration. Data Registration R E G I S T R A T I O N 1 . D A T A R E G S T R A T I O N 3. - Page 320 l-1100.book Page 8 Friday, December 13, 2002 5:07 PM TX SETTINGS For details on accessing the settings below, see page 15-7. Setting Description Sub-Settings 1.ECM TX Enables/disables Error Correction Mode (ECM) during transmission. 2.MID PAUSE SET Selects the length of a pause entered within a fax/telephone 2 SEC (1 to 15) number with Pause.
-
Page 321: Accessing The Rx Settings Menu
l-1100.book Page 9 Friday, December 13, 2002 5:07 PM Accessing the RX SETTINGS Menu 1. Open the One-Touch Speed Dialing panel. 2. Press Data Registration. Data Registration R E G I S T R A T I O N 1 . D A T A R E G S T R A T I O N 3. - Page 322 l-1100.book Page 10 Friday, December 13, 2002 5:07 PM RX SETTINGS For details on accessing the settings below, see page 15-9. Setting Description Sub-Settings 1.ECM RX Enables/disables Error Correction Mode (ECM) during reception. 2.RX MODE Selects the receive mode. (See Chapter 7.) FAX/TEL AUTO SW If you select FAX/TEL AUTO SW or DRPD, you can select FAX ONLY MODE...
-
Page 323: Accessing The Printer Settings Menu
l-1100.book Page 11 Friday, December 13, 2002 5:07 PM Accessing the PRINTER SETTINGS Menu 1. Open the One-Touch Speed Dialing panel. 2. Press Data Registration. Data Registration R E G I S T R A T I O N 1 . D A T A R E G S T R A T I O N 3. - Page 324 l-1100.book Page 12 Friday, December 13, 2002 5:07 PM PRINTER SETTTINGS For details on accessing the settings below, see page 15-11. Setting Description Sub-Settings 1.RX REDUCTION Enables/disables reduction of documents to fit on the paper loaded in the multi-purpose tray or cassette. If you select ON, you can select the direction of the reduction.
-
Page 325: Accessing The Polling Box Menu
l-1100.book Page 13 Friday, December 13, 2002 5:07 PM Accessing the POLLING BOX Menu 1. Open the One-Touch Speed Dialing panel. 2. Press Data Registration. Data Registration R E G I S T R A T I O N 1 . D A T A R E G S T R A T I O N 3. -
Page 326: Polling Box
l-1100.book Page 14 Friday, December 13, 2002 5:07 PM POLLING BOX For details on accessing the settings below, see page 15-13. Setting Description Sub-Settings 1.SETUP FILE Set up a polling box to hold a document until it is polled by and –... -
Page 327: Accessing The System Settings Menu
l-1100.book Page 15 Friday, December 13, 2002 5:07 PM Accessing the SYSTEM SETTINGS Menu 1. Open the One-Touch Speed Dialing panel. 2. Press Data Registration. Data Registration R E G I S T R A T I O N 1 . D A T A R E G S T R A T I O N 3. -
Page 328: System Settings
l-1100.book Page 16 Friday, December 13, 2002 5:07 PM SYSTEM SETTINGS For details on accessing the settings below, see page 15-15. Setting Description Sub-Settings 1.RX RESTRICTION Restricts reception of faxes to the numbers registered for speed dialing on your machine. (See page 10-6.) If you select ON, you can select additional sub-settings. -
Page 329: Appendix Specifications
l-1100.book Page 1 Friday, December 13, 2002 5:07 PM Appendix Specifications The specifications for the machine are listed in this section. ❏ General ....................A-2 ❏ Plain Paper Fax..................A-4 ❏ Copier ....................A-6 ❏ Telephone ....................A-7 ❏ Printer ....................A-8 •... -
Page 330: General
l-1100.book Page 2 Friday, December 13, 2002 5:07 PM General Applicable line: Public Switched Telephone Network Compatibility: Data compression MH, MR, MMR system: FAX modem Modem type: Modem speed: 33600, 31200, 28800, 26400, 24000, 21600, 19200, 16800, 14400, 12000, 9600, 7200, 4800, 2400 bps (automatic fallback) Transmission speed: Approximately 3 seconds/page*... - Page 331 l-1100.book Page 3 Friday, December 13, 2002 5:07 PM Applicable standards: • Electrical safety: UL1950, C-UL • Radiation: FCC Part 15, Class B, IC • PTT: FCC Part 68, IC • Energy Star compliant • Others: CDRH, TSCA, FCC Part 255 Interface: Appendix Specifications...
-
Page 332: Plain Paper Fax
l-1100.book Page 4 Friday, December 13, 2002 5:07 PM Plain Paper Fax Automatic document • 30 letter- or A4-size sheets feeder capacity:* • 20 legal-size sheets • 1 sheet for sizes other than legal-, letter-, or A4-size sheets Manual document •... - Page 333 l-1100.book Page 5 Friday, December 13, 2002 5:07 PM • Standard mode: 203 dpi × 98 dpi Resolution: (8 pels/mm × 3.85 lines/mm) • Fine mode: 203 dpi × 196 dpi (8 pels/mm × 7.7 lines/mm) • Photo mode: 203 dpi × 196 dpi (8 pels/mm ×...
-
Page 334: Copier
l-1100.book Page 6 Friday, December 13, 2002 5:07 PM Networking: • Delayed transmission (up to 125 locations at a single pre-set time) • Sequential broadcast (up to 125 locations) • Automatic receiving • Non-ring reception • Deactivate ECM Report/reference: • Activity report (up to 20 transactions) •... -
Page 335: Telephone
l-1100.book Page 7 Friday, December 13, 2002 5:07 PM Telephone • Automatic FAX/TEL switchover • Answering machine connection (CNG detecting signal) • Telephone connection • Handset connection • Remote reception by telephone (Default reception ID: 25) • Tone button • Pause button Appendix Specifications HT1-2205-000-V.1.0 LSL User’s Guide... -
Page 336: Printer
l-1100.book Page 8 Friday, December 13, 2002 5:07 PM Printer Printing method: Laser beam printing 600 × 600 dpi Printing resolution: Paper handling: Automatic feed Paper cassette capacity: 250 sheets of letter or A4 (20 lb or 75 g/m Multi-purpose tray •... -
Page 337: Printable Area: Papers
l-1100.book Page 9 Friday, December 13, 2002 5:07 PM Printable Area: Papers The shaded area in the following figure shows the printable area for papers. Printable area: Letter size Legal size A4 size 8.5” 8.5” 210 mm Max. 0.24” Max. 0.24” Max. -
Page 338: Printable Area: Envelopes
l-1100.book Page 10 Friday, December 13, 2002 5:07 PM Printable Area: Envelopes The shaded portion in the following figure shows the printable area for envelopes. Printable area: U.S. Commercial No. 10 European DL 4.1” 110 mm Max. 0.16” Max. 4.0 mm Max. -
Page 339: Document Sizes
l-1100.book Page 11 Friday, December 13, 2002 5:07 PM Document Sizes The following illustrations show the largest and smallest documents you can feed into the machine. When the document feed lever is set to Automatic document feed Minimum Document Size Maximum Document Size 5.8"... - Page 340 l-1100.book Page 12 Friday, December 13, 2002 5:07 PM The figure below shows how much of a legal-, letter-, or A4-size document the machine scans when faxing or scanning. MAX. 0.16" (MAX. 4.0 mm) LETTER/LEGAL/A4 MAX. 0.16" (MAX. 4.0 mm) MAX.
-
Page 341: Pc Interface
l-1100.book Page 13 Friday, December 13, 2002 5:07 PM PC Interface Type: Printer Driver System requirements: • IBM or compatible computer with the following Pentium processor: ® ® • Microsoft Windows 98, Windows ® ® Windows 2000, or Windows ® Windows 98: A 90-megahertz (MHz) –... - Page 342 l-1100.book Page 14 Friday, December 13, 2002 5:07 PM A-14 Specifications Appendix HT1-2205-000-V.1.0 LSL User’s Guide...
-
Page 343: Glossary
l-1100.book Page 1 Friday, December 13, 2002 5:07 PM Glossary Alternating current. The type of electrical current available from a wall outlet. Activity report A journal of the machine’s fax transactions, both sent and received. Application program Software prepared for a specific function or set of functions. Developers who make application programs include drivers that support different types of printers. - Page 344 l-1100.book Page 2 Friday, December 13, 2002 5:07 PM Automatic redialing When the receiving machine is busy or does not answer, or when an error occurs while sending, the machine waits a specified time and then automatically redials the number. If the receiving machine is still busy or does not answer, the machine waits the specified time and dials again.
- Page 345 l-1100.book Page 3 Friday, December 13, 2002 5:07 PM Delayed sending The ability to send a document at a preset time in the future. You do not have to be in your office to use delayed sending to one or more destinations.
- Page 346 l-1100.book Page 4 Friday, December 13, 2002 5:07 PM FAX/TEL switching This option allows you to set the machine to automatically detect whether a call is from a fax or telephone. If the call is from another machine, the transmission is automatically received. If the call is from a telephone, the machine rings to let you know, so you can pick up the handset.
- Page 347 l-1100.book Page 5 Friday, December 13, 2002 5:07 PM Interface The connection between two devices that makes it possible for them to communicate with each other. The machine features a USB interface, which makes it compatible with IBM and similar personal computers. Interface cable The cable used to create the interface between a printer and a computer.
- Page 348 l-1100.book Page 6 Friday, December 13, 2002 5:07 PM Memory broadcast Allows you to send a scanned fax to as many as 125 locations at once, using a combination of One-Touch Speed Dialing, Coded Speed Dialing, and regular dialing. Memory sending Scans a document into memory before the machine dials the number(s) and sends it.
-
Page 349: Printer Driver
l-1100.book Page 7 Friday, December 13, 2002 5:07 PM Pause A timing entry required for registering certain long distance numbers and for dialing out through some telephone systems or switchboards. Pressing Pause enters a pause between digits of a telephone number. Photo The document setting you use for sending or copying documents with intermediate tones, such as photographs. - Page 350 l-1100.book Page 8 Friday, December 13, 2002 5:07 PM Random Access Memory. Memory that is used for temporary storage of information such as: documents you want to print, scanned and received documents, and downloaded fonts. RECEIVE MODE The button that controls how the machine receives fax and telephone calls.
- Page 351 l-1100.book Page 9 Friday, December 13, 2002 5:07 PM Regular dialing Pressing the individual numeric buttons to dial a fax or telephone number. Remote receiving ID The two-digit code that enables you to manually activate fax reception using a telephone that is connected to the machine. Remote reception Activating fax reception by answering a telephone that is connected to the machine, but that is not located near the machine.
- Page 352 l-1100.book Page 10 Friday, December 13, 2002 5:07 PM Sender ID Information printed at the top of a fax (also called TTI or Transmit Terminal ID): ❏ Date and time the fax was sent ❏ Sender’s fax/telephone number ❏ Sender’s name ❏...
- Page 353 Transmit Terminal ID. See Sender ID. See Sending. ™ (Ultra High Quality) An exclusive Canon digital image processing system that incorporates 64 shades of gray along with a special edge enhancement feature which ensures that text and photos are transmitted with ultimate clarity. Glossary...
- Page 354 l-1100.book Page 12 Friday, December 13, 2002 5:07 PM G-12 Glossary HT1-2205-000-V.1.0 LSL User’s Guide...
-
Page 355: Index
l-1100.book Page 1 Friday, December 13, 2002 5:07 PM Index Automatic Document Feeder (ADF) 2-23 6-22 adding pages Activity Report 13-5 jams 12-2 printing 6-24 removing document 12-3 sample Automatic redialing Alarm lamp 6-27 canceling 2-27 explanation Automatic redialling 15-4 ALARM VOLUME setting 6-28 setting up... - Page 356 l-1100.book Page 2 Friday, December 13, 2002 6:03 PM 2-21, 6-14 CHECK COVER/CART message STANDARD 13-39 Conventions 13-39 CHECK DOCUMENT message type 13-39 CHECK PAPER SIZE message 11-2 Copying 13-40 CHECK POLLING ID message features 13-40 CHECK PRINTER message 13-32 problems 13-41 CHK SUBADDR/PSWD massage...
- Page 357 l-1100.book Page 3 Friday, December 13, 2002 5:07 PM 10-2 through switchboard 10-4 tone 10-4 tone dialing on a pulse line ECM (Error Correction Mode) Dimensions ECM RX machine 13-42 message 15-16 DISPLAY LANGUAGE setting 15-10 setting Distinctive Ring Pattern Detection ECM TX 7-2, 7-16 (DRPD)
- Page 358 l-1100.book Page 4 Friday, December 13, 2002 5:07 PM 5-27 using Guides 2-23 document 7-6, 7-7 F/T RING TIME setting 2-23 paper Face-down delivery setting 2-23 slot Face-up delivery 4-10 setting Handset 2-23 slot 2-25 jack Fax number 6-15 sending with 3-10 registering your Hook button...
- Page 359 l-1100.book Page 5 Friday, December 13, 2002 5:07 PM 2-39, 4-12 recording paper Location choosing 15-4 KEYPAD VOLUME setting dimensions Long distance 10-3 dialing Label 2-5, 2-10 paper loading Labels Machine selecting 2-10 assembling 4-10 using 14-2 cleaning Latch 2-5, 2-23 components 2-23 release...
- Page 360 l-1100.book Page 6 Friday, December 13, 2002 6:36 PM 1-3, 7-14 MANUAL MODE Multitasking description 7-10 using Memory deleting documents from 7-13, 8-2 Name documents in 5-7, 5-17 changing printing list of documents in 6-15, 6-20 3-10 registering your sending 11-4, 13-43, 13-43 NO RX PAPER message...
- Page 361 l-1100.book Page 7 Friday, December 13, 2002 5:07 PM 2-23, 2-26 9-13 Operation panel canceling polling box setup 9-11 entering information via changing polling box setup Output slots to receive 13-7 jams POLLING BOX 15-13, 15-14 accessing the menu setting Power cord 2-19 connecting...
- Page 362 l-1100.book Page 8 Friday, December 13, 2002 6:36 PM 6-26 Pulse line manual 3-12 6-28 setting setting up 10-4 using tone dialing on a Reduction 11-2, 11-3 when copying Registering date guidelines 7-14 Receive mode receiving while ANS.MACHINE MODE time 3-10 FAX ONLY MODE your fax number...
- Page 363 l-1100.book Page 9 Friday, December 13, 2002 5:07 PM 6-13 FAX STANDARD Selecting 6-13 scanning automatic document feed 6-13, 11-2 setting manual document feed 6-13 SUPER FINE paper delivery 2-26 Resolution button print media 2-27 explanation Selector 6-13, 11-2 2-23, 4-9, 4-10 using paper delivery 15-10...
- Page 364 l-1100.book Page 10 Friday, December 13, 2002 5:07 PM 2-29 2-25 Delayed Transmission button jack 2-29 3-12 Memory Reference button setting type 2-29 1-12, 2-3 Polling button Temperature 2-29 Report button Testing 2-30 2-46 Search buttons machine 2-30 Space button Time 2-30 Tone button...
- Page 365 l-1100.book Page 11 Friday, December 13, 2002 5:07 PM 12-4, 12-5 TX report 15-6 TX REPORT setting TX SETTINGS menu 1-11 Ventilation 15-7 accessing 2-3, 2-19 Voltage description Volume 15-8 settings 15-4 ALARM VOLUME setting 15-16 TX START SPEED setting 15-4 CALLING VOLUME setting 13-45...
- Page 366 l-1100.book Page 12 Thursday, December 12, 2002 4:25 PM HT1-2205-000-V.1.0 LSL User’s Guide...
- Page 367 HT1-2205-000-V.1.0 LSL User’s Guide...
Need help?
Do you have a question about the Laser Class 2050P and is the answer not in the manual?
Questions and answers