Sign In
Upload
Manuals
Brands
KTM Manuals
Motorcycle
450 EXC AUS 2009
KTM 450 EXC AUS 2009 Manuals
Manuals and User Guides for KTM 450 EXC AUS 2009. We have
2
KTM 450 EXC AUS 2009 manuals available for free PDF download: Repair Manual, Setup Instructions
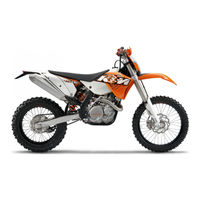
KTM 450 EXC AUS 2009 Repair Manual (272 pages)
Brand:
KTM
| Category:
Motorcycle
| Size: 82.98 MB
Table of Contents
Table of Contents
2
Means of Representation
6
Important Notes
7
Serial Numbers
8
Chassis Number
8
Type Label
8
Key Number (All EXC Models)
8
Engine Number
9
Fork Part Number
9
Shock Absorber Part Number
9
Motorcycle
10
Raising the Motorcycle with the Lift Stand
10
Removi Ng the Motorcycle from the I Ift Stand
10
Starting
10
Starting the Motorcycle for a Check
11
Ollfork, TRIPLE CLAMP
12
Adjusting the Compression Damping of the Fork
12
Adjusling Ihe Rebound Damping of Ihe Fork
12
Adjusling Spring Preload of Ihe Fork
12
Bleeding Fork Legs
13
Cleaning the Dust Bools of Ihe Fork Legs
13
Loosening the Fork Protector
13
Positioning the Fork Protector
14
Removing the Fork Legs
14
Inslalling Fork Legs
14
Removing the Fork Proteclor
15
Inslalling Ihe Fork Protector
15
Performing a Fork Service
16
Disassembling the Fork Legs
16
Cartridge Disassembly
19
Disassembling the Compression Damping Fitting
21
Checking the Fork Legs
21
Assembling Ihe Compression Damping Fitting
22
Assembling Ihe Cartridge
23
Assembling the Fork Legs
25
Greasing the Steering Head Bearing
29
Removing the Lower Triple Clamp (EXC USA, All SIX DAYS Models)
29
Inslalling Ihe Lower Triple Clamp (EXC USA, All SIX DAYS Models)
29
Removing the Lower Triple Clamp (EXC EU/AUS)
31
Installing the Lower Triple Clamp (EXC Euiaus)
32
Fork Offset (XC-W SIX DAYS)
33
Setting the Fork Offset (XC-W SIX DAYS)
34
Checking the Steering Head Bearing Play
34
SIX DAYS Models)
34
Adjusling Play of Steering Head Bearing (EXC EU/AUS)
35
02/Handlebar, Instruments
36
Handlebar Position
36
Adjusting Handlebar Position
36
Adjusling the Basic Position of Ihe Clulch Lever
36
Checking the Choke Cable Routing
37
Exc Six Days)
37
Checking the Choke Cable Play (EXC EU, EXC SIX DAYS)
37
Adjusting the Choke Cable Play (EXC EU, EXC SIX DAYS)
37
Checking the Throttle Cable Routing
37
Checking the Play in Ihe Throttle Cable
38
Adjusling the Play in the Throttle Cable
38
03/Frame
39
Removing the Engine Sprocket Cover
39
Installing the Engine Sprocket Cover
39
04/Shock ABSORBER, SWINGARM
40
Adjusting High-Speed Compression Damping of the Shock Absorber
40
Adjusting the Low-Speed Compression Damping of Ihe Shock Absorber
40
Adjusting Rebound Damping of the Shock Absorber
41
Measuring Rear Wheel Sag Unloaded
41
Checking the Static Sag of the Shock Absorber
41
Checking Ihe Riding Sag of Ihe Shock Absorber
42
Adjusting the Spring Preload of the Shock Absorber
42
Adjusting the Riding Sag
43
Removi Ng the Shock Absorber
43
Installing the Shock Absorber
43
Perform a Shock Absorber Service
44
Removing the Spring
44
Disassembling the Damper
45
Disassembling the Pislon Rod
46
Disassembling the Seal Ring Retainer
47
Replacing the Pilot Bushing
48
Checking the Damper
48
Disassembling the Rebound Adjuster
49
Removing the Heim Joint
50
Installing the Heim Joint
50
Assembling the Rebound Adjuster
51
Assembling the Seal Ring Retainer
52
Assembling the Piston Rod
52
Assembling the Damper
54
Bleeding and Filling the Damper
56
Filling Ihe Damper Wilh Nitrogen
58
Installing the Spring
59
Changing the Heim Joint
60
05/Exhaust
62
Removing the Manifold
62
Installing the Manifold
62
Removi Ng Mai N si Lencer
62
Installing the Main Silencer
62
Changing the Glass Fiber Yarn Filling of the Main Silencer
63
06/Air Filter
64
Removing the Air Filter Box Lid
64
Installing the Air Filter Box Lid
64
Removing the Air Filter
64
Installing the Air Filter
64
Cleaning the Air Filter and Air Filler Box
65
Removing the Carburetor Connection Boot
65
Installing the Carburetor Connection Boot
65
07/Fuel Tank, Seat, Trim
66
Opening Filler Cap
66
Closing Filler Cap
66
Removi Ng the Seal
66
Mounting the Seal
66
Removing the Fuel Tank
66
Installing the Fuel Tank
67
Fuel Tap
68
08!Mask, Fender
69
Removi Ng the Front Fender
69
Install I Ng the Front Fender
69
Removing Headlight Mask with Headlight
69
Refitting the Headlight Mask with the Headlight
69
09/Front Wheel
71
Removi Ng Front Wheel
71
Checking the Brake Discs
72
Removing the Iront Brake Disc
72
Install I Ng the Front Wheel
73
Installing the Front Brake Disc
73
Checking the Tire Condition
73
Checking Tire Air Pressure
73
Checking Spoke Tension
74
Lo/Rear WHEEL
75
Removing the Rear Wheel
75
Installing the Rear Wheel
75
Removing the Rear Brake Disc
76
Installing the Rear Brake Disc
76
Checking the Chain Tension
76
Adjusting the Chain Tension
77
Adjusting Chain Guide
78
Checking the Chain, Rear Sprocket, Engine Sprocket and Chain Guide
78
Checking for Chain Dirt Accumulation
80
Clean I Ng the Chai N
80
11IWIRING HARNESS, Battery
81
Removing the Main Fuse
81
Installing the Main Fuse
81
XC-W Six Days)
81
Removi Ng the Battery
82
Installing the Battery
82
Rechargi Ng the Battery
82
Checking the Quiescent Current
83
Checking the Charging Voltage
83
Checking the Voltage Regulator
84
Checking the Starter Relay
85
13/Brake System
86
Checking the Front Brake Linings
86
Removing Front Brake Linings
86
Installing the Front Brake Linings
86
Changing the Front Brake Linings
87
Checking Free Travel of Hand Brake Lever
88
(XC-W SIX Days)
89
Models)
89
Checking the Brake Iluid Level of the Iront Brake
89
Adding Iront Brake Iluid
90
Changing the Iront Brake Iluid
90
Checking Rear Brake Linings
91
Removing Rear Brake Linings
92
Mounting Rear Brake Linings
92
Changing the Rear Brake Linings
93
Checking the Iree Travel of the Loot Brake Lever
94
Adjusting the Basic Position 01 the Loot Brake Lever
94
Checking Rear Brake Iluid Level
95
Adding Brake Fluid to the Rear Brake Circuit
95
Changing the Rear Brake Iluid
96
14/Lighting SYSTEM, INSTRUMENTS
98
Adjusting the Speedometer Lunctions
98
Setting Kilometers or Miles
98
Activating the Additional Lunctions
99
Setting the Wheel Circumference
99
Setting the Clock
100
Checking the Headlight Adjustment
100
Adjusting the Headlight Range
100
Engine
101
Removing the Engine
101
Installing the Engine
102
Disassembling the Engine
104
Preparations
104
Draining the Engine Oil
104
Removing the Oil Lilter
104
Draining the Gear Oil, Removing the Gear Oil Screen
104
Removi Ng the Starter Motor
105
Removi Ng the Spark Pi Ug
105
Removing the Valve Cover
105
Removing the Shift Lever
105
Removi Ng the Alternator Cover
106
Positioning the Engine at Ignition Top Dead Center
106
Removing the Timing Chain Tensioner
107
Removing the Camshaft
107
Removing the Cylinder Head
107
Removing the Piston
107
Removi Ng the Rotor
108
Removing the Balance Weight
108
Removing the Timing Chain Guide Rail
108
Removing the Timing Chain Tensioning Rail
109
Removing the Timing Chain Securing Guide
109
Removing the Timing Chain
109
Removing the Ignition Pulse Generator
109
Removing the Suction Pump
109
Removing the Kickstarter
110
Removing the Water Pump Cover
110
Disassembling the Clutch Disks
111
Removi Ng the Pri Mary Gear Nut
111
Removing the Outer Clutch Hub
111
Removing the Balancer Shaft
112
Removing the Torque Limiter
112
Removing the Starter Idler Gear
112
Removing the Kickstarter Idler Gear
112
Removing the Kickstarter Idler Gear
113
Removing the Shift Shaft
113
Removing the Shift Drum Locating Unit
113
Removing the Locking Lever
113
Removing the Oil Pump Gears
113
Removing the Oil Pumps
114
Removing the Primary Gear
114
Removing the Iree Wheel Gear
114
Removi Ng the Left Section 01 the Engi Ne Case
115
Removing the Shift Rails
116
Removing the Shift Drum
116
Removing the Shift Lorks
116
Removing the Transmission Shafts
116
Removing the Crankshaft
117
Engine - Work on the Individual Parts
118
Working on the Right Section of the Engine Case
118
Working on the Left Section of the Engine Case
119
Removing the Oil Pressure Regulator Valve
121
Checking Spring Length of Oil Pressure Regulator Valve
121
Installing the Oil Pressure Regulator Valve
121
Removing the Crankshaft Seal Ring in the Clutch Cover
121
Installing the Crankshaft Seal Ring in the Clutch Cover
121
Removing the Water Pump
122
Installing the Water Pump
122
Checking the Balancer Shaft
123
Removing the Timing Chain Sprocket
123
Installing the Timing Chain Sprocket
124
Changing the Connecting Rod, Conrad Bearing and Crank Pin
124
Checking Crankshaft Run-Out at Bearing Pin
126
Cylinder - Nikasil" Coating
126
Checking/Measuring Cylinder
126
Checking/Measuring the Piston
127
Checking the Piston Ring End Gap
127
Piston/Cylinder - Determining the Mounting Clearance
128
Checking the Oil Pumps
128
Disassembling the Autodecompressor
128
Assembling the Autodecompressor
129
Checking Camshaft
129
Checking the Timing Assembly
130
Preparing the Timing Chain Tensioner for Installation
130
Removing the Rocker Arm
131
Removing the Valves
131
Changing Camshaft Bearing
132
Checking Valves
132
Checking Valve Springs
133
Checking Valve Spring Seat
133
Checking the Cylinder Head
133
Checking the Rocker Arm Shafts
134
Installing the Valves
134
Installing the Rocker Arm
135
Checking the Clutch
135
Checking Shift Mechanism
136
Preassembling the Shift Shaft
137
Disassembling the Main Shaft
137
Assembling the Main Shaft
138
Disassembling the Countershaft
138
Assembling the Countershaft
139
Checking the Transmission
139
Premounting the Kickstarter Shaft
140
Checking the Electric Starter Mode
141
Removing the Freewheel
142
Checking the Freewheel
142
Installing the Free Wheel
142
30/ENGINE Assembly
144
Installing the Crankshaft
144
Installing the Transmission Shafts
144
Installing the Shift Forks
144
Installing the Shift Drum
145
Installing the Shift Rails
145
Installing the Left Engine Case
145
Installing the Free Wheel Gear
146
Installing the Primary Gear
146
Installing the Oil Pumps
146
Installing the Oil Pump Gears
147
Installing the Locking Lever
147
Installing the Shift Drum Locating Uni
147
Installing the Shift Shaft
147
Installing the Kickstarter Idler Gear
148
Installing the Kickstarter Shaft
148
Installing the Starter Idler Gear
148
Installing the Torque Limiter
148
Installing the Balancer Shaft
149
Installing the Outer Clutch Hub
149
Installing the Primary Gear Nut
150
Installing the Clutch Discs
150
Installing the Clutch Cover
150
Installing the Water Pump Cover
151
Installing the Kickstarter
151
Installing the Suction Pump
151
Installing the Ignition Pulse Generator
152
Installing the Timing Chain
152
Installing the Timing Chain Securing Guide
152
Installing the Timing Chain Tensioning Rail
152
Installing the Timing Chain Guide Rail
153
Installing the Balance Weight
153
Installing the Rotor
153
Installing the Piston
153
Installing the Cylinder Head
155
Installing the Timing Chain Tensioner
156
Installing the Camshaft
157
Checking the Valve Clearance
157
Adjusting the Valve Clearance
157
Installing the Alternator Cover
157
Installing the Shift Lever
158
Installing the Valve Cover
158
Installing the Spark Plug
158
Installing the Starter Motor
158
Installing the Oil Filter
159
Filling up with Engine Oil
159
Filling up with Gear Oil
159
Removing the Engine from the Work Stand
160
31/Carburetor
161
Choke (EXC AUS/USA, XC.W SIX DAYS)
161
Choke (EXC EU, EXC SIX DAYS)
161
Carburetor - Adjusting the Idle Speed
161
Emptying the Carburetor Float Chamber
162
Removing the Carburetor
163
Installing the Carburetor
163
Checking/Adjusting the Carburetor Components
164
Checking the Throttle Valve Sensor
165
Disassembling the Carburetor
165
Checking the Choke Slide
168
Checking the Jet Needle
168
Checking the Throttle Slide
168
Checking the Needle Jet
169
Checking the Float Needle Valve
169
Assembling the Carburetor
169
Checking/Adjusting the Float Level
172
Checking/Setting the Throttle Slide Opening
172
Checking/Adjusting the Accelerator Pump
173
Adjusting the Position of the Throttle Position Sensor
173
321Clutch
175
Checking the Fluid Level of Hydraulic Clutch
175
Changing the Hydraulic Clutch Fluid
175
Removing the Engine Sprocket
177
Installing the Engine Sprocket
177
33Ftransmission
177
Checking the Anti-Freeze and Coolant Level
178
Cooling System
178
35Iwater Pump, Cooling System
178
Checking the Coolant Level
179
Draining Coolant
179
Refilling Coolant
180
Oil Circuit
181
Checking Engine Oil Level
181
Changing Engine Oil and Oil Filter, Cleaning Engine Oil Screen
182
Draining Engine Oil, Cleaning Engine Oil Screen
182
Removing the Oil Filter
182
Installing the Oil Filte
183
Filling up with Engine Oil
183
Adding Engine Oil
184
Checking the Engine Oil P'essu'e
184
Checking the Gea, Oil Level
185
Changing Gear Oil, Cleaning Gear Oil Screen
185
Draining Gear Oil, Cleaning Gear Oil Screen
185
Filling up with Gea, Oil
186
Adding Gea, Oil
186
381Lubrication System
181
39/1Gnition System
188
Checking the Ignition System
188
Ignition Coil - Checking the P,Imary Winding
189
Ignition Coil - Checking the Secondary Winding
189
Checking the Spa,K Plug Connecto
190
Alternato, - Checking the Cha,Ging Coil of the Ignition
190
Alternato, - Checking the Light and Battery Winding
190
Checking the Ignition Pulse Gene,Ato
191
Removi Ng the Stato
192
Installing the Stato
192
40/Electric Starter
193
Checking the Starte' Mota
193
Technical Data - Engine
194
Gapacity - Engine Oil
194
Gapacity - Transmission Oil
195
Gapacity - Coolant
195
Technical Data - Tolerance, Wear Limits of Engine
196
Technical Data - Engine Tightening Torques
197
Technical Data - Carburetor
199
All 400 Models
199
Exc Eu/Aus, 450 Exc Six Days
199
Exc Usa
199
450 XC-W Six Days Usa
200
Exc Eu/Aus, 530 Exc Six Days
200
Exc Usa
200
530 XC-W Six Days Usa
201
Technical Data - Carburetor Tightening Torques
202
Technical Data - Chassis
203
Lighting Equipment
204
Ti,Es
204
Gapacity - Fuel
204
Technical Data - Fork
205
Technical Data - Shock Absorber
206
Technical Data - Chassis Tightening Torques
207
Cleaning
208
Clean I Ng the Motorcycle
208
Storage
209
Sto'age
209
Putting into Ope,Ation Afie, Sto,Age
209
Service Schedule
210
Service Wo,K (as Additional O'de')
211
Wiring Diagram
212
EXC EU, EXC SIX Days)
212
EXC EU, EXC SIX Days)
214
EXC EU, EXC SIX Days)
216
EXC EU, EXC SIX Days)
218
EXC EU, EXC SIX Days)
220
Exc Aus)
222
Exc Aus)
224
Exc Aus)
226
Exc Aus)
228
Exc Aus)
230
Exc Usa)
232
Exc Usa)
234
Exc Usa)
236
Exc Usa)
238
Exc Usa)
240
XC-W Six Days)
242
XC-W Six Days)
244
XC-W Six Days)
246
XC-W Six Days)
248
Substances
250
Auxiliary Substances
252
Special Tools
254
Standards
267
Index
268
Advertisement
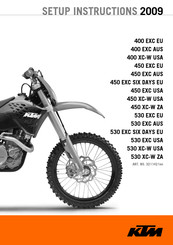
KTM 450 EXC AUS 2009 Setup Instructions (14 pages)
Brand:
KTM
| Category:
Motorcycle
| Size: 0.46 MB
Table of Contents
Means of Representation
4
Installing the Battery
8
Recharging the Battery
8
Technical Data - Tightening Torques for Chassis
11
Auxiliary Substances
13
Advertisement
Related Products
KTM 450 EXC AUS
KTM 450 EXC AUS 2010
KTM 450 EXC AUS 2013
KTM 450 EXC AUS 2011
KTM 450 EXC AUS 2014
KTM 450 EXC AU 2016
KTM 450 EXC AU 2015
KTM 450 EXC-R AUS/UK 2008
KTM 450 EXC EU 2014
KTM 450 EXC-F 2021
KTM Categories
Motorcycle
Motorcycle Accessories
Offroad Vehicle
Engine
Bicycle Accessories
More KTM Manuals
Login
Sign In
OR
Sign in with Facebook
Sign in with Google
Upload manual
Upload from disk
Upload from URL