Cisco Small Business WRP400 User Manual
Wireless-g broadband router with 2 phone ports
Hide thumbs
Also See for Small Business WRP400:
- Regulatory compliance and safety information manual (35 pages) ,
- Quick start manual (2 pages) ,
- Administration manual (173 pages)
Table of Contents
Advertisement
Quick Links
Download this manual
See also:
Administration Manual
Advertisement
Table of Contents
Troubleshooting

Related Manuals for Cisco Small Business WRP400


Summary of Contents for Cisco Small Business WRP400
- Page 1 USER GUIDE Cisco Small Business WRP400 Wireless-G Broadband Router with 2 Phone Ports...
- Page 2 © 2009 Cisco Systems, Inc. All rights reserved. OL-18475-01...
-
Page 3: Table Of Contents
Contents Chapter 1: Getting to Know the WRP400 Front Panel Back Panel Side Panel Placement Positions Chapter 2: Before You Begin: Understanding Wireless Security Change the Default Wireless Network Name or SSID Change the Default Router Password Enable MAC Address Filtering for Wireless Access... - Page 4 Wireless > Advanced Wireless Settings Chapter 7: Configuring Network Security and Controlling Internet Access Security > Firewall Firewall Internet Filter Web Filter Security > VPN Passthrough Access Restrictions > Internet Access Creating or Modifying an Internet Access Policy Cisco WRP400 User Guide...
- Page 5 Firmware Upgrade Administration > Config Management Backup Configuration Restore Configuration Administration > Reboot Chapter 10: Using the Status Screens Status > Router Router Information Internet Connection Status > Mobile Network Mobile Network Status Data Card Status Cisco WRP400 User Guide...
- Page 6 Call Forward Settings Selective Call Forward Settings Speed Dial Settings Supplementary Service Settings Distinctive Ring Settings Ring Settings Voice > Admin Login Chapter 12: Interactive Voice Response Menu Overview Menu Commands Appendix A:Troubleshooting General Troubleshooting Mobile Network Troubleshooting Cisco WRP400 User Guide...
- Page 7 Contents Appendix B:Specifications Appendix C:Regulatory Information Appendix D:Where to Go From Here Cisco WRP400 User Guide...
- Page 8 Preface Finding Information in PDF Files The WRP400 documents are published as PDF files. The PDF Find/Search tool within Adobe® Reader® lets you find information quickly and easily online. You can perform the following tasks: • Search an individual PDF file.
- Page 9 From the drop-down box, choose Browse for Location. Then choose the location on your computer or local network, and click OK. c. If you want to specify additional search criteria, click Use Advanced Search Options, and choose the options you want. d. Click Search. Cisco WRP400 User Guide...
- Page 10 When the Results appear, click + to open a folder, and then click any link to open STEP 4 the file where the search terms appear. For more information about the Find and Search functions, see the Adobe Acrobat online help. Cisco WRP400 User Guide...
-
Page 11: Chapter 1: Getting To Know The Wrp400
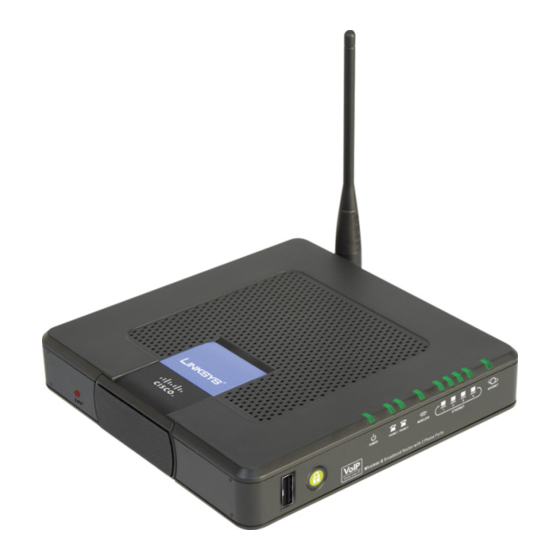
Phone Ports. The WRP400 lets you access the Internet via a wireless connection or through one of its four switched ports. You can also use the WRP400 to share resources such as computers, printers and files. The built-in phone adapter enables Voice-over-IP (VoIP) calls even while you are using the Internet. - Page 12 • Power: The Power LED shines green and stays on while the WRP400 is powered on. If the LED shines red, verify that the correct power adapter is used. If the LED remains red, contact your service provider for support.
- Page 13 Ethernet 1-4 (Green): These numbered LEDs, corresponding with the numbered ports on the back panel, serve two purposes. If the LED is solidly lit, the WRP400 is connected to a device through that port. It flashes to indicate network activity over that port.
-
Page 14: Back Panel
Back Panel Back Panel Port Description Internet: Use this port to connect the WRP400 to a cable or DSL Internet connection. Phone 1-2: Use these ports to connect standard analog telephones to the WRP400. Ethernet 1, 2, 3, 4: Use these Ethernet ports to connect the WRP400 to wired computers and other Ethernet network devices. -
Page 15: Side Panel
Place the WRP400 on a level surface near an electrical outlet. • Vertical Placement: The WRP400 has a stand on the side panel opposite to the antenna. Rotate the stand 90 degrees, and place the WRP400 on a level surface near an electrical outlet. •... - Page 16 Getting to Know the WRP400 Placement Positions Figure 1 Horizontal and Vertical Placement Options To mount the WRP400 on a wall, follow these instructions: Choose a wall that is smooth, flat, dry, and sturdy. Make sure that an electrical STEP 1 outlet is nearby.
- Page 17 Cisco is not responsible for damages incurred by insecure wall-mounting NOTE hardware. Position the WRP400 so that two of the wall-mount slots are over the two screws. STEP 4 Slide the WRP400 down until the screws fit snugly into the wall-mount slots.
-
Page 18: Chapter 2: Before You Begin: Understanding Wireless Security
The Setup Wizard guides you through the process of completing the tasks that are NOTE described below. You are strongly encouraged to use the Setup Wizard for initial configuration of the WRP400. Change the Default Wireless Network Name or SSID Wireless devices have a default wireless network name or Service Set Identifier (SSID) set by the factory. -
Page 19: Change The Default Router Password
When you connect to the administration web server, you will be asked for a password. The WRP400 has a default password set by the factory. The default password is admin. Hackers know the defaults and may try to use them to access your wireless device and change your network settings. -
Page 20: General Network Security Guidelines
Turn wireless routers, access points, or gateways off when they are not being used (at night, during vacations). • Use strong passphrases that are at least eight characters in length. Combine letters and numbers to avoid using standard words that can be found in the dictionary. Cisco WRP400 User Guide... -
Page 21: Chapter 3: Using The Web-Based Utility For Advanced Configuration
Using the Web-Based Utility for Advanced Configuration After you set up the WRP400 with the Setup Wizard (located on the CD-ROM), the router will be ready for use. However, if you’d like to change its advanced settings, use the web-based utility. This chapter describes each web page of the utility and each page’s key functions. -
Page 22: How To Access The Web-Based Utility
If you place the WRP400 behind a primary router with the IP address of NOTE 192. 1 68. 1 5. 1 , then the WRP400 will automatically assume a new default IP address, 192. 1 68. 1 6. 1 . - Page 23 Using the Web-Based Utility for Advanced Configuration How to Access the Web-Based Utility Figure 4 Web-Based Utility Login Window Cisco WRP400 User Guide...
-
Page 24: Chapter 4: Basic Settings
Configure advanced settings for PPPoE Relay, NAT, Dynamic Routing (RIP), or Static Routing? “Setup > Advanced Routing,” on page For information about using the Setup screens to configure mobile network NOTE settings, see Chapter 5, “Installing and Configuring Your Mobile Network.” Cisco WRP400 User Guide... -
Page 25: Setup > Basic Setup
Cancel Changes to cancel your changes. Internet Setup You can use the Internet Setup section to configure the WRP400 for your Internet connection. Most of the entries in this section require information that you can obtain from your service provider. - Page 26 Figure 6 Setup > Basic Setup > Internet Connection Type > Static IP Enter the information that was provided by your service provider. • Internet IP Address: The IP address of your WRP400, as seen from the Internet. • Subnet Mask: The subnet mask, as seen by users on the Internet (including your service provider).
- Page 27 WRP400 automatically re-establishes your connection. To enable this option, select Keep Alive. Keep the default Redial Period of 30 seconds, or specify the interval at which you want the WRP400 to check the Internet connection. Cisco WRP400 User Guide...
- Page 28 WRP400 automatically re-establishes your connection. To enable this option, select Keep Alive. Keep the default Redial Period of 30 seconds, or specify the interval at which you want the WRP400 to check the Internet connection. Cisco WRP400 User Guide...
- Page 29 WRP400 automatically re-establishes your connection. To enable this option, select Keep Alive. Keep the default Redial Period of 30 seconds, or specify the interval at which you want the WRP400 to check the Internet connection. Cisco WRP400 User Guide...
- Page 30 WRP400 automatically re-establishes your connection. To enable this option, select Keep Alive. Keep the default Redial Period of 30 seconds, or specify the interval at which you want the WRP400 to check the Internet connection. Cisco WRP400 User Guide...
- Page 31 Figure 11 Setup > Basic Setup > Optional Settings • Host Name and Domain Name: A host and domain name for the WRP400. Some service providers, usually cable service providers, require these names as identification. In most cases, leaving these fields blank will work.
-
Page 32: Network Setup
Chapter 6, “Configuring Your NOTE Wireless Network.” Router IP You can enter the Local IP Address and Subnet Mask of the WRP400, as seen by your network. Figure 12 Setup > Basic Setup > Network Setup DHCP Server Setting You can use these settings to configure the Dynamic Host Configuration Protocol (DHCP) server function. - Page 33 IP addresses. The Starting IP Address must be greater than the default IP address of the WRP400, 192. 1 68. 1 5. 1 , and less than 192. 1 68. 1 5.253. The default Starting IP Address is 192. 1 68. 1 5. 1 00.
- Page 34 DHCP Reservation This page appears if you click the DHCP Reservation button on the Basic Setup page. Use this page to assign a fixed local IP address to a computer on the network. Figure 14 DHCP Reservation Cisco WRP400 User Guide...
-
Page 35: Time Setting
Time Zone: Select the time zone for the location. • Automatically adjust clock for daylight saving changes: Select this option if you want the WRP400 to automatically adjust the clock for daylight saving time. This option is enabled by default. •... -
Page 36: Setup > Ddns
(DDNS) feature. DDNS lets you assign a fixed host and domain name to a dynamic Internet IP address. It is useful when you are hosting your own website, FTP server, or other server behind the WRP400. Before you can use this feature, you need to sign up for DDNS service with a DDNS service provider, such as www.dyndns.org or www.TZO.com. - Page 37 To enable wildcards, select Enabled. To disable wildcards, keep the default, Disabled. If you are not sure which setting to use, keep the default, Disabled. • Internet IP Address: The Internet IP address of the WRP400 is displayed here. Because it is dynamic, it will change. •...
-
Page 38: Tzo.com
E-mail Address, TZO Key, and Domain Name: Enter the settings for your account with TZO. • Internet IP Address: The Internet IP address of the WRP400 is displayed here. Because it is dynamic, it will change. • Status: The status of the DDNS service connection is displayed here. -
Page 39: Setup > Mac Address Clone
Internet. If you previously registered a MAC address with your service provider for this purpose, you can reassign that MAC address to the WRP400. In this sense, you are “cloning” the MAC address to be used by this router. -
Page 40: Setup > Advanced Routing
You can use the Advanced Routing page to set up PPPoE Relay, NAT, Dynamic Routing (RIP), or Static Routing. After you enter settings on this page, click Save Settings to apply your changes, or NOTE click Cancel Changes to cancel your changes. Figure 19 Setup > Advanced Routing Cisco WRP400 User Guide... -
Page 41: Advanced Settings: Pppoe Relay
Choose the features that you want to enable. • NAT: If the WRP400 is hosting your network’s connection to the Internet, keep the default, Enabled. If another router exists on your network, select Disabled. When the NAT setting is disabled, dynamic routing will be enabled. - Page 42 Gateway: This is the IP address of the gateway device that allows for contact between the WRP400 and the remote network or host. Interface: This interface tells you whether the Destination LAN IP address is on the LAN and Wireless (Ethernet and wireless networks) or the Internet (WAN).
-
Page 43: Chapter 5: Installing And Configuring Your Mobile Network
Installing and Configuring Your Mobile Network You can connect a compatible Mobile Broadband USB modem to the USB port of the WRP400 and configure the mobile network connection. How Do I... • Connect a USB modem to my WRP400? “Installing Your USB Modem,” on page 42 •... -
Page 44: Installing Your Usb Modem
After the device initializes, the Power LED shines steady green. If the device fails to initialize, the LED continues to flash green and orange. By default, the WRP400 connects to the Internet through the local Ethernet, if available. The mobile network connection is used as a failover when an Ethernet connection is unavailable. -
Page 45: Setup > Mobile Network
Figure 21 Setup > Mobile Network Ethernet Connection Recovery and Interface Connection Failover will work only if NOTE the Connection Mode is set to Auto. For more information about these features, see “Setup > Connection Recovery,” on page 46.. Cisco WRP400 User Guide... - Page 46 Connect Mode to Auto without enabling Ethernet Connection. • Connect on Demand with Max. Idle Time: You can configure the WRP400 to terminate the Internet connection after it has been inactive for a specified period of time (Max Idle Time). If your Internet connection has been...
- Page 47 If your location supports only one mobile data service, you may set up for enhance build up connection. The first selection will always search for HSPDA/3G/UMTS service or switch to GPRS automatically only when it is available. Cisco WRP400 User Guide...
-
Page 48: Setup > Connection Recovery
USB port. While both Ethernet and USB interfaces may be connected, only one of them can be used to establish a link at a time. By default, the WRP400 uses the Ethernet Internet connection when available. If the Ethernet Internet connection fails, the WRP400 automatically attempts to bring up another connection on another interface. -
Page 49: Recovery & Failover
Internet link. If the link is idle for some time, the WRP400 will attempt to ping a destination. If the ping does not reply, the WRP400 assumes the link is down and attempts to fail over to another interface. -
Page 50: Wan Interfaces
Status: The link status of this interface: Disconnected: The device is plugged in and available but not active. Connecting: The WRP400 is attempting to bring up the link over the device. Connected: The link is up and running on the device. -
Page 51: Understanding The Led Behavior For Mobile Network
If the initialization is successful, the Power LED shines steady green. If the initialization fails, the LED continues to flash green and orange. By default, the WRP400 connects to the Internet through the wired Ethernet, if available. The mobile network connection is used as a failover when an Ethernet connection is unavailable. - Page 52 If the USB device was removed, this LED behavior indicates that the WRP400 has power. To check the status of the USB Modem, or modify the settings for the mobile network, connection recovery, and failover, you can use the administration web server. Cisco WRP400 User Guide...
-
Page 53: Chapter 6: Configuring Your Wireless Network
Wireless > Basic Wireless Settings You can use the Basic Wireless Settings page to configure your wireless network manually or to use Wi-Fi Protected Setup. Figure 23 Wireless > Basic Wireless Settings > Wireless Configuration Cisco WRP400 User Guide... -
Page 54: Manual Configuration Of The Network
Mixed. If you have only Wireless-G devices, select Wireless-G only. If you have only Wireless-B devices, select Wireless-B only. • Wireless Channel: Select the channel that you want to use. To allow the WRP400 to select the best available wireless channel, keep the default, Auto. Cisco WRP400 User Guide... - Page 55 Configure the following settings for each wireless network: Wireless Network Name (SSID): The default wireless network uses this name: “cisco” followed by the last four digits of the wireless MAC address of the WRP400. To rename the default wireless network, enter a unique Wireless Network Name, which is case-sensitive and must not exceed 32 characters.
-
Page 56: Wi-Fi Protected Setup
Repeat for any additional devices that you need to configure. Method #3: If your client device asks for the PIN number of the WRP400, enter the PIN number that is shown on the screen. This number also appears on the label on the bottom of the WRP400. - Page 57 Configuring Your Wireless Network Wireless > Basic Wireless Settings Cisco WRP400 User Guide...
-
Page 58: Wireless > Wireless Security
Wireless > Wireless Security You can use the Wireless Security page to configure the security of your wireless network(s). The WRP400 supports the following wireless security mode options: WPA Personal, WPA Enterprise, WPA2 Personal, WPA2 Enterprise, and WEP. WEP (Wired Equivalent Privacy) is an older security standard. WPA (Wi-Fi Protected Access) is a newer security standard that is stronger than WEP encryption. -
Page 59: Wep
Passphrase: Enter a Passphrase to automatically generate WEP keys. Then click Generate. • Key 1-4: If you did not enter a Passphrase, enter the WEP key(s) manually. • TX Key: Select which TX (Transmit) Key to use. The default is 1. Cisco WRP400 User Guide... -
Page 60: Wpa Personal
WPA Shared Key: Enter a WPA Shared Key of 8-63 characters. • Group Key Renewal: Enter a Group Key Renewal period, which instructs the WRP400 how often it should change the encryption keys. The default is 3600 seconds. Cisco WRP400 User Guide... -
Page 61: Wpa2 Personal
WPA Shared Key: Enter a WPA Shared Key of 8-63 characters. • Group Key Renewal: Enter a Group Key Renewal period, which instructs the WRP400 how often it should change the encryption keys. The default is 3600 seconds. Cisco WRP400 User Guide... -
Page 62: Wpa Enterprise
RADIUS Port: Enter the port number of the RADIUS server. The default value is 1812. • Shared Key: Enter the key shared between the WRP400 and the server. • Key Renewal Timeout: Enter a Key Renewal Timeout period, which instructs the WRP400 how often it should change the encryption keys. The default is 600 seconds. -
Page 63: Wpa2 Enterprise
RADIUS Port: Enter the port number of the RADIUS server. The default value is 1812. • Shared Key: Enter the key shared between the WRP400 and the server. • Key Renewal Timeout: Enter a Key Renewal Timeout period, which instructs the WRP400 how often it should change the encryption keys. The default is 600 seconds. -
Page 64: Wireless > Wireless Mac Filter
Select a SSID: Select the SSID that you want to configure. If you enabled the second wireless network on the Basic Wireless NOTE Settings screen, then you can set up wireless MAC filtering for each SSID. Cisco WRP400 User Guide... - Page 65 Check the Save to MAC Address Filter List check box to select a device. Then click Add to add the device to the MAC Address Filter List. To retrieve the most up-to-date information, click Refresh. To exit this screen and return to the Wireless MAC Filter screen, click Close. Cisco WRP400 User Guide...
-
Page 66: Wireless > Advanced Wireless Settings
Wireless > Advanced Wireless Settings The Advanced Wireless Settings screen is used to set up the advanced wireless functions of the WRP400. These settings should only be adjusted by an expert administrator as incorrect settings can reduce wireless performance. After you enter settings on this page, click Save Settings to apply your changes, or NOTE click Cancel Changes to cancel your changes. - Page 67 CTS Protection Mode: The WRP400 will automatically use CTS (Clear-To- Send) Protection Mode when your Wireless-G products are experiencing severe problems and are not able to transmit to the WRP400 in an environment with heavy 802. 1 1b traffic. This function boosts the ability of the WRP400 to catch all Wireless-G transmissions but will severely decrease performance.
-
Page 68: Chapter 7: Configuring Network Security And Controlling Internet Access
The Firewall screen is used to configure a firewall that can filter out various types of unwanted traffic on the local network. After you enter settings on this page, click Save Settings to apply your changes, or NOTE click Cancel Changes to cancel your changes. Cisco WRP400 User Guide... -
Page 69: Firewall
Internet NAT redirection. It is not selected by default. • Filter IDENT (Port 113): This feature keeps port 113 from being scanned by devices outside of your local network. This feature is selected by default. Deselect this feature to disable it. Cisco WRP400 User Guide... -
Page 70: Web Filter
Web Filter • Proxy: Use of WAN proxy servers may compromise the security of the WRP400. Denying Proxy will disable access to any WAN proxy servers. Select this feature to enable proxy filtering. Deselect the feature to allow proxy access. -
Page 71: Access Restrictions > Internet Access
PPTP: Passthrough Point-to-Point Tunneling Protocol (PPTP) allows the Point-to-Point Protocol (PPP) to be tunneled through an IP network. To allow PPTP tunnels to pass through the WRP400, keep the default, Enabled. • L2TP Passthrough: Layer 2 Tunneling Protocol is the method used to enable Point-to-Point sessions via the Internet on the Layer 2 level. - Page 72 Access Policy: Select a policy from the drop-down list to display that policy’s settings. You can then enter or modify the settings. Be sure to save your changes before selecting another policy from the drop-down list. Cisco WRP400 User Guide...
- Page 73 To return to the Internet Access Policy screen, click Close. • Enter Policy Name: Enter a name for the policy that you selected in the Access Policy list. • Status: Policies are disabled by default. To enable the selected policy, select Enabled. Cisco WRP400 User Guide...
- Page 74 To return to the Internet Access Policy screen, click Close. • Access Restriction: Select the appropriate option, Deny or Allow, depending on whether you want to block or allow Internet access for the computers that are listed on the List of PCs screen. Cisco WRP400 User Guide...
-
Page 75: Creating Or Modifying An Internet Access Policy
In the List of PCs window, enter individual MAC addresses or IP addresses, or enter IP address ranges. b. Click Save Settings to apply your changes, or click Cancel Changes to cancel your changes. Then click Close close the window. Cisco WRP400 User Guide... - Page 76 Click Save Settings to save the settings. To cancel the settings, click Cancel STEP 8 Changes. Repeat these steps to create additional policies, one at a time. STEP 9 Cisco WRP400 User Guide...
-
Page 77: Chapter 8: Configuring Applications And Gaming
Configuring Applications and Gaming You can use the Applications and Gaming screens to configure your WRP400 to support applications, services, and gaming. How Do I... • Customize port services for common applications? “Applications and Gaming > Single Port Forwarding,” on page •... -
Page 78: Applications And Gaming > Single Port Forwarding
When users send these types of requests to your network via the Internet, the WRP400 will forward those requests to the appropriate servers (computers). Before using forwarding, you should assign static IP addresses to the designated servers (use the DHCP Reservation feature on the Basic Setup screen). -
Page 79: Applications And Gaming > Port Range Forward
Some Internet applications may not require any forwarding.) When users send these types of requests to your network via the Internet, the WRP400 will forward those requests to the appropriate servers (computers). Before using forwarding, you should assign static IP addresses to the designated servers (use the DHCP Reservation feature on the Basic Setup screen). - Page 80 DHCP Reservation button on the Basic Setup screen to look up its static IP address. See “Setup > Basic Setup,” on page • Enabled: Select Enabled to enable port forwarding for the applications you have defined. Cisco WRP400 User Guide...
-
Page 81: Applications & Gaming > Port Range Triggering
The IP address of the computer that sends the matching data is remembered by the WRP400, so that when the requested data returns through the WRP400, the data is pulled back to the proper computer by way of IP address and port mapping rules. -
Page 82: Applications And Gaming > Dmz
Source IP Address: If you want any IP address to be the source, select Any IP Address. If you want to specify an IP address or range of IP addresses as the designated source, select and complete the IP address range fields. Cisco WRP400 User Guide... -
Page 83: Applications And Gaming > Qos
The DHCP Client Table lists computers and other devices that have been assigned IP addresses by the WRP400. The list can be sorted by Client Name, IP Address, and MAC Address. To select a DHCP client, click Select. To retrieve the most up- to-date information, click Refresh. - Page 84 WMM Support: If you have other devices that support Wi-Fi Multimedia (WMM) on your network, select Enabled. Otherwise, keep the default, Disabled. • No Acknowledgement: To prevent the WRP400 from resending data if an error occurs, select Enabled. Otherwise, keep the default, Disabled. Cisco WRP400 User Guide...
- Page 85 Enabled/Disabled: To use the QoS policies you have set, keep the default, Enabled. Otherwise, select Disabled. • Upstream Bandwidth: To allow the WRP400 to control the maximum bandwidth for upstream data transmissions, keep the default, Auto. To manually set the maximum, select Manual, and enter the appropriate number in the field provided.
- Page 86 You can have up to three ranges to define for this bandwidth allocation. Port numbers can range from 1 to 65535. Check your application’s documentation for details on the service ports used. Priority: Select the appropriate priority: High, Medium (Recommend), Normal, or Low. Cisco WRP400 User Guide...
- Page 87 Add: Click this button to add your new entry to the Summary list. Ethernet Port • Ethernet: Select the appropriate Ethernet port. • Priority: Select the appropriate priority: High, Medium (Recommend), Normal, or Low. • Add: Click this button to add your new entry to the Summary list. Cisco WRP400 User Guide...
- Page 88 • Remove: Click this button to remove an entry. • Edit: Click this button if you want to change the information. The information will appear in the Category section of the page for editing. Cisco WRP400 User Guide...
-
Page 89: Chapter 9: Administration
“Administration > Factory Defaults,” on page 96 • Upgrade the firmware? “Administration > Firmware Upgrade,” on page • Back up and restore settings? “Administration > Config Management,” on page • Reboot the device? “Administration > Reboot,” on page 100. Cisco WRP400 User Guide... -
Page 90: Administration > Management
Play), and to enable support for multimedia streaming. After you enter settings on this page, click Save Settings to apply your changes, or NOTE click Cancel Changes to cancel your changes. Figure 42 Administration > Management Cisco WRP400 User Guide... -
Page 91: Management
Select HTTP or HTTPS. HTTP is the default. • Web Utility Access via Wireless: If you are using the WRP400 in a public domain where you are giving wireless access to your guests, you can disable wireless access to the web-based utility of the WRP400. You will only be able to access the utility via a wired connection if you disable the setting. - Page 92 Remote Management Port: Enter the port number that will be open to outside access. When you are in a remote location and wish to manage the WRP400, you can use NOTE HTTP or HTTPS to connect to the IP address of the WRP400, at the remote management port number, as shown: http://<Internet_IP_address>:port or https://<Internet_IP_address>:port...
-
Page 93: Igmp
Internet Protocol Television (IPTV) with multiple setup boxes on the same local network. These setup boxes have different video streams running simultaneously, so you should use the IGMP feature of the WRP400. • Support IGMP Version: Select the version you want to support, IGMP 1, IGMP v2, or IGMP 3. - Page 94 The Security Log will display the login information for the web-based utility. • The DHCP Client Log will display the LAN DHCP server status information. Click Refresh to update the log. Click Clear to clear all the information that is displayed. Cisco WRP400 User Guide...
-
Page 95: Administration > Diagnostics
Times to Ping: Enter many times you wish to test it. • Start to Ping: To run the test, click this button. The Ping Test screen will show if the test was successful. Click Close to return to the Diagnostics screen. Cisco WRP400 User Guide... -
Page 96: Traceroute Test
IP or URL Address: Enter the address of the PC whose connection you wish to test. • Start to Traceroute: To run the test, click this button. The Traceroute Test screen will show if the test was successful. Click Close to return to the Diagnostics screen. Cisco WRP400 User Guide... - Page 97 Table screen will show the search results. You can sort the results by IP Address, MAC Address, Interface, Client Name, or IP Status. To re-run the search, click Retry. Click Close to return to the Diagnostics screen. Cisco WRP400 User Guide...
-
Page 98: Administration > Factory Defaults
• Restore Router Factory Defaults: To reset the router settings to the default values, select Yes. Then click Save Settings. Any custom router settings you have saved will be lost when the default settings are restored. Cisco WRP400 User Guide... -
Page 99: Administration > Firmware Upgrade
WRP400. Do not upgrade the firmware unless you are experiencing problems with the WRP400 or the new firmware has a feature you want to use. If you want to upgrade the firmware, then you may need a user name and password available only from your service provider. -
Page 100: Firmware Upgrade
Administration Administration > Firmware Upgrade The WRP400 may lose the settings you have customized. Before you upgrade the NOTE firmware, use the Config Management screen to back up your settings. For more informaiton, see “Administration > Config Management,” on page Firmware Upgrade Download the latest firmware from Cisco.com, and then upgrade the firmware on... -
Page 101: Administration > Config Management
Administration Administration > Config Management Firmware Upgrade After you download the firmware from Cisco.com, you can upgrade the WRP400. Figure 51 Administration > Firmware Upgrade • Please select a file to upgrade the firmware: Click Browse and select the firmware upgrade file that you downloaded from Cisco.com. -
Page 102: Backup Configuration
Restore: To restore the configuration settings, click this button and follow the on-screen instructions. Administration > Reboot The Reboot screen allows you to reboot the device from the administration web server. Click the Reboot button. Figure 53 Administration > Config Management Cisco WRP400 User Guide... -
Page 103: Chapter 10: Using The Status Screens
Using the Status Screens You can use the Status screens to view information about your WRP400. How Do I... • View the firmware version, the router name, the host name, the Internet MAC address and the current time? “Status > Router,” on page 102. -
Page 104: Status > Router
The Router screen displays information about the WRP400. Figure 54 Status > Router Router Information • Firmware Version: The version number of the current firmware is displayed. • Current Time: The time set on the WRP400 is displayed. Cisco WRP400 User Guide... -
Page 105: Internet Connection
Internet MAC Address: The MAC address, as seen by your service provider, is displayed. • Router Name: The name of the WRP400 is displayed. • Host Name: If required by your service provider, this was entered on the Basic Setup screen. -
Page 106: Status > Mobile Network
Connection Up Time: The period of time that the Mobile USB modem has been connected to the Internet during this session • Current Session Usage: The number of packets have been downloaded and uploaded during this session Cisco WRP400 User Guide... -
Page 107: Data Card Status
• Service Type: Displayed your current UMTS/GPRS/EVDO service for Internet connection. • Signal Strength: Indicated the signal strength of your current UMTS/GPRS/ EVDO service to your location. • Card Status: Indicated current Mobile WAN connection status. Cisco WRP400 User Guide... -
Page 108: Status > Local Network
Local MAC Address: The MAC address of the local, wired interface of the WRP400 is displayed. • Router IP Address: The IP address of the WRP400, as it appears on your local network, is displayed. • Subnet Mask: The Subnet Mask of the WRP400 is displayed. - Page 109 The DHCP Client Table lists computers and other devices that have been assigned IP addresses by the WRP400. The list can be sorted by Client Name, IP Address, Interface, MAC Address, and Expires Time (how much time is left for the current IP address).
-
Page 110: Status > Wireless Network
• Network Name (SSID): The network name, which is also called the SSID, is displayed. • Security: The wireless security method is displayed. • SSID Broadcast: The status of the SSID Broadcast feature is displayed. Cisco WRP400 User Guide... -
Page 111: Chapter 11: Configuring Voice Services
The Admin Login allows access to more advanced settings. To access administrative screens, click Admin Login, and enter the user name and password provided by your service provider. Contact your service provider for more information. (The factory default Admin Login name and password are admin.) Cisco WRP400 User Guide... -
Page 112: Voice > Info
In most cases, you do not need to use the administrative screens. Contact your NOTE service provider for more information. Voice > Info The Info screen displays Voice over Internet Protocol (VoIP) information about the WRP400. Figure 59 Voice > Info Cisco WRP400 User Guide... -
Page 113: Product Information
Client Certificate: The status of the client certificate, which indicates that the WRP400 has been authorized by your service provider, System Status • Current Time: The current date and time of the WRP400 are displayed. • Elapsed Time: The amount of time elapsed since the last reboot of the WRP400 •... -
Page 114: Line 1/2 Status
Call 1/2 Callback: This indicates whether the call was triggered by a call back request. • Call 1/2 Peer Name: The name of the internal phone • Call 1/2 Peer Phone: The phone number of the internal phone • Call 1/2 Duration: The duration of the call Cisco WRP400 User Guide... -
Page 115: Voice > System
Call 1/2 Mapped RTP Port: The number of the NAT mapped RTP port • Call 1/2 Media Loopback: The Media Loopback feature allows the service provider to test the quality of the connection to the WRP400. The status of the feature Voice > System The System screen displays the User Password setting. -
Page 116: System Configuration
1, and the User 2 screen displays settings for users of phone line 2. After you enter settings on this page, click Save Settings to apply your changes, or NOTE click Cancel Changes to cancel your changes. Cisco WRP400 User Guide... - Page 117 Configuring Voice Services Voice > User 1/2 Figure 61 Voice > User 1 Cisco WRP400 User Guide...
-
Page 118: Call Forward Settings
Block Last Caller: Enter the ID of the caller blocked via the Block Last Caller service. • Accept Last Caller: Enter the ID of the caller accepted via the Accept Last Caller service. Speed Dial Settings • Speed Dial 2-9: Enter the phone number for each Speed Dial setting. Cisco WRP400 User Guide... -
Page 119: Supplementary Service Settings
Call Back Ring: Select the ring pattern for call back notification. The default is 7. • Cfwd Ring Splash Len: Enter the duration of the ring splash when a call is forwarded. The range is 0 to 10.0 seconds. The default is 0. Cisco WRP400 User Guide... -
Page 120: Voice > Admin Login
Contact your service provider for more information. (The factory default Admin Login name and password are admin.) In most cases, you do not need to use the administrative screens. Contact your NOTE service provider for more information. Cisco WRP400 User Guide... -
Page 121: Chapter 12: Interactive Voice Response Menu
WRP400 will use voice responses. To access the IVR Menu: Use a telephone connected to the Phone 1 or 2 port of the WRP400. (You can only STEP 1 access the IVR Menu through an analog telephone, not any of the Internet phones.) Press **** (in other words, press the star key four times). - Page 122 WRP400. Check Static The IVR announces the Gateway IP current gateway IP Address address of the WRP400. Check MAC The IVR announces the Address MAC address of the WRP400 in hexadecimal string format. Check Firmware...
-
Page 123: Appendix A:troubleshooting
My computer cannot connect to the Internet. Follow these instructions until your computer can connect to the Internet: a. Make sure that the WRP400 is powered on. The Power LED should be green and not flashing. b. If the Power LED is flashing, then power off all of your network devices, including the modem, the WRP400, and the computers. - Page 124 Make sure your network has an active Internet connection. Try to access the Internet, and check to see if the WRP400 Internet LED is lit. If you do not have a connection, then power off all of your network devices, including the modem, the WRP400, and the computers.
- Page 125 The DSL telephone line does not fit into the WRP400 Internet port. The WRP400 does not replace your modem. You still need your DSL modem in order to use the WRP400. Connect the telephone line to the DSL modem, insert the setup CD into your computer, and then follow the on-screen instructions.
- Page 126 If you place the WRP400 behind a primary router with the IP address NOTE of 192. 1 68. 1 5. 1 , then the WRP400 will automatically assume a new default IP address, 192. 1 68. 1 6. 1 .
-
Page 127: Mobile Network Troubleshooting
Troubleshooting Mobile Network Troubleshooting What do I do if the WRP400 does not recognize my USB device? a. Make sure that you have the latest mobile-support firmware loaded on your WRP400. To download the latest firmware, go to the WRP400 product page on www.cisco.com/en/US/products/ps10028/index.html... - Page 128 Option 1: Physically remove and reinsert your Mobile Broadband USB modem from the WRP400. Option 2: Log on to the WRP400 web-based utility. Click Setup tab > Mobile Network page. Click the Disconnect button. The Disconnect button appears only when Connect mode is set on NOTE Manual.
- Page 129 Follow these instructions: a. Open a web browser. b. Enter the IP address of the WRP400 in the Address field (the default IP address is 192. 1 68. 1 5. 1 ). Then press Enter. c. When prompted, complete the User name and Password fields (the default user name and password is admin).
-
Page 130: Specifications
Type of Service - TOS (RFC 791/1349) SNTP - Simple Network Time Protocol (RFC 2030) QoS - Packet Prioritization by Type MAC Address Cloning Port Forwarding IP Multicast / IGMP v1/v2/v3 / IGMP proxy / IGMP Immediate Leave Cisco WRP400 User Guide... - Page 131 RFC 3551 (RTP: Real Time Protocol for AVP) RFC 2327 (SDP: Session Description Protocol) RFC 3428 (SIP Extensions for Instant Messaging) RFC 3261 (SIP: Session Initiation Protocol) RFC 3262 (PRACK : Provisional Response ACK) RFC 3263 (Locating SIP Servers) Cisco WRP400 User Guide...
- Page 132 RFC 3455 (Private Header (P-Header) Extensions to SIP for 3GPP) RFC 3323 (A Privacy Mechanism for SIP) RFC 3420 (Internet Media Type Message/Sipfrag) RFC 2833 (RTP Payload for DTMF, Telephone Tone and Signals) RFC 3711 (SRTP) Cisco WRP400 User Guide...
- Page 133 Frequency Response: 300 – 3400Hz Terminating Impedance : 8 Configurable Settings including North America 600 ohms, European CTR21 Regulatory FCC (Part 15 Class B), CE, ICES-003, RoHS, UL, A-Tick, NZ Telepermit, CB Compliance: Number of Antennas Connector Fixed Type Cisco WRP400 User Guide...
- Page 134 Power Adapter: 100-240v - 50-60Hz (26-34VA) AC Input, 1.8m cord Indicator Power, Ethernet 1-4, Wireless, Phone 1, Phone 2, Internet, WPS Lights/LED Documentation Quick Installation and User Guide are downloaded from www.cisco.com/ go/smallbiz SPA ATA Administration Guide - Service Providers Only Provisioning Guide - Service Providers Only Security "Password protected configuration for web &...
- Page 135 Many specifications are programmable within a defined range or list of options. NOTE Please see the ATA Administration Guide for details. The target configuration profile is uploaded to the WRP400 at the time of provisioning. Specifications are subject to change without notice. NOTE...
-
Page 136: Regulatory Information
This device complies with Part 15 of the FCC Rules. Operation is subject to the following two conditions: (1) This device may not cause harmful interference, and (2) this device must accept any interference received, including interference that may cause undesired operation. Cisco WRP400 User Guide... -
Page 137: Fcc Radiation Exposure Statement
This transmitter must not be co-located or operating in conjunction with any other antenna or transmitter. IEEE 802. 1 1b or 802. 1 1g operation of this product in the USA is firmware-limited to channels 1 through 11. Cisco WRP400 User Guide... - Page 138 WARNING: Many Internet phone service providers do not support calls to emergency service numbers (000 in Australia or 111 in New Zealand). An alternative phone should be used to make emergency calls. Cisco WRP400 User Guide...
-
Page 139: Industry Canada Statement
Regulatory Information WARNING: To ensure compliance with explosure limits to radiofrequency fields, the antenna of the WRP400 should be no closer than 20 cm from the body during use. Industry Canada Statement This device complies with Industry Canada ICES-003 rule. -
Page 140: Wireless Disclaimer
Performance depends on many factors, conditions and variables, including distance from the access point, volume of network traffic, building materials and construction, operating system used, mix of wireless products used, interference and other adverse conditions. Cisco WRP400 User Guide... - Page 141 [Bulgarian]: [Czech]: Dansk Dette udstyr er i overensstemmelse med de væsentlige krav og andre relevante [Danish]: bestemmelser i Direktiv 1999/5/EF. Deutsch Dieses Gerät entspricht den grundlegenden Anforderungen und den weiteren [German]: entsprechenden Vorgaben der Richtlinie 1999/5/EU. Cisco WRP400 User Guide...
- Page 142 Dette utstyret er i samsvar med de grunnleggende krav og andre relevante [Norwegian]: bestemmelser i EU-direktiv 1999/5/EF. Polski [Polish]: Português Este equipamento está em conformidade com os requisitos essenciais e outras [Portuguese]: provisões relevantes da Directiva 1999/5/EC. Cisco WRP400 User Guide...
- Page 143 Ta naprava je skladna z bistvenimi zahtevami in ostalimi relevantnimi pogoji [Slovenian]: Direktive 1999/5/EC. Slovensky Toto zariadenie je v zhode so základnými požiadavkami a inými príslušnými [Slovak]: nariadeniami direktív: 1999/5/EC. Suomi [Finnish]: Svenska [Swedish]: Latviski Malti Magyar Polski Cisco WRP400 User Guide...
- Page 144 As such, TPC is not required. CE Marking For the Wireless-N, -G, -B, and/or -A products, the following CE mark, notified body number (where applicable), and class 2 identifier are added to the equipment. Cisco WRP400 User Guide...
-
Page 145: National Restrictions
“Overview of Regulatory Requirements for Wireless LANs” provides an overview of the regulatory requirements applicable for the 2,4- and 5-GHz bands. Later in this document you will find an overview of countries in which additional restrictions or requirements or both are applicable. Cisco WRP400 User Guide... - Page 146 Regulatory Information The requirements for any country may evolve. Cisco recommends that you check with the local authorities for the latest status of their national regulations for both the 2,4- and 5-GHz wireless LANs. Table 1 Overview of Regulatory Requirements for Wireless LANs...
- Page 147 2. The regulatory limits for maximum output power are specified in EIRP. The EIRP level of a device can be calculated by adding the gain of the antenna used (specified in dBi) to the output power available at the connector (specified in dBm). Cisco WRP400 User Guide...
-
Page 148: Product Usage Restrictions
TNC extension cable (AC9TNC). Both of these cables are 9 meters long and have a cable loss (attenuation) of 5 dB. To compensate for the attenuation, Cisco also offers higher gain antennas, the HGA7S (with R-SMA connector) and HGA7T (with R-TNC connector). - Page 149 úady. Správná likvidace a recyklace pomáhá pedcházet potenciálním negativním dopadm na životní prostedí a lidské zdraví. Podrobnjší informace o likvidaci starého vybavení si laskav vyžádejte od místních úad, podniku zabývajícího se likvidací komunálních odpad nebo obchodu, kde jste produkt zakoupili. Cisco WRP400 User Guide...
- Page 150 Si desea obtener información más detallada sobre la eliminación segura de su aparato usado, consulte a las autoridades locales, al servicio de recogida y eliminación de residuos de su zona o pregunte en la tienda donde adquirió el producto. Cisco WRP400 User Guide...
- Page 151 Jsu pienkums ir šo un citas elektriskas un elektroniskas ierces izmest atkritumos, izmantojot pašus atkritumu savkšanas veidus un ldzekus, ko nodrošina valsts un pašvaldbu iestdes. Ja izmešana atkritumos un prstrde tiek veikta pareizi, tad mazins iespjamais Cisco WRP400 User Guide...
- Page 152 Voor meer informatie over het vernietigen van uw oude apparatuur neemt u contact op met de plaatselijke autoriteiten of afvalverwerkingsdienst, of met de winkel waar u het product hebt aangeschaft. Cisco WRP400 User Guide...
- Page 153 Slovenina (Slovak) - Informácie o ochrane životného prostredia pre zákazníkov v Európskej únii Cisco WRP400 User Guide...
- Page 154 Korrekt kassering och återvinning skyddar mot eventuella negativa konsekvenser för miljön och personhälsa. För mer detaljerad information om kassering av din gamla utrustning kontaktar du dina lokala myndigheter, avfallshanteringen eller butiken där du köpte produkten. Cisco WRP400 User Guide...
- Page 155 Documentation tsd_products_support_series_home.html Firmware www.cisco.com/en/US/products/ps10024/index.html Downloads Customer Support www.cisco.com/en/US/support/ tsd_cisco_small_business_support_center_contacts.html Warranty and End www.cisco.com/go/warranty User License Agreement Open Source www.cisco.com/go/osln License Notices Regulatory www.cisco.com/en/US/products/ps10024/ Compliance and tsd_products_support_series_home.html Safety Information Cisco Partner www.cisco.com/web/partners/sell/smb Central site for Small Business Cisco WRP400 User Guide...