Table of Contents
Advertisement
Quick Links
Operation - Repair - Parts
Fonctionnement - Réparation - Pieces
Funcionamiento - Reparación - Piezas
Bediening - Reparatie - Delen
Betrieb - Reparatur - Teile
LineDriver
®
LineDriver HD Electric Start
For the propulsion of line striping and removal equipment. Not approved for use in explosive atmospheres or hazardous (classified)
locations.
Pour la propulsion de l'équipement de traçage de lignes et le retrait. Non homologué pour une utilisation en atmosphère explosive ou
dans des zones (classées) dangereuses.
Para la propulsión de los equipos de trazado y eliminación de líneas. No aprobado para uso en atmósferas explosivas o ubicaciones
(clasificadas como) peligrosas.
Voor de aandrijving van belijnings- en lijnverwijderingsapparatuur. Niet goedgekeurd voor gebruik in omgevingen met explosiegevaar,
op gevaarlijke locaties en op als gevaarlijk geclassificeerde locaties.
Für den Antrieb von Linienmarkier- und Linienbeseitigungsgeräten. Nicht für den Einsatz in explosionsgefährdeten und in als
Gefahrenzone klassifizierten Bereichen zugelassen.
Models / Modèles / Modelos / Modellen / Modelle:
262004 (LineDriver) / 262005 (LineDriver HD) / 25U474 (LineDriver HD Electric Start)
10 mph (16 kph) Maximum Operating Speed / de vitesse de fonctionnement maximum / de velocidade operando se máxima / Maximum Werkende
Snelheid / Maximale Arbeitsgeschwindigkeit
Important Safety Instructions
Read all warnings and instructions in this manual and in related manuals
before using the equipment. Save these instructions.
Instructions de sécurité importantes
Lisez tous les avertissements et toutes les instructions de ce manuel et des
manuels connexes avant d'utiliser l'équipement. Conservez ces instructions.
Instrucciones importantes de seguridad
Lea todas las advertencias e instrucciones de este manual y todos los
manuales relacionados antes de utilizar este equipo. Guarde estas
instrucciones.
Belangrijke veiligheidsinstructies
Lees alle waarschuwingen en instructies in deze handleiding en bijbehorende
handleidingen voordat u de apparatuur gebruikt. Bewaar deze instructies.
Wichtige Sicherheitshinweise
Alle Warnhinweise und Anweisungen in diesem Handbuch und damit zusam-
menhängenden Handbüchern vor Verwendung des Geräts gründlich lesen.
Bewahren Sie diese Anweisungen sorgfältig auf.
Related Manuals
Manual in
Description
English
309405
Trailer Hitch Conversion Instructions
309406
Battery Instructions
Vanguard Engine manual
Honda Engine manual
/ LineDriver HD /
ti31180a
312540N
EN FR ES NL DE
LineDriver HD
Electric Start
Advertisement
Table of Contents

Related Manuals for Graco LineDriver


Summary of Contents for Graco LineDriver
- Page 1 Models / Modèles / Modelos / Modellen / Modelle: 262004 (LineDriver) / 262005 (LineDriver HD) / 25U474 (LineDriver HD Electric Start) 10 mph (16 kph) Maximum Operating Speed / de vitesse de fonctionnement maximum / de velocidade operando se máxima / Maximum Werkende...
-
Page 2: Table Of Contents
Warranty / Garantie / Garantía / Garantie / Garantie ..62 Graco Information....... . 63... -
Page 3: Warnings
Warnings Warnings The following warnings are for the setup, use, grounding, maintenance, and repair of this equipment. The exclamation point symbol alerts you to a general warning and the hazard symbols refer to procedure-specific risks. When these symbols appear in the body of this manual or on warning labels, refer back to these Warnings. Product-specific hazard symbols and warnings not covered in this section may appear throughout the body of this manual where applicable. - Page 4 Warnings WARNING BURN HAZARD Equipment surfaces and fluid that is heated can become very hot during operation. To avoid severe burns: Do not touch hot fluid or equipment. • CARBON MONOXIDE HAZARD Exhaust contains poisonous carbon monoxide, which is colorless and odorless. Breathing carbon monoxide can cause death.
-
Page 5: Avertissements
Avertissements Avertissements Les avertissements suivants concernent la configuration, l’utilisation, la mise à la terre, la maintenance et la réparation de cet équipement. Le point d’exclamation indique un avertissement général tandis que les symboles de danger font référence aux risques spécifiques associés à la procédure en cours. Lorsque ces symboles apparaissent dans le texte du présent manuel ou sur des étiquettes d’avertissement, reportez-vous à... - Page 6 Avertissements AVERTISSEMENTS RISQUES DE BRÛLURE Les surfaces de l’appareil et le fluide chauffé peuvent devenir brûlants quand l’appareil est en service. Pour éviter des brûlures graves : Ne touchez pas le produit ou équipement chaud. • DANGER DU MONOXYDE DE CARBONE Les gaz d’échappement contiennent du monoxyde de carbone qui est un gaz dangereux incolore et inodore.
-
Page 7: Advertencias
Advertencias Advertencias Las advertencias siguientes corresponden a la configuración, el uso, la conexión a tierra, el mantenimiento y la reparación de este equipo. El signo de exclamación le indica que se trata de una advertencia general, y el símbolo de peligro se refiere a un riesgo específico de procedimiento. Cuando aparezcan estos símbolos en el cuerpo de este manual o en las etiquetas de advertencia, consulte nuevamente estas advertencias. - Page 8 Advertencias ADVERTENCIA PELIGRO DE QUEMADURAS La temperatura de la superficie del equipo y la del fluido calentado pueden aumentar mucho durante la operación. Para evitar quemaduras graves: No toque el fluido ni el equipo calientes. • PELIGRO DE MONÓXIDO DE CARBONO Los gases de escape contienen monóxido de carbono venenoso, que es incoloro e inodoro.
-
Page 9: Waarschuwingen
Waarschuwingen Waarschuwingen De onderstaande waarschuwingen betreffen de installatie, het gebruik, de aarding, het onderhoud en de reparatie van deze apparatuur. Het symbool met het uitroepteken verwijst naar een algemene waarschuwing en de gevarensymbolen verwijzen naar procedurespecifieke risico’s. Als u deze symbolen in de handleiding of op de waarschuwingsetiketten ziet, raadpleeg dan deze Waarschuwingen. - Page 10 Waarschuwingen WAARSCHUWING GEVAAR VAN BRANDWONDEN Het oppervlak van de apparatuur en het materiaal dat wordt verhit, kunnen zeer heet worden tijdens het gebruik. Zo vermijdt u ernstige brandwonden: Raak het warme materiaal of de warme apparatuur niet aan. • GEVAAR VAN KOOLMONOXIDE Uitlaatgassen bevatten giftig koolmonoxide, een kleurloos en reukloos gas.
-
Page 11: Warnhinweise
Warnhinweise Warnhinweise Die folgenden Warnhinweise betreffen die Einrichtung, Verwendung, Erdung, Wartung und Reparatur dieses Geräts. Das Symbol mit dem Ausrufezeichen steht bei einem allgemeinen Warnhinweis und die Gefahrensymbole beziehen sich auf Risiken, die während bestimmter Arbeiten auftreten. Wenn diese Symbole in dieser Betriebsanleitung oder auf Warnschildern erscheinen, müssen diese Warnhinweise beachtet werden. - Page 12 Warnhinweise WARNUNG VERBRENNUNGSGEFAHR Geräteflächen und erwärmtes Applikationsmaterial können während des Betriebs sehr heiß werden. Um schwere Verbrennungen zu vermeiden: Niemals heißes Material oder heiße Geräte berühren. • GEFAHR DURCH KOHLENMONOXID Abgase enthalten giftiges Kohlenmonoxid, das farb- und geruchlos ist. Das Einatmen von Kohlenmonoxid kann zum Tod führen.
-
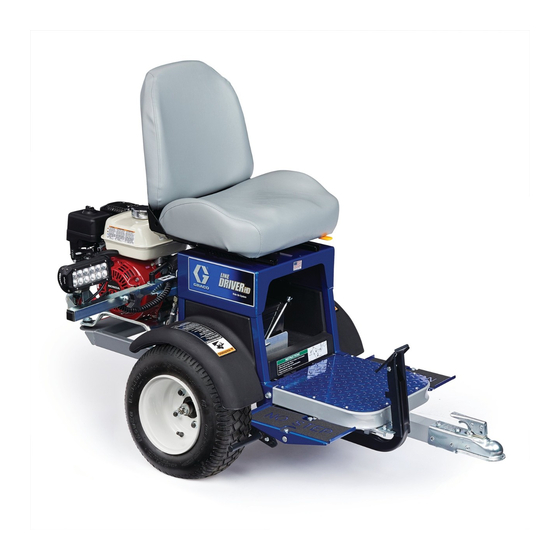
Page 13: Component Identification / Identification Des Composants
Component Identification / Identification des composants / Identificación de los componentes / De onderdelen / Komponenten Component Identification / Identification des composants / Identificación de los componentes / De onderdelen / Komponenten Honda (262004, 262005) Vanguard (25U474) English Français Español Nederlands Deutsch Wheel Release... -
Page 14: Operation / Fonctionnement / Funcionamiento / Bediening
Line Striper verbinden auf die Kugel der Antriebsradentriegelung Anhängerkupplung am um zwei Umdrehungen Zugvorrichtungs-Aufnah LineLazer aufsetzen. öffnen ( - ). Den LineDriver mesatz 245321, von der Palette Betriebsanleitung 309405 herunterrollen. Nach dem Einsatz die Verriegelung mit der Hand wieder... - Page 15 Operation / Fonctionnement / Funcionamiento / Bediening / Betrieb ti11086a ti10940a English Insert safety pin in latch Adjust seat Suggestion: Adjust one pedal Rotate pedal to desired forward/backward with for full motion forward and one position. Tighten bolts. lever below seat. for full motion in reverse.
- Page 16 Operation / Fonctionnement / Funcionamiento / Bediening / Betrieb Startup / Mise en service / Puesta en marcha / Opstarten / Inbetriebnahme ti3308a ti10938a ti3309a English Check engine oil level. See Fill fuel tank. Do not overfill. Check hydraulic oil level. engine manual for See engine manual.
- Page 17 Operation / Fonctionnement / Funcionamiento / Bediening / Betrieb English Start engine. Engage parking brake Move fuel valve to open. COLD ENGINE: Move throttle to 1/3 of MAX Move choke to closed. position. WARM ENGINE: Leave choke open. Français Démarrage du moteur. Serrer le frein de parking Mettre la vanne de carburant MOTEUR FROID :...
- Page 18 Operation / Fonctionnement / Funcionamiento / Bediening / Betrieb English Set engine switch ON. Pull starter cord or use key to After engine starts, move Set throttle to desired start engine. choke to open. setting. Français Mettre l’interrupteur du Tirez le cordon du démarreur Dès que le moteur tourne, Régler l’accélérateur en moteur sur ON...
- Page 19 LineDriver. frene. Nederlands Let op: De beweging van de Druk op de handgrepen Let op: De LineDriver stopt als Beweeg het pedaal (de LineDriver is vooruit en van de belijner om de beide voeten van de pedalen pedalen) naar achteren om achteruit.
- Page 20 Ponga en marcha el funciona correctamente. de seguridad. pulverizador. Nederlands Zet de LineDriver op de Let op: Het beveiligingssysteem Het beveiligingssysteem testen: Ontkoppel de parkeerrem. parkeerrem, wanneer u van de LineDriver voorkomt dat Zet op de parkeerrem.
-
Page 21: Troubleshooting
LineDriver Engine continues to run when operator Safety switch Adjust and set parking brake. Replace exits LineDriver and parking brake is not safety switch and/or any connecting wires. Consult engine manual for proper oil Engine misses during turns and forward... -
Page 22: Dépannage
Dépannage Dépannage PROBLÈME CAUSE SOLUTION Le moteur ne démarre pas Le frein de parking n’est pas serré. Serrer le frein. Consulter le manuel Moteur sur ARRET, pas d’essence ou moteur fourni niveau d’huile bas Le moteur tourne trop vite – s’arrête en Limiteur de régime usé... -
Page 23: Detección De Problemas
El motor se revoluciona – se cala Regulador desgastado Consulte el manual del motor, durante el funcionamiento. suministrado El motor funciona, pero el LineDriver no Bajo nivel de aceite hidráulico Llene el depósito hidráulico con aceite avanza ni retrocede. sintético Mobil 1 (15W-50). Suelte el El dispositivo de liberación de la rueda... -
Page 24: Storingen Opsporen En Verhelpen
Zet op de parkeerrem de LineDriver stapt De motor blijft draaien als de bestuurder Veiligheidsschakelaar De parkeerrem afstellen en inschakelen. van de LineDriver stapt en de machine Vervang de veiligheidsschakelaar en/of niet op de parkeerrem staat de verbindingsdraden. Raadpleeg de motorhandleiding... -
Page 25: Fehlersuche
Motor dreht sehr hoch, stirbt aber beim Drehzahlregler defekt Bedienungsanleitung für den Motor Betrieb ab lesen. Motor läuft, LineDriver fährt aber weder Hydrauliköl-Pegelstand zu niedrig Hydraulikbehälter mit Synthetiköl Mobil 1 vorwärts noch rückwärts (15W-50) befüllen. Die Feststellbremse Antriebsrad ist entkoppelt. -
Page 26: Repair / Réparation / Reparación / Reparatie / Reparatur26
Repair / Réparation / Reparación / Reparatie / Reparatur Repair / Réparation / Reparación / Reparatie / Reparatur To avoid injury from unexpected start up, disconnect spark plug Voorkom letsel door het onverwachts opstarten van het apparaat wire and black battery cable before you service your unit. door de bougiekabel en de zwarte kabel van de accu te ontkoppelen, voordat u onderhoud uitvoert. - Page 27 Purgado del sistema hidráulico / Het hydraulisch systeem ontluchten / Spülen des Hydrauliksystems ti11027a ti10938a ti11127a English Follow this procedure after Set LineDriver on blocks so Fill oil reservoir to top of Open (–) drive wheel replacing any hydraulic wheels are off ground. baffle. release two turns.
- Page 28 Repair / Réparation / Reparación / Reparatie / Reparatur t110943a ti10938a ti11027a English Start engine and run at low Slowly move motion Check oil level and top off Close (+) drive wheel rpm. control pedals in forward to top of baffle. release and repeat step 5.
- Page 29 Repair / Réparation / Reparación / Reparatie / Reparatur t110943a ti10938a English Increase speed. Move Check oil level. Top off to pedals to see if wheels turn top of baffle. freely. Français Augmenter la vitesse. Contrôler le niveau d’huile. Appuyer sur les pédales Faire l’appoint jusqu’en pour voir si les roues haut de la cloison.
- Page 30 Radmotoren ti111089a ti11119a ti11127a English Tire Removal Tire Installation Set LineDriver on blocks so Remove four lug nuts (185) Replace tire and install lug Tilt LineDriver back and wheels are off ground. and tire (16). nuts. Alternately tighten lug remove blocks.
- Page 31 110) van de wielmotor (21a). wielmotor (21a). wielnaaf heeft u mogelijk een Steek er een plug in de wieltrekker nodig; deze wordt slanguiteinden en hang ze niet geleverd door Graco. omhoog. Deutsch Radmotorausbau Den Reifen abnehmen. Stift (56), Kronenmutter (21b) Die zwei Hydraulikschläuche...
- Page 32 Repair / Réparation / Reparación / Reparatie / Reparatur ti11088a ti111089a English Wheel Motor Installation Install wheel motor (21a) Connect two hydraulic Install wheel hub (22b), Install tire. Purge hydraulic with four bolts (78) and lock hoses (109 & 110) to wheel castle nut (21b), and pin system.
- Page 33 Graco 245343. para la batería y las luces. regulador (126) con el perno Use el kit 245343 de batería Graco. Interruptor de la batería (C) Desmontaje - Desenchufe el (53) y la tuerca (142). Realice la instalación según el mostrado en posición sin batería.
- Page 34 (129), las dos arandelas todos los cables necesarios. motor. Desconecte tres cables entre (131), la contratuerca (130) y el motor y el LineDriver. NOTA: Todas las revisiones del la cubierta de protección del motor deben realizarse en un acoplamiento (125).
- Page 35 (129), two Install engine with four washers (131) and lock nut Connect three wires from engine mounting screws (130). engine to LineDriver. (69) and lock nuts (142). Torque to 17 ft-lb (22.6 N·m) Français Installation Remettre les quatre vis à...
- Page 36 LineDriver moteur doit être effectué par un à la terre (noirs) (Vanguard). l’entretoise (141). (Honda). Débranchez deux fils concessionnaire agréé. du moteur vers le LineDriver (Vanguard). Español Desmontaje Retire cuatro tornillos de Retire el tornillo (129), la...
- Page 37 Installeer de motor met vier Sluit drie draden aan tussen aan met vier schroeven en beschadigd raakt. montageschroeven (69) en de motor en de LineDriver sluitringen. Aandraaien tot 17 Installeer de koppeling (34b) borgmoeren (142). Bevestig (Honda). Sluit twee draden ft-lb (22.6 N·m).
- Page 38 Repair / Réparation / Reparación / Reparatie / Reparatur LineDriver Hydraulic Pump / Pompe du LineDriver / Bomba LineDriver / Pomp van de LineDriver / LineDriver-Pumpe ti11125a ti11124a ti11122a English Removal Be prepared to plug Disconnect hydraulic lines Remove cap screw (72), Remove two cap screws hydraulic connections.
- Page 39 Repair / Réparation / Reparación / Reparatie / Reparatur ti10933a ti11123a ti10933a English Installation Remove cap screw (129), Remove set screw (A) from Install pump (5) and key Install coupler guard (125) lock nut (130), washer (131) flexible coupling (34) and (83).
- Page 40 Repair / Réparation / Reparación / Reparatie / Reparatur ti11125a ti11124a ti11122a English Install two cap screws (80). Install cap screw (72) and Connect hydraulic lines spacer (33) into control arm (109, 110) and hoses (118, (15) with nut (174). 119) to pump (5).
- Page 41 Repair / Réparation / Reparación / Reparatie / Reparatur LineDriver HD Pump/ProStart Clutch / Pompe du LineDriver HD /Carter ProStart / Bomba LineDriver HD/Embrague ProStart / LineDriver HD pomp/ProStart koppeling / LineDriver-HD-Pumpe/ProStart-Kupplung ti11168a ti11171a ti11166a ti11125a ti111350a English Removal Remove cap screw (72),...
- Page 42 Repair / Réparation / Reparación / Reparatie / Reparatur ti11167a ti11162a ti11165a ti11161a ti11164a English Remove two screws (80), Remove screw (129), flat Remove spacer (141). Remove four screws (70), nuts (86) and clutch plate washer (156) and clutch washers (71) and clutch (4) from pump.
- Page 43 Repair / Réparation / Reparación / Reparatie / Reparatur ti11161a ti11165a ti11162a English Installation Caution: Orientation is critical to Caution: Washer size is critical to avoid destruction of clutch keep clutch from flying apart. Install clutch housing (125) Install spacer (141). with four screws (70) and Install clutch (34b) with flat Apply LockTite to screw...
- Page 44 Repair / Réparation / Reparación / Reparatie / Reparatur ti11164a ti11166a ti11168a ti11167a English Align holes on clutch plate Insert key on pump shaft. Extend pump shaft a Apply Locktite to two set with slots in pump. Mount Align centrifugal clutch minimum of 1/8 in.
- Page 45 Repair / Réparation / Reparación / Reparatie / Reparatur ti11171a ti11351a ti11350a English Insert pump housing into 10. Install cap screw (72) and 11. Connect hydraulic lines clutch housing with return spacer (33) into control arm (109, 110) and hoses (118, to neutral mechanism (15) with nut (174).
-
Page 46: Parts / Pièces / Piezas / Delen / Teile
Parts / Pièces / Piezas / Delen / Teile Parts / Pièces / Piezas / Delen / Teile... - Page 47 Parts / Pièces / Piezas / Delen / Teile Parts List - LineDriver (262004), LineDriver HD (262005), LineDriver HD Electric Start (25U474) Part Description Part Description 103746 NUT FRAME (page 49) 129636 SPRING, neutral return ENGINE, gas 15R309 ROD, standoff, 1/4 OD x 2.75 in.lg...
- Page 48 Parts / Pièces / Piezas / Delen / Teile...
- Page 49 Parts / Pièces / Piezas / Delen / Teile Parts List - LineDriver (262004), LineDriver HD (262005), LineDriver HD Electric Start (25U474) Part Description Part Description 121234 PAD, non-slip, pedal 289342 FRAME, LineDriver, painted 110037 SCREW, mach, torx pan hd...
- Page 50 Parts / Pièces / Piezas / Delen / Teile...
- Page 51 Parts / Pièces / Piezas / Delen / Teile Parts List - LineDriver (262004), LineDriver HD (262005), LineDriver HD Electric Start (25U474) Part Description Part Description 198954 HOSE, hydraulic 289343 CARRIAGE, seat, linedriver, 198955 HOSE, hydraulic painted 198976 WIRE, switch, brake...
- Page 52 EVERY 100 HOURS OF OPERATION Change engine oil. Reference Engine Owner's Manual for correct oil viscosity. YEARLY OR 500 HOURS Replace hydraulic oil and filter element. Use Mobil 1 (15W-50) synthetic oil and Graco filter 245342. Hydraulic Oil Replacement Procedure: Remove filter and allow oil reservoir to drain from filter base.
- Page 53 ANNUEL OU TOUTES LES 500 HEURES Vidanger l’huile hydraulique et remplacer le filtre. Utiliser de l’huile de synthèse Mobil 1 (15W–50) et un filtre Graco 245342. Procédure de vidange de l’huile hydraulique. Démonter le filtre et laisser l’huile s’écouler par l’embase du filtre.
- Page 54 Motoröl wechseln. Die erforderliche Viskosität des Öls ist in der Betriebsanleitung des Motors BETRIEBSSTUNDEN angegeben. JÄHRLICH ODER ALLE 500 Hydrauliköl und Filterelement auswechseln. Syntheseöl Mobil 1 (15W-50) und Graco-Filter 245342 verwenden. BETRIEBSSTUNDEN Hydrauliköl auswechseln: Filter abnehmen und Öl aus dem Behälter laufen lassen.
-
Page 55: Recycling And Disposal / Recyclage Et Mise Au Rebut / Reciclaje Y Eliminación / Recyclen En Afdanken / Recycling Und Entsorgung
Recycling and Disposal / Recyclage et mise au rebut / Reciclaje y eliminación / Recyclen en afdanken / Recycling und Entsorgung Recycling and Disposal / Recyclage et mise au rebut / Reciclaje y eliminación / Recyclen en afdanken / Recycling und Entsorgung Rechargeable Battery Disposal / End of Product Life / Fin de vie Mise au rebut des batteries... -
Page 56: Technical Specifications
LineDriver HD Electric Start (attached to LineLazer IV 200HS) Left Hand 0.5 m/s Right Hand 0.4 m/s † Vibration measured per ISO 5349 based on 8 hour daily exposure A(8) LineDriver and LineDriver HD: Vibration at seat and pedals (EN1032) < 0.5 m/s... -
Page 57: Caractéristiques Techniques
(fixé au LineLazer IV 200 HS) Main gauche 0,5 m/s Main droite 0,4 m/s † Vibrations mesurées selon ISO 5349 sur la base d’un service de 8 heures par jour A(8) LineDriver et LineDriver HD: Vibrations au siège et aux pédales (EN1032) < 0.5 m/s... -
Page 58: Características Técnicas
(acoplado al LineLazer IV 200HS) * Mano izquierda 0,5 m/s Mano derecha 0,4 m/s † Vibraciones medidas según la ISO 5349 en base a una exposición diaria de 8 horas A(8) LineDriver y LineDriver HD: Vibración en asiento y pedales (EN1032) < 0,5 m/s... -
Page 59: Technische Gegevens
(bevestigd aan LineLazer IV 200HS) linksdraaiend 0,5 m/s rechtsdraaiend 0,4 m/s † Trillingen gemeten conform ISO 5349 op basis van 8 uur blootstelling per dag A(8) LineDriver en LineDriver HD: trillingsniveau ter hoogte van stoel en pedalen (EN1032) < 0.5 m/s... -
Page 60: Technische Daten
LineDriver HD Electric Start (an LineLazer IV 200HS angeschlossen) Linke Hand 0,5 m/s Rechte Hand 0,4 m/s † Vibrationen gemessen gemäß ISO 5349 bei 8 Stunden täglichem Einsatz A(8) LineDriver und LineDriver HD: Schwingungen an Sitz und Pedalen (EN 1032) < 0,5 m/s²... - Page 61 If in a condition that it can no longer operate, it should be taken out of service and dismantled. Individual parts should be sorted by material and disposed of properly. Key construction materials can be found in the Materials of Construction Section. Graco Date Code/Serial Month (First Year (2nd and 3rd...
-
Page 62: Warranty / Garantie / Garantía / Garantie / Garantie
With the exception of any special, extended, or limited warranty published by Graco, Graco will, for a period of twelve months from the date of sale, repair or replace any part of the equipment determined by Graco to be defective. This warranty applies only when the equipment is installed, operated and maintained in accordance with Graco’s written recommendations. -
Page 63: Graco Information
Graco Information Graco Information For the latest information about Graco products, visit www.graco.com. For patent information, see www.graco.com/patents. TO PLACE AN ORDER, contact your Graco distributor or call 1-800-690-2894 to identify the nearest distributor. - Page 64 Übersetzung der Originalbetriebsanleitung. This manual contains German. MM 312540 Graco Headquarters: Minneapolis International Offices: Belgium, China, Japan, Korea GRACO INC. AND SUBSIDIARIES • P.O. BOX 1441 • MINNEAPOLIS MN 55440-1441 • USA Copyright 2008, Graco Inc. All Graco manufacturing locations are registered to ISO 9001. www.graco.com...