Mitsubishi Electric CR800 Series Instruction Manual
Industrial robot, controller setup, basic operation, and maintenance
Hide thumbs
Also See for CR800 Series:
- Instruction manual (204 pages) ,
- Special specifications manual (156 pages) ,
- Ethernet function instruction manual (146 pages)

Related Manuals for Mitsubishi Electric CR800 Series


Summary of Contents for Mitsubishi Electric CR800 Series
- Page 1 Mitsubishi Electric Industrial Robot CR800 Series Controller INSTRUCTION MANUAL Controller setup, basic operation, and maintenance CR800-D CR800-R CR800-Q BFP-A3476-H...
- Page 3 Safety Precautions Always read the following precautions and the separate "Safety Manual" before starting use of the robot to learn the required measures to be taken. CAUTION All teaching work must be carried out by an operator who has received special training.
- Page 4 The points of the precautions given in the separate "Safety Manual" are given below. Refer to the actual "Safety Manual" for details. DANGER When automatic operation of the robot is performed using multiple control devices (GOT, programmable controller, push-button switch), the interlocking of operation rights of the devices, etc.
- Page 5 WARNING When the robot arm has to be moved by hand from an external area, do not place hands or fingers in the openings. Failure to observe this could lead to hands or fingers catching depending on the posture. CAUTION Do not stop the robot or apply emergency stop by turning the robot controller's main power OFF.
- Page 6 (VPNs), and antivirus solutions. Mitsubishi Electric shall have no responsibility or liability for any problems involving robot trouble and system trouble by unauthorized access, DoS attacks, computer viruses, and other cyberattacks.
- Page 7 *CR800 controller Notes of the basic component are shown. CAUTION Please install the earth leakage breaker in the primary side power supply of the controller because of leakage protection. ACIN cable connection Groove for main Three phase Single phase <1> <2> Controller rear key (wide) AC200V...
- Page 8 Revision history Date of print Specifications No. Details of revisions 2017-04-25 BFP-A3476 ・ First print 2017-09-25 BFP-A3476-A ・ ”4.3.2 Input the serial number” was added. 2017-11-01 BFP-A3476-B ・ Description of countermeasures against unauthorized access was added. ・ Descriptions of CR800-R controller in “4.1.1 Names of each parts” were supplemented.
- Page 9 The information contained in this document has been written to be accurate as much as possible. Please interpret that items not described in this document "cannot be performed." This document explains for CR800 series controller. Installation of the emergency stop switch...
- Page 10 For users operating robots that have not been mounted with an operation panel: Operation of robot programs such as start-up and shutdown are carried out using external signals (exclusive input/output signals). This instruction manual is based on key operations on the teaching pendant and operation in the operation screen of the teaching pendant.
-
Page 11: Table Of Contents
Contents Page 1 Before starting use .......................... 1-1 1.1 Using the instruction manuals ....................1-1 1.1.1 The details of each instruction manuals ................1-1 1.1.2 Symbols used in instruction manual ..................1-2 1.2 Safety Precautions ........................1-3 1.2.1 Precautions given in the separate Safety Manual ..............1-4 2 Unpacking to installation ................................ - Page 12 Contents Page 4.5 Opening and closing the hand ............................4-54 4.6 Programming .................................... 4-55 (1) Creation procedures ..............................4-55 (2) Robot work ................................... 4-55 4.6.1 Creating the program ..............................4-56 (1) Deciding the operation order ..........................4-56 (2) Deciding the operation position name ......................4-57 (3) Describing and creating the program ........................
-
Page 13: Before Starting Use
1Before starting use 1 Before starting use This chapter explains the details and usage methods of the instruction manuals, the basic terminology and the safety precautions. Moreover, handling and operation of a teaching pendant (T/B) are described based on R32TB in instruction manuals. If using other T/B, such as R56TB, refer to a supplied instruction manual of the T/B. -
Page 14: Symbols Used In Instruction Manual
1Before starting use 1.1.2 Symbols used in instruction manual The symbols and expressions shown in Table 1-1 are used throughout this instruction manual. Learn the meaning of these symbols before reading this instruction manual. Table 1-1:Symbols in instruction manual Terminology Item/Symbol Meaning iQ Platform compatible type... -
Page 15: Safety Precautions
1Before starting use 1.2 Safety Precautions Always read the following precautions and the separate "Safety Manual" before starting use of the robot to learn the required measures to be taken. CAUTION All teaching work must be carried out by an operator who has received special training. -
Page 16: Precautions Given In The Separate Safety Manual
1Before starting use 1.2.1 Precautions given in the separate Safety Manual The points of the precautions given in the separate "Safety Manual" are given below. Refer to the actual "Safety Manual" for details. DANGER When automatic operation of the robot is performed using multiple control devices (GOT, programmable controller, push-button switch), the interlocking of operation rights of the devices, etc. - Page 17 (VPNs), and antivirus solutions. Mitsubishi Electric shall have no responsibility or liability for any problems involv- ing robot trouble and system trouble by unauthorized access, DoS attacks, com- puter viruses, and other cyberattacks.
-
Page 18: Unpacking To Installation
2Unpacking to installation 2 Unpacking to installation 2.1 Confirming the products Confirm that the parts shown in the standard configuration of the controller shown in Table 2-1 are enclosed with the purchased product. Users who have purchased options should refer to the separate "Standard Specifications". The primary power supply cable and grounding cable must be prepared by the customer. -
Page 19: Installation
2Unpacking to installation 2.2 Installation 2.2.1 Unpacking procedures The controller is shipped from the factory packaged in cardboard.Open the cardboard package and take out the controller. 2.2.2 Transportation procedures The following shows how to transport the controller. Mass Approx. 12.5kg Fig. -
Page 20: Installation Procedures
2Unpacking to installation 2.2.3 Installation procedures The installed size is shown as follows. When installing the controller horizontally, only one controller can be stacked on top of another controller. Fig.2-2 : Installation dimensions CAUTION When installing the controller vertically, ensure that the air intake is at the bottom as illustrated in Fig. - Page 21 2Unpacking to installation CAUTION When storing the controller in a cabinet, etc., take special care to the heat radiating properties and ventilation properties so that the ambient temperature remains within the specification values. And, don't install the controller in the position where direct rays or the heat of lighting hits.
-
Page 22: Installation And Connection
2Unpacking to installation 2.3 Installation and connection 2.3.1 Installation of the robot CPU unit (CR800-R controller) (1) Notes on the handling Explain notes on the handling of the CPU unit, the input/output unit, the intelligent functional unit, the power supply unit, the base unit, etc. 1) Please do not drop the unit, the terminal stand connector, and the pin connector, or do not supply a strong shock. - Page 23 2Unpacking to installation The installation procedure of the base unit is shown in the following. a) Fix two mounting screws for the upper side of the base unit to the control panel. b) Place the notch on the right side of the base unit to a screw on the right side of the panel. When the RQ extension base unit is used, place the bell-shaped hole on the right side of the base unit to the screw on the right side of the panel.
-
Page 24: Notes On Base Unit Installation
2Unpacking to installation (2) Notes on base unit installation If it installs the robot CPU system in the plate etc., please fully take into consideration the operativity, conservativeness, and environment-proof. 1) Installation position for unit To improve the airflow and change a module easily, provide clearance between the module top/bottom and structures/parts as shown below. - Page 25 2Unpacking to installation 6) Distance with other equipment Because of to avoid the effect of the radiation noise or the heat, please secure the following distance for the robot CPU system and the equipment (the contactor and relay). ・ Front of the robot CPU system ....100mm or more ・...
-
Page 26: Installation And Removal Of The Unit
2Unpacking to installation (3) Installation and removal of the unit The installing-and-removing procedure to base units, such as the power supply unit, the sequencer CPU unit, the robot CPU unit, the input-and-output unit, and the intelligent functional unit, is shown in the following. ■... - Page 27 2Unpacking to installation ■ Removal 1) Remove unit fixing screws. 2) Support the unit with both hands and securely press the unit fixing hook (a) with your finger. 3) Pull the unit straight supporting it at its bottom while pressing the unit fixing hook (a). While lifting the unit, remove the concave part (b) from the guide (c) of the base unit.
-
Page 28: Installation Of The Robot Cpu Unit (Cr800-Q Controller)
2Unpacking to installation 2.3.2 Installation of the robot CPU unit (CR800-Q controller) (1) Notes on the handling Explain notes on the handling of the CPU unit, the input/output unit, the intelligent functional unit, the power supply unit, the base unit, etc. 1) Please do not drop the unit, the terminal stand connector, and the pin connector, or do not supply a strong shock. - Page 29 2Unpacking to installation a) Install the two screws for fixing for basic base unit surface to the plate. Plate 盤 b) Hook the hollow on the right side of the basic base unit on the right side screw. Plate 盤 c) Hook the long hole on the left side of the basic base unit on the left side screw.
-
Page 30: Notes On Base Unit Installation
2Unpacking to installation (2) Notes on base unit installation If it installs the robot CPU system in the plate etc., please fully take into consideration the operativity, conservativeness, and environment-proof. 1) Installation dimension Five fixing screws (M4x14) 5-取付けネジ(M4×14) I/O0 I/O1 I/O4 I/O5 I/O7... - Page 31 2Unpacking to installation 3) Unit installation direction a) Use the robot CPU system in the installation direction of the airy following figure because of heat dissipation. b) Don't use it in the installation direction of the following figure. Upside down installation Vertical installation Horizontal installation 天地逆取付け...
-
Page 32: Installation And Removal Of The Unit
2Unpacking to installation (3) Installation and removal of the unit The installing-and-removing procedure to base units, such as the power supply unit, the sequencer CPU unit, the robot CPU unit, the input-and-output unit, and the intelligent functional unit, is shown in the following. 1) Installing and removing of the unit to the base unit "Q3 □... - Page 33 2Unpacking to installation b) Removing from "Q3 □ DB" Push R e m o v e th e s c re w , if th e u n it fix in g s c re w is b e in g u s e d .
-
Page 34: Connecting The Power Cable And Grounding Cable
2Unpacking to installation 2.3.3 Connecting the power cable and grounding cable The following shows how to connect the power cables and grounding cables. CAUTION Please install the earth leakage breaker in the primary side power supply of the controller because of leakage protection. ACIN cable connection Groove for main Three phase... -
Page 35: Connection Between The Robot Cpu Unit And The Drive Unit
2Unpacking to installation 2.3.4 Connection between the robot CPU unit and the drive unit The connection method of the robot CPU unit and the controller is shown below. Connect with reference to Fig. 2-6. Fig. 2-6 : Connection between the robot CPU system and the controller CAUTION 1) If the cap is not installed in the SSCNET III connector after removing the SSCNET III cable, there is a possibility that the characteristic may deteriorate and malfunction by... -
Page 36: Emergency Stop Input And Output Etc
2Unpacking to installation 2.3.5 Emergency stop input and output etc. Do wiring of the external emergency stop, the special stop input, the door switch, and the mode selector switch from the "special input/output" terminal connector. Connection of the external emergency stop is explained in "2.3.6 Connecting the external emergency stop and mode selector switch". -
Page 37: Connecting The External Emergency Stop And Mode Selector Switch
2Unpacking to installation [Note] If a stop signal or servo OFF signal is input simultaneously with a door switch open/emergency stop input, the error, H056n “Servo sys. error (A/D)” may occur. When a door switch open/emergency stop is input, the robot turns off the servo after it stops. It is unnecessary to input a stop signal or servo OFF signal. - Page 38 2Unpacking to installation Fig. 2-8 : Emergency stop cable and mode selector switch connection Refer to the following for details on the example of external emergency stop connection, arrangement of connectors for exclusive input/output signals, and pin assignment. Item Reference Example of external emergency stop connection Fig.
- Page 39 2Unpacking to installation Internal circuit structure (Customer) (Customer) (Controller side) T/B emergency stop +24V +24V +3.3V CNUSR11 +3.3V External emergency stop input +3.3V +3.3V Control circuit 1 +3.3V +24V Door switch input CNUSR11 Mode output +3.3V +24V Mode selector Emergency stop switch input output Robot error output...
- Page 40 2Unpacking to installation Arrangement of connectors for exclusive input/output signals are shown in Fig. 2-10. The pin assignments of the connectors for exclusive input/output signals are shown in Table 2-5 Table 2-6. Fig. 2-10 : Arrangement of connectors for exclusive input/output signals Table 2-5 :...
- Page 41 2Unpacking to installation Name Function Remarks Name Function Remarks MODEOUT11 Mode output Confirming the MODEOUT12 Mode output Confirming the controller operation controller operation mode. mode. This pin and pin 27 is a This pin and pin 11 is a pair. pair.
- Page 42 2Unpacking to installation Connection procedure Wire cables to the CNUSR11 and CNUSR12 user wiring connectors (attachment), and fit them into the corresponding connectors (ports) located on the rear side of the controller. The customer needs to prepare the following items. ...
- Page 43 2Unpacking to installation 2.3.7 Examples of safety measures The controller's dedicated I/O terminal connector has a duplicate emergency stop circuit. The safety measure examples are shown in Fig. 2-12 Fig. 2-15. Create a circuit as shown below for safety measures. In addition, the figure shows the normal state which is not in the emergency stop state. [Note] ・...
- Page 44 2Unpacking to installation <Wiring example 2>: Connect the emergency stop switch, and door switch of peripheral equipment to the controller. The power supply for emergency stop input uses the power supply in the controller. Monitor the emergency stop state by the peripheral equipment side. <Operation of the emergency stop>...
- Page 45 2Unpacking to installation <Wiring example 3>: Connect the emergency stop switch of peripheral equipment, and the door switch to two controllers, and it interlocks. The power supply for emergency stop input uses the power supply of peripheral equipment. Monitor the emergency stop state by the peripheral equipment side. <Operation of the emergency stop>...
- Page 46 2 systems (i.e. QS90SR2SP (Manufacture: Mitsubishi Electric Corporation)). 2) When connecting emergency stop button output to an exterior safety relay, please take note of the polarity and make sure that the electrical current flows in the same direction as indicated by the dotted arrows in the two places in the diagram.
-
Page 47: External Emergency Stop Connection [Supplementary Explanation]
2Unpacking to installation (1) External emergency stop connection [supplementary explanation] (1) Use a 2-contact type switch for all switches. (2) Install a limit switch on the safety fence's door. With a constantly open contact (normal open), wire to the door switch input terminal so that the switch turns ON (is conducted) when the door is closed, and turns OFF (is opened) when the door is open. -
Page 48: Additional Axis Synchronization Output
2Unpacking to installation 2.3.8 Additional axis synchronization output When an additional axis is used, the servo ON/OFF status of the additional axis can be synchronized with the servo ON/OFF status of the robot itself by using the output contact (AXMC) provided on the rear or inside of the controller and configuring a circuit so that the power to the servo amplifier for the additional axis can be turned off when this output is open. -
Page 49: Image Of How To Connect The Controller Connector
2Unpacking to installation (2) Image of how to connect the controller connector * Refer to Page 30 "Fig. 2-11: Wiring method to the user wiring connector" for more details about how to wire a connector. Fig. 2-17 : AXMC terminal connector Installation and connectionInstallation 2-37... -
Page 50: Connecting To The Robot Arm
2Unpacking to installation 2.3.9 Connecting to the robot arm Use a machine cable to connect a robot arm with a controller. (1) Connecting a machine cable Refer to the separate manual "Robot arm setup and maintenance", and connect the controller and robot arm with machine cables. -
Page 51: Installing The Option Devices
3Installing the option devices 3 Installing the option devices Refer to Page 47, "4.2.1 Installing and removing the T/B" for installing method of T/B. Refer to the separate "Standard Specifications" or each option's manual for the optional devices other than those described in this manual. -
Page 52: Removing The Option Card
3Installing the option devices 3.1.2 Removing the Option Card The following describes how to remove the interface card. Fig. 3-2 : Removing of the interface card 1) Turn off the power. 2) Remove the interface card with the removal lever pushed up. Hold the handle of the interface card and pull out the interface card in parallel with the controller. -
Page 53: Installing And Wiring Of The Controller Protection Box (Cr800-Mb)
3Installing the option devices 3.2 Installing and wiring of the controller protection box (CR800-MB) Method of installing and wiring with CR800-MB is as follows. 1) Release the metal fittings (4 pcs.) of CR800-MB and remove the top plate. 2) Copy the serial number of a controller to a transcription label, and put it to the front of CR800-MB. After that, put a transparent label on to a transcription label. - Page 54 3Installing the option devices 11) Fix the top plate with metal fittings (4 pcs.) of CR800-MB. CAUTION When you do not connect T/B to CR800-MB, be sure to connect T/B cap to TB connector. CAUTION Install a controller option before combining a controller and CR800-MB. CAUTION When CR800-MB is used vertically, exchange for the screws of the left side the rubber legs attached to the bottom.
-
Page 55: Basic Operations
4Basic operations 4 Basic operations In this chapter, the following items will be explained regarding the basic operations for handling the robot. Handling the controller The functions of the various keys on the controller are explained. Handling the teaching pendant The methods of installing/removing the T/B, and the functions of the various keys are explained. -
Page 56: Handling The Controller
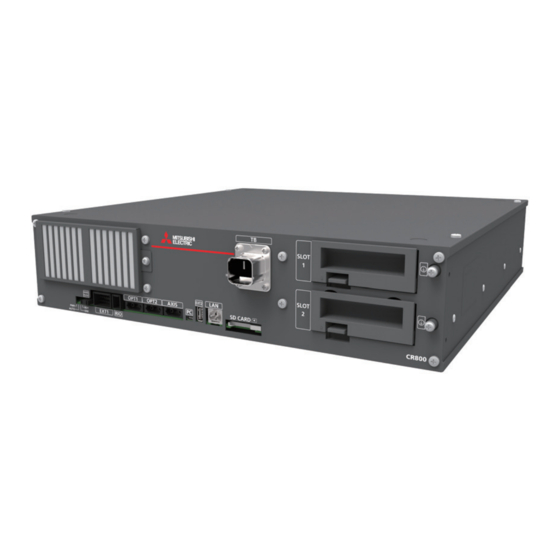
4Basic operations 4.1 Handling the controller 4.1.1 Names of each parts Fig. 4-1 : Names of controller parts <1> ACIN connector ........Supplied ACIN cable connector (input voltage: AC200V). Number of ACIN cable phase Single phase Terminal: M5, cable length: 3m Three phase Terminal: M5, cable length: 3m <2>... - Page 57 4Basic operations <7> LED ...............Four LEDs indicating the controller status. Details POWER Indicates the control power status. On: Control power ON Off: Control power OFF AUTO Indicates the controller mode. On: AUTOMATIC mode Off: MANUAL mode ERROR Indicates the error status. On: Error occurred.
- Page 58 4Basic operations ◇◆◇ What are the operation rights? ◇◆◇ Even when multiple devices, such as a T/B and personal computer, are connected to the controller, the operation at one time is limited to one device. This limited device (has the operation rights) ◇◆◇...
-
Page 59: Handling The T/B
4Basic operations 4.2 Handling the T/B 4.2.1 Installing and removing the T/B Installing and removing the T/B, with turning off the controller power. If T/B is installed and removed in the state of control source ON, emergency stop alarm will be occurred. However, it allows you to remove the T/B from the controller without occurrence of alarm by pulling out the T/ B connector within five seconds while the 3-position enable switch of the T/B is being pulled up lightly (in the position 2). -
Page 60: Functions Of Each Key
4Basic operations 4.2.2 Functions of each key ② ④ ① ③ ⑤ ⑤ ⑥ ⑥ ⑧ ⑦ ⑨ ⑩ ⑪ ⑰ ⑫ ⑱ ⑬ ⑭ ⑲ ⑮ ⑯ ⑳ Fig. 4-3 : Teaching pendant ① [Emergency stop] switch....The robot servo turns OFF and the operation stops immediately. The release of the emergency stop turns the switch to the right, or pulls it. -
Page 61: Turning The Power On And Off
4Basic operations 4.3 Turning the power ON and OFF 4.3.1 Turning the control power ON CAUTION Always confirm the following items before turning the controller power ON. 1) Make sure that there are no operators in the robot operation range. 2) Make sure that the controller and robot arm are securely connected with the machine cable. -
Page 62: Input The Serial Number
4Basic operations 4.3.2 Input the serial number If error C0152 (unmatched robot serial number) occurs after purchasing the robot, please input the serial number of the robot arm into parameter RBSERIAL. The serial number is printed to the rating name board on base section of the robot arm. 1) Press the [RESET] key of T/B and cancel the error of T/B. -
Page 63: Shutting Off The Control Power
4Basic operations 4.3.3 Shutting OFF the control power ■ CR800-D controller 1) If the robot is operating, stop the robot. 2) After the robot has stopped, turn the servo OFF. 3) Turn OFF the switch of the earth leakage breaker installed outside. ■... -
Page 64: Shutting Off The Controller Power
4Basic operations 4.3.4 Shutting OFF the controller power If the controller power is shut off while the robot CPU system is ON, the errors shown in Table 4-1 occurs. To recover from the error, reset the error after turning on the controller power. Error resetting operation requires about 60 seconds. -
Page 65: Jog Operation
4Basic operations 4.4 Jog operation Refer to the separate manual "Robot arm setup and maintenance" when carrying out jog operation. The following jog operation modes are available. Use these according to the purpose. Table 4-2 : Jog modes Jog mode Main application Explanation JOINT JOG... -
Page 66: Opening And Closing The Hand
4Basic operations 4.5 Opening and closing the hand Hands 1 to 6 can be opened and closed with the T/B. <HAND> ±C : HAND1 ±Z : HAND4 ±B : HAND2 ±Y : HAND5 ±A : HAND3 ±X : HAND6 76543210 76543210 OUT-900□□□□□□... -
Page 67: Programming
4Basic operations 4.6 Programming The procedures from creating the program to automatic operation are explained in order using a simple procedure as an example. MELFA-BASIC VI commands are used in the program examples. (1) Creation procedures Start Decide the robot operation order, operation path Deciding the operation order (necessity of linear movement), and the work at each operation position (hand open/close, etc). -
Page 68: Creating The Program
4Basic operations 4.6.1 Creating the program (1) Deciding the operation order :Joint movement Wait position :Linear movement :Teaching position Upward position to Upward position to grasping workpiece release workpiece (8) Hand open (4) Hand close Position to grasp workpiece Position to release workpiece Start (1) Move to wait position (joint movement). -
Page 69: Deciding The Operation Position Name
4Basic operations (2) Deciding the operation position name Wait position (PWAIT) Upward position to Upward position to grasping workpiece release workpiece Position to release workpiece Position to grasp workpiece (PGET) (PPUT) Position variable Name Teaching Remarks name Wait position PWAIT Required Upward position to grasping -... -
Page 70: Describing And Creating The Program
4Basic operations (3) Describing and creating the program ■ Convert the target robot operations and work into commands. Refer to the separate manual "Instruction Manual: Detailed explanations of functions and operations" for details on the commands. Table 4-3 : Commands used (For MELFA-BASIC VI commands) Target operation and work Command Example of designation... - Page 71 4Basic operations CAUTION Note) Upward movement is designated at a position along the Z axis of the TOOL coordinate system, and the direction is designated with the + and - signs. Refer to the section on the TOOL JOG operation in the separate "Installation Manual/ Robot arm setup and maintenance", and confirm the Z axis direction of the TOOL coordinate system.
- Page 72 4Basic operations ■ Input the described program into the controller. The T/B is used for this operation. 1) Set the controller’s mode to “MANUAL” . Preparing the T/B 2) Set the T/B [ENABLE] switch to "ENABLE". Up :DISABLE Down:ENABLE *Lighting Rear of T/B 3) In the <MENU>...
- Page 73 4Basic operations 6) Press the [F3] key. <PROGRAM> 1 100% The cursor will move to the command editing _ line. EDIT DELETE INSERT CLOSE 7) Confirm that the number input mode and <PROGRAM> 1 press the [1] key. "1" of the step number is inputted. _...
- Page 74 4Basic operations 11) Press the [SP], [PQRS] key, and input the <PROGRAM> 1 space and "P". 1MOV P1 _ CLOSE SPACE 12) Press the [WXYZ] key, and input the space <PROGRAM> 1 and "W". 1MOV PWAIT _ CLOSE <PROGRAM> 1 13) Input "A", "I"...
- Page 75 4Basic operations ■ Teach the robot operation position. Set the position with jog operation (Teaching PGET) 1) Move the robot with jog operation, and set Hand ハンド the end of the hand to the position for grasping the workpiece. When the position has been set, open and close the hand to confirm that the workpiece can be grasped.
-
Page 76: Confirming The Program
4Basic operations (4) Confirming the program Using the T/B execute the program line by line (step operation), and confirm the operation. Following operations are operated with lightly pressing the enabling switch on the T/B. <POS.> JNT 100% PWAIT 1) Press the [FUNCTION] key and change the X:+128.56 A:+180.00 Y: +0.00... -
Page 77: Correcting The Program
4Basic operations (5) Correcting the program ■ Correcting the commands As an example, the joint movement at line No.7 will be changed to linear movement. Note) (Change 7 Mov PPUT, +20 to 7 Mvs PPUT, +20) <PROGRAM> 1 1 Mov pwait 1) Press the [FUNCTION] key and change the 2 Mov PGET +20 function display. - Page 78 4Basic operations 3) Press the [F1] (Edit) key and display <PROGRAM> 1 command edit screen. 7 Mov PPUT, +20 8 Mvs PPUT 9 Hopen 1 10 Dly 1.0 INSERT EDIT DELETE CLOSE 4) Press the [→] key 3 times. Move the cursor <PROGRAM>...
- Page 79 4Basic operations ■ Correcting the taught position As an example, the wait position (PWAIT) will be corrected. New wait position (PWAIT) Change <PROGRAM> 1 1 Mov pwait 1) In the program edit screen, press the 2 Mov PGET +20 [FUNCTION] key twice and change the 3 Mvs PGET 4 Hclose 1 function display.
-
Page 80: Saving The Program
4Basic operations <POS.> XYZ 100% PWAIT X:+128.56 A:+180.00 4) Press the [F2] (Teaching) key. Y: +0.00 B: +90.00 The teaching confirmation screen is Z:+845.23 C:-180.00 displayed. FL1: FL2: ⇒ TEACH Prev Next MOVE <POS.EDIT> 1 5) Press the [F1] (Yes) key and register the PWAIT RECORD CURRENT POSITION. -
Page 81: Start Automatic Operation
4Basic operations (7) Start automatic operation. Operations are carried out from the <OPERATION> screen opened by selecting <MENU> → <RUN>. CAUTION The T/B has the operation rights while displaying the <OPERATION> screen. (The T/ B’s status display lamp [ENABLE] blinks) Note that operations which require external signal to have operation rights cannot be executed. - Page 82 4Basic operations 4) Press [3] key while the <RUN> screen is displayed. The <OPERATION> screen appears. <RUN> <OPERATION> 100% Auto PROGRAM NAME: STEP: 1.CHECK 2.TEST RUN 3.OPERATION PRG1 00001 STATUS: STOP MODE: CONT. CLOSE START CYCLE RESET CHOOSE ⇒ ...
- Page 83 4Basic operations 6) Enter the name of the program into the Program Name brackets, and press the [EXE] key. The program will be newly selected, and the display will return to the <OPERATION> screen. <OPERATION> 100% Auto <PROGRAM CHOICE> PROGRAM NAME PROGRAM NAME: STEP:...
- Page 84 4Basic operations 10) The operation mode follows the mode displayed on the screen. Change the mode if necessary. <OPERATION> 100% Auto <OPERATION> 100% Auto PROGRAM NAME: STEP: PROGRAM NAME: STEP: PRG2 00001 PRG2 00001 STATUS: RUN MODE: CONT. STATUS: RUN MODE: CYCLE START CYCLE...
-
Page 85: Maintenance And Inspection
5Maintenance and Inspection 5 Maintenance and Inspection The maintenance and inspection procedures to be carried out to use the robot for a long time without trouble are described in this chapter. The types and replacement methods of consumable parts are also explained. 5.1 Maintenance and inspection interval Maintenance and inspection are divided into the inspections carried out daily, and the periodic inspections carry out at set intervals. -
Page 86: Inspection Items
5Maintenance and Inspection 5.2 Inspection items The controller inspection items are shown below. Refer to section "Maintenance and Inspection" in the separate manual "Robot arm setup and maintenance", and inspect the robot arm at the same time. 5.2.1 Daily inspection items Carry out daily inspections following the procedures given in Table 5-1. -
Page 87: Maintenance And Inspection Procedures
5Maintenance and Inspection 5.3 Maintenance and inspection procedures The procedures for carrying out periodic maintenance and inspection are described below. Thoroughly comprehend the procedures, and follow the instructions. This work can be commissioned to the Mitsubishi Service Dept. for a fee. (Never disassemble, etc., any of the parts not described in this section.) The maintenance parts required for the maintenance and inspection are shown in Page 78, "5.4 Maintenance parts". - Page 88 5Maintenance and Inspection "+" side Battery lead connector Do not hold lead wire Battery connector Q6BAT Battery lead wire Battery holder Fig. 5-2 : Exchange of the battery 1) Turn on the robot CPU system power supply for 10 minutes or longer. 2) Perform a full backup using RT ToolBox3 (option).
-
Page 89: The Check Of The Filter, Cleaning, Exchange
5Maintenance and Inspection 5.3.2 The check of the filter, cleaning, exchange. The filter is installed in the controller. The following shows the procedure for inspecting, cleaning and replacing the filter: 1) Loosen the M4 x 6 screws and remove the filter cover from the front of the controller. Remove the claw on the left side of the filter cover as it is inserted in the front face of the controller. -
Page 90: Maintenance Parts
Robot CPU unit: For Q172DSRCPU Mitsubishi Electric Co. (CR800-Q controller only) Note1) Confirm the robot arm serial No., and contact the dealer or service branch of Mitsubishi Electric Co., for the type. Table 5-5 : Controller spare parts list Note1) Part name Qty. - Page 92 HEAD OFFICE: TOKYO BUILDING, 2-7-3, MARUNOUCHI, CHIYODA-KU, TOKYO 100-8310, JAPAN NAGOYA WORKS: 5-1-14, YADA-MINAMI, HIGASHI-KU NAGOYA 461-8670, JAPAN Authorised representative: Mitsubishi Electric Europe B.V. FA - European Business Group Mitsubishi-Electric-Platz 1, D-40882 Ratingen, Germany Tel: +49(0)2102-4860 Oct. 2020 MEE Printed in Japan on recycled paper.