Table of Contents
Advertisement
GB
Operating instructions
Welding machines for MMA welding
PICO 230
PICO 230 CEL
PICO 260
PICO 260 CEL
PICO 260 CEL PWS
PICO 300
PICO 300 CEL
PICO 300 CEL PWS
N. B. These operating instructions must be read before commissioning.
Failure to do so may be dangerous.
Machines may only be operated by personnel who are familiar with the appropriate safety
regulations.
The machines bear the conformity mark and thus comply with the
•
EC Low Voltage Directive (2006/95/ EG)
•
EC EMC Directive (2004/108/ EG)
In compliance with IEC 60974, EN 60974, VDE 0544 the machines can be used in environments
with an increased electrical hazard.
© 2007
Subject to alteration.
Dr. Günter - Henle - Straße 8 • D-56271 Mündersbach
Phone: +49 2680 181 0 • Fax: +49 2680 181 244
Item No.: 099-002032-EWM01
HIGHTEC WELDING GmbH
www.ewm.de
•
info@ewm.de
Revised: 28.03.2007
EWM
Advertisement
Table of Contents

Related Manuals for EWM PICO 230


Summary of Contents for EWM PICO 230
- Page 1 Phone: +49 2680 181 0 • Fax: +49 2680 181 244 www.ewm.de • info@ewm.de Operating instructions Welding machines for MMA welding PICO 230 PICO 230 CEL PICO 260 PICO 260 CEL PICO 260 CEL PWS PICO 300 PICO 300 CEL PICO 300 CEL PWS N.
- Page 2 Congratulations! You have chosen a quality product from EWM HIGHTEC WELDING GmbH. EWM machines provide results of the highest perfection thanks to their PREMIUM quality. Therefore we are happy to provide you with a full 3-year warranty according to our operating instructions.
- Page 3 Machine and Company Data Please enter the EWM machine data and your company’s data in the appropriate fields. EWM HIGHTEC WELDING GMBH D-56271 MÜNDERSBACH TYP: SNR: ART: PROJ: GEPRÜFT/CONTROL: Name of Customer / company Name of Customer / company Adress...
-
Page 4: Table Of Contents
PICO 230; 230 CEL ........................10 PICO 260; 260 CEL; 260 CEL PWS ....................11 PICO 300; 300 CEL; 300 CEL PWS ....................12 4 Machine description..........................13 4.1.1 PICO 230; 260; 300; PICO 230; 260; 300 CEL............13 4.1.2 Front view ........................13 4.1.3 Rear view........................14 PICO 260;... - Page 5 Warranty Declaration ........................36 9 Operating problems, causes and remedies ..................37 Error messages (power source) ....................37 10 Spare parts list ............................. 38 10.1 PICO 230; 230 CEL ........................38 10.1.1 Front view ........................38 10.1.2 Rear view........................39 10.1.3...
-
Page 6: Safety Instructions
Safety instructions For your safety Safety instructions For your safety Observe accident prevention regulations! Ignoring the following safety procedures can be fatal! Proper usage This machine has been manufactured according to the latest developments in technology and current regulations and standards. It is to be operated only for the use for which it was designed (see chapter Commissioning/Area of application). - Page 7 Safety instructions For your safety Workpiece, flying sparks and droplets are hot! • Keep children and animals well away from the working area. Their behaviour is unpredictable. • Move containers with inflammable or explosive liquids away from the working area. There is a danger of fire and explosion.
-
Page 8: Transport And Installation
Safety instructions Transport and installation Transport and installation The machines may only be transported and operated in an upright position. Before carrying away or moving, pull out mains plug and place on the machine. When setting up the machine, resistance to tilting is only guaranteed up to an angle of 10° (as specified in EN 60974-1). -
Page 9: Notes On The Use Of These Operating Instructions
Safety instructions Notes on the use of these operating instructions Notes on the use of these operating instructions These operating instructions are arranged into chapters. To help you find your way around more quickly, in the margins you will occasionally see symbols along with the sub-headings. -
Page 10: Technical Data
Technical data PICO 230; 230 CEL Technical data PICO 230; 230 CEL PICO range 230 / 230 CEL Setting range: 10 A / 10.4 V to 260 A / 20.4 V 10 A / 20.4 V to 230 A / 29.2 V electrode 20°C... -
Page 11: Pico 260; 260 Cel; 260 Cel Pws
Technical data PICO 260; 260 CEL; 260 CEL PWS PICO 260; 260 CEL; 260 CEL PWS PICO range 260; 260 CEL; 260CEL PWS Setting range: 10 A / 10.4 V to 260 A / 20.4 V 10 A / 20.4 V to 260 A / 30.4 V electrode 20°C 40°C... -
Page 12: Pico 300; 300 Cel; 300 Cel Pws
Technical data PICO 300; 300 CEL; 300 CEL PWS PICO 300; 300 CEL; 300 CEL PWS PICO range 300; 300 CEL; 300 CEL PWS Setting range: 10 A / 10.4 V to 260 A / 22 V 10 A / 20.4 V to 260 A / 32 V electrode 20°C 40°C... -
Page 13: Machine Description
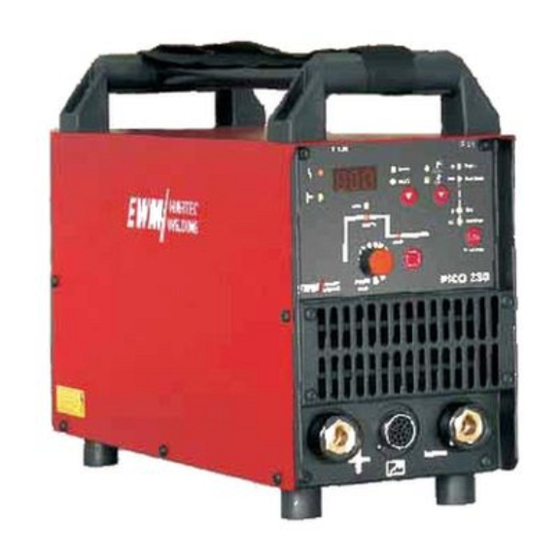
Machine description PICO 300; 300 CEL; 300 CEL PWS Machine description 4.1.1 PICO 230; 260; 300; PICO 230; 260; 300 CEL 4.1.2 Front view Figure 4-1 Item Symbol Description Carrying strap Transport bar Carrying handle Control / Operating elements (see chapter Function specification) Cooling air inlet Connection socket, “+”... -
Page 14: Rear View
Machine description PICO 300; 300 CEL; 300 CEL PWS 4.1.3 Rear view Figure 4-2 Item Symbol Description Main switch, machine on/off Strain relief with mains connection cable Cooling air outlet Item No.: 099-002032-EWM01... -
Page 15: Pico 260; 300 Cel Pws
Machine description PICO 260; 300 CEL PWS PICO 260; 300 CEL PWS 4.2.1 Front view Figure 4-3 Item Symbol Description Carrying strap Transport bar Carrying handle Control / Operating elements (see chapter Function specification) Cooling air inlet Connection socket, 19-pole Remote control connection Connection socket, electrode holder The welding current polarity (“+”... -
Page 16: Rear View
Machine description PICO 260; 300 CEL PWS 4.2.2 Rear view Figure 4-4 Item Symbol Description Main switch, machine on/off Strain relief with mains connection cable Cooling air outlet Fuse Solenoid switch pole reversal fuse Fuse Solenoid switch pole reversal fuse Item No.: 099-002032-EWM01... -
Page 17: Functional Characteristics
Functional characteristics Machine control – Operating elements Functional characteristics Machine control – Operating elements Figure 5-1 Item Symbol Description Three-figure LED display Display of welding current and voltage, welding parameters, error code “Collective interference” signal light Error messages, see chapter on troubleshooting, causes and remedies “Excess temperature”... -
Page 18: Welding Data Display
Functional characteristics Welding data display Item Symbol Description “Display switching” button VOLT Welding current display VOLT Welding voltage display “Arcforce” button (welding characteristics) according to electrode type “Select welding parameters” button This button is used to select the welding parameters depending on the welding process and operating mode used. -
Page 19: Electrode Type Allocation
MMA welding 5.3.2.1 Electrode type allocation PICO 230; 260; 300 Item Electrode type rutile rutile basic basic rutile/cellulose PICO 230; 260; 300 CEL PICO 260; 300 CEL PWS Item Electrode type rutile rutile basic basic and rutile/cellulose cellulose Figure 5-2 The selectable electrode characteristics on the machine control are guideline values. -
Page 20: Antistick
Functional characteristics TIG welding Functional sequence of hotstart device The hotstart device uses an increased ignition current to improve arc ignition. The parameters for the hotstart current and time can be adjusted individually. When the stick electrode has been struck, the arc ignites at the adjusted hotstart current AMP (factory setting: 120% of main current) and welds at this current until the hotstart time in seconds has elapsed (factory setting: 1 second). -
Page 21: Tig Arc Ignition
Functional characteristics Remote control 5.4.2 TIG arc ignition Figure 5-5 The arc is ignited on contact with the workpiece: a) Carefully place the torch gas nozzle and tungsten electrode tip onto the workpiece (liftarc current flowing, regardless of the main current set). b) Incline the torch towards the torch gas nozzle until there is a gap of approx. -
Page 22: Advanced Settings (Mma Welding)
Functional characteristics Advanced settings (MMA welding) Advanced settings (MMA welding) To enable the greatest possible breadth of applications, the following parameters can be adjusted or optimised for the welding task. 5.6.1 Arcforce correction (welding characteristics) Note for "PICO CEL machines": The arcforce characteristic for cellulose electrodes "... -
Page 23: Arc Length Restriction (Usp)
Rutilbas Rutilcel AMP% Arcforce PICO 230 CEL Figure 5-6 Welding machines with the “VRD” option is equipped with a voltage reduction device which meets the requirements set down in the Australian standard AS 1674.2-2003 in a category C environment, in accordance with table 3.2.6:... -
Page 24: Commissioning
PICO 230; 260; 300 • MMA direct current welding for rutile, rutile/basic and rutile/cellulose electrode types. PICO 230; 260 CEL; PICO 260; 300 CEL PWS MMA direct current welding for rutile, rutile/basic, basic, rutile/cellulose and cellulose electrode types. • Any other use is regarded as “improper” and no liability is assumed for any damage arising therefrom. -
Page 25: Dirt Filter
Commissioning Mains connection 6.3.1 Dirt filter The dirt filter can be used in places with unusually high levels of dirt and dust in the ambient air. The filter reduces the duty cycle of the welding machine via the reduced flow of cooling air. The filter must be disassembled and cleaned regularly depending on the level of dirt (blow out with compressed air). -
Page 26: Mma Welding
Commissioning MMA welding MMA welding 6.7.1 PICO 230; 260; 300; PICO 230; 260; 300 CEL Item Description Connection socket "+" Connection socket "-" Connection socket, 19-pole Figure 6-2 Item Symbol Description Connection socket, “+” welding current Workpiece lead or electrode holder connection Connection socket, “-”... -
Page 27: Pico 260; 300 Cel Pws
Commissioning PICO 260; 300 CEL PWS PICO 260; 300 CEL PWS Figure 6-3 Item Symbol Description Connection socket, 19-pole Remote control connection Connection socket, electrode holder The welding current polarity (“+” or “-”) are based on the setting of the “Welding current polarity changeover switch”. -
Page 28: Electrode Holder Connection
Commissioning TIG welding 6.8.1.2 Electrode holder connection Caution: Risk of injury from crushing! Suitable protective gloves should be worn when changing spent stick electrodes. When pausing work, always place the electrode holder on an insulated surface. • Insert cable plug on the electrode holder into the welding current socket “ ”... -
Page 29: Connection For Workpiece Lead
Commissioning TIG welding 6.9.3 Connection for workpiece lead • Insert cable plug of the workpiece lead into the “+” or “ ” welding current connection socket and lock by turning to the right. For machines with pole reversal switch (PWS), the welding current polarity is changed as follows after selecting “TIG welding process”: •... -
Page 30: Maintenance And Care
DIN EN 61010-1 Appendix A – Measuring Circuit A1. You as the user are tasked with ensuring that your EWM machines conform to the standard E VDE 0544-207 and are tested with the relevant test equipment and measuring devices given above. -
Page 31: Test Intervals And Scope
Maintenance and care Repetition test 7.3.1 Test intervals and scope A quarterly partial test and an annual extensive test are to be carried out. The extensive test must also be carried out each time that repairs are made; in the case of heavy use, the period can be reduced (e.g. to 6 months when used at construction sites). -
Page 32: Measurement Of Insulation Resistance
Maintenance and care Repetition test 7.3.5 Measurement of insulation resistance The mains switch must be on before the insulation in the interior of the machine through to the transformer can be checked. If a mains contactor is fitted, this should be bridged or the measurement must be carried out on both sides. -
Page 33: Repair Work
Returns of defective equipment subject to warranty may only be made through your EWM sales partner. In the event of problems or queries, please contact the EWM Service Department directly (+49 (0) 2680 181 0). Use only original spare parts and replacement parts when servicing. When placing an order, please quote the type designation and item number, as well as the type, serial number and item number of the relevant equipment. -
Page 34: Disposing Of Equipment
Your administrative office will be pleased to inform you of the options. EWM participates in an approved waste disposal and recycling system and is registered in the Used Electrical Equipment Register (EAR) under number WEEE DE 57686922. -
Page 35: 3-Year Warranty
(such as circuit boards, ignition units) Manufacturer/supplier warranty on: • all additional parts used by EWM, but manufactured by other companies (e.g. motors, pumps, fans, torches, etc.) Non-reproducible software errors and parts subject to mechanical aging are excluded from the warranty (e.g. -
Page 36: Warranty Declaration
Furthermore, it is not valid in the case of unauthorised changes, repairs or modifications. In addition, a claim for warranty does not exist in the case of partially or completely dismantled products and interventions by persons who are not authorised by EWM, as well as in the case of normal wear. -
Page 37: Operating Problems, Causes And Remedies
Rutilcel AMP% Arcforce PICO 230 CEL Figure 9-1 A welding machine error is indicated by the collective fault signal light (A1) lighting up and an error code (see table) being displayed in the three-digit LED display of the machine controller (B1). -
Page 38: Spare Parts List
Spare parts list PICO 230; 230 CEL Spare parts list 10.1 PICO 230; 230 CEL 10.1.1 Front view Figure 10-1 Item Designation Type Item number BH490X259X186-DRUCK Casing angle 094-008896-00002 CARRYING HANDLE Hand grip mount 094-007383-00003 D25X1.5X548MM TUBE Hand grip 094-007501-00003... -
Page 39: 10.1.2 Rear View
Spare parts list PICO 230; 230 CEL 10.1.2 Rear view Figure 10-2 Item Designation Type Item number Cable assembly MAINS CABLE 4X1.5QMM/5.5M 092-001844-00000 Cap nut M20X1.5 SIZE THREADED JOINT METR. 094-007871-00000 Mains switch MAINS SWITCH 25A/3PHASE 074-000279-00003 Rear panel casing BRG257.5X185X44... -
Page 40: 10.1.3 Left-Hand Side
Spare parts list PICO 230; 230 CEL 10.1.3 Left-hand side Figure 10-3 Item Description Type Item number Mains switch MAINS SWITCH 25A/3PHASE 074-000279-00003 Lock nut M20X1.5 7035 COUNTERNUT METR. 094-007878-00000 PCB primary circuit board DC 231 040-000643-00000 Cable harness KB "PICO 230"... -
Page 41: 10.1.4 Right-Hand Side
PICO 230 SECONDARY AIR CHOKE 032-000201-00000 PCB current transformer 042-000787-00000 DIO MODULE BYT200PIV-400/ISOTOP 044-002601-00000 Cable harness KB " PICO 230 CEL ADD-ON" 094-008937-00000 PCB SEC. connections CELL 1 (PICO 230 CELL) 042-000786-00000 PCB SEC. connections KON 2 (PICO 230) 042-000785-00000... -
Page 42: Pico 260; 260 Cel; 260 Cel Pws
Spare parts list PICO 260; 260 CEL; 260 CEL PWS 10.2 PICO 260; 260 CEL; 260 CEL PWS This chapter is currently in preparation! Item No.: 099-002032-EWM01... -
Page 43: Accessories, Options
Accessories, options Remote control / connection cable Accessories, options 11.1 Remote control / connection cable Type Description / Name Item number Remote control current 090-008097-00000 RT PWS 1 Vertical down current remote control, pole reversal 090-008199-00000 RA5 19POLE 5M Connection cable, e.g. for remote control 092-001470-00005 RA10 19POLE 10M Connection cable, e.g. -
Page 44: Circuit Diagrams
Circuit diagrams PICO 230 Circuit diagrams Original format circuit diagrams are located inside the machine. 12.1 PICO 230 Figure 12-1 Item No.: 099-002032-EWM01... -
Page 45: Pico 230 Cel
Circuit diagrams PICO 230 CEL 12.2 PICO 230 CEL Figure 12-2 Item No.: 099-002032-EWM01... -
Page 46: Pico 260
Circuit diagrams PICO 260 12.3 PICO 260 X6/1 X6/1 X1/1 X1/1 X2/1 X2/1 X1/1 X1/1 TDW1+ TDW1+ TDW1+ TDW1+ X6/1 X6/1 X1/2 X1/2 X2/2 X2/2 X1/2 X1/2 TDW1- TDW1- TDW1- TDW1- X6/2 X6/2 X1/3 X1/3 X2/3 X2/3 X1/3 X1/3 TDW2+ TDW2+ X6/3 X6/3... -
Page 47: Pico 260 Cel
Circuit diagrams PICO 260 CEL 12.4 PICO 260 CEL X6/1 X6/1 X1/1 X1/1 X2/1 X2/1 X1/1 X1/1 TDW1+ TDW1+ TDW1+ TDW1+ X6/1 X6/1 X1/2 X1/2 X2/2 X2/2 X1/2 X1/2 TDW1- TDW1- TDW1- TDW1- X6/2 X6/2 X1/3 X1/3 X2/3 X2/3 X1/3 X1/3 TDW2+ TDW2+... -
Page 48: Pico 260 Cel Pws
Circuit diagrams PICO 260 CEL PWS 12.5 PICO 260 CEL PWS X6/1 X6/1 X1/1 X1/1 X2/1 X2/1 X1/1 X1/1 TDW1+ TDW1+ TDW1+ TDW1+ X6/1 X6/1 X1/2 X1/2 X2/2 X2/2 X1/2 X1/2 TDW1- TDW1- TDW1- TDW1- X6/2 X6/2 TDW2+ TDW2+ X1/3 X1/3 X2/3 X2/3... -
Page 49: Pico 300
Circuit diagrams PICO 300 12.6 PICO 300 X6/1 X1/1 X2/1 X1/1 TDW1+ TDW1+ X6/1 X1/2 X2/2 X1/2 TDW1- TDW1- X6/2 X1/3 X2/3 X1/3 TDW2+ X6/3 X1/4 X2/4 X1/4 TDW2- X6/4 X1/5 X2/5 X1/5 Iprim+ IPrim+ X6/5 X1/6 X2/6 X1/6 Iprim- IPrim- X6/6 X1/7... -
Page 50: Pico 300 Cel
Circuit diagrams PICO 300 CEL 12.7 PICO 300 CEL X6/1 X1/1 X2/1 X1/1 TDW1+ TDW1+ X6/1 X1/2 X2/2 X1/2 TDW1- TDW1- X6/2 X1/3 X2/3 X1/3 TDW2+ X6/3 X1/4 X2/4 X1/4 TDW2- X6/4 X1/5 X2/5 X1/5 Iprim+ IPrim+ X6/5 X1/6 X2/6 X1/6 Iprim- IPrim-... -
Page 51: Pico 300 Cel Pws
Circuit diagrams PICO 300 CEL PWS 12.8 PICO 300 CEL PWS X6/1 X1/1 X2/1 X1/1 TDW1+ TDW1+ X6/1 X1/2 X2/2 X1/2 TDW1- TDW1- X6/2 X1/3 X2/3 X1/3 TDW2+ X6/3 X1/4 X2/4 X1/4 TDW2- X6/4 X1/5 X2/5 X1/5 Iprim+ IPrim+ X6/5 X1/6 X2/6 X1/6... -
Page 52: Declaration Of Conformity
Umbauten, die nicht ausdrücklich von authorised by EWM. bées n’ayant pas été autorisés expressé- EWM autorisiert sind, verliert diese ment par EWM, cette déclaration devient Erklärung ihre Gültigkeit. caduque. Gerätebezeichnung: Description of the machine: Déscription de la machine: Gerätetyp:...
Need help?
Do you have a question about the PICO 230 and is the answer not in the manual?
Questions and answers