Table of Contents
Advertisement
OWNER'S MANUAL
MODEL NO.
164174500US
Assembly
Operation
Trouble –Shooting
Parts
Warranty
CAUTION:
You must read and
understand this owner's
manual before operating
unit.
Keep this manual for
future reference.
Serial number
_____________________
Write the serial number
in the space above for
reference. Serial number
can be found at the front
bottom section of the
elliptical.
Advertisement
Table of Contents

Related Manuals for Xterra 164174500US


Summary of Contents for Xterra 164174500US
- Page 1 OWNER’S MANUAL MODEL NO. 164174500US Assembly Operation Trouble –Shooting Parts Warranty CAUTION: You must read and understand this owner’s manual before operating unit. Keep this manual for future reference. Serial number _____________________ Write the serial number in the space above for reference.
-
Page 2: Table Of Contents
Manufacture’s Limited Warranty Dyaco Canada Inc. warrants all its home use elliptical parts for a period of time listed below, from the date of retail sale, as determined by a sales receipt or in the absence of a sales receipt. Dyaco Canada Inc.’s responsibilities include providing new or remanufactured parts, at Dyaco Canada Inc.’s option, and technical support to our independent dealers and servicing organizations. -
Page 3: Safety Precautions
IMPORTANT SAFETY INFORMATION THIS UNIT IS INTENDED FOR HOUSEHOLD USE ONLY READ ALL INSTRUCTIONS BEFORE USING THIS ELLIPTICAL Thank you for purchasing our product. Even though we go to great efforts to ensure the quality of each product we produce, occasional errors and /or omissions do occur. In any event should you find this product to have either a defective or a missing part please contact us for a replacement. - Page 4 muscles. 17. Never hold your breath while exercising. Breathing should remain at a normal rate in conjunction with the level of exercise being performed. If dizziness, nausea, chest pains, or any other abnormal symptoms are experienced while using this equipment, STOP the workout at once. CONSULT A PHYSICIAN IMMEDIATELY.
-
Page 5: Important Safety Instructions
Important Safety Instructions When using an electrical appliance, basic precautions should always be followed, including the following: Read all instructions before using this appliance. WARNING - To reduce the risk of burns, fire, electric shock, or injury to persons: An appliance should never be left unattended when plugged in. Unplug from outlet when not in use, and before repairing or cleaning. - Page 6 Grounding Instructions This product must be grounded. If it should malfunction or breakdown, grounding provides a path of least resistance for electric current to reduce the risk of electric shock. This product is equipped with a cord having an equipment-grounding conductor and a grounding plug. The plug must be plugged into an appropriate outlet that is properly installed and grounded in accordance with all local codes and ordinances.
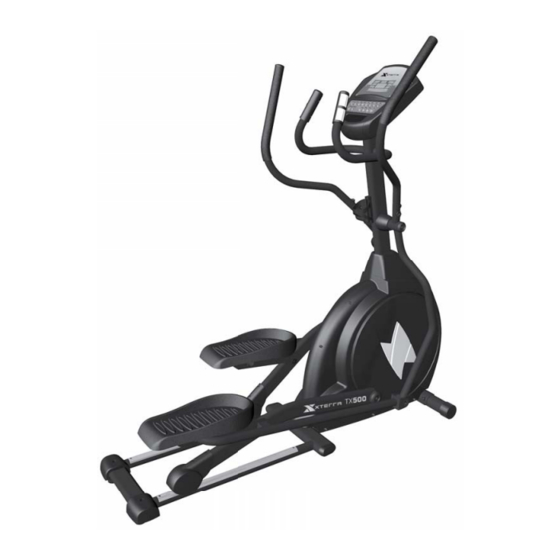
- Page 7 HOW THE ELLIPTICAL WORKS The elliptical allows your feet to move in a natural elliptical path, minimIzing the impact on your knees and ankles. Dual Action Handles for total body workout Stationary handlebar for stability Console Handlebar Handpulse Water Bottle Holder Console Mast Console Mast Cover...
-
Page 8: Assembly Pack Checklist
Assembly Pack Checklist Hardware Step 1 (not shown at actual size) #70. 5/16" × UNC18 × #97. Ø8 × Ø23 × 1.5T #102. Ø8 × Ø23 × 15L_Hex Head Bolt _Flat Washer (4 pcs) 2T_Curved Washer (6 pcs) (2 pcs) ... -
Page 9: Assembly Tools
Hardware Step 4 #78. M5 × P0.8 × 10L_ #79. M5 × P0.8 × 15L_ Phillips Head Screw Phillips Head Screw (4 pcs) (6 pcs) Assembly Tools #108. Combination M5 Allen #110. Phillips Head Screw Wrench & Phillips Head Screw Driver Driver #111. -
Page 10: Assembly Instruction
Assembly Instructions Rear Rail, Console Mast & Console 1. Locate the Console Mast (10) and Console Mast Cover (41) and slide the Cover onto the Mast as far as it will go. Make sure the Console Mast Cover (41) is facing the correct way. 2. - Page 11 Connecting & Lower Swing Arms Put Lower Handle Bars (L) and (R), (4) and (5), at each side of Console Mast shaft and secure with 2pcs of 5/16" × UNC18 × 15L_Button Head Socket Bolts (151) and 2pcs of Ø8.5 × Ø26 × 2.0T_Flat Washers (147) by using Combination M5 Allen Wrench &...
- Page 12 Upper Swing Arms Install the Left and Right Swing Arms (13 & 14) into the Lower Left and Right Lower Handle Bars (4 & 5) with 6pcs of 5/16" × UNC18 × 15L_Hex Head Bolts(70) and 6pcs of Ø8 × Ø23 × 2T_Curved Washer(102) by using the 12.14m/m_Wrench (111).
- Page 13 Plastic Covers 1. Locate the Console Assembly (31) and the 4pcs of M5 × P0.8 × 10L Phillips Head Screws (78) by using the Phillips Head Screw Driver (110). 2. There will be two electrical wire connectors at the top opening of the Console Mast (10), two Handpulse W/Cable Assemblies (37), one Computer Cable (32).
-
Page 14: Computer Instructions
Operation of Your Console Console Power Up Power the elliptical on by plugging it into an appropriate wall outlet. When turned on, the display with emit 3 beep sound as all LCD displays light up. The text window will display “ WELCOME” by scrolling. Note: When there is no signal or data input for 4 minutes, the machine will enter sleep mode. -
Page 15: Console Operation
Console Operation Key Function: Mode: To input desired value or workout mode. May advance flashing prompt to next parameter or mode for selection. Start/Stop: Pauses & Resume workouts. Back up to the previous prompt during data entry. Operates only when in pause mode. Holding key for 3 seconds will reset computer to power-up condition. -
Page 16: Program Operation
More About Workout Parameters Field Display Range Default Increment/ Description Value Decrement Time 0:00~ 99:00 00:00 ± 1:00 1.When display is 0:00, Time will count 2.When time is 10:00-99:00, It will count down to 0. Distance 0.00~99.90 0.00 ±0.10 1.When display is 0:00, Distance will count up. -
Page 17: Interval Program
4. Interval Program Selecting “Interval ” by pressing the Interval program and then pressing Mode. The text window will display “SELECT LEVEL” for 3 seconds. There are 3 levels (L1,L2,L3) to select, using + - then pressing mode to confirm. Setting Parameters for Interval After that 1 parameter “Time”... - Page 18 Setting Data for BMI BMR FATT Selecting “BMI BMR FATT” by pressing the BMI BMR FATT Program key and then pressing mode. The text window will display “SELECT AGE” for 3 seconds, meanwhile “30” will flash so Age can be adjusted using , press mode to save value & move to next data. The text window will display ‘SELECT GENDER”...
-
Page 19: Heart Rate
Heart Rate The old motto, “no pain, no gain”, is a myth that has been overpowered by the benefits of exercising comfortably. A great deal of this success has been promoted by the use of heart rate monitors. With the proper use of a heart rate monitor, many people find that their usual choice of exercise intensity was either too high or too low and exercise is much more enjoyable by maintaining their heart rate in the desired benefit range. -
Page 20: Rate Of Perceived Exertion
Rate of Perceived Exertion Heart rate is important but listening to your body also has a lot of advantages. There are more variables involved in how hard you should workout than just heart rate. Your stress level, physical health, emotional health, temperature, humidity, the time of day, the last time you ate and what you ate all contribute to the intensity at which you should workout. -
Page 21: Maintenance
General Maintenance and Troubleshooting 1. Wipe down all areas in the sweat path with a damp cloth after each workout. 2. If a squeak, thump, clicking or rough feeling develops, the main cause is most likely one of two reasons: The hardware was not sufficiently tightened during assembly. - Page 22 Elliptical Lubrication ■ 1. Pour 2c.c of the lubricant under the middle of the rail. You must be lubricate the rails every three months. 2. If you feel the exercise is not smooth or you hear noise during your exercise, lubricate the middle rail with 2 c.c.of the lubricant.
-
Page 23: Parts List & Diagram
Exploded View Diagram CUSTOMER SERVICE 1-888-707-1880 Dyaco Canada Inc.©2014 ... - Page 24 KEY NO. PART NO. Description Q’TY 17450001 Main Frame 17450002 Pedal Arm (L) 17450003 Pedal Arm (R) 17450004 Lower Handle Bar (L) 17450005 Lower Handle Bar (R) 17450007 Connecting Arm (L) 17450008 Connecting Arm (R) 17450009 Cross Bar 17450010 Console Mast 17450011 Idler Wheel Assembly 17450012...
- Page 25 KEY NO. PART NO. Description Q’TY 17450037 850m/m_Handpulse W/Cable Assembly 37~4 17450037-4 Ø3 × 20L_Tapping Screw 17450038 Power Adaptor 17450039 Ø82_Slide Wheel , Urethane 40~1 17450040-1 3/8" × UNC16 × 2"_Flat Head Socket Bolt 40~2 17450040-2 Ø35 × 10m/m_Rubber Foot 17450041 Console Mast Cover 17450042...
- Page 26 KEY NO. PART NO. Description Q’TY 17450094 Ø10 × Ø19 × 1.5T_Flat Washer 17450096 Ø8 × Ø35 × 1.5T_Flat Washer 17450097 Ø8 × Ø23 × 1.5T_Flat Washer 17450098 Ø8 × Ø20 × 1.5T_Flat Washer 17450099 Ø6.5 × Ø19 × 1T_Flat Washer 174500100 M8 ×...
-
Page 27: User Direction
Getting on / off your elliptical IMPORTANT The elliptical comes with two Dual Action Handles and a Stationary Handlebar. Always hold the Stationary Handlebar when getting on and off the elliptical. First time users should familiarize themselves with using the elliptical by using the Stationary Handlebar first and then progressing to the Dual Action Handles. Once you have familiarized yourself with using the elliptical, you can progress to using the Dual Action Handles to provide a total body workout. Hands can be positioned on the Dual Action Handles at the most appropriate position for your height and arm length. Caution should always be taken when getting on and off any exercise machine. Please follow the safety steps below. Ensure the left Foot Pedal is in the lowest position and grasp the Stationary Handlebar with both hands. Place your left foot on the left Foot Pedal and get secure. Lift your right foot over machine and place on right Foot Pedal. Get balanced and begin your workout. Important To get off, come to a complete stop and reverse the procedure. Always wear rubber‐soled shoes, such as tennis shoes. It is recommended that you keep at least one hand on the Stationary Handlebar at all times, especially when getting on or off. If you are performing a walking action with your arms, or doing upper body strength training exercises, ensure you are well balanced. All equipment should be set‐up and operated on solid, level surfaces. CUSTOMER SERVICE 1-888-707-1880 Dyaco Canada Inc.©2014 ... - Page 28 Correct Position Your body should be in an upright position so that your back is straight. Keep your head up to minimize neck and upper back strain. Always try and use the elliptical in a rhythmical and smooth motion. If you find yourself feeling uncomfortable, or experience a surging type feeling, there is probably too much tension. The elliptical can be used in forward or reverse notion. When going in reverse, bend your knees slightly more. More emphasis is on the buttocks and hamstrings in the reverse motion. MOVING YOUR ELLIPTICAL The elliptical can be easily moved from room to room. 1.Move to the front of the machine and ensure swing arms are even (one foot pedal at top of Elliptical Disk and other at bottom). ...
-
Page 29: Training Guideline
TRAINING GUIDELINES Exercise Exercise is one of the most important factors in the overall health of an individual. Listed among its benefits are: Increased capacity for physical work (strength endurance) Increased cardiovascular (heart and arteries/veins) and respiratory efficiency Decreased risk of coronary heart disease ... - Page 30 is why it is important to have an exercise program tailored to your specific needs. Reversibility If you stop exercising or do not do your program often enough, you will lose the benefits you have gained. Regular workouts are the key to success. Warm Up Every exercise program should start with a warm up where the body is prepared for the effort to come.
- Page 31 Endurance Circuit Training Cardiovascular endurance, muscle, strength, flexibility and coordination are all necessary for maximum fitness. The principle behind circuit training is to give a person all the essentials at one time by going through your exercise program moving as fast as possible between each exercise. This increases the heart rate and sustains it, which improves the fitness level.
-
Page 32: Stretching
STRETCHING Stretching should be included in both your warm up and cool down, and should be performed after 3-5 minutes of low intensity aerobic activity or callisthenic type exercise. Movements should be performed slowly and smoothly, with no bouncing or jerking. Move into the stretch until slight tension, not pain, is felt in the muscle and hold for 20-30 seconds. - Page 33 INNER THIGH STRETCH TOUCHES Sit with the soles of your feet together with your Slowly bend forward from your waist, letting knees pointing outward. Pull your feet as close your back and shoulders relax as you stretch Into your groin as possible. Gently push your toward your toes.
Need help?
Do you have a question about the 164174500US and is the answer not in the manual?
Questions and answers